本文主要是介绍RIP环境下的MGRE 综合实验,希望对大家解决编程问题提供一定的参考价值,需要的开发者们随着小编来一起学习吧!
实验题目及要求:
1.R5为ISP,只能进行IP地址配置,其所有地址均配为公有IP地址
2.R1和R5间使用PPP的PAP认证,R5为主认证方;
R2于R5之间使用PPP的chap认证,R5为主认证方;
R3于R5之间使用HDLC封装。
3.R1/R2/R3构建一个MGRE环境,R1为中心站点,R1、R4间为点到点的GRE
4.整个私有网络基于RIP全网可达
5.所有pc设置私有IP为源IP,可以访问R5环回,达到全网通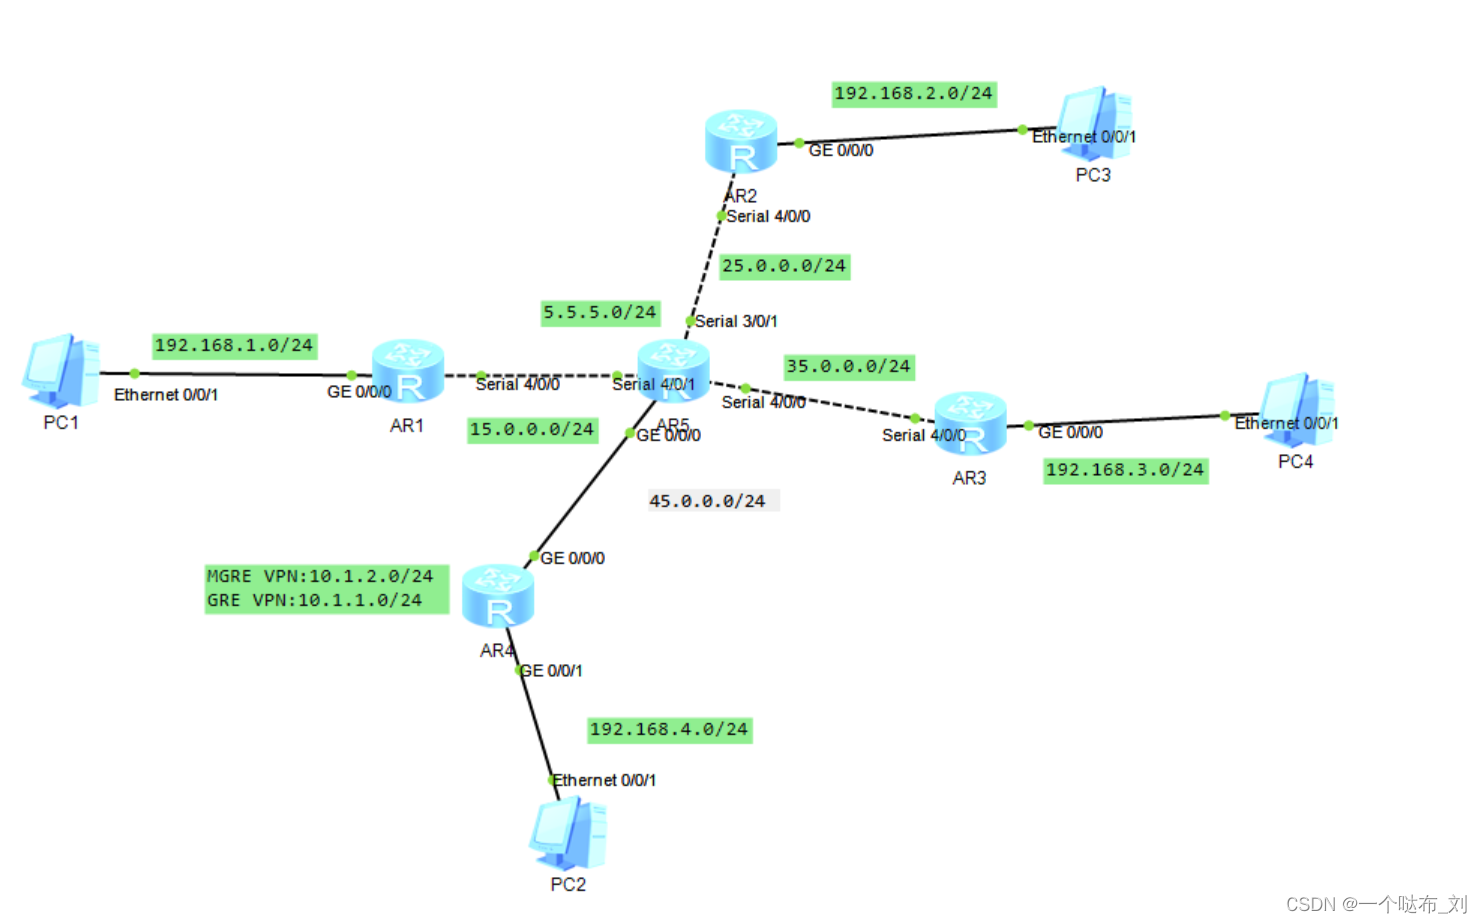
一,根据要求配置IP地址
1、接口配ip
R1:
[R1]int g 0/0/0
[R1-GigabitEthernet0/0/0]ip add 192.168.1.1 24
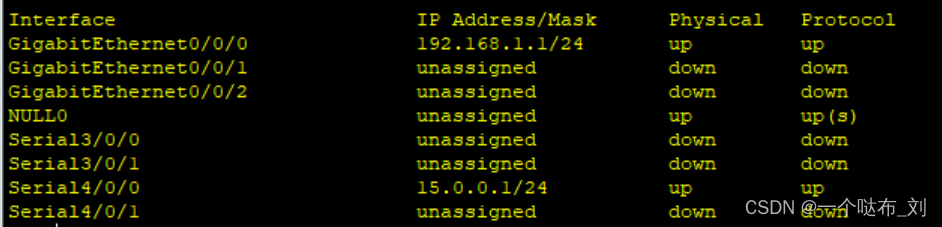
[R1-GigabitEthernet0/0/0]int serial 4/0/0
[R1-Serial4/0/0]ip add 15.0.0.1 24
R2:
[R2]int g 0/0/0
[R2-GigabitEthernet0/0/0]ip add 192.168.2.1 24
[R2-GigabitEthernet0/0/0]int serial 4/0/0
[R2-Serial4/0/0]ip add 25.0.0.1 24
R3:
[R3]int g 0/0/0
[R3-GigabitEthernet0/0/0]ip add 192.168.3.1 24
[R3-GigabitEthernet0/0/0]int serial 4/0/0
[R3-Serial4/0/0]ip add 35.0.0.1 24
R4:
[R4]int g 0/0/1
[R4-GigabitEthernet0/0/1]ip add 192.168.4.1 24
[R4-GigabitEthernet0/0/1]int g 0/0/0
[R4-GigabitEthernet0/0/0]ip add 45.0.0.1 24
R5:
[R5]int g 0/0/0
[R5-GigabitEthernet0/0/0]ip add 45.0.0.2 24
[R5-GigabitEthernet0/0/0]int serial 4/0/0
[R5-Serial4/0/0]ip add 35.0.0.2 24
[R5-Serial4/0/0]int serial 4/0/1
[R5-Serial4/0/1]ip add 15.0.0.2 24
[R5-Serial4/0/1]int serial 3/0/1
[R5-Serial3/0/1]ip add 25.0.0.2 24
[R5]int l0
[R5-LoopBack0]ip add 5.5.5.5 24
2、R1,R2,R3,R4配缺省路由
[R1]ip route-static 0.0.0.0 0 15.0.0.2
[R2]ip route-static 0.0.0.0 0 25.0.0.2
[R3]ip route-static 0.0.0.0 0 35.0.0.2
[R4]ip route-static 0.0.0.0 0 45.0.0.2
二、配置NAT进行地址转换
R1:
[R1]acl 2000
[R1-acl-basic-2000]rule 1 permit source any
[R1-acl-basic-2000]q
[R1]int s 4/0/0
[R1-Serial4/0/0]nat outbound 2000
R2:
[R2]acl 2000
[R2-acl-basic-2000]rule 1 permit source any
[R2-acl-basic-2000]q
[R2]int s 4/0/0
[R2-Serial4/0/0]nat outbound 2000
R3:
[R3]acl 2000
[R3-acl-basic-2000]rule 1 permit source any
[R3-acl-basic-2000]q
[R3]int s 4/0/0
[R3-Serial4/0/0]nat outbound 2000
R4:
[R4]acl 2000
[R4-acl-basic-2000]rule 1 permit source any
[R4-acl-basic-2000]q
[R4]int g 0/0/0
[R4-GigabitEthernet0/0/0]nat outbound 2000
1、R1和R5间使用PPP的PAP认证,R5为主认证方主
主认证方R5:
[R5]aaa
[R5-aaa]loca
[R5-aaa]local-user xiaomi password cipher 123456
Info: Add a new user.
[R5-aaa]local-user xiaomi service-type ppp
[R5-aaa]q
[R5]int s 3/0/0
[R5-Serial3/0/0]ppp authentication-mode pap
被认证方R1:
[R1]int s 4/0/0
[R1-Serial4/0/0]ppp pap local-user huawei password cipher huawei
2、R2与R5之间使用ppp的chap认证
主认证方R5:
[R5]aaa
[R5-aaa]local-user xiaomi password cipher 123456
Info: Add a new user.
[R5-aaa]local-user xiaomi service-type ppp
[R5-aaa]q
[R5]int s 3/0/1
[R5-Serial3/0/1]ppp authentication-mode chap
被认证方R2:
[R2]int s 4/0/0
[R2-Serial4/0/0]ppp chap user xiaomi
[R2-Serial4/0/0]ppp chap password cipher 123456
3、 R3于R5之间使用HDLC封装
R3:
[R3]int s 4/0/0
[R3-Serial4/0/0]link-protocol hdlc
Warning: The encapsulation protocol of the link will be changed. Continue? [Y/N]:y
R5:
[R5]int s 4/0/0
[R5-Serial4/0/0]link-protocol hdlc
Warning: The encapsulation protocol of the link will be changed. Continue? [Y/N]:y
三、R1/R2/R3构建一个MGRE环境,R1为中心站点,R1、R4间为点到点的GRE
1、MGRE的环境搭建
R1:
[R1]int t 0/0/0
[R1-Tunnel0/0/0]ip add 10.1.1.1 24
[R1-Tunnel0/0/0]tunnel-protocol gre p2mp
[R1-Tunnel0/0/0]source 15.0.0.1
Mar 30 2024 14:39:20-08:00 R1 %%01IFNET/4/LINK_STATE(l)[0]:The line protocol IP
on the interface Tunnel0/0/0 has entered the UP state.
[R1-Tunnel0/0/0]nhrp network-id 100![]()
R2:
[R2]int t 0/0/0
[R2-Tunnel0/0/0]ip add 10.1.1.2 24
[R2-Tunnel0/0/0]tunnel-protocol gre p2mp
[R2-Tunnel0/0/0]source s 4/0/0
Mar 30 2024 14:46:07-08:00 R2 %%01IFNET/4/LINK_STATE(l)[0]:The line protocol IP
on the interface Tunnel0/0/0 has entered the UP state.
[R2-Tunnel0/0/0]nhrp entry 10.1.1.1 15.0.0.1 register ![]()
R3:
[R3]int t 0/0/0
[R3-Tunnel0/0/0]ip add 10.1.1.3 24
[R3-Tunnel0/0/0]tunnel-protocol gre p2mp
[R3-Tunnel0/0/0]source s 4/0/0
Mar 30 2024 14:48:29-08:00 R3 %%01IFNET/4/LINK_STATE(l)[0]:The line protocol IP
on the interface Tunnel0/0/0 has entered the UP state.
[R3-Tunnel0/0/0]nhrp entry 10.1.1.1 15.0.0.1 register![]()
2、GRE环境搭建
R1:
[R1]int t 0/0/1
[R1-Tunnel0/0/1]ip add 20.1.1.1 24
[R1-Tunnel0/0/1]tunnel-protocol gre
[R1-Tunnel0/0/1]source 15.0.0.1
[R1-Tunnel0/0/1]destination 45.0.0.1
Mar 30 2024 14:55:34-08:00 R1 %%01IFNET/4/LINK_STATE(l)[0]:The line protocol IP
on the interface Tunnel0/0/1 has entered the UP state. ![]()
R4:
[R4]interface Tunnel 0/0/1
[R4-Tunnel0/0/1]ip address 20.1.1.2 24
[R4-Tunnel0/0/1]tunnel-protocol gre
[R4-Tunnel0/0/1]source 45.0.0.1
[R4-Tunnel0/0/1]destination 15.0.0.1
Mar 30 2024 14:59:22-08:00 R4 %%01IFNET/4/LINK_STATE(l)[0]:The line protocol IP
on the interface Tunnel0/0/1 has entered the UP state. ![]()
四、整个私有网络基于RIP全网可达
R1:
[R1]rip 1
[R1-rip-1]version 2
[R1-rip-1]network 192.168.1.0
[R1-rip-1]network 10.0.0.0
[R1-rip-1]network 20.0.0.0
[R1-rip-1]q
[R1]int t 0/0/0
[R1-Tunnel0/0/0]nhrp entry multicast dynamic
[R1-Tunnel0/0/0]undo rip split-horizon 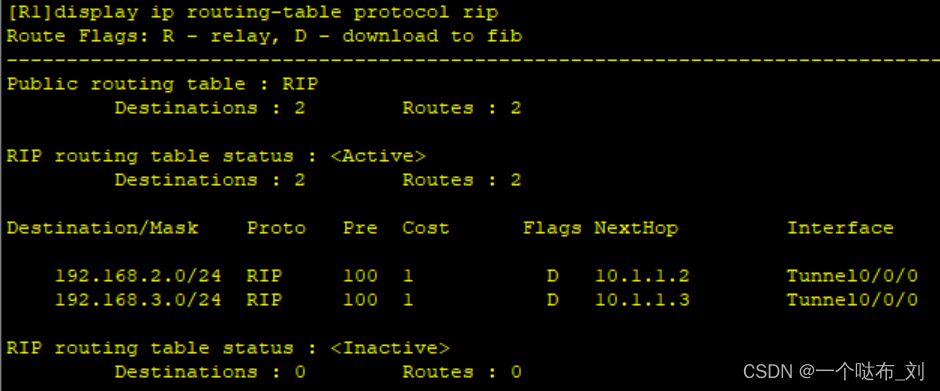
R2:
[R2]rip 1
[R2-rip-1]version 2
[R2-rip-1]network 192.168.2.0
[R2-rip-1]network 10.0.0.0
R3:[R3]rip
[R3-rip-1]version 2
[R3-rip-1]network 192.168.3.0
[R3-rip-1]network 10.0.0.0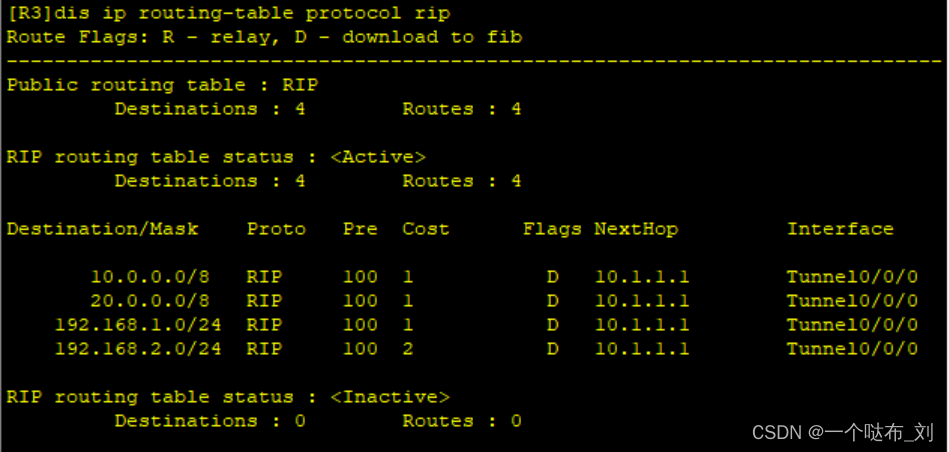
R4:
[R4]rip 1
[R4-rip-1]version 2
[R4-rip-1]network 192.168.4.0
[R4-rip-1]network 20.0.0.0
五、所有pc设置私有IP为源IP,可以访问R5环回
PC1:
PC2:

PC3:

PC4: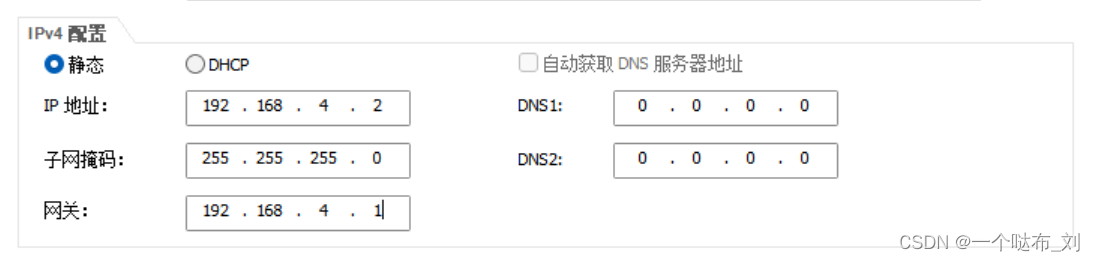

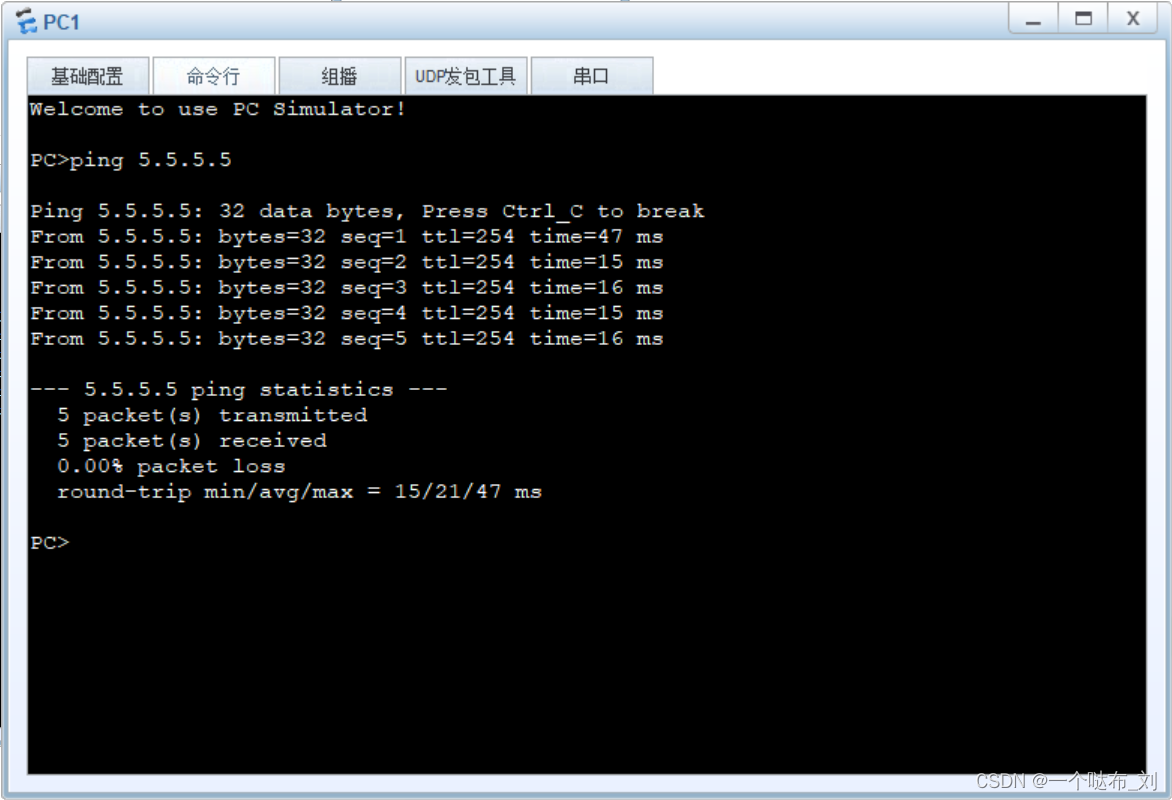
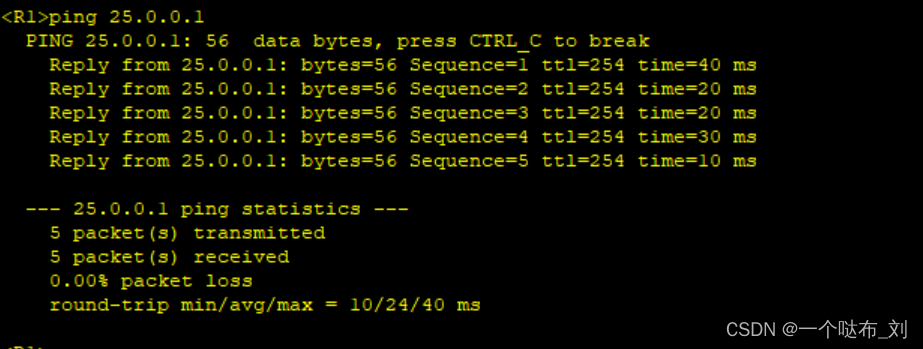
六、ping看是否全网可达


这篇关于RIP环境下的MGRE 综合实验的文章就介绍到这儿,希望我们推荐的文章对编程师们有所帮助!


