本文主要是介绍我于窗中窥月光,恰如仰头见“链表”(Java篇),希望对大家解决编程问题提供一定的参考价值,需要的开发者们随着小编来一起学习吧!
本篇会加入个人的所谓‘鱼式疯言’
❤️❤️❤️鱼式疯言:❤️❤️❤️此疯言非彼疯言
而是理解过并总结出来通俗易懂的大白话,
小编会尽可能的在每个概念后插入鱼式疯言,帮助大家理解的.
🤭🤭🤭可能说的不是那么严谨.但小编初心是能让更多人能接受我们这个概念 !!!

前言
在上一篇文章中我们讲解了线性表中:顺序表和ArrayList
而在本篇文章中小编将带着大家讲解另外一种线性表:LinkedList与链表
而在本篇文章提及的链表是: 单链表
下面让我们看看我们要学习的章节吧 💖 💖 💖
目录
- 链表的初识
- 单链表的实现
- 单链表的优化
一. 链表的初识
1. ArrayList 的不足
在上一篇文章中我们已经熟悉了 ArrayList 的使用,并且进行了简单的模拟实现。
通过源码知道,ArrayList底层是使用数组来存储元素:
public class ArrayList<E> extends AbstractList<E>
implements List<E>, RandomAccess, Cloneable, java.io.Serializable
{
// ...
// 默认容量是10
private static final int DEFAULT_CAPACITY = 10;
//...
// 数组:用来存储元素
transient Object[] elementData; // non-private to simplify nested class access
// 有效元素个数
private int size;
public ArrayList(int initialCapacity) {
if (initialCapacity > 0) {
this.elementData = new Object[initialCapacity];
} else if (initialCapacity == 0) {
this.elementData = EMPTY_ELEMENTDATA;
} else {
throw new IllegalArgumentException("Illegal Capacity: "+
initialCapacity);
}
}
// ...}
由于其底层是一段 连续空间 ,当在 ArrayList 任意位置插入或者删除元素时,就需要将后序元素整体往前或者往后搬移,时间复杂度为 O(n),效率比较低
因此 ArrayList不适合做任意位置插入和删除比较多的场景。因此:
java集合 中又引入了 LinkedList,即链表结构。
下面小编就介绍了我们今天的男一号选手 链表
2. 链表的概念
链表是一种 物理存储结构上非连续存储结构 ,数据元素的 逻辑顺 是通过链表中的引用 链接次序 实现的 。

我们平常说的 节点(又叫结点) 就是链表的基本单位,相当于上面这个火车的 每一节车厢

实际中链表的结构非常多样,那么链表组合起来一共有多少种结构呢 💥 💥 💥
3.链表的结构
实际中链表的结构非常多样,以下情况组合起来就有 8种链表结构
- 单向或者双向
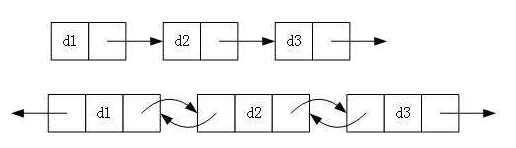
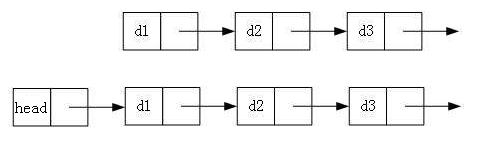
- 带头或者不带头
- 循环或者非循环
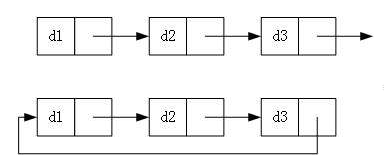
虽然有这么多的链表的结构,但是我们重点掌握两种
第一种结构就是本篇文章要重点讲的
无头单向非循环链表(俗称 单链表 )
结构简单,一般不会单独用来存数据。 实际中更多是作为其他数据结构的子结构
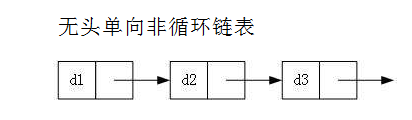
如 哈希桶、图的邻接表 等等。
另外这种结构在 笔试面试 中出现很多。
第二种结构是下篇文章的重点内容哦,小伙伴们可以 期待 一下哦 💞 💞 💞
无头双向链表
在Java的集合框架库中 LinkedList底层 实现就是 无头双向循环链表 。
二. 单链表的实现
小伙伴们要理解链表就需要动手去 实现他们
所以这次就让小编带着小伙伴们来实现我们的 单链表 吧 💥💥💥
1. 框架搭建
<1>. 节点定义
public class MySingleLinkedList implements ISingleLinkList{public ListNode head;public static  class ListNode {// 存放数据public  int val;// 指向下一个节点的nextpublic ListNode next;public ListNode(int val) {this.val = val;}}public MySingleLinkedList() {this.head = new ListNode(1);}
}
我们先定义一个类
在这个类中再定义一个 内部类 ,一个个内部类就代表我们一个个 节点 ,用我们的 next 的引用来指向,另外在添加一个自身数据的 val
还需要定义个接口来 整合功能 吧
<2>. 功能接口
package singlinklist;
public interface ISingleLinkList {// 打印数据public void display();// 尾删数据public void removeLast();// 头删public void removeFirst();// 指定位置删除数据public void remove(int pos);// 删除指定数据public void removeVal(int val);// 删除指定的所有数据public void removeValAll(int val);// 头插public void insertFirst(int val);// 尾插数据public void insertLast(int val);// 指定位置插入数据public void insert(int pos,int val);// 确定数据是否存在public boolean contains(int val);// 修改数据public void modify(int pos ,int val);// 清空单链表public void clear();// 链表长度public int length();}
2. 功能实现
从上面的接口中我们就可以知道,咱们功能主要是四大板块: 增删查改
package singlinklist;public class MySingleLinkedList implements ISingleLinkList{public ListNode head;public static  class ListNode {// 存放数据public  int val;// 指向下一个节点的nextpublic ListNode next;public ListNode(int val) {this.val = val;}}public MySingleLinkedList() {this.head = new ListNode(1);}// 打印单链表@Overridepublic void display() {checknull();ListNode cur=head;while (cur != null) {System.out.print(cur.val+" ");cur=cur.next;}System.out.println();}@Overridepublic void insertFirst(int val) {checknull();ListNode node=new ListNode(val);node.next=head;head=node;}@Overridepublic void insertLast(int val) {checknull();ListNode cur=head;while (cur.next !=null) {cur=cur.next;}ListNode node =new ListNode(val);//       本身 cur.next=null  这行可加可不加
//        node.next=cur.next;cur.next=node;}// 指定位置插入@Overridepublic void insert(int pos, int val) {checknull();if (pos==0) {insertFirst(val);return;}if (pos==length()) {insertLast(val);return;}ListNode des= indexFind(pos);if (des==null) {return;}ListNode cur=head;while (cur.next != des) {cur=cur.next;}ListNode node=new ListNode(val);node.next=des;cur.next=node;}@Overridepublic void removeLast() {checknull();if (isEmpty()) {return;}ListNode cur=head;if (cur.next==null) {head=null;return;}while (cur.next.next != null) {cur=cur.next;}cur.next=null;}@Overridepublic void removeFirst() {checknull();if (isEmpty()) {return;}ListNode cur=head;head=head.next;cur=null;}@Overridepublic void remove(int pos) {checknull();if (isEmpty()) {return;}if (pos==0) {removeFirst();return;}ListNode dec=indexFind(pos);if (dec==null) {return;}ListNode cur=head;while (cur.next !=dec) {cur=cur.next;}cur.next=cur.next.next;}// 删除特定数据@Overridepublic void removeVal(int val) {checknull();if (isEmpty()) {return;}ListNode cur=head;if (cur.val==val) {removeFirst();return;}while (cur.next != null) {if (cur.next.val==val) {cur.next=cur.next.next;return;}cur=cur.next;}}// 删除特定的所有数据@Overridepublic void removeValAll(int val) {checknull();if (isEmpty()) {return;}ListNode cur=head.next;ListNode pre=head;while (cur != null) {if (cur.val == val) {cur=cur.next;} else {pre.next=cur;pre=pre.next;cur=cur.next;}}pre.next=null;if (head.val==val) {removeFirst();}}//    //删除单链表中所有的keyword
方法一:
//    public void removeValAll(int val){
//        ListNode cur=head;
//
//        while(cur.next!=null){
//            if(cur.next.val==val){
//                ListNode ret=cur.next;
//                cur.next=ret.next;//这里ret.next和直接写cur.next.next是一样的;
//            } else {
//                cur=cur.next;
//
//            }
//            if(cur==null){
//                break;
//            }
//        }
//
//        if(head.val==val){
//            head=head.next;
//        }
//    }// 搜索是否含有该数据@Overridepublic boolean contains(int val) {checknull();ListNode cur=head;while (cur != null) {if (cur.val==val) {return true;}cur=cur.next;}return false;}@Overridepublic void modify(int pos, int val) {checknull();if (isEmpty()) {return;}ListNode des=indexFind(pos);if (des==null) {return;}des.val=val;}@Overridepublic void clear() {head=null;}private void  checknull() {if (head==null) {System.out.println("单链表为null");}}private  ListNode indexFind(int pos) {try {chackIdex(pos);}catch (IndexOutOfBoundsException e) {e.printStackTrace();return null;}ListNode cur=head;for (int i = 0; i < pos; i++) {cur=cur.next;}return cur;}@Overridepublic int length() {int count=0;ListNode cur=head;while (cur != null) {count++;cur=cur.next;}return count;}// 检查链表是否长度为 0private  boolean isEmpty() {return length()==0;}// 检查下标是否合法private void chackIdex(int pos) throws IndexOutOfBoundsException {if (pos <0 || pos >= length()) {throw  new  IndexNotLegalException();}}}
是不是看着眼花缭乱的,不妨不妨下面让小编来细细讲解一下我们 增删查改 的主要内容吧 💥💥💥
<1>. 增加功能
以 指定位置 插入为例
// 指定位置插入@Overridepublic void insert(int pos, int val) {checknull();if (pos==0) {insertFirst(val);return;}if (pos==length()) {insertLast(val);return;}ListNode des= indexFind(pos);if (des==null) {return;}ListNode cur=head;while (cur.next != des) {cur=cur.next;}ListNode node=new ListNode(val);node.next=des;cur.next=node;}
我们先找到 pos 位置,把新的 node 的 next 修改成修改指向 pos 位置的节点的
在将 pos-1 位置的 next 修改指向为 node

鱼式疯言
在插入中需要特别考虑以下三种情况
- pos 可能不合法
try {chackIdex(pos);}catch (IndexOutOfBoundsException e) {e.printStackTrace();return null;}
- 在头位置 插入
if (pos==0) {insertFirst(val);return;
}
- 在 尾位置 插入
if (pos==length()) {insertLast(val);return;}
<2>. 删除功能
指定找到 pos 位置,并把 pos-1 的节点和 pos+1 的节点用 next 进行连接
@Overridepublic void remove(int pos) {checknull();if (isEmpty()) {return;}if (pos==0) {removeFirst();return;}ListNode dec=indexFind(pos);if (dec==null) {return;}ListNode cur=head;while (cur.next !=dec) {cur=cur.next;}cur.next=cur.next.next;}
鱼式疯言
需要注意的点
- 当pos 位置不合法时
try {chackIdex(pos);}catch (IndexOutOfBoundsException e) {e.printStackTrace();return null;}
- 如果链表为空 时
if (isEmpty()) {return;}
- 头部位置删除时
if (pos==0) {removeFirst();return;}
<3>. 查找功能
查找功能主要是查找是否含有该数据以及下标的功能
主要过程是先 从头节点开始遍历 ,当找到该数据就返回 true 或 下标位置
// 搜索是否含有该数据@Override
public boolean contains(int val) {checknull();ListNode cur=head;while (cur != null) {if (cur.val==val) {return true;}cur=cur.next;}return false;
}
是的
这里就可以 很清楚的寻找到对应数据的位置
鱼式疯言
如果数据为 空,我们就不需要修改了
<4>. 修改功能
主要过程是先 从头节点开始遍历 ,当找到该数据就返回 下标位置
然后找到该小标位置就返回该节点,对这个 节点 的数据进行 修改
@Override
public void modify(int pos, int val) {checknull();if (isEmpty()) {return;}ListNode des=indexFind(pos);if (des==null) {return;}des.val=val;
}
鱼式疯言
如果链表为 空 ,我们就 不需要修改 了
if (des==null) {return;
}
基本单链表的的框架我们讲完了,但小爱同学就思考了,我们这种链表在val
中只能放整型数据么? 不可以放其他类型的数据吗?
答案自然是 可以的
3.其他处理
- 自定义一个异常来检查下标合法性
package singlinklist;
public class IndexNotLegalException extends RuntimeException{public IndexNotLegalException() {}public IndexNotLegalException(String message) {super(message);}
}
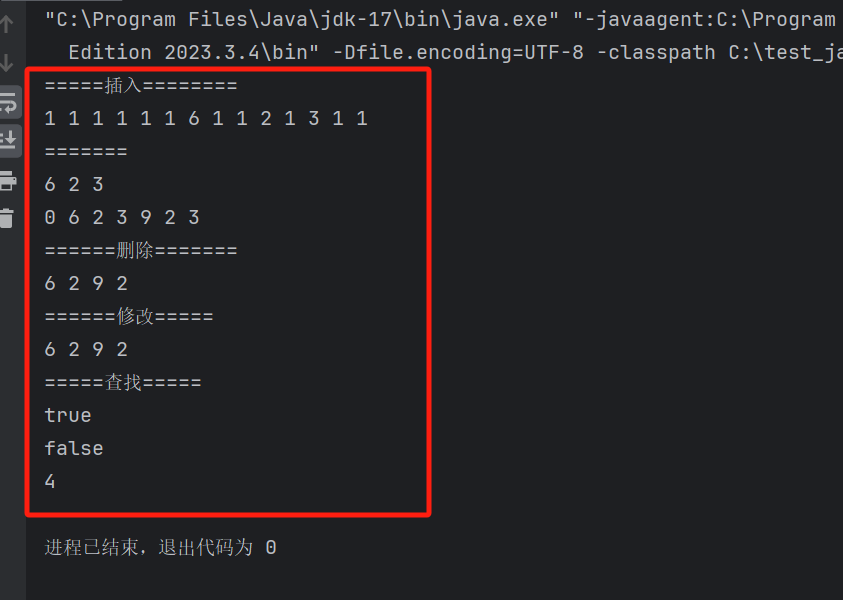
- 主函数逻辑的实现
package singlinklist;public class Test {public static void main(String[] args) {ISingleLinkList msl =new MySingleLinkedList();// 插入System.out.println("=====插入========");// 尾插msl.insertFirst(1);msl.insertLast(1);msl.insertLast(1);msl.insertLast(1);msl.insertLast(1);msl.insertLast(6);msl.insertLast(1);msl.insertLast(1);msl.insertLast(2);msl.insertLast(1);msl.insertLast(3);msl.insertLast(1);msl.insertLast(1);msl.display();//        System.out.println("======删除=======");
//
//        msl.remove(3);
//        msl.removeFirst();
//        msl.removeLast();
//        msl.display();
//
//
//        System.out.println("======修改=====");
//        msl.modify(1,2);
//        msl.display();
//
//
//        System.out.println("=====查找=====");
//        System.out.println(msl.contains(2));
//        System.out.println(msl.contains(3));
//        System.out.println(msl.length());
//
//        msl.clear();System.out.println("=======");
//        msl.removeVal(0);
//        msl.removeVal(1);
//        msl.removeVal(2);
//        msl.removeVal(3);
//        msl.display();msl.removeValAll(1);msl.display();msl.insertLast(2);msl.insertLast(3);msl.insert(3,9);msl.insertFirst(0);msl.display();System.out.println("======删除=======");msl.remove(3);msl.removeFirst();msl.removeLast();msl.display();System.out.println("======修改=====");msl.modify(1,2);msl.display();System.out.println("=====查找=====");System.out.println(msl.contains(2));System.out.println(msl.contains(3));System.out.println(msl.length());msl.clear();}
}
三. 单链表的优化
单链表如果 限定死了 ,只能存放 整型或者 浮点型 那就太单一了
所以如果我们要对 单链表优化 的话,那么我们不得不请出我们的 泛型 啦
1.功能接口
package generarraysinglinklist;public interface IGSingleLinkList<T> {// 打印数据public void display();// 尾删数据public void removeLast();// 头删public void removeFirst();// 指定位置删除数据public void remove(int pos);// 删除指定数据public void removeVal(T val);// 删除指定的所有数据public void removeValAll(T val);// 头插public void insertFirst(T val);// 尾插数据public void insertLast(T val);// 指定位置插入数据public void insert(int pos,T val);// 确定数据是否存在public boolean contains(T val);// 修改数据public void modify(int pos ,T val);// 清空单链表public void clear();// 链表长度public int length();}
2. 功能实现
package generarraysinglinklist;import singlinklist.ISingleLinkList;
import singlinklist.IndexNotLegalException;public class GMySingleLinkedList<T> implements IGSingleLinkList<T> {public ListNode head;public static  class ListNode<T> {// 存放数据public  T val;// 指向下一个节点的nextpublic ListNode<T> next;public ListNode(T val) {this.val = val;}}public GMySingleLinkedList(T val) {this.head = new ListNode<T>(val);}// 打印单链表@Overridepublic void display() {checknull();ListNode cur=head;while (cur != null) {System.out.print(cur.val+" ");cur=cur.next;}System.out.println();}@Overridepublic void insertFirst(T val) {checknull();ListNode node=new ListNode(val);node.next=head;head=node;}@Overridepublic void insertLast(T val) {checknull();ListNode cur=head;while (cur.next !=null) {cur=cur.next;}ListNode node =new ListNode(val);//       本身 cur.next=null  这行可加可不加
//        node.next=cur.next;cur.next=node;}// 指定位置插入@Overridepublic void insert(int pos, T val) {checknull();if (pos==0) {insertFirst(val);return;}if (pos==length()) {insertLast(val);return;}ListNode des= indexFind(pos);if (des==null) {return;}ListNode cur=head;while (cur.next != des) {cur=cur.next;}ListNode node=new ListNode(val);node.next=des;cur.next=node;}@Overridepublic void removeLast() {checknull();if (isEmpty()) {return;}ListNode cur=head;if (cur.next==null) {head=null;return;}while (cur.next.next != null) {cur=cur.next;}cur.next=null;}@Overridepublic void removeFirst() {checknull();if (isEmpty()) {return;}ListNode cur=head;head=head.next;cur=null;}@Overridepublic void remove(int pos) {checknull();if (isEmpty()) {return;}if (pos==0) {removeFirst();return;}ListNode dec=indexFind(pos);if (dec==null) {return;}ListNode cur=head;while (cur.next !=dec) {cur=cur.next;}cur.next=cur.next.next;}// 删除特定数据@Overridepublic void removeVal(T val) {checknull();if (isEmpty()) {return;}ListNode cur=head;if (cur.val.equals(val)) {removeFirst();return;}while (cur.next != null) {if (cur.next.val.equals(val)) {cur.next=cur.next.next;return;}cur=cur.next;}}// 删除特定的所有数据@Overridepublic void removeValAll(T val) {checknull();if (isEmpty()) {return;}ListNode cur=head.next;ListNode pre=head;while (cur != null) {if (cur.val .equals(val) ) {cur=cur.next;} else {pre.next=cur;pre=pre.next;cur=cur.next;}}pre.next=null;if (head.val.equals(val)) {removeFirst();}}//    //删除单链表中所有的keyword
方法一:
//    public void removeValAll(int val){
//        ListNode cur=head;
//
//        while(cur.next!=null){
//            if(cur.next.val.equals(val)){
//                ListNode ret=cur.next;
//                cur.next=ret.next;//这里ret.next和直接写cur.next.next是一样的;
//            } else {
//                cur=cur.next;
//
//            }
//            if(cur==null){
//                break;
//            }
//        }
//
//        if(head.val.equals(val)){
//            head=head.next;
//        }
//    }// 搜索是否含有该数据@Overridepublic boolean contains(T val) {checknull();ListNode cur=head;while (cur != null) {if (cur.val.equals(val)) {return true;}cur=cur.next;}return false;}@Overridepublic void modify(int pos, T val) {checknull();if (isEmpty()) {return;}ListNode des=indexFind(pos);if (des==null) {return;}des.val=val;}@Overridepublic void clear() {ListNode<T> cur=head;while (cur != null) {cur.val=null;cur=cur.next;}head=null;}private void  checknull() {if (head==null) {System.out.println("单链表为null");}}private  ListNode indexFind(int pos) {try {chackIdex(pos);}catch (IndexOutOfBoundsException e) {e.printStackTrace();return null;}ListNode cur=head;for (int i = 0; i < pos; i++) {cur=cur.next;}return cur;}@Overridepublic int length() {int count=0;ListNode cur=head;while (cur != null) {count++;cur=cur.next;}return count;}// 检查链表是否长度为 0private  boolean isEmpty() {return length()==0;}// 检查下标是否合法private void chackIdex(int pos) throws IndexOutOfBoundsException {if (pos <0 || pos >= length()) {throw  new IndexNotLegalException();}}}
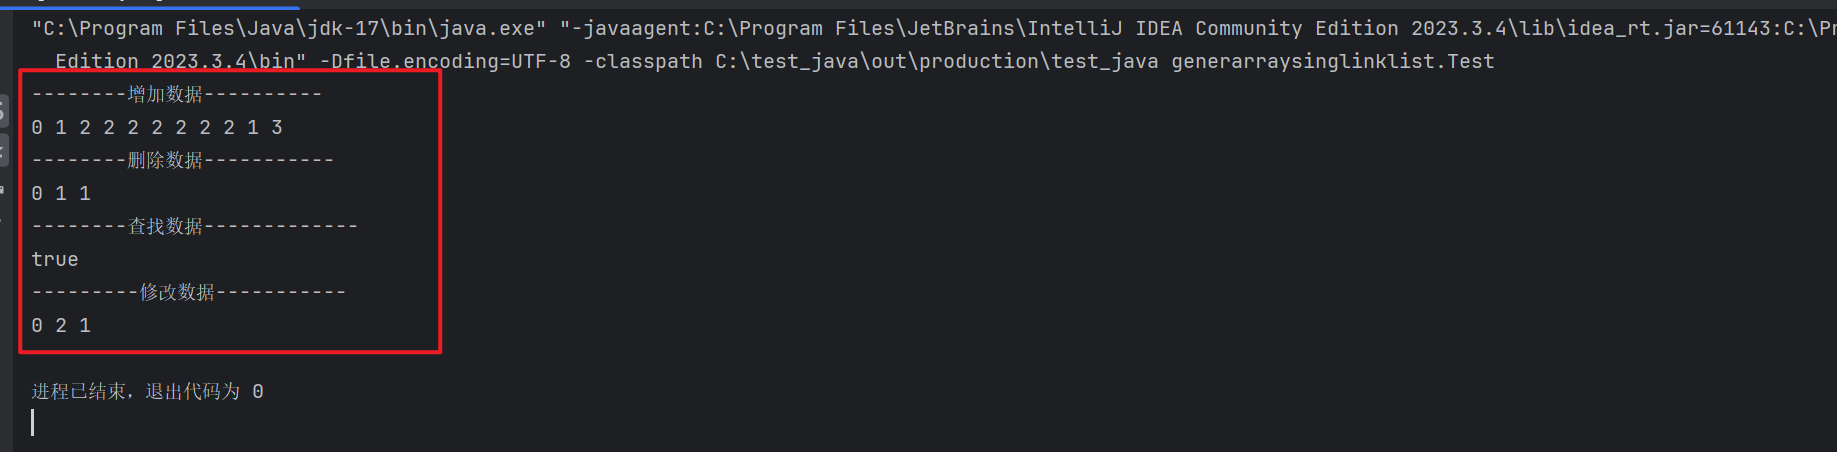
3. 其他处理
package generarraysinglinklist;import generarraylist.GMyArrayList;
import generarraylist.IGList;import java.util.List;public class Test {public static void main(String[] args) {IGSingleLinkList<String> c=new GMySingleLinkedList<>("1");System.out.println("--------增加数据----------");c.insertLast("1");c.insertLast("3");c.insert(1,"2");c.insert(1,"2");c.insert(1,"2");c.insert(1,"2");c.insert(1,"2");c.insert(1,"2");c.insert(1,"2");c.insertFirst("0");c.display();System.out.println("--------删除数据-----------");c.removeValAll("2");c.removeLast();c.display();System.out.println("--------查找数据-------------");String str= "0";boolean b= c.contains(str);System.out.println(b);System.out.println("---------修改数据-----------");c.modify(1,"2");c.display();}
}
- 自定义一个异常来检查下标合法性
package singlinklist;
public class IndexNotLegalException extends RuntimeException{public IndexNotLegalException() {}public IndexNotLegalException(String message) {super(message);}
}
在前面小编已经详细介绍了 底层原理 ,这里小编就 不重复赘述 了,
心细的小伙伴是不是发现了只需要把 int 类型改成 T 即可完成我们的需求
具体泛型的理解期待博主下一篇文章的详解哦,在这里小伙伴们只需要记住一点:
泛型是可以接收并使用任何类型的
总结
- 链表的初识: 从我们的ArrayList 引出我们链表的概念以及多种结构的了解
- 单链表的实现: 单链表节点如何实现创建和连接并进行增删查改的详细说明
- 单链表的优化: 我们讲解了泛型的引入可以使单链表的可以增加不同类型的
如果觉得小编写的还不错的咱可支持 三连 下 (定有回访哦) , 不妥当的咱请评论区 指正
希望我的文章能给各位宝子们带来哪怕一点点的收获就是 小编创作 的最大 动力 💖 💖 💖

这篇关于我于窗中窥月光,恰如仰头见“链表”(Java篇)的文章就介绍到这儿,希望我们推荐的文章对编程师们有所帮助!


