本文主要是介绍SpringBoot Actuator和Spring boot Admin工具,希望对大家解决编程问题提供一定的参考价值,需要的开发者们随着小编来一起学习吧!
目录
一、Spring Boot Actuator
1、简介
2、访问方式
3、端点
4、SpringBoot项目引入actuator
端点
①health
②beans
③configprops
④env
⑤loggers
⑥heapdump
⑦threaddump
⑧metrics
⑨scheduledtasks
⑩mappings
⑪shutdown
定制端点
一、定制health端点
二、自定义info端点
三、自定义metrics端点
四、自定义Endpoint
二、Spring Boot Admin
1、简介
2、搭建SpringBootAdmin
①、搭建服务端
②、搭建客户端
③、安全防护
④、邮件通知
一、Spring Boot Actuator
1、简介
官方介绍,为生产环境准备的特性。可以用来监控和管理发布到生产环境下的应用。比如,应用的健康状态、日志信息、内存占用、线程信息、Bean加载信息等等。
官网地址:
Spring Boot Actuator: Production-ready Features![]() https://docs.spring.io/spring-boot/docs/2.5.6/reference/html/actuator.html
https://docs.spring.io/spring-boot/docs/2.5.6/reference/html/actuator.html
2、访问方式
- http
- JMX
3、端点
端点就是SpringBoot Actuator对外暴露的一系列接口,actuator服务端可以通过这些接口获得对应的信息,比如日志、内存、线程等等。
Spring Boot Actuator: Production-ready Features![]() https://docs.spring.io/spring-boot/docs/2.5.6/reference/html/actuator.html#actuator.endpoints端点有actuator提供的原生的,也可以用户自定义端点。
https://docs.spring.io/spring-boot/docs/2.5.6/reference/html/actuator.html#actuator.endpoints端点有actuator提供的原生的,也可以用户自定义端点。
原生端点是在应用程序里提供众多 Web 接口,通过它们了解应用程序运行时的内部状况。原生端点可以分成三类:
- 应用配置类:可以查看应用在运行期的静态信息:例如自动配置信息、加载的 springbean 信息、yml 文件配置信息、环境信息、请求映射信息;
- 度量指标类:主要是运行期的动态信息,例如堆栈、请求连、一些健康指标、metrics 信息等;
- 操作控制类:主要是指 shutdown,用户可以发送一个请求将应用的监控功能关闭。
原生自带的端点有以下这些:也可以参考官网说明,只不过官网是英文。

每一个端点是可以设置启动或禁用的,Spring Boot 2.x版本默认是只启用了health 和 info两个端点,其他默认是关闭的。
4、SpringBoot项目引入actuator
创建SpringBoot项目,引入actuator依赖
<dependency><groupId>org.springframework.boot</groupId><artifactId>spring-boot-starter-actuator</artifactId>
</dependency>
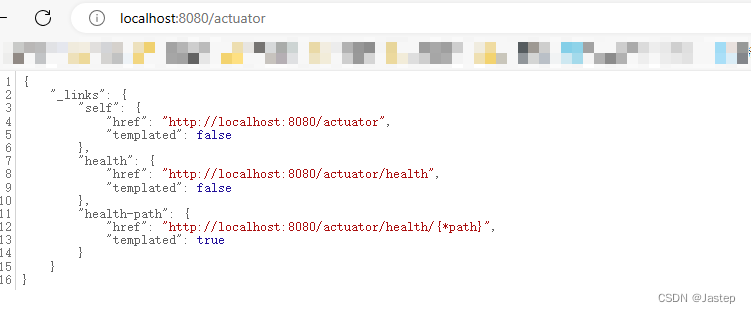
启动SpringBoot项目,访问 localhost:8080/actuator ,只要项目引入actuator依赖,就可以访问默认的health和info端点。

如果想开启所有的端点,将配置为 '*' 即可。如果配置多个用 , 分割
management.endpoints.web.exposure.include=*
management.endpoints.web.exposure.exclude=env,beans
端点
①health
health端点是显示服务或应用健康状态的接口,默认只显示状态,不显示详情,health有三种状态配置never、when-authorized、always,默认是never。

官网描述:Spring Boot Actuator: Production-ready Features

可以配置成always,则会显示状态详情,配置属性是management.endpoint.health.show-details,效
果如下:status是总的状态,其中有一个子节点的状态变为down的话,总的status也会变为down。

②beans
beans端点是注册进容器中的对象实例

③configprops
配置属性的信息
④env
配置的环境相关的变量属性
⑤loggers
各个包下的类对应的日志级别及其对应的信息展示。级别是可调的。调日志级别需要发送post请求,网页是无法发送的。
如果要远程查看日志信息,则需要将日志存储在文件中。配置属性logging.file.name,配置完以后会多一个端点 /logfile,存储日志信息。

⑥heapdump
容器运行时的jvm信息,比如堆栈占用信息等等,可以结合jdk自带的java VisualVM来分析。
⑦threaddump
线程的一些信息
⑧metrics
各个指标、http请求数,jdbc连接数,gc次数,cpu使用情况等等。
⑨scheduledtasks
任务调度
⑩mappings
映射信息
⑪shutdown
优雅关闭
优雅关闭就是如果在关闭容器的时候,还有请求任务未处理完成,则等待这些任务处理完成并返回以后才会关闭容器。
容器需要先配置优雅关闭开启,server.shutdown = graceful
容器支持优雅关闭以后,就可以发送post请求到shutdown端点来优雅关闭容器。
定制端点
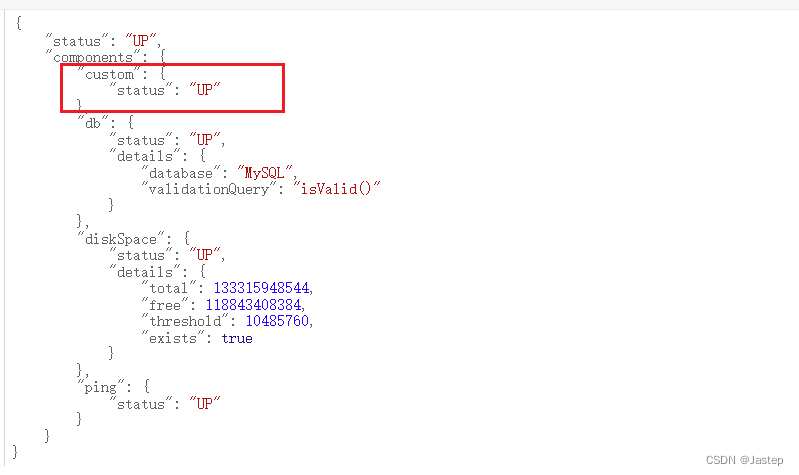
一、定制health端点
@Component
public class CustomHealthIndicator extends AbstractHealthIndicator {@Overrideprotected void doHealthCheck(Health.Builder builder) throws Exception {boolean res = check();if (res) {builder.up();} else {builder.down();}}private boolean check() {return true;}
}
实现抽象类,其中的doHealthCheck是检查端点是否健康的方法,在这里可以实现自定义。
访问 localhost:8080/actuator/health 效果如下:

二、自定义info端点
默认的info端点没有任何信息。
方式一:通过yml配置文件的方式实现
info:app-name: testversion: 3.0.0mavenversion: @project.artifactId@ # @@可以获取pom配置文件的属性值效果:localhost:8080/actuator/info

方式二:编写代码的方式实现
@Component
public class CustomInfo implements InfoContributor {@Overridepublic void contribute(Info.Builder builder) {builder.withDetail("k1", "v1").withDetail("hello", "world").withDetails(Collections.singletonMap("kkk", "vvv"));}
}
效果:
配置文件和编写代码的方式可以同时使用,最终会汇集所有的信息。
三、自定义metrics端点
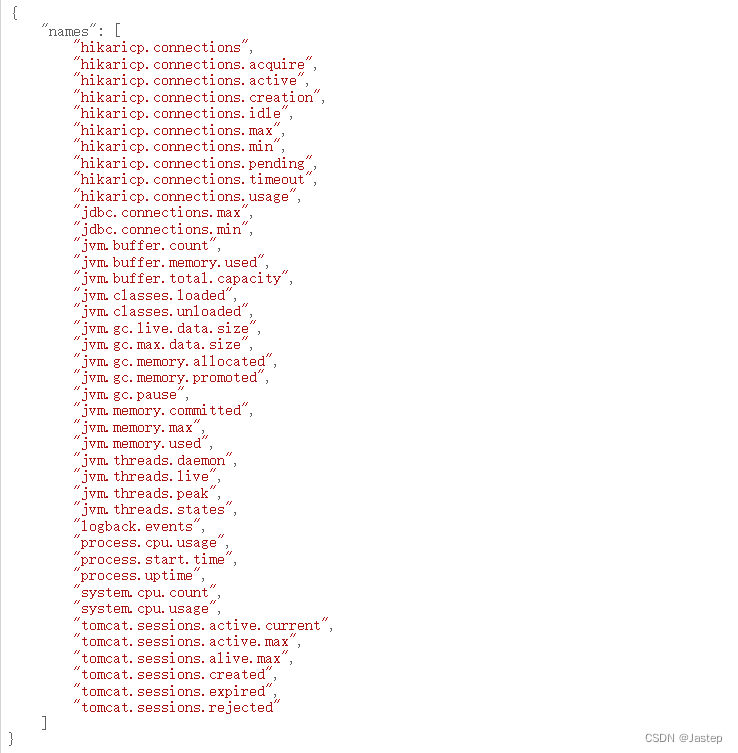
默认的metrics端点提供了jvm、数据库连接信息、cpu、进程相关的一些信息。

counter
计数器,一个简单的Meter,可以用来记录请求次数、支付订单次数等增长类的统计。
//定制metrics counter指标
Metrics.counter("count","tags").increment();
查看metrics端点,发现自定义的counter指标也出现了。

访问接口counter会增加,实现计数器的效果。
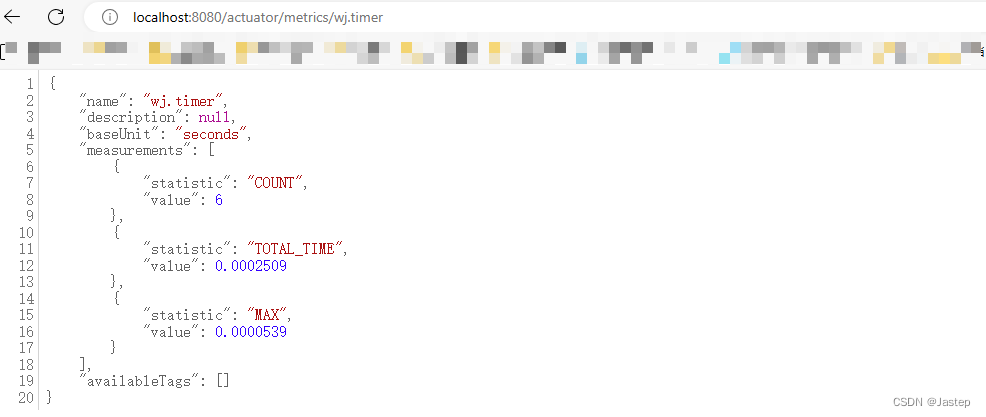
查看指标的具体数据,在http://localhost:8080/actuator/metrics/ 后面跟上对应的指标即可。

Timer
定时器指标,用来记录一些代码执行的时间计算。

Guage
一般用来记录有浮动值的数据,例如积压的消息,任务,集合、数组等等。
Summary
可以记录命中率的一些doble值。
四、自定义Endpoint
官网描述戳这里:Spring Boot Actuator: Production-ready Features
@Component
@Endpoint(id = "wjPoint")
public class CustomPoint {Map<String,Object> map = new HashMap();{Map<String,String> m1 = new HashMap<>();m1.put("k1","v1");m1.put("k2","v2");Map<String,String> m2 = new HashMap<>();m2.put("k3","v3");m2.put("k4","v4");map.put("m1",m1);map.put("m2",m2);}@ReadOperationpublic Map getOperation(){return map;}
}

二、Spring Boot Admin
1、简介
基于SpringBoot Actuator的可视化的监控平台,是一个vue程序。
官方地址:
GitHub - codecentric/spring-boot-admin: Admin UI for administration of spring boot applicationsAdmin UI for administration of spring boot applications - codecentric/spring-boot-admin![]() https://github.com/codecentric/spring-boot-admin文档说明地址:
https://github.com/codecentric/spring-boot-admin文档说明地址:
Spring Boot Admin Reference Guide![]() https://docs.spring-boot-admin.com/2.5.1/#getting-started
https://docs.spring-boot-admin.com/2.5.1/#getting-started
2、搭建SpringBootAdmin
SpringBootAdmin分为服务端和客户端
服务端:即SpringBootAdmin这个监控平台
客户端:即被监控平台监控的后台应用或者容器服务
①、搭建服务端
第一步:创建SpringBoot服务作为admin服务端,服务端需要引入依赖(用到的SpringBoot的版本是2.5.6)
<dependency><groupId>de.codecentric</groupId><artifactId>spring-boot-admin-starter-server</artifactId><version>2.5.1</version>
</dependency>
第二步:启动类加注解@EnableAdminServer

第三步,直接启动
浏览器可以访问,但是目前只有服务端,没有客户端的效果。

②、搭建客户端
第一步:创建SpringBoot应用程序作为客户端,引入依赖
<dependency><groupId>de.codecentric</groupId><artifactId>spring-boot-admin-starter-client</artifactId><version>2.5.1</version>
</dependency>
第二步:yml中配置服务端的地址和要暴露的端点
spring.boot.admin.client.url=http://localhost:8080
management.endpoints.web.exposure.include=*
第三步:启动客户端
这时候服务端的监控页面就会出现一个刚刚启动的客户端实例,绿色就是正常的,如果显示红色或者灰色就需要查看客户端服务的健康状态了。


所有暴露的端点中的信息都可以在监控平台页面上面查看。
③、安全防护
SpringBootAdmin结合SpringSecurity做了登录的用户身份的校验,在进入监控页面之前需要先登录的功能。
Spring Boot Admin Reference Guide![]() https://docs.spring-boot-admin.com/2.5.1/#_securing_spring_boot_admin_server第一步:在服务端引入依赖
https://docs.spring-boot-admin.com/2.5.1/#_securing_spring_boot_admin_server第一步:在服务端引入依赖
<dependency><groupId>org.springframework.boot</groupId><artifactId>spring-boot-starter-security</artifactId>
</dependency>
第二步:配置SecureConfig配置类
官方有详细的说明,不懂Spring Security问题不大。
@Configuration(proxyBeanMethods = false)
public class SecuritySecureConfig extends WebSecurityConfigurerAdapter {private final AdminServerProperties adminServer;private final SecurityProperties security;public SecuritySecureConfig(AdminServerProperties adminServer, SecurityProperties security) {this.adminServer = adminServer;this.security = security;}@Overrideprotected void configure(HttpSecurity http) throws Exception {SavedRequestAwareAuthenticationSuccessHandler successHandler = new SavedRequestAwareAuthenticationSuccessHandler();successHandler.setTargetUrlParameter("redirectTo");successHandler.setDefaultTargetUrl(this.adminServer.path("/"));http.authorizeRequests((authorizeRequests) -> authorizeRequests.antMatchers(this.adminServer.path("/assets/**")).permitAll() .antMatchers(this.adminServer.path("/actuator/info")).permitAll().antMatchers(this.adminServer.path("/actuator/health")).permitAll().antMatchers(this.adminServer.path("/login")).permitAll().anyRequest().authenticated() ).formLogin((formLogin) -> formLogin.loginPage(this.adminServer.path("/login")).successHandler(successHandler).and() ).logout((logout) -> logout.logoutUrl(this.adminServer.path("/logout"))).httpBasic(Customizer.withDefaults()) .csrf((csrf) -> csrf.csrfTokenRepository(CookieCsrfTokenRepository.withHttpOnlyFalse()) .ignoringRequestMatchers(new AntPathRequestMatcher(this.adminServer.path("/instances"),HttpMethod.POST.toString()), new AntPathRequestMatcher(this.adminServer.path("/instances/*"),HttpMethod.DELETE.toString()), new AntPathRequestMatcher(this.adminServer.path("/actuator/**")) )).rememberMe((rememberMe) -> rememberMe.key(UUID.randomUUID().toString()).tokenValiditySeconds(1209600));}// Required to provide UserDetailsService for "remember functionality"@Overrideprotected void configure(AuthenticationManagerBuilder auth) throws Exception {auth.inMemoryAuthentication().withUser(security.getUser().getName()).password("{noop}" + security.getUser().getPassword()).roles("USER");}}
第三步:服务端的yml配置文件配置admin登录页面的用户名和密码
spring.security.user.name=123456
spring.security.user.password=123456
第四步:注册到服务端的客户端配置文件也需要配置登录的用户名和密码,格式如下
spring.boot.admin.client:username: 123456password: 123456
这样就算是实现了安全防护。
当然,SpringBoot除了可以注册单个客户端,也可以注册注册中心的客户端,就可以监控整个注册中心中的应用和服务。
④、邮件通知
SpringBootAdmin支持客户端服务发生异常时的通知,包括邮箱通知,钉钉或者其他的方式,具体参考官网:
Spring Boot Admin Reference Guide![]() https://docs.spring-boot-admin.com/2.5.1/#_notifications第一步:引入依赖(服务端)
https://docs.spring-boot-admin.com/2.5.1/#_notifications第一步:引入依赖(服务端)
<dependency><groupId>org.springframework.boot</groupId><artifactId>spring-boot-starter-mail</artifactId>
</dependency>
第二步:配置邮箱信息,发件人和收件人
#发件人用qq邮箱服务,发件人的用户名和密码,密码是授权码
spring.mail.host=smtp.qq.com
spring.mail.username=123456789@qq.com
spring.mail.password=1234567889#收件人,多个人用,分割
spring.boot.admin.notify.mail.from=123456789@qq.com
spring.boot.admin.notify.mail.to=123456789@qq.com
上面的邮箱使用实际的邮箱,邮箱密码其实是qq邮箱是授权码
授权获取方式在qq邮箱后台设置里面获取:


根据指引获取授权码即可。
当服务挂了(或者重启)以后,就会有邮件发送出来


练习源码已上传:https://download.csdn.net/download/ywanju/89053368![]() https://download.csdn.net/download/ywanju/89053368
https://download.csdn.net/download/ywanju/89053368
这篇关于SpringBoot Actuator和Spring boot Admin工具的文章就介绍到这儿,希望我们推荐的文章对编程师们有所帮助!


