本文主要是介绍@SpringBootApplication和SpringApplication.run源码解析: 2.3.12.RELEASE版本,希望对大家解决编程问题提供一定的参考价值,需要的开发者们随着小编来一起学习吧!
文章目录
- 一、@SpringBootApplication和自动配置
- 1、主要功能
- 2、@SpringBootConfiguration
- 3、@EnableAutoConfiguration
- 4、@ComponentScan
- 5、Spring boot自动配置
- 5.1、@Configuration开启自动配置
- 5.2、查看自动配置
- 5.3、禁用自动配置
- 二、run()
- 1、new SpringApplication()
- 2、第三个run()方法
当前版本
<spring-boot.version>2.3.12.RELEASE</spring-boot.version>
一、@SpringBootApplication和自动配置
/*** Indicates a {@link Configuration configuration} class that declares one or more* {@link Bean @Bean} methods and also triggers {@link EnableAutoConfiguration* auto-configuration} and {@link ComponentScan component scanning}. This is a convenience* annotation that is equivalent to declaring {@code @Configuration},* {@code @EnableAutoConfiguration} and {@code @ComponentScan}.** @author Phillip Webb* @author Stephane Nicoll* @author Andy Wilkinson* @since 1.2.0*/
@Target(ElementType.TYPE)
@Retention(RetentionPolicy.RUNTIME)
@Documented
@Inherited
@SpringBootConfiguration
@EnableAutoConfiguration
@ComponentScan(excludeFilters = { @Filter(type = FilterType.CUSTOM, classes = TypeExcludeFilter.class),@Filter(type = FilterType.CUSTOM, classes = AutoConfigurationExcludeFilter.class) })
public @interface SpringBootApplication {
1、主要功能
- @EnableAutoConfiguration:启用Spring Boot的自动配置机制。
- == @ComponentScan==:对应用程序所在的包启用 @Component 扫描(见最佳实践)。
- @SpringBootConfiguration:允许在Context中注册额外的Bean或导入额外的配置类。这是Spring标准的 @Configuration 的替代方案,有助于在你的集成测试中检测配置。
这几个功能都可以一定程度的自定义 ,列如你不需要在你的应用程序中使用组件扫描或配置属性扫描。
当@SpringBootConfiguration(proxyBeanMethods = false)就 不能自动检测到 @Component 和 @ConfigurationProperties(这两个是SpringBootConfiguration类下引用了这两个注解) 注解的类,而是明确导入用户定义的Bean
@SpringBootConfiguration(proxyBeanMethods = false)
@EnableAutoConfiguration
@Import({ SomeConfiguration.class, AnotherConfiguration.class })
public class MyApplication {public static void main(String[] args) {SpringApplication.run(MyApplication.class, args);}}
2、@SpringBootConfiguration
//指示类提供Spring Boot application@Configuration。
//可以用作Spring的标准@Configuration注释的替代品,以便可以自动找到配置(例如在测试中)。
//应用程序应该只包含一个@SpringBootConfiguration,大多数惯用的SpringBoot应用程序将从@SpringBootApplication继承它。
@Target(ElementType.TYPE)
@Retention(RetentionPolicy.RUNTIME)
@Documented
@Configuration
@Indexed
public @interface SpringBootConfiguration {
3、@EnableAutoConfiguration
启用Spring应用程序上下文的自动配置,尝试猜测和配置您可能需要的bean。自动配置类通常基于类路径和您定义的bean来应用。例如,如果您的类路径上有tomcat-embedded.jar,那么您可能想要一个TomcatServlet WebServerFactory(除非您定义了自己的Servlet WebServerFactoryBean)。
当使用@SpringBootApplication时,上下文的自动配置会自动启用,因此添加此注释没有其他效果。
自动配置试图尽可能地智能化,并将随着您定义更多自己的配置而退出。您总是可以手动排除()任何您永远不想应用的配置(如果您没有访问权限,请使用excludeName())。您也可以通过spring.autoconfig.exclude属性排除它们。自动配置总是在用户定义的bean注册后应用
@Target(ElementType.TYPE)
@Retention(RetentionPolicy.RUNTIME)
@Documented
@Inherited
@AutoConfigurationPackage
@Import(AutoConfigurationImportSelector.class)
public @interface EnableAutoConfiguration {
4、@ComponentScan
配置与@Configuration类一起使用的组件扫描指令。提供与Spring XML的<context:component scan>元素并行的支持。
可以指定basePackageClasses或basePackages(或其别名值)来定义要扫描的特定包。
如果未定义特定的包,则将从声明此注释的类的包进行扫描。
请注意,context:component-scan元素具有annotation-config属性;然而,这个注释没有。这是因为在几乎所有情况下,当使用@ComponentScan时,都会假设默认的注释配置处理(例如处理@Autowired和friends)。
此外,当使用AnnotationConfigApplicationContext时,注释配置处理器始终是注册的,这意味着在@ComponentScan级别禁用它们的任何尝试都将被忽略。
@Retention(RetentionPolicy.RUNTIME)
@Target(ElementType.TYPE)
@Documented
@Repeatable(ComponentScans.class)
public @interface ComponentScan {
5、Spring boot自动配置
5.1、@Configuration开启自动配置
SpringBoot的自动装配机制会试图根据你所添加的依赖来自动配置你的Spring应用程序。比如你添加了数据库相关的依赖,Springboot就会自动配置数据库相关的内容,(你引入mysql依赖,但是你不去配置,就会触发数据库资源配置问题)
上面的@SpringBootApplication 或 @EnableAutoConfiguration 注解就是开启自动配置的注解,这两个在系统中只能出现一次
其他的自动配置使用 @Configuration注解注入自动配置
5.2、查看自动配置
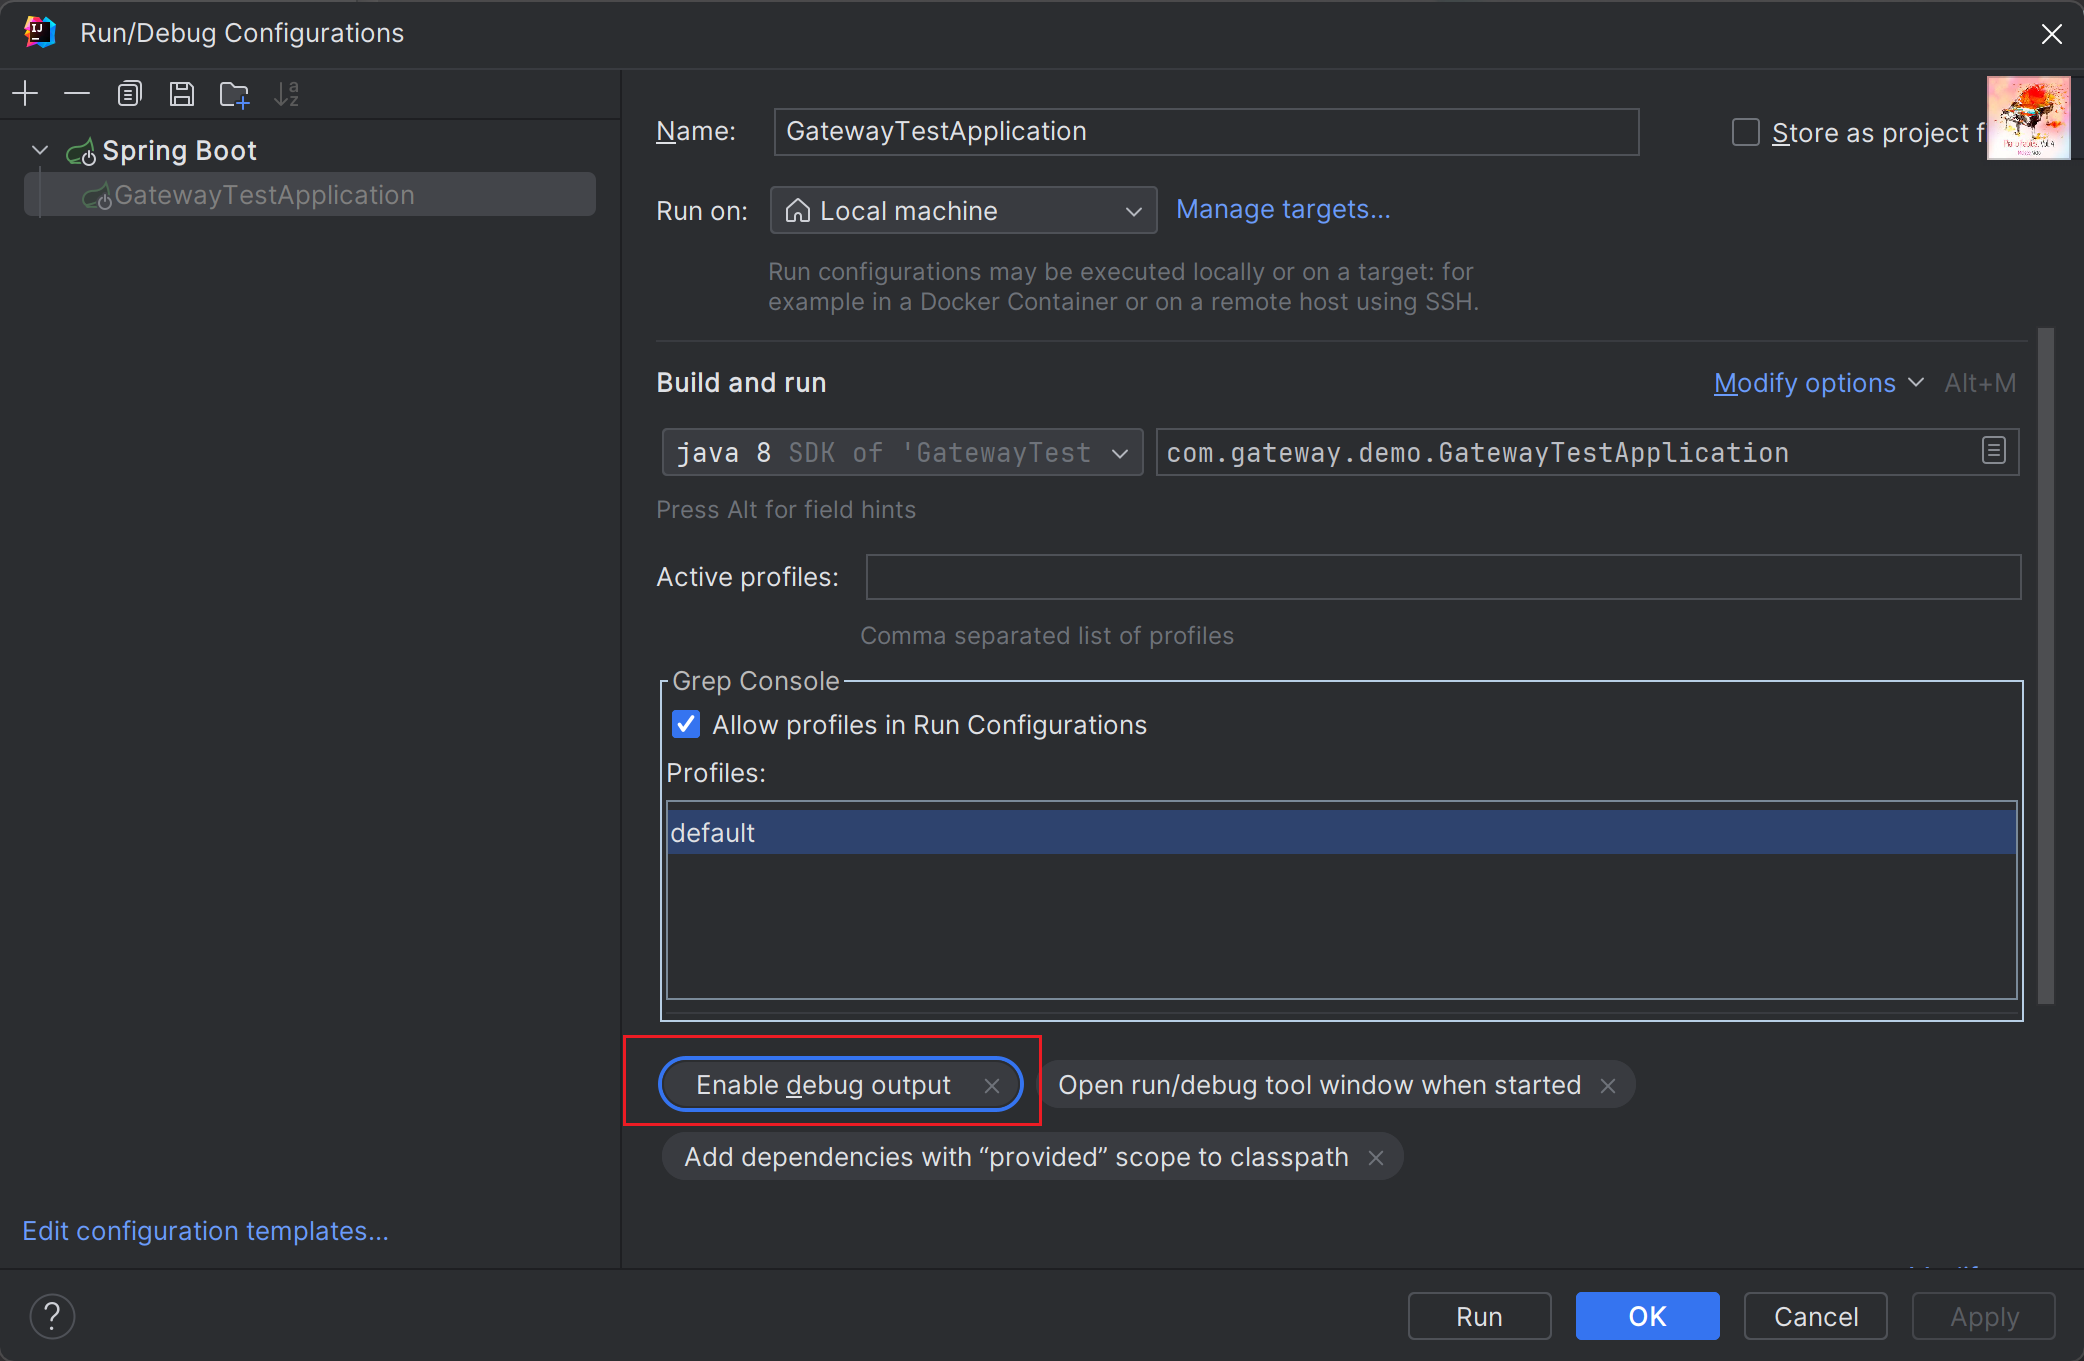
如果要 的可以进入Debug模式查看
进入方法有
- 命令行 启动时加入 --debug (jar 直接加就可以 ),maven命令行 mvn spring-boot:run --debug
- properties添加属性 debug=true
- 通过idea启动项上添加VM 配置 –Ddebug 新版idea只需要在 启动配置页面ALT+D就可触发

5.3、禁用自动配置
第一个方式
@SpringBootApplication(exclude = { XXXXX.class })
第二个方式
properties配置
spring.autoconfigure.exclude=XXXXXX
这两个配置其实是一个配置,只是写的地方不一样
在@SpringBootApplication的exclude属性
/*** Exclude specific auto-configuration classes such that they will never be applied.* 排除特定的自动配置类别,使其永不被应用。* @return the classes to exclude*/@AliasFor(annotation = EnableAutoConfiguration.class)Class<?>[] exclude() default {};/*** Exclude specific auto-configuration class names such that they will never be* applied.* @return the class names to exclude* @since 1.3.0*/@AliasFor(annotation = EnableAutoConfiguration.class)String[] excludeName() default {};可以注意, SpringBootApplication里面有一个exclude和 excludeName
因为有的像禁用的包没有导入的包会找不到.class文件 这个上海就可以使用包的全路径名类似org.springframework.boot.autoconfigure.jdbc.DataSourceAutoConfiguration,这个样子
自动配置是非侵入性的。Spring有一套默认的配置,当你开始自定义配置时,你配置的bean会自动使用代替默认配置
TIPS Spring文档 中提到一个点,不要去使用自动配置类中的方法或者属性,包括嵌套的配置类。都不建议你去使用。
无论是单一原则,还是系统后期版本变动都不应该去使用这些。
二、run()
直接的说法就是 run方法是 SpringApplication类下的一个方法,是负责启动Spring Boot的入口
@SpringBootApplication
public class GatewayTestApplication {public static void main(String[] args) {SpringApplication.run(GatewayTestApplication.class, args);}
}
SpringApplication下供有三个run方法分别是
- 静态方法, 使用默认设置从指定源运行SpringApplication。
package org.springframework.boot;public static ConfigurableApplicationContext run(Class<?> primarySource, String... args) {return run(new Class<?>[] { primarySource }, args);}
- 静态方法, 使用默认设置和用户提供的参数从指定的源运行SpringApplication。
package org.springframework.boot;public static ConfigurableApplicationContext run(Class<?>[] primarySources, String[] args) {return new SpringApplication(primarySources).run(args);}
- 运行Spring应用程序,创建并刷新一个新的ApplicationContext。
package org.springframework.boot;public ConfigurableApplicationContext run(String... args) {暂时省略。。。。。}
-
当你需要灵活配置或者又其他和Spring应用结构不同的情况下使用最后一个,
-
前两个其实是一个,第一个方法也会走到第二个run方法,是等价的,他这样就是为了同时满足多模块程序和单模块程序,
-
你可以发现,默认情况下他是从第一个方法进入,将参数格式重组放到第二个方法,第二个方法在创建一个新对象去调用第三个run方法
问题 那他为什么要这样做,首先你需要了解SpringApplication的创建方法
1、new SpringApplication()
package org.springframework.boot;public SpringApplication(Class<?>... primarySources) {this(null, primarySources);} public SpringApplication(ResourceLoader resourceLoader, Class<?>... primarySources) {//设置资源加载器this.resourceLoader = resourceLoader;//主应用程序类判空Assert.notNull(primarySources, "PrimarySources must not be null");//赋值主应用程序集合this.primarySources = new LinkedHashSet<>(Arrays.asList(primarySources));//判断启动类型 this.webApplicationType = WebApplicationType.deduceFromClasspath(); setInitializers((Collection) getSpringFactoriesInstances(ApplicationContextInitializer.class));setListeners((Collection) getSpringFactoriesInstances(ApplicationListener.class));this.mainApplicationClass = deduceMainApplicationClass();}
你可以看到默认情况下,是通过第一个在调用第二个,第一个参数ResourceLoader 传了一个空的资源进去,第二个是要 加载的应用程序
- 前三行代码先对基础的 resourceLoader ,primarySources 进行赋值(LinkedHashSet1)
- 第四行在 通过
webApplicationType2 的deduceFromClasspath()方法,根据你的文件路径格式判断启动什么样的应用程序 - 第五行:初始化加载文件中所有实现了
ApplicationContextInitializer接口的类配置路径,默认为“META-INF/spring.factories”(可自定义实现ApplicationContextInitializer) - 第六行: 这个同样是从META-INF/spring.factories文件中加载所有实现了
ApplicationListener接口的类 (注册监听器,可以在应用运行期间监听相应的事件,并在事件发生时执行自定义的逻辑,支持自定义监听器,自定义逻辑) - 第七行,从堆栈中获取主应用程序main 赋值给
mainApplicationClass
创建SpringApplication简单的解释就这么多了
2、第三个run()方法
在来看第三个run方法
public ConfigurableApplicationContext run(String... args) {StopWatch stopWatch = new StopWatch(); /*创建计时器*/stopWatch.start(); //开始计时ConfigurableApplicationContext context = null; configureHeadlessProperty(); //配置headless属性 SpringApplicationRunListeners listeners = getRunListeners(args); //获取监听器,就创建SpringApplication里面的时候放的listeners.starting();//启动监听器try {// 创建应用参数对象 用来放启动参数ApplicationArguments applicationArguments = new DefaultApplicationArguments(args);// 准备应用程序配置环境 prepareEnvironment方法会将应用程序的各种环境配置放到 environment对象中ConfigurableEnvironment environment = prepareEnvironment(listeners, applicationArguments);// 配置环境配置的忽略Bean的信息,就是你配置的忽略的jar包configureIgnoreBeanInfo(environment); //打印横幅,横幅其实就是你Spring启动的那个字符拼成的图形,//可以自定义(banner.XXX命名就行),可以禁用(spring.main.banner-mode = off)Banner printedBanner = printBanner(environment);//准备应用程序上下文 应用程序的核心容器context = createApplicationContext();//准备上下文 容器 配置环境,监听器,应用程序参数,横幅prepareContext(context, environment, listeners, applicationArguments, printedBanner);//刷新容器 ,在Spring中刷新容器也意味着启动容器refreshContext(context);//定义在容器刷新之后执行的操作,可以自定义afterRefresh(context, applicationArguments);//停止计时stopWatch.stop();if (this.logStartupInfo) {//记录启动日志,就包括上面的启动时间等new StartupInfoLogger(this.mainApplicationClass).logStarted(getApplicationLog(), stopWatch);}//通知监听器应用程序已经启动listeners.started(context);//功能是调用 在应用程序启动后需要执行的任务 callRunners(context, applicationArguments);}catch (Throwable ex) {//失败信息处理,handleRunFailure(context, ex, listeners);throw new IllegalStateException(ex);}try {//通知监听器应用程序正在运行listeners.running(context);}catch (Throwable ex) {handleRunFailure(context, ex, null);throw new IllegalStateException(ex);}//输出容器return context;}
返回容器,就代表了容器启动流程结束了,中级的过程其实简化了很多。
下次新开一个专门分析SpringApplication的构造函数,和Spring应用程序容器的内容。
参考文章
https://blog.csdn.net/u014131617/article/details/85335692
Spring中文文档
Spring文档
GPT3.5
Set接口的哈希表和链表实现, 具有可预测的迭代顺序。https://docs.oracle.com/javase/8/docs/api/java/util/LinkedHashSet.html ↩︎
请查看类 org.springframework.boot.WebApplicationType; ↩︎
这篇关于@SpringBootApplication和SpringApplication.run源码解析: 2.3.12.RELEASE版本的文章就介绍到这儿,希望我们推荐的文章对编程师们有所帮助!


