本文主要是介绍Spring框架3(TX事务管理、TX事务管理属性配置详解、Spring中注解的使用),希望对大家解决编程问题提供一定的参考价值,需要的开发者们随着小编来一起学习吧!
Spring中的TX事务管理
1.TX事务管理介绍
Spring中的内容
IOC:控制反转------帮助我们创建对象和解耦
AOP:面向切面-----提升代码的扩展性和解耦
TX:声明式事务
[1].为什么使用事务
我们在学习mybatis的时候知道,mybatis中的事务是和JDBC中的事务一致的,那么Spring中是如何进行事务管理的呢?
[2]事务管理
事务管理:编程式事务和声明式事务
A、编程式事务:整个事务管理都需要程序员手动编写,自己提交或者回滚
B、声明式事务:整个事务管理操作,不需要我们自己书写,现在Spring已经帮我们处理好了,我们自己只需要在代码中声明配置即可。
[3]事务使用的场景
当我们执行的是两条或两条以上的添加、删除、修改的SQL语句时使用
[4]Spring中声明式事务
给方法增加事务,就是给切点增加通知。
切点:需要的方法
通知:事务
织入成切面
[5]使用的时候要注意
我们增加了声明式事务的代码块不可以自己捕获异常,如果自己进行了异常的捕获,spring就没有办法得知此事的异常,这个时候我们配置的声明式事务就不再起作用了。
如果我们就需要书写try catch代码块还要结合声明式事务,这个时候就需要自己手动抛异常。
[6]具体文件配置代码
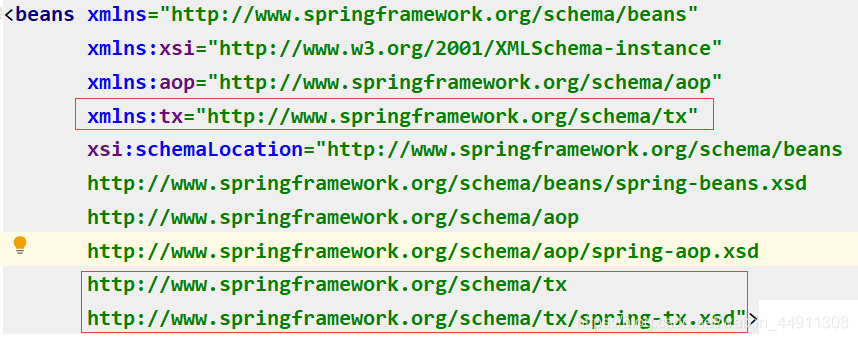
1.配置xsd约束文件,把圈出的代码复制到指定位置

<!-- [1]连接数据库获得数据源 源码在spring-jdbc jar包下 --><bean id="ds" class="org.springframework.jdbc.datasource.DriverManagerDataSource"><property name="driverClassName" value="com.mysql.jdbc.Driver"></property><property name="url" value="jdbc:mysql://localhost:3306/qt3"></property><property name="username" value="root"></property><property name="password" value="1111"></property></bean><!--[2]获得sqlSession工厂对象 源码在mybatis-spring jar包下--><bean id="factory" class="org.mybatis.spring.SqlSessionFactoryBean"><property name="dataSource" ref="ds"></property><property name="typeAliasesPackage" value="cn.qt.pojo"></property></bean><!--[3]扫描mapper文件 源码在mybatis-spring jar包下--><bean id="mapperScannerConfigurer" class="org.mybatis.spring.mapper.MapperScannerConfigurer"><property name="sqlSessionFactoryBeanName" value="factory"></property><!--cn.qt.mapper下文件的resultType--><property name="basePackage" value="cn.qt.mapper"></property></bean><!--配置声明式事务 ---><!--声明事务的对象 在Spring-jdbc包下--><bean id="transactionManager" class="org.springframework.jdbc.datasource.DataSourceTransactionManager"><!--这里ref引用的ds为第1步连接数据库获得的数据源的id--><property name="dataSource" ref="ds"></property></bean><!--配置声明式事务--><tx:advice id="ads" transaction-manager="transactionManager"><tx:attributes><!--限定切点pt2中需要声明事务的方法名,若切点具体到只有一个方法,则无需tx:attributes配置--><!--配置切点pt2中第一个需要声明事务的方法--><tx:method name="login"/><!--配置切点pt2中第一个需要声明事务的方法--><tx:method name="save"/></tx:attributes></tx:advice><!--通过配置切面的方式增加通知--><aop:config><aop:pointcut id="pt2" expression="execution(* cn.qt.service.Impl.AdminServiceImpl.*(..))"/><aop:advisor advice-ref="ads" pointcut-ref="pt2"></aop:advisor></aop:config>
2.Spring中TX事务管理属性配置详解
<tx:advice id="ads" transaction-manager="transactionManager"><tx:attributes ><tx:method name="login" propagation="" isolation=""/></tx:attributes></tx:advice>
- name=""表示切点所在的类中哪些方法需要事务配置。支持通配符,例如name="save* "表示expression的限制路径下,所有以save开头的方法。
- readonly=“boolean” :是否是只读事务
2.1如果为true,告诉数据库此事务为只读事务,数据化优先,会对性能有一定的提升,所以只要是查询方法,建议使用此数据。
2.2如果为false(默认值),表示需要的提交事务,建议增、删、改 - propagation :控制事务传播行为
3.1当一个具有事务控制的方法被另一个具有事务控制的方法调用后,需要如何管理事务?(新建事务?在事务中执行?把事务挂起?抛异常?)
3.2 required(默认值):如果当前有事务,在事务中执行。如果当前没有事务,新建一个事务。
3.3 supports:如果当前有事务,就在事务中执行。如果当前没有事务,就在非事务状态下执行。
3.4 mandatory:必须在事务内部中执行,如果当前有事务,就在事务中执行,如果没有则报错。
3.5 requires_new:必须在事务中执行。如果当前没有事务,新建事务。如果当前有事务,把当前事务挂起。
3.6 not_supported:必须在非事务下进行。如果当前没有事务,则运行。如果当前有事务,把当前事务挂起。
3.7 never:必须在非事务状态下进行。如果当前没有事务,则正常进行。如果当前有事务,则报错。
3.8 nested:必须在事务状态下进行。如果没有事务,则创建一个事务。若当前有事务,则创建一个嵌套事务。 - isolocation="",事务隔离级别。
在多线程或并发状态下如何保证访问到的数据是具有完整性的。
4.1 default:默认值,由数据库自动判断应使用什么隔离级别。
4.2 read_uncommitted:可以读取未提交的数据。可能出现脏读、不重复读、幻读。效率最高。
4.3 read_committed:只能读取其他事务已经提交的数据。可以防止脏读,可能出现不重复读、幻读。
4.4 repeatable_read:读取的数据被添加锁,防止其他事务修改此数据。可以防止脏读、不重复读,可能出现幻读。
4.5 serializable:排队操作,对整个表加锁。一个事务在操作数据时,另一个事务必须等待事务操作完成后才能操作这个表。
最安全的。效率最低的。 - rollback-for=“异常类型全限制路径”:即当出现什么异常时才进行回滚。
建议:给定该属性值。手动抛异常一定要给该属性值。 - no-rollback-for="":出现什么情况时不回滚事务。
3.Spring中注解的使用
[1]Spring中注解使用的例子
我们使用SpringIOC时,创建一个学生对象
Student实体类
public class Student {private String name;private int age;private String sex;Constructor构造方法set and get方法toString方法等
}
xml配置文件
<bean id="student" class="cn.qt.pojo.Student"></bean>
然后通过getBean获得Student对象
ApplicationContext app=new ClassPathXmlApplicationContext("applicatopnContext.xml");Student stu = app.getBean("stu", Student.class);
但我们使用注解时,代码则为
Student实体类
import org.springframework.stereotype.Component;import javax.annotation.Resource;/* @Component 相当于在配置文件中 <bean id="student" class="cn.qt.pojo.Student"></bean>*/
@Component("stu")
public class Student {private String name;private int age;private String sex;Constructor构造方法set and get方法toString方法等}
xml配置文件
<!--扫描pojo包 (Student对象在此包中) ,而无需使用<bean>标签 --><context:component-scan base-package="cn.qt.pojo"></context:component-scan>
通过getBean获得Student对象相同。
问题:如何给Student对象赋值?如在创建Student时定义name=“张三”?
解决:用 @Resource或@Autowired注解,即在Student实体类中
@Resourceprivate String name;
由于是给name赋值,则在定义name的语句之上,添加 @Resource注解,然后在xml标签中配置
<!-- class="java.lang.String" 为name属性的类型-->
<bean id="name" class="java.lang.String"><constructor-arg value="张三"></constructor-arg></bean>
@Resource会根据下面属性的名称,去到xml配置文件中找id="name"的< bean/>标签,将其constructor-arg 标签的value赋值给属性。
[2]Spring中常见的注解及其作用
- @Component 创建类对象,相当于配置< bean />,bean的ID默认为类名首字母小写,也可以指定其类名,例如@Component(“student”)
- @Service ,与@Component功能相同。专门写在ServiceImpl类上(即业务层)。
- @Repository 与@Component功能相同。专门写在数据访问层。
- @Controller与@Component功能相同。写在控制器类上
- @Resource写在属性上,用于给属性注入值(类中不需要写属性的set()/get()方法)。默认按照byName注入,若没有对象名称,也会按照byType注入。建议对象名称和spring中对象名(id)相同。是java中的注解
- @Autowired 和@Resource作用相似,但是其默认使用byType注入。是Spring中的注解。
注意:无论是使用@Resource还是@Autowired,都应保证属性名和xml中< constructor-arg values="">所在的父标签的id保持一致。 - @Value("${键名}") 获取properties文件中的内容。
读取属性文件的标签为 <context:property-placeholder location=“classpath:属性名”></context:property-placeholder>
注意:以下注解仅针对于Aspect J方式 - @Pointcut():定义切点
- @Aspect():定义切面类
- @Befour():前置通知
- @After():后置通知
- @AfterReturning:后置通知,你先切点正确进行
- @AfterThrowing:异常通知
- @Around:环绕通知
注意:使用注解,一定要在配置文件中声明注解扫描。
<context:component-scan base-package=“包名路径”></context:component-scan>
用注解实现AspectJ时,一定要在配置文件中添加
 <!--扫描通知所在的类--><context:component-scan base-package="cn.qt.advice"></context:component-scan>
<!--扫描的是@AspectJ--><aop:aspectj-autoproxy></aop:aspectj-autoproxy>
[3]代码实现使用注解实现AspectJ添加通知
A、实体类
import org.springframework.stereotype.Component;@Component("user")
public class User {public void u(){System.out.println("切点方法UU()");}
}
B、通知类
import org.aspectj.lang.ProceedingJoinPoint;
import org.aspectj.lang.annotation.*;
import org.springframework.stereotype.Component;@Component
@Aspect
public class Advice {//前置通知方法@Before("execution(* cn.qt.pojo.User.u())")public void beforeAdv(){System.out.println("前置通知");}//后置通知方法@After("execution(* cn.qt.pojo.User.u())")public void afterAdv(){System.out.println("后置通知");}//环绕通知方法@Around("execution(* cn.qt.pojo.User.u())")public Object aroundAdv(ProceedingJoinPoint point) throws Throwable{System.out.println("环绕通知---前");Object o = point.proceed();System.out.println("环绕通知---后");return o;}//异常通知方法@AfterThrowing("execution(* cn.qt.pojo.User.u())")public void throwAdv(){System.out.println("异常通知");}
}
C、配置文件
<?xml version="1.0" encoding="UTF-8"?>
<beans xmlns="http://www.springframework.org/schema/beans"xmlns:xsi="http://www.w3.org/2001/XMLSchema-instance"xmlns:context="http://www.springframework.org/schema/context"xmlns:aop="http://www.springframework.org/schema/aop"xsi:schemaLocation="http://www.springframework.org/schema/beanshttp://www.springframework.org/schema/beans/spring-beans.xsdhttp://www.springframework.org/schema/contexthttp://www.springframework.org/schema/context/spring-context.xsd http://www.springframework.org/schema/aop http://www.springframework.org/schema/aop/spring-aop.xsd"><!--扫描User所在的pojo包--><context:component-scan base-package="cn.qt.pojo"></context:component-scan><!--扫描通知所在的包--><context:component-scan base-package="cn.qt.advice"></context:component-scan><!--扫描的是@AspectJ--><aop:aspectj-autoproxy></aop:aspectj-autoproxy>
</beans>
D、测试类
import cn.qt.pojo.User;
import org.springframework.context.ApplicationContext;
import org.springframework.context.support.ClassPathXmlApplicationContext;public class Test {public static void main(String[] args) {ApplicationContext app=new ClassPathXmlApplicationContext("applicatopnContext.xml");User us = app.getBean("user", User.class);us.u();}
}
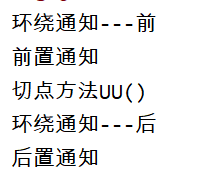
输出结果

4.总结

这篇关于Spring框架3(TX事务管理、TX事务管理属性配置详解、Spring中注解的使用)的文章就介绍到这儿,希望我们推荐的文章对编程师们有所帮助!


