本文主要是介绍AbstractQueuedSynchronizer 独占式源码阅读,希望对大家解决编程问题提供一定的参考价值,需要的开发者们随着小编来一起学习吧!
概述
● 一个int成员变量 state 表示同步状态
● 通过内置的FIFO队列来完成资源获取线程的排队工作
属性
AbstractQueuedSynchronizer属性
/*** 同步队列的头节点 */private transient volatile Node head;/*** 同步队列尾节点,enq 加入*/private transient volatile Node tail;/*** 同步状态*/private volatile int state;/*** 获取状态*/protected final int getState() {return state;}/*** 设置状态*/protected final void setState(int newState) {state = newState;}/*** CAS 设置状态*/protected final boolean compareAndSetState(int expect, int update) {// See below for intrinsics setup to support thisreturn unsafe.compareAndSwapInt(this, stateOffset, expect, update);}/*** The number of nanoseconds for which it is faster to spin* rather than to use timed park. A rough estimate suffices* to improve responsiveness with very short timeouts.*/static final long spinForTimeoutThreshold = 1000L;
Node 节点属性
static final class Node {/** 共享节点 */static final Node SHARED = new Node();/** 独占节点 */static final Node EXCLUSIVE = null;// 在同步队列中等待的线程等待超时或被中断, 需要从同步队列中取消等待, 状态不会变化 |static final int CANCELLED = 1;// 后继节点处于等待状态, 当前节点释放了同步状态或者被取消, 通知后续节点, 使后续节点得以运行static final int SIGNAL = -1;// 值为-2, 节点在等待队列, 当其他线程 signal(),从等待队列中移除到同步队列中 |static final int CONDITION = -2;// 值为-3, 下一次共享获取同步状态将会无条件传播下去static final int PROPAGATE = -3;/*** 节点初始状态,初始化为0*/volatile int waitStatus;/*** 前一个节点*/volatile Node prev;/*** 后一个节点*/volatile Node next;/** 节点的线程*/volatile Thread thread;/*** 下一个等待者*/Node nextWaiter;/*** 是否是共享节点*/final boolean isShared() {return nextWaiter == SHARED;}/*** 前一个节点*/final Node predecessor() throws NullPointerException {Node p = prev;if (p == null)throw new NullPointerException();elsereturn p;}Node() { // Used to establish initial head or SHARED marker}Node(Thread thread, Node mode) { // Used by addWaiterthis.nextWaiter = mode;this.thread = thread;}Node(Thread thread, int waitStatus) { // Used by Conditionthis.waitStatus = waitStatus;this.thread = thread;}}
常用方法
同步状态的三个方法:
● getState() 获取同步状态
● setState(int newState) 设置当前同步状态
● compareAndSetState(int expect, int update) CAS设置同步状态,原子操作
AbstractQueuedSynchronizer可重写的方法:
| 方法名称 | 方法描述 |
|---|---|
| boolean tryAcquire(int arg) | 独占式获取同步状态,查询当前状态是否符合预期,并且CAS设置 |
| boolean tryRelease(int arg) | 独占式释放同步状态,释放后,等待获取同步状态的线程有机会获取同步状态 |
| int tryAcquireShared(int arg) | 共享式获取同步状态,如果大于等于0,表示获取成功 |
| boolean tryReleaseShared(int arg) | 共享式释放同步状态 |
| boolean isHeldExclusively() | 在独占模式下被线程占用,表示是否被当前线程独占 |
AbstractQueuedSynchronizer提供的模版方法
| 方法名称 | 方法描述 |
|---|---|
| boolean acquire(int arg) | 独占式获取同步状态, 成功返回, 失败队列等待, 调用tryAcquire() |
| boolean acquireInterruptibly(int arg) | acquire 相同, 但是可以中断 |
| int tryAcquireNanos(int arg, long nanos) | acquireInterruptibly 基础上增加了超时限制, 超时返回false, 返回true |
| acquireShared(int arg) | 共享式获取同步状态, 和acquire差不多, 区别是同一时刻可以有多个线程获取同步状态 |
| acquireSharedInterruptibly(int arg) | acquireShared 相同, 但是可以中断 |
| int tryAcquireSharedInterruptibly(int arg, long nanos) | acquireSharedInterrup |
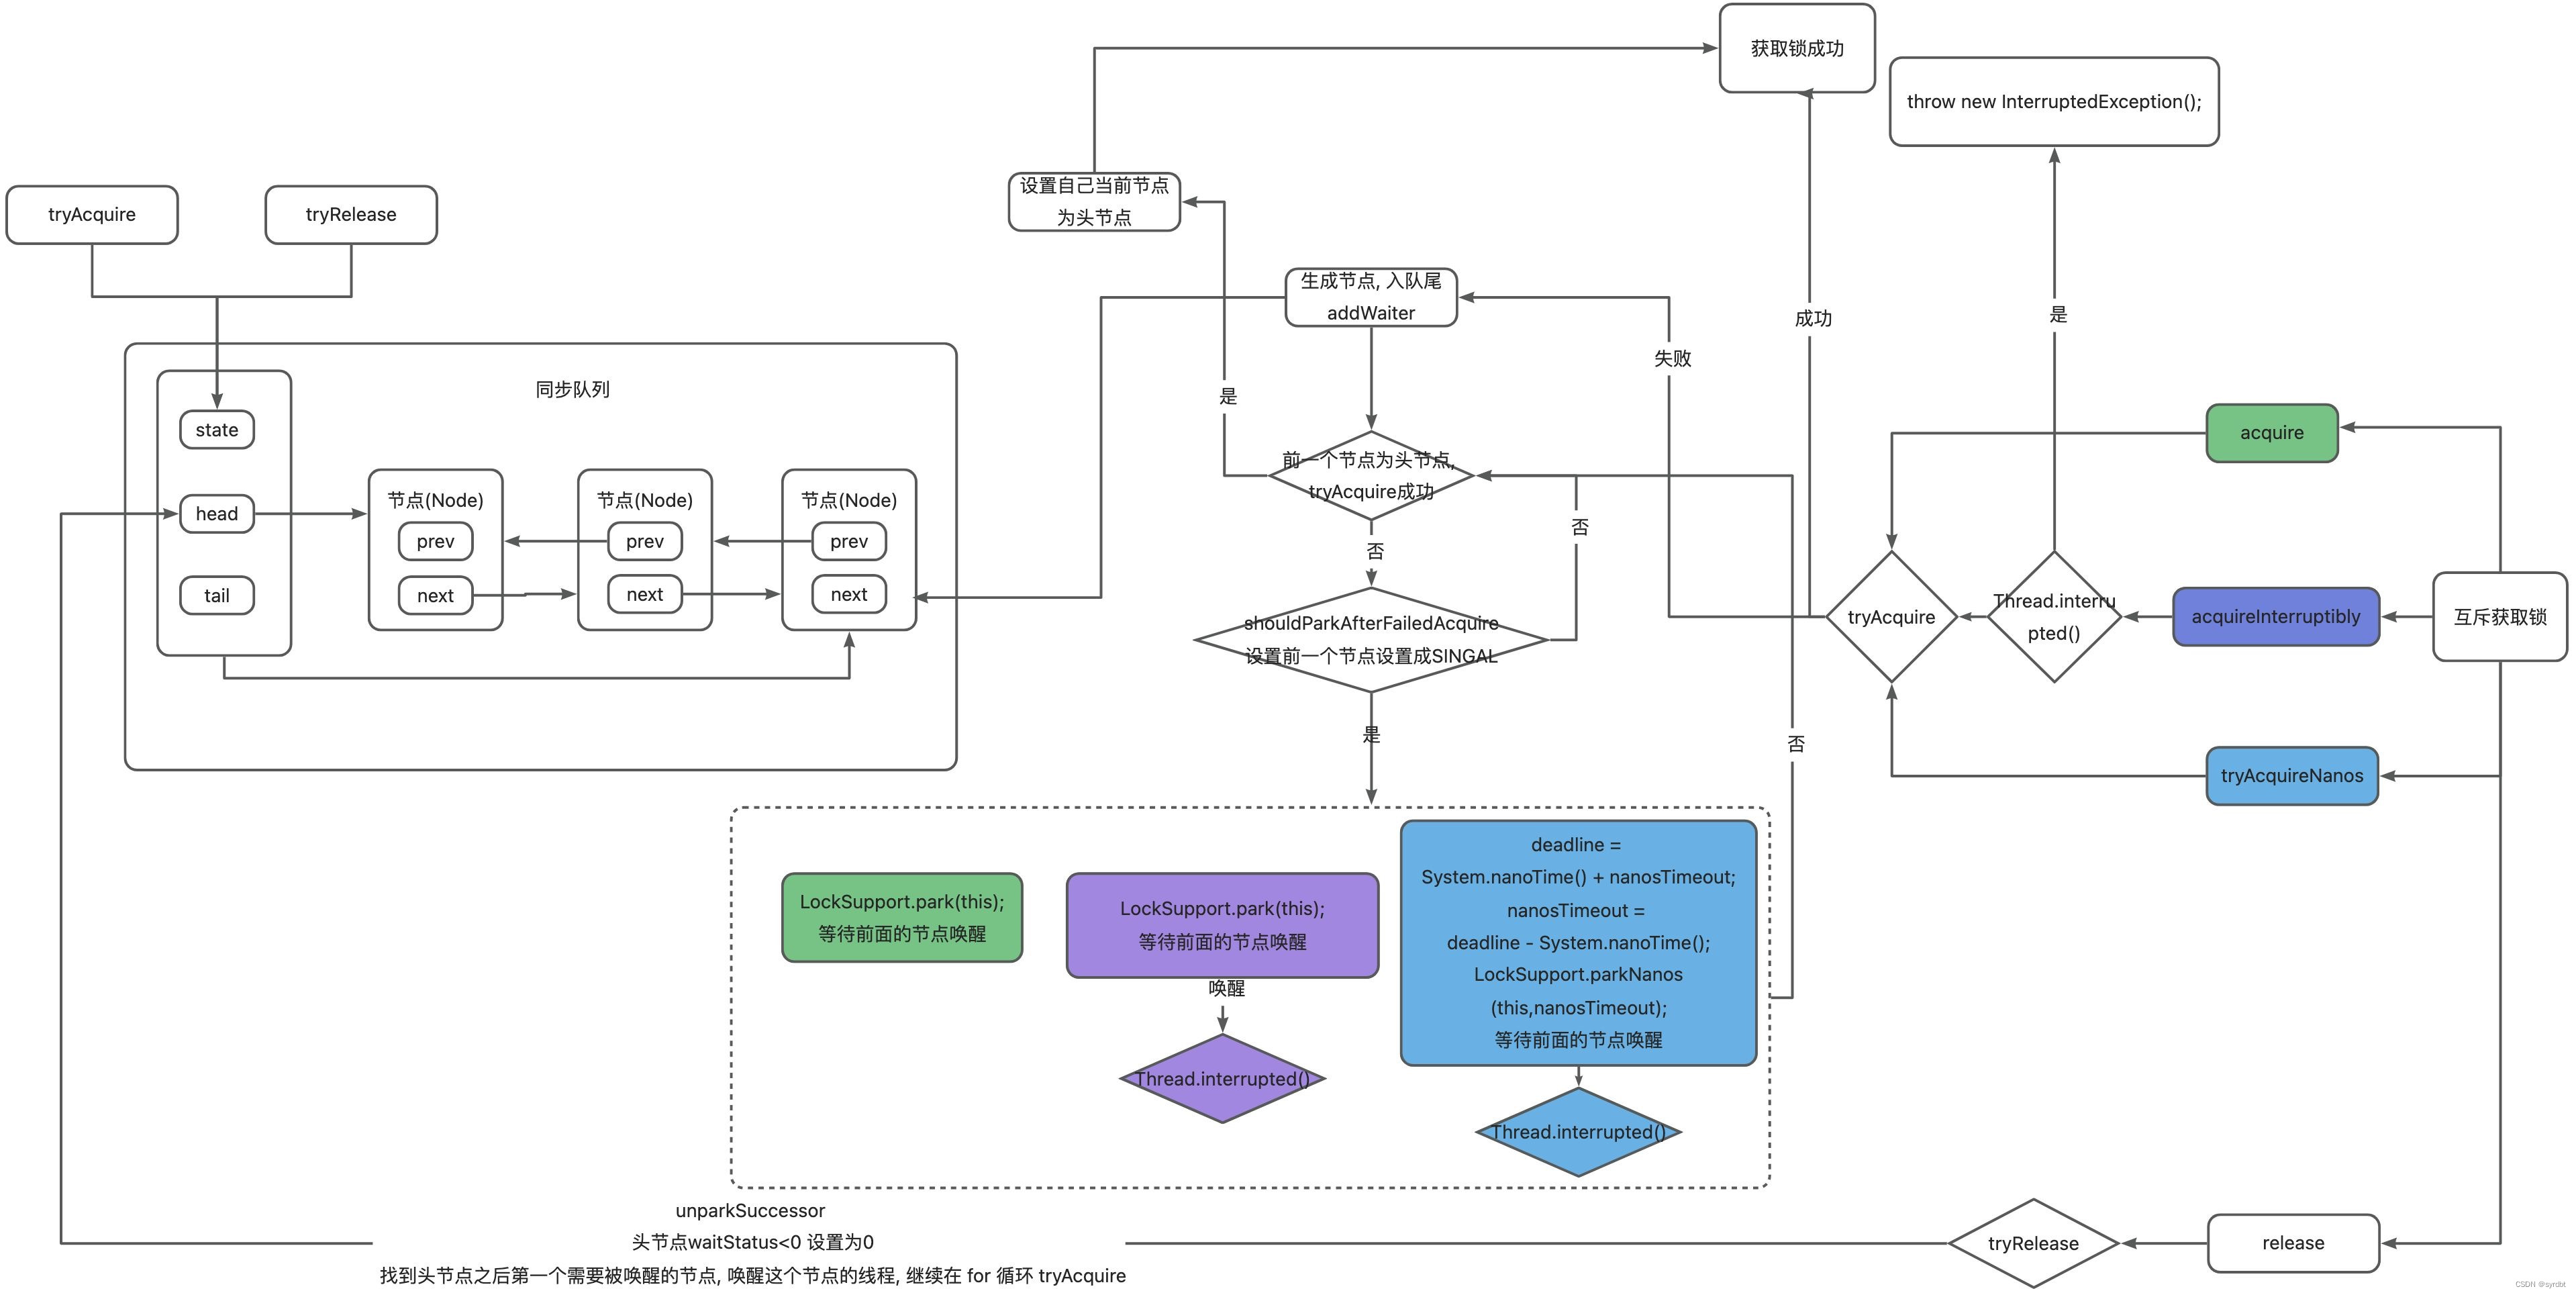
流程图

流程图主要方法源码阅读
acquire
独占式获取同步状态, 成功返回, 失败队列等待
public final void acquire(int arg) {// tryAcquire获取信号量// 如果失败 tryAcquire(arg)=false addWaiter入队列、acquireQueued 排队获取锁if (!tryAcquire(arg) &&acquireQueued(addWaiter(Node.EXCLUSIVE), arg))selfInterrupt();
}final boolean acquireQueued(final Node node, int arg) {boolean failed = true;try {boolean interrupted = false;for (;;) {// 前一个节点是头节点 尝试获取锁 获取锁成功 设置自己为头节点 final Node p = node.predecessor();if (p == head && tryAcquire(arg)) {setHead(node);p.next = null; // help GCfailed = false;return interrupted;}// 前面节点设置为 singal,自己就可以睡眠了if (shouldParkAfterFailedAcquire(p, node) &&parkAndCheckInterrupt())// 被中断 尝试获取信号量interrupted = true;}} finally {if (failed)cancelAcquire(node);}
}
addWaiter
节点进入同步队列
private Node addWaiter(Node mode) {// 创建节点Node node = new Node(Thread.currentThread(), mode);// Try the fast path of enq; backup to full enq on failureNode pred = tail;// 尾节点不为空if (pred != null) {// 设置当前节点的前一个节点为尾节点node.prev = pred;// cas 设置自己为尾节点if (compareAndSetTail(pred, node)) {pred.next = node;return node;}}// 尾节点为空 或 cas 设置自己为尾节点失败了enq(node);return node;}/*** 入队*/private Node enq(final Node node) {for (;;) {Node t = tail;// 尾节点为空,设置新的头节点if (t == null) { // Must initializeif (compareAndSetHead(new Node()))tail = head;} else {// 设置当前节点的前一个节点为尾节点node.prev = t;// cas 设置自己为尾节点if (compareAndSetTail(t, node)) {t.next = node;return t;}}}}
shouldParkAfterFailedAcquire
前面节点设置为 singal,设置成功返回true,失败false
private static boolean shouldParkAfterFailedAcquire(Node pred, Node node) {int ws = pred.waitStatus;// 前面的节点SIGNAL自己就可以park了if (ws == Node.SIGNAL)return true;if (ws > 0) {// 找到第一个不是取消状态的节点do {node.prev = pred = pred.prev;} while (pred.waitStatus > 0);pred.next = node;} else {/** 设置 WaitStatus SIGNAL*/compareAndSetWaitStatus(pred, ws, Node.SIGNAL);}return false;}
parkAndCheckInterrupt
private final boolean parkAndCheckInterrupt() {LockSupport.park(this);return Thread.interrupted();}
acquireInterruptibly
acquire 相同, 但是可以中断
public final void acquireInterruptibly(int arg)throws InterruptedException {// 被中断抛出InterruptedExceptionif (Thread.interrupted())throw new InterruptedException();if (!tryAcquire(arg))doAcquireInterruptibly(arg);}private void doAcquireInterruptibly(int arg)throws InterruptedException {final Node node = addWaiter(Node.EXCLUSIVE);boolean failed = true;try {for (;;) {final Node p = node.predecessor();if (p == head && tryAcquire(arg)) {setHead(node);p.next = null; // help GCfailed = false;return;}if (shouldParkAfterFailedAcquire(p, node) &&parkAndCheckInterrupt())// 被中断抛出InterruptedExceptionthrow new InterruptedException();}} finally {if (failed)cancelAcquire(node);}tryAcquireNanos
acquireInterruptibly 基础上增加了超时限制, 超时返回false, 返回true
public final boolean tryAcquireNanos(int arg, long nanosTimeout)throws InterruptedException {if (Thread.interrupted())throw new InterruptedException();return tryAcquire(arg) ||doAcquireNanos(arg, nanosTimeout);}private boolean doAcquireNanos(int arg, long nanosTimeout)throws InterruptedException {if (nanosTimeout <= 0L)return false;final long deadline = System.nanoTime() + nanosTimeout;final Node node = addWaiter(Node.EXCLUSIVE);boolean failed = true;try {for (;;) {final Node p = node.predecessor();if (p == head && tryAcquire(arg)) {setHead(node);p.next = null; // help GCfailed = false;return true;}nanosTimeout = deadline - System.nanoTime();// 超时返回falseif (nanosTimeout <= 0L)return false;if (shouldParkAfterFailedAcquire(p, node) &&nanosTimeout > spinForTimeoutThreshold)// park指定时间LockSupport.parkNanos(this, nanosTimeout);// 中断抛出异常if (Thread.interrupted())throw new InterruptedException();}} finally {if (failed)cancelAcquire(node);}}release
释放信号量, 如果头节点不为空 状态为SINGAL, 唤醒头节点的下一个节点
public final boolean release(int arg) {if (tryRelease(arg)) {// 释放arg信号量成功Node h = head;// 如果头节点不为空 状态为SINGAL, 唤醒头节点的下一个节点if (h != null && h.waitStatus != 0)unparkSuccessor(h);return true;}return false;
}private void unparkSuccessor(Node node) {int ws = node.waitStatus;// 唤醒先修改waitStatus从SINGAL->0初始化if (ws < 0)compareAndSetWaitStatus(node, ws, 0);// 找到node之后第一个不被取消的节点, LockSupport.unpark唤醒该节点Node s = node.next;if (s == null || s.waitStatus > 0) {s = null;for (Node t = tail; t != null && t != node; t = t.prev)if (t.waitStatus <= 0)s = t;}if (s != null)LockSupport.unpark(s.thread);
}
参考文献
- Java并发编程的艺术第二版 方腾飞、魏鹏、程晓明
这篇关于AbstractQueuedSynchronizer 独占式源码阅读的文章就介绍到这儿,希望我们推荐的文章对编程师们有所帮助!


