本文主要是介绍交叉编译Hi3536上面使用的nginx_附一些订正,希望对大家解决编程问题提供一定的参考价值,需要的开发者们随着小编来一起学习吧!
原文:
叶迎宪 - 交叉编译Hi3536上面使用的nginx - 简书
订正部分为红色
↓↓↓↓↓↓↓↓↓↓↓↓↓↓↓↓↓↓↓↓↓↓↓
宿主机操作系统为ubuntu 16.04。交叉编译需要用到的软件包为
openssl-OpenSSL_1_1_0i.tar.gz
pcre-8.42.tar.gz
nginx-1.14.0.tar.gz
暂时还没有把zlib加上
我编译的系统为Ubuntu19.10
使用的流媒体模块为pingos pingos github
nginx 1.22.1
openssl 1.1.1s
pcre 8.45
zlib 1.2.12
configure配置:
./configure --user=root --group=root \--sbin-path=/usr/local/nginx/sbin/nginx \
--conf-path=/usr/local/nginx/conf/nginx.conf \
--pid-path=/usr/local/nginx/nginx.pid \
--error-log-path=/usr/local/nginx/logs/error.log \
--with-http_ssl_module \
--with-cc=arm-hisiv400-linux-gcc \
--with-cpp=arm-hisiv400-linux-cpp \
--with-pcre=../pcre-8.45 \
--with-openssl=../openssl-1.1.1s \
--add-module=../nginx-client-module \
--add-module=../nginx-multiport-module \
--add-module=../nginx-toolkit-module \
--add-module=../nginx-rtmp-module \
--with-http_flv_module \
--with-http_mp4_module \
--with-debug \
--with-zlib=../zlib-1.2.12 \
--with-http_stub_status_module \
--with-cc-opt='-D_FILE_OFFSET_BITS=64 -D__USE_FILE_OFFSET64 -D_LARGE_FILE -D_LARGEFILE_SOURCE -D_LARGEFILE64_SOURCE' \
--with-ld-opt=-lpthread \
--with-http_slice_module
一、注意openssl和pcre只需要把源码解压缩,不需要单独交叉编译!
开始的时候不知道,傻傻的把这两个库弄半天把它们编译过去了。谁知道nginx的--with-pcre和--with-openssl选项,指定的是这两个库源代码的路径,并非安装路径!nginx的编译系统只会从/usr、/usr/local等少数几个目录查找是否有预编译的pcre、zlib、openssl等库。对于交叉编译,直接把交叉编译后的pcre等安装在/usr、/usr/local显然不合适,因此需要使用--with-pcre和--with-openssl指定源代码的位置
二、交叉编译nginx
在x64 linux上面编译非常简单的nginx,没想到在交叉编译的时候巨多坑。下面一个configure是编译成功的配置
./configure --with-http_ssl_module --with-cc=arm-hisiv400-linux-gcc --with-cpp=arm-hisiv400-linux-cpp --with-pcre=/home/src/pcre-8.42 --with-openssl=/home/src/openssl-OpenSSL_1_1_0i --without-http_gzip_module --without-http_upstream_zone_module
如果要用pingos编译则可以参考我上面发的命令
踩坑一,configure的时候报错
checking for C compiler ... found but is not working
./configure: error: C compiler arm-hisiv400-linux-gcc is not found
这是因为nginx编译的时候除了检查cc是否存在,还需要执行编译后的程序。很明显交叉编译的程序无法执行。解决办法
vi auto/cc/name
ngx_feature="C compiler"ngx_feature_name=ngx_feature_run=yes==> ngx_feature_run=no
踩坑二,configure的时候报错
checking for int size ...objs/autotest: 1: objs/autotest: Syntax error: word unexpected (expecting ")")
bytes
./configure: error: can not detect int size
同样也是因为cc编译后的程序无法本地执行导致。解决办法
vi auto/types/sizeof
ngx_test="$CC $CC_TEST_FLAGS $CC_AUX_FLAGS \==> ngx_test="gcc $CC_TEST_FLAGS $CC_AUX_FLAG \if [ -x $NGX_AUTOTEST ]; thenngx_size=`$NGX_AUTOTEST`==> ngx_size=4
需要注意,ngx_size=4是目标机器为32位情况时的设值。如果是64位,要改为8
这里的话可以先改成ngx_size=4
但要加点东西:
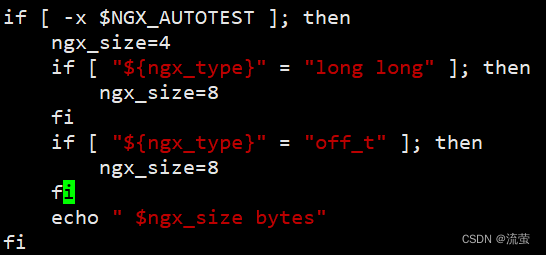
if [ "${ngx_type}" = "long long" ]; thenngx_size=8fiif [ "${ngx_type}" = "off_t" ]; thenngx_size=8fi
这两个类型的size是8,是在目标机上跑测试程序得出来的。
踩坑三,make的时候报错
cd /home/src/pcre-8.42
&& if [ -f Makefile ]; then make distclean; fi
&& CC="arm-hisiv400-linux-gcc" CFLAGS="--host=arm-hisiv400-linux -pipe"
./configure --disable-shared
...
configure: error: in `/home/src/pcre-8.42':
configure: error: C compiler cannot create executables
这是因为编译pcre的时候,nginx没有正确设置交叉编译链。解决
vi auto/options
PCRE_CONF_OPT===> PCRE_CONF_OPT=--host=arm-hisiv400-linux
这里修改了编译可能会再次报错,那么手动进入pcre的目录,执行编译再回来即可。
./configure --host=arm-hisiv400-linuxmake -j4
踩坑四,make的时候报错
src/core/ngx_rwlock.c:125:2: error: #error ngx_atomic_cmp_set() is not defined!
报错的地方,nginx的源码是这样的
#if (NGX_HTTP_UPSTREAM_ZONE || NGX_STREAM_UPSTREAM_ZONE)#error ngx_atomic_cmp_set() is not defined!#endif
解决办法,在configure的时候加上--without-http_upstream_zone_module和--without-stream_upstream_zone_module
这里可以不用加这个without配置,修改objs/Makefile添加配置:

-DNGX_HAVE_GCC_ATOMIC=1或者 vi objs/ngx_auto_config.h 加上:
#ifndef NGX_HAVE_GCC_ATOMIC
#define NGX_HAVE_GCC_ATOMIC 1
#endif
踩坑五,make的时候报错
src/os/unix/ngx_errno.c: In function ‘ngx_strerror’:
src/os/unix/ngx_errno.c:37:31: error: ‘NGX_SYS_NERR’ undeclared (first use in this function)
msg = ((ngx_uint_t) err < NGX_SYS_NERR) ? &ngx_sys_errlist[err]:
出错的原因仍然是因为交叉编译程序无法本地运行,导致NGX_SYS_NERR宏没有赋值。解决办法,手动编辑 objs/ngx_auto_config.h,加上
这里可以用135,在目标机上跑测试程序得出来的结果是135
#ifndef NGX_SYS_NERR
#define NGX_SYS_NERR  132
#endif
踩坑六,make的时候报错
/home/src/openssl-OpenSSL_1_1_0i/.openssl/lib/libssl.a: error adding symbols: File format not recognized
collect2: error: ld returned 1 exit status
objs/Makefile:236: recipe for target 'objs/nginx' failed
这是SSL编译的时候调用了x86的gcc,而非交叉编译gcc导致的。解决办法
vi auto/lib/openssl/make
&& ./config --prefix=$ngx_prefix no-shared no-threads $OPENSSL_OPT \
改为
&& ./Configure --prefix=$ngx_prefix no-shared no-threads --cross-compile-prefix=arm-hisiv400-linux- linux-generic32 \
踩坑七,make的时候报错
objs/src/core/ngx_cycle.o: In function 'ngx_init_cycle':
/home/src/nginx-1.14.0/src/core/ngx_cycle.c:476: undefined reference to 'ngx_shm_alloc'
/home/src/nginx-1.14.0/src/core/ngx_cycle.c:685: undefined reference to 'ngx_shm_free'
解决办法
vi objs/ngx_auto_config.h
#ifndef NGX_HAVE_SYSVSHM
#define NGX_HAVE_SYSVSHM 1
#endif
这里可以直接 vi auto/unix 将NGX_HAVE_SYSVSHM测试处的
ngx_feature_run=no改为yes
ngx_feature="System V shared memory"
ngx_feature_name="NGX_HAVE_SYSVSHM"
ngx_feature_run=no===>ngx_feature_run=yes
ngx_feature_incs="#include <sys/ipc.h>
新增:
编译到rtmp模块这里有报错
../nginx-rtmp-module/ngx_live_relay_httpflv.c: 在函数‘ngx_live_relay_httpflv_parse’中:
src/core/ngx_core.h:103:37: 错误: comparison between signed and unsigned integer expressions [-Werror=sign-compare]#define ngx_min(val1, val2)  ((val1 > val2) ? (val2) : (val1))^
../nginx-rtmp-module/ngx_live_relay_httpflv.c:318:23: 附注: in expansion of macro ‘ngx_min’len = ngx_min(st->len, b->last - p);^
src/core/ngx_core.h:103:54: 错误: signed and unsigned type in conditional expression [-Werror=sign-compare]#define ngx_min(val1, val2)  ((val1 > val2) ? (val2) : (val1))^
../nginx-rtmp-module/ngx_live_relay_httpflv.c:318:23: 附注: in expansion of macro ‘ngx_min’len = ngx_min(st->len, b->last - p);^
cc1:所有的警告都被当作是错误
make[1]: *** [objs/Makefile:1739:objs/addon/nginx-rtmp-module/ngx_live_relay_httpflv.o] 错误 1
解决办法
vi objs/Makefile
删除CFLAGS里的-Werror -g
![]()
作者:叶迎宪
链接:https://www.jianshu.com/p/5d9b60f7b262
来源:简书
著作权归作者所有。商业转载请联系作者获得授权,非商业转载请注明出处。
这篇关于交叉编译Hi3536上面使用的nginx_附一些订正的文章就介绍到这儿,希望我们推荐的文章对编程师们有所帮助!


