本文主要是介绍RHCE学习笔记(RHEL8) - RH294,希望对大家解决编程问题提供一定的参考价值,需要的开发者们随着小编来一起学习吧!
Chapter Ⅰ 介绍Ansible
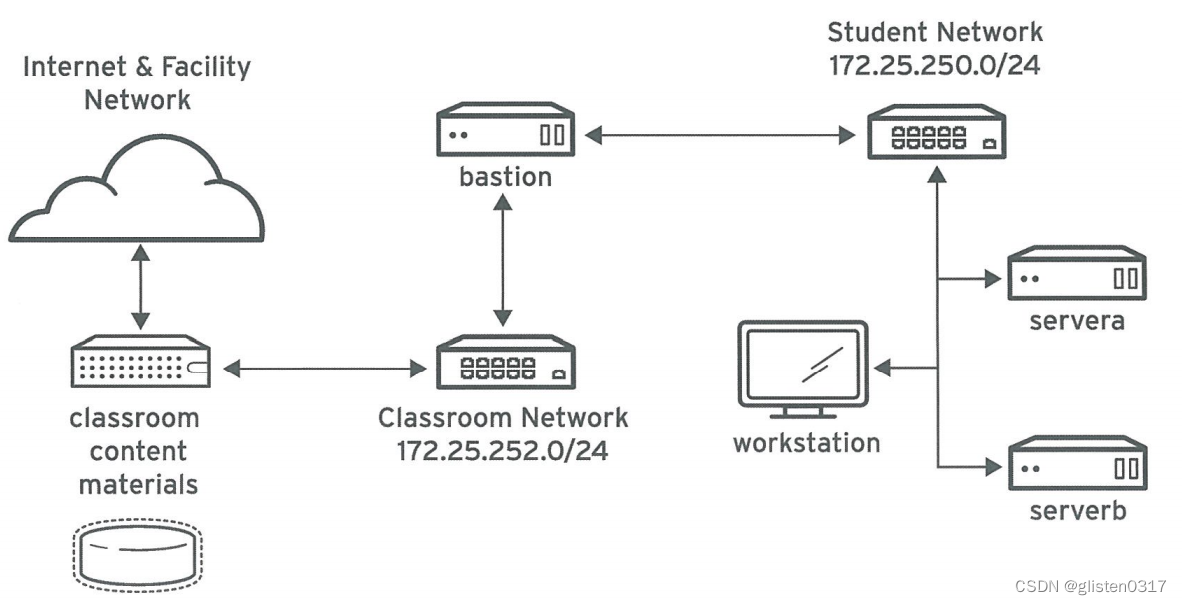
ansible
ansible是一款开源自动化平台
ansible围绕一种无代理架构构建,在控制节点上安装ansible,且客户端不需要任何特殊的代理软件;ansible使用SSH等标准协议连接受管主机,并在受管主机上运行代码或命令来确保他们处于ansible指定的状态
Ansible帮助:
1、官方网站:https://docs.ansible.com/ansible/2.8/modules/modules_by_category.html
2、ansible-doc 模块名称

Chapter Ⅱ 部署Ansible
| 类别 | 文件 | 说明 |
|---|---|---|
| 配置文件 | ansible.cfg | 通过哪个账号、登录方式(用户名密码/密钥)、提权 |
| 管理清单 | inventory | 管理设备的清单列表(支持分组) |
| 运行脚本 | playbook | ansible的语法、具体执行任务脚本 |
1、配置文件
三种配置文件
| 配置文件 | 所在路径 | 优先级 |
|---|---|---|
| ansible.cfg | 当前目录 | 高 |
| ~/.ansible.cfg | 家目录 | 次高 |
| /etc/ansible/ansible.cfg | 全局配置目录 | 低 |
# some basic default values...
[defaults]
# 指定清单文件
inventory      = /home/student/ansible/inventory
# 登录是否需要输入密码,因为已经在sshd中设置密钥登录,所以此处可以设置为False
ask_pass      = False
# 指定登录到被管主机的账号
remote_user = devops[privilege_escalation]
# 是否可以切换高权限账号
become=True
# 切换的方式采用sudo
become_method=sudo
# 切换到什么账号
become_user=root
# 切换时是否需要密码
become_ask_pass=False
注:提权sudo等相关配置在/etc/sudoers中配置
2、管理清单
清单定义Ansible将要管理的一批主机。这些主机也可以分配到组中,以进行集中管理。组可以包含子组,主机也可以是多个组的成员。清单还可以设置应用到它所定义的主机和组的变量。

验证inventory
ansible 主机名或组名 --list-hosts,或者直接用all也可以

3、运行临时命令
Ansible有两种方式运行:临时运行(单词命令行)和脚本运行(playbook)
ansible host-pattern -m moudule [-a 'module arguments'] [-i inventory]
Ansible模块
| 模块类别 | 模块 |
|---|---|
| 文件模块 | ▪ copy:将本地文件复制到受管主机 ▪ file:设置文件的权限和其他属性,如创建、删除等 ▪ lineinfile:确保特定行是否在文件中 ▪ synchronize:使用rsync同步内容 |
| 软件包模块 | ▪ package:使用操作系统本机的自动监测软件包管理器管理软件包 ▪ yum:使用YUM软件包管理器管理软件包 ▪ apt:使用APT软件包管理器管理软件包 ▪ dnf:使用DNF软件包管理器管理软件包▪ gem:管理Ruby gem ▪ pip:从PyPI管理Python软件包 |
| 系统模块 | ▪ firewalld:使用firewalld管理任意端口和服务 ▪ reboot:重启计算机 ▪ service:管理服务 ▪ user:添加、删除和管理用户账户 |
| Net Tools模块 | ▪ get_url:通过HTTP、HTTPS或FTP下载文件 ▪ nmcli:管理网络 ▪ uri:与web服务交互 |
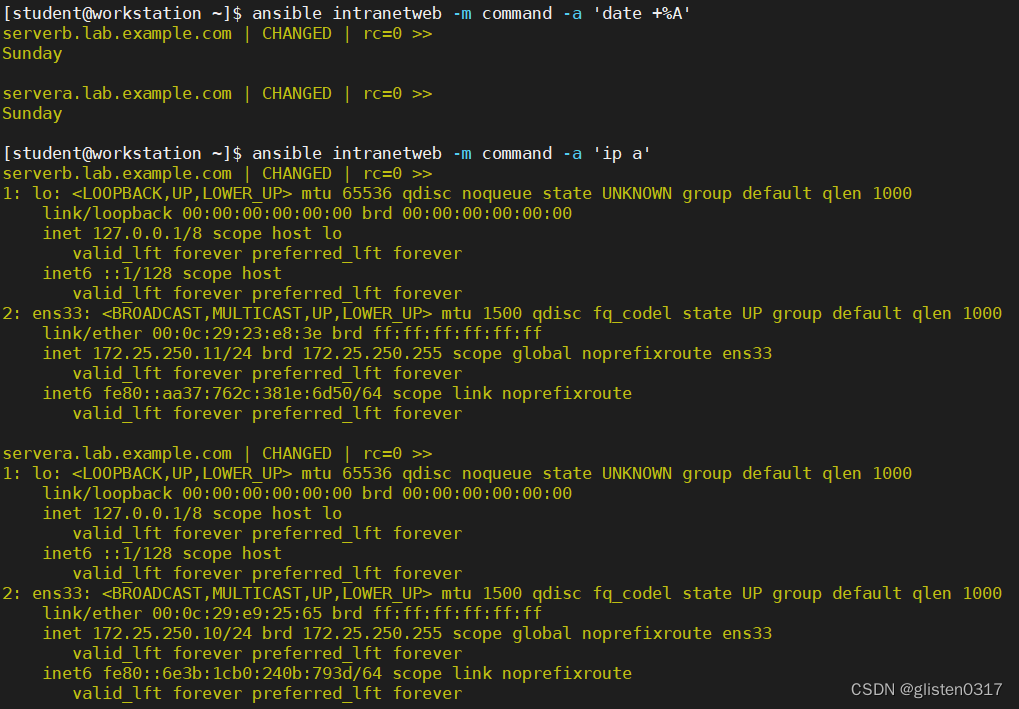
在受管主机上运行任意命令
command模块允许管理员在受管主机的命令行中运行任意命令,要运行的命令通过-a选项指定为该模块的参数
Chapter Ⅲ 实施PLAYBOOK
1、规范
Playbook是以YAML格式编写的文本文件,通常使用扩展名yml或yaml保存。Playbook使用空格字符缩进来表示其数据结构。
- 处于层次结构中同一级别的数据元素必须具有相同的缩进量
- 如果项目属于其他项目的子项,其缩进量必须大于父项
YAML语法规则:
- 大小写敏感
- 使用缩进量表示层级关系
- 缩进时不允许使用tab键,只可以使用空格
- 缩进时空格数量不重要,只要相同元素左侧对齐,表示这些元素属于同一个层级
- #表示当行注释
- 字符串可以不用引号标注(但建议加上引号,便于理解和阅读)
Playbook开头的一行由三个破折号(—)组成,标记文档开始;末尾可能使用三个圆点(…),实际中通常会省略;首末标记位之间,会以play列表的形式定义playbook,YAML列表中的项目以一个破折号加空格开头。
---
- name: "install and start http"hosts: intranetwebvars:tasks:- name: "install http"yum:name: httpdstate: present- name: "start http"service:name: httpdstate: startedenabled: true
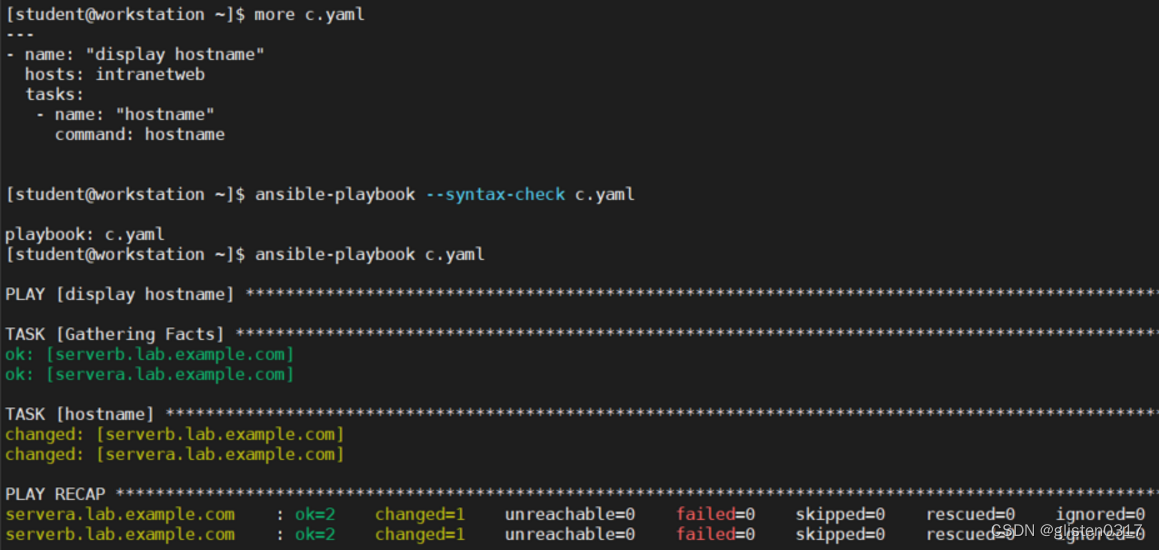
2、语法检查
ansible-playbook --syntax-check test.yaml
3、显示详细信息verbose
ansible-playbook -vvv test.yaml
| 选项 | 描述 |
|---|---|
| -v | 显示任务结果 |
| -vv | 任务结果和任务配置都会显示 |
| -vvv | 包含关于与受管主机连接的信息 |
| -vvvv | 增加了连接插件相关的额外详细程度选项,包括受管主机上用于执行脚本的用户,以及所执行的脚本 |
4、模拟仿真(空运行)
ansible-playbook -C test.yaml
返回结果,但不会真的到受管主机上执行
Ansible模块维护
用ansible-doc查询模块时,需要注意维护属性,有些非商用的模块有可能后期会下线,尽量使用stableinterface和core的模块
1、status(开发状态)
- stableinterface:模块的关键字稳定,将尽力确保不删除关键字或更改其含义
- preview:模块处于技术预览阶段,可能不稳定,其关键字可能会更改,或者可能需要本身受到不兼容更改的库或web服务
- deprecated:模块已被弃用,未来某一发行版中将不再提供
- removed:模块已从发行版中移除,但因文档需要存根,以帮助之前的用户迁移到新的模块
2、supported_by(维护人)
- core:由上游“核心”Ansible开发人员维护,始终随Ansible提供
- curated:模块由社区中的合作伙伴或公司提交并维护
community:模块不受到核心上游开发人员、合作伙伴或公司的支持,完全由一般开源社区维护

Chapter Ⅳ 管理变量和事实
https://docs.ansible.com/ansible/2.8/user_guide/playbooks_variables.html
命名变量:变量的名称必须以字母开头,并且只能含有字母、数字和下划线
1、全局范围变量:从命令行或Ansible配置设置的变量
2、Play范围变量:在play和相关结构中设置的变量
3、主机范围变量:由清单、事实收集或注册的任务,在主机组和个别主机上设置的变量
优先级:1<2<3,不同级别定义相同变量,采用优先级最高的变量,即低优先级会被高优先级覆盖
注:清单中的变量优先级小于playbook中的变量,一般在其中定义与playbook相同的变量,作用是防止playbook未定义变量导致执行错误
变量的使用
- 双花括号
- 以变量开始的时候,必须加"“,即”{{ var }}"(建议都加)
- 在when语句中调用变量不能加{{}}
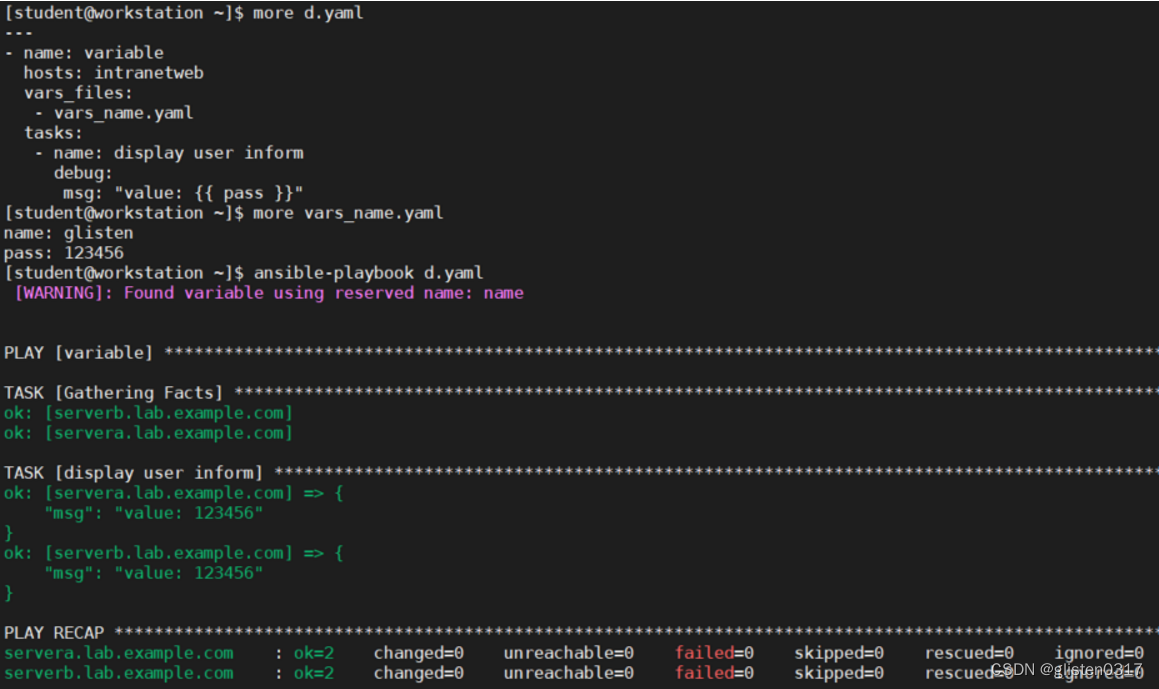
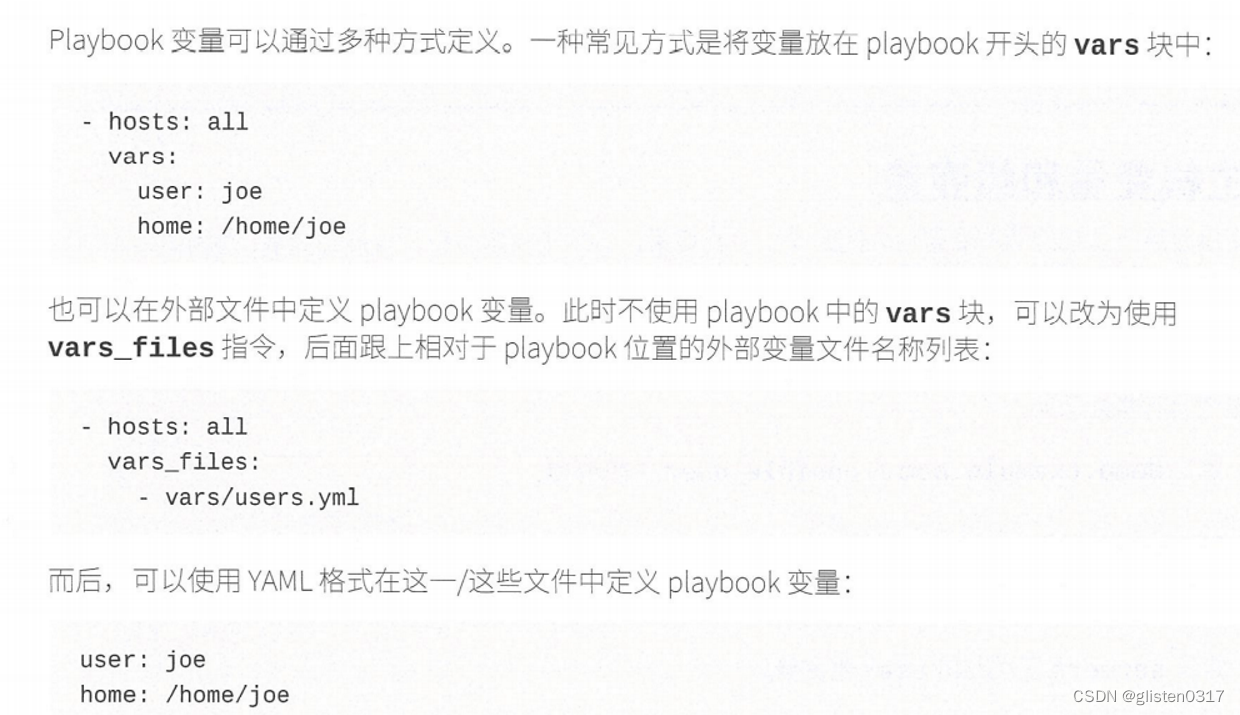
变量数组
如下代码可以转换为名为users的数组
user1_first_name: Bob
user1_last_name: Jones
user1_home_dir: /users/bjones
user2_first_name: Anne
user2_last_name: Cook
user2_home_dir: /users/acook
users:bjones:first_name: Boblast_name: Joneshome_dir: /users/bjonesacook:first_name: Annelast_name: Cookhome_dir: /users/acook
可以用如下两种形式访问数据:
# Returns 'Bob'
users.bjones.first_name# Returns '/users/acook'
users.acook.home_dir# Returns 'Bob'
users['bjones']['first_name']# Returns '/users/acook'
users['accok']['home_dir']
模块debug
在调试的时候使用,相当于打印
var:取变量值打印
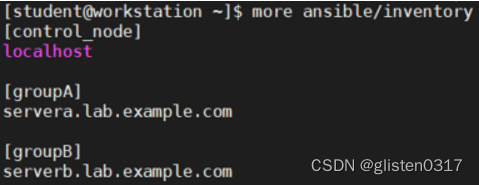
使用目录填充主机和组变量
根据被管主机或组进行分别定义的变量
目录group_hosts、hosts_group的名字必须这么写,不能改
文件名必须和Inventory中定义的主机相同
实验:servera归属groupA,serverB归属groupB,其中groupA安装ntpd、groupB安装httpd、servera添加用户devops、serverb添加用户student


---
- name:hosts: groupA, groupBvars:ignore_errors: yestasks:- name: "group: install software"yum:name: "{{ package }}"state: present- name: "hosts: add user"user:name: "{{ user_name }}"

注册变量register
register变量,可以临时保存本模块执行后的结果,一般用在判断关系中,决定后续语句如何执行
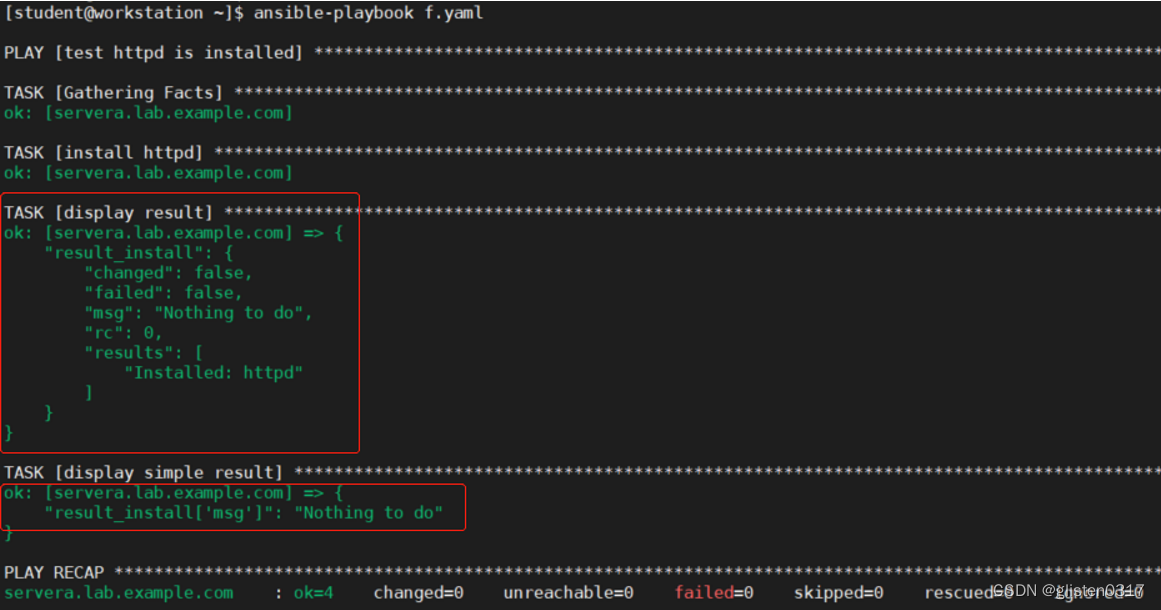
示例:在servera上安装httpd,通过结果判断是否已经预先安装,第一个显示全部结果信息,第二个只显示msg字段信息
---
- name: "test httpd is installed"hosts: servera.lab.example.comvars:tasks:- name: "install httpd"yum:name: httpdstate: presentregister: result_install- name: "display result"debug:var: result_install- name: "display simple result"debug:var: result_install['msg']
facts变量
Ansible执行YAML前,会去被管主机上采集信息,并通过json格式存储在内存中。(Gathering Facts)
目的:做环境状态的判断
可以收集IP地址、硬件信息(CPU、内存、BIOS、磁盘等)、分区信息
也可以在被管主机上自定义facts变量
1、facts采集是默认开启的,但会比较耗时,如果需要关闭,添加gather_facts: no
---
- name:hosts: groupA, groupBvars:gather_facts: no
2、支持采集的变量
使用ansible serverb.lab.example.com -m setup获取
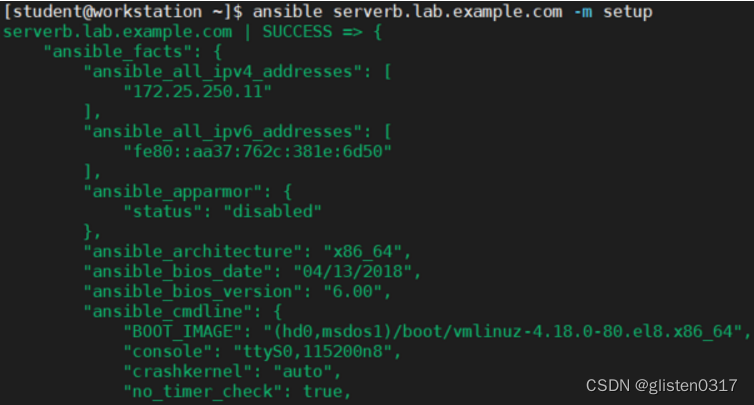
常用的变量:IP地址、主机名(完全解析域名FQDN、短主机名)等
3、调用变量
| ANSIBLE_FACTS形式 | 旧FACTS变量形式 |
|---|---|
| ansible_facts[‘hostname’] | ansible_hostname |
| ansible_facts[‘fqdn’] | ansible_fqdn |
| ansible_facts[‘default_ipv4’][‘address’] | ansible_default_ipv4[‘address’] |
| ansible_facts[‘interfaces’] | ansible_interfaces |
| ansible_facts[‘devices’][‘vda’][‘partitions’][‘vda1’][‘size’] | ansible_devices[‘vda’][‘partitions’][‘vda1’][‘size’] |
注:尽量选择新形式
---
- name: "display facts"hosts: intranetwebvars:tasks:- name: "IP address, netmask and gateway"debug:var: ansible_facts['default_ipv4']['address'], ansible_facts['default_ipv4']['netmask'], ansible_facts['default_ipv4']['gateway']- name: "fqdn and hostname"debug:var: ansible_facts['fqdn'], ansible_facts['hostname']- name: "virtual groups"debug:var: ansible_facts['lvm']['vgs']- name: "memory usage"debug:var: ansible_facts['memory_mb']['real']['total'], ansible_facts['memory_mb']['real']['used']
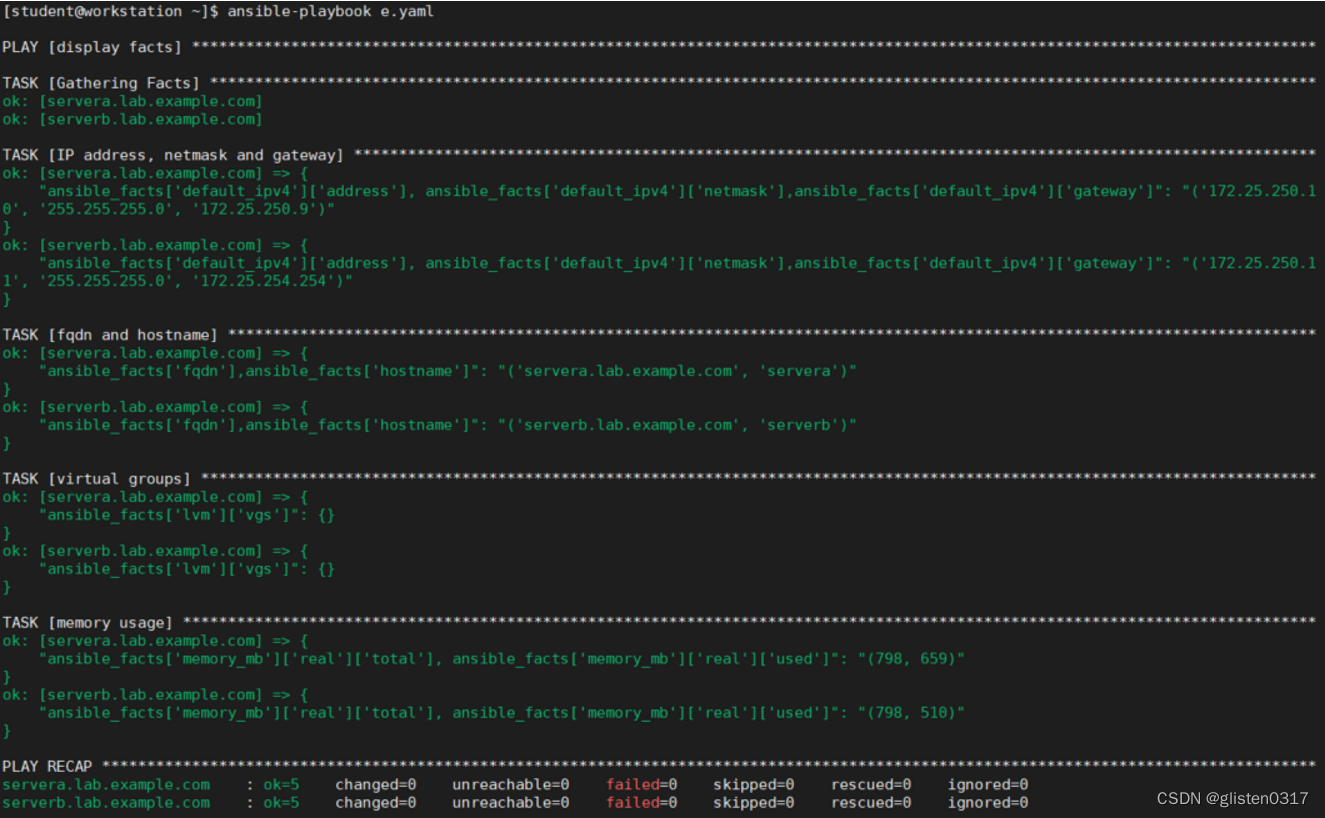
魔法变量magic variable
- hostvars
包含受管主机的变量,可以用于获取另外一台受管主机的变量的值
hostvar[‘serverb.lab.example.com’][‘ansible_facts’][‘hostname’] - group_names(组)
了出当前受管主机所属的所有组 - groups(组+主机)
列出清单中的所有组和主机 - inventory_hostname(主机)
包含清单中配置的当前受管主机的主机名称。(Inventory中的主机名可能与实际取到的主机名不同)
实验:把serverb主机名和IP写入到servera的/etc/hosts中
---
- name: "test"hosts: servera.lab.example.com, serverb.lab.example.comvars:tasks:- name: "modify /etc/hosts"copy:content: "{{ hostvars['serverb.lab.example.com']['ansible_facts']['hostname'] }}  {{ hostvars['serverb.lab.example.com']['ansible_facts']['default_ipv4']['address']"dest: /etc/hosts
yaml文件加密
ansible-vault
| 选项 | 作用 |
|---|---|
| create | 新建一个加密文件 |
| encrypt | 在现有文件上加密 |
| decrypt | 去加密 |
| edit | 编辑加密文件 |
| rekey | 重新生成密码 |
| view | 查看加密文件 |
加密后在用普通的cat/more指令查看yaml为文件,显示的是加密后内容
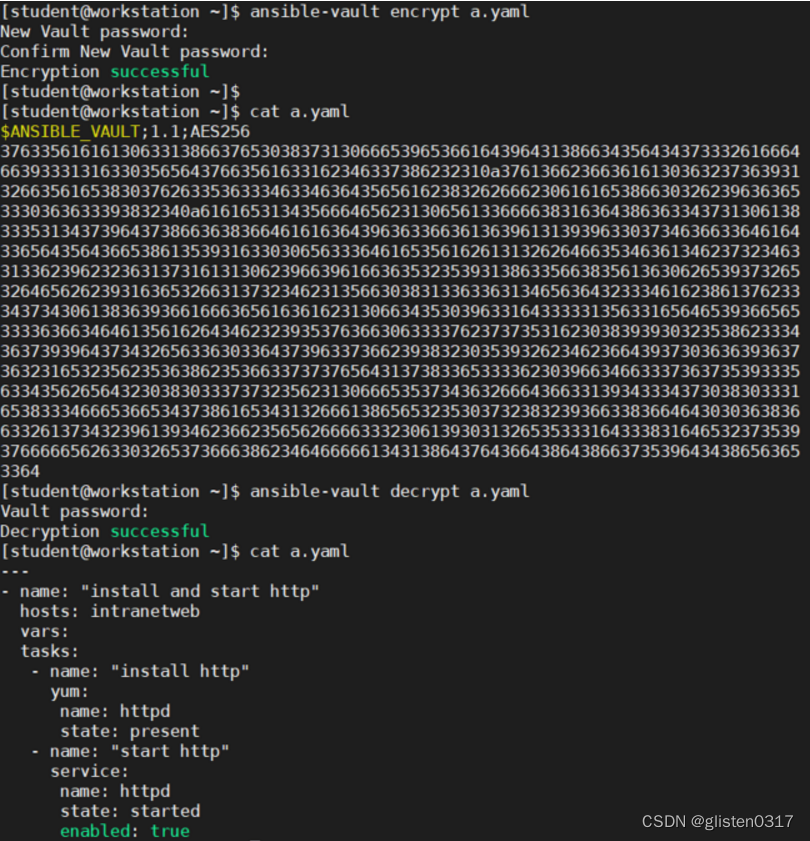
ansible-playbook --ask-pass来调用加密的yaml文件
ansible-playbook --vault-password-file用来指定解密的密码文件,不用每次都输入密码
Chapter Ⅴ 实施任务控制
Ansible模块设计具有幂等性(执行多次的影响与执行一次的影响相同)
- 循环任务loop+item
loop关键字添加到任务中,将应对其迭代任务的项目列表取为值;循环变量item保存每个迭代过程中使用的值。
(老版本中用with_items等作为循环,在现有版本中已废弃)
三种安装软件包的写法
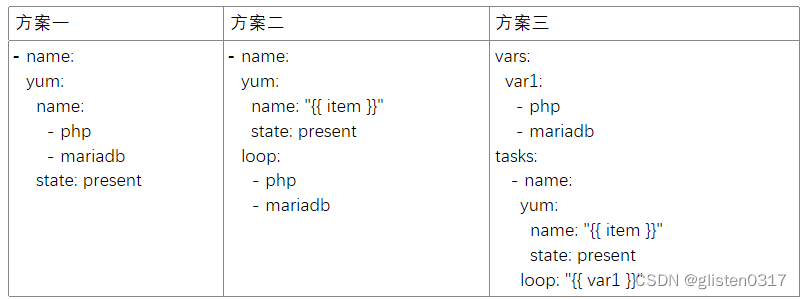
loop的循环是一次次的遍历变量的取值,每次遍历列表中的一个值
- 判断任务when
和loop的item变量组合,在when内部可以调用
1、==进行字符的内容判断
2、is或is not,用于定义好的值(succeed、defined等)
3、in 包含
示例:
vars:var1:- php- mariadb- httpd
tasks:- name:yum:name: "{{ item }}"state:presentloop: "{{ var1 }}"when:- inventory_hostname in groups['dev']- item == "php"
| 操作 | 示例 |
|---|---|
| 等于(值为字符串) | ansible_machine == “x86_64” |
| 等于(值为数字) | max_memory == 512 |
| 小于 | min_memory < 128 |
| 大于 | min_memory > 256 |
| 小于等于 | min_memory <= 256 |
| 大于等于 | min_memory >= 512 |
| 不等于 | min_memory != 512 |
| 变量存在 | min_memory is defined |
| 变量不存在 | min_memory is not defined |
| 布尔变量是true | memory_available |
| 布尔变量是false | not memory_available |
| 第一个变量的值存在,作为第二个变量的列表中的值 | ansible_distribution in supported_distors |
- 或操作
when: ansible_facts['distribution'] == "RedHat" or ansible_facts['distribution'] == "Fedora"
- 与操作
when: ansible_facts['distribution'] == "Redhat" and ansible_facts['distribution'] == "Fedora"
when:- ansible_facts['distribution] ==ansible_facts['distribution'] == "RedHat"- ansible_facts['distribution'] == "Fedora"
- 与或同有(使用大于符号>,长条件在playbook中可分成多行,便于阅读)
when: >( ansible_facts['distribution'] == "RedHat" and ansible_facts['distribution']['major_version'] == "7" )or( ansible_facts['distribution'] == "Fedora" andansible_facts['distribution']['major_version'] == "28" )
when和loop结合使用的实际案例:
- name: install mariadb-server if enough space on rootyum:name: mariadb-serverstate: latestloop: "{{ ansible_mounts }}"when: item.mount == "/" and item.size_available > 300000000
实验:
1、Install Packages
create a playbook called /home/student/ansible/package.yml that:
install the php and mariadb packages on hosts in the “dev”, “test”, and “prod” host groups
install the “Development Tools” packages group on hosts in the “dev” host group
updates all packages to the latest version on hosts in the “dev” host group
---
- name: "install software"hosts: allgather_facts: yesvars:var1:- pack: phpgrp: dev- pack: mariadbgrp: dev- pack: phpgrp: test- pack: phpgrp: prod- pack: mariadbgrp: prod- pack: Development_Toolsgrp: devvar2:- gg: devtasks:- name: " install php and mariadb on dev, test, prod/ install Development_Tools on dev"yum:name: "{{ item.pack }}"state: presentloop: "{{ var1 }}"when:- inventory_hostname in groups[ item.grp | string ]- name: " Upgrade all packages on dev"yum:name: '*'state: latestloop: "{{ var2 }}"when:- inventory_hostname in groups[ item.gg | string ]
2、Modify file content
Create a playbook called /home/student/ansible/issue.yml as follows:
The playbook runs on all inventory hosts
The playbook replaces the contents of /etc/issue with a single line of text as follows:
On hosts in the “dev” host group, the line reads: Development
On hosts in the “test” host group, the line reads: Test
On hosts in the “prod” host group, the line reads: Production
---
- name:hosts: allgather_facts: yesignore_errors: yesvars:var1:- group1: devissue1: Development- group2: testissue2: Test- group3: prodissue3: Productiontasks:- name:copy:content: "{{ item.issue1 }}"dest: /etc/issuewhen:- inventory_hostname in groups[ item.group1 | string ]loop: "{{ var1 }}"
3、Create and use a logical volume
Create a playbook called /home/student/ansible/lv.yml that runs on node1, node2, node3 and node4 that does the follows:
Create a logical volume with these requirements:
The logical volume is created in the “research” volume group
The logical volume name is “data”
The logical volume size is 1500 MiB
Formats the logical volume with the ext4 filesystem
Mounts the filesystem persistently at /data on hosts in the “qa” host group ONLY
If the requested logical volume size “cannot be created”
the error message “Could not create logical volume of that size” should be displayed and the size 800 MiB should be used instead
If the volume group research “does not exist”,
the error message “Volume group does not exist” should be displayed.
处理程序
处理程序可视为非活动任务,只有在使用notify语句调用时才会被触发。
notify+handlers
注:
1、handlers与tasks处于一个层次
2、notify后面是标记,并非变量
3、notify和handlers一一对应,通告notify定义handlers的name进行管理并调用
4、notify默认不会立即调用handlers,需要task全部执行结束后,handlers才会开始执行;如果需要立即触发之前所有的handlers,需要使用meta模块
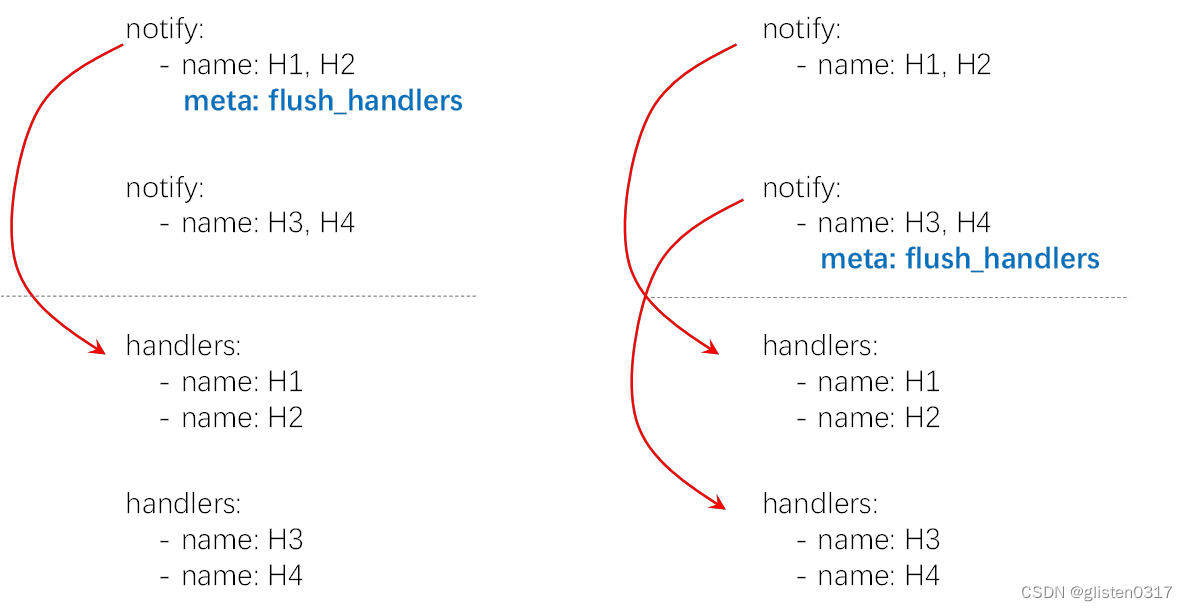
实验:在tasks中调用变量创建相应的文件夹及文件,然后通过处理程序写入内容
---
- name:hosts: devvars:var1:- my_dir: dir1my_file: file1my_content: This is file1- my_dir: dir2my_file: file2my_content: This is file2tasks:- name: Create directoryfile:path: "/home/devops/{{ item['my_dir'] }}"state: directorymode: '0755'loop: "{{ var1 }}"- name: Create files in directoryfile:path: "/home/devops/{{ item['my_dir] }}/{{ item['my_file'] }}"state: touchmode: '0766'loop: "{{ var1 }]"notify:- Add content into the file- Resultshandlers:- name: Add content into the filecopy:content: "{{ item['my_content'] }}"dest: "/home/devops/{{ item['my_dir'] }}/{{ item['my_file'] }}"loop: "{{ var1 }}"- name: Resultsdebug:msg: "All work is done"
实验:安装httpd程序,并通过处理程序启动、重启、停止
---
- name: install, start and restart httpdhosts: testgather_facts: novars:my_service:- httpdtasks:- name: install httpdyum:name: "{{ item }}"state: presentloop: "{{ my_service }}"notify:- start httpd now- restart httpd now- stop httpd nowhandlers:- name: start httpd nowservice:name: httpdstate: started- name: restart httpd nowservice:name: httpdstate: restarted- name: stop httpd nowservice:name: httpdstate: stopped
changed_when
使用register变量获取执行结果,可以取到不同的值,然后根据需要,通过changed_when和notify进行后续操作
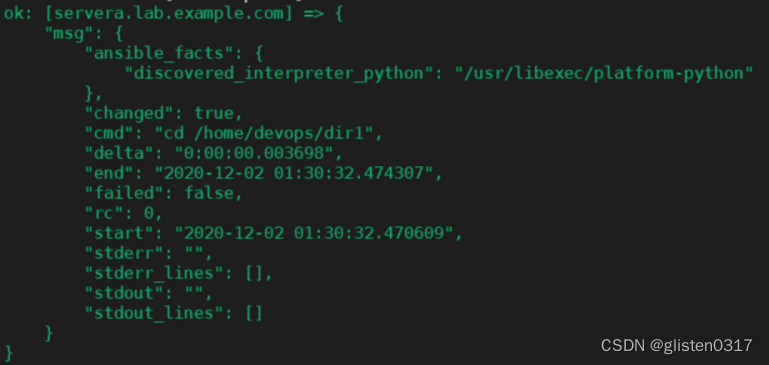
实验:如果进入目录成功,则打印msg
changed_when: command_result.changed相当于判断条件changed为true,也可以针对字符型的变量用包含等,比如重启某进程等
---
- name:hosts: devgather_facts: noignore_errors: yesvars:tasks:- name:shell:cmd: "cd /home/devops/dir1"register: command_resultchanged_when: command_result.changednotify:- reuslt printhandlers:- name: result printdebug:msg: " Command executing success! "
register变量获取的值如下
Ansible的块和错误处理
▪ block:要运行的重要任务
▪ rescue:要在block中的任务失败时运行的任务
▪ always:始终独立运行的任务,无论block和rescue中的任务是成功还是失败
可用于,比如在block中定义更新httpd软件,在rescue中定义回退httpd,然后在always中定义重启httpd服务
实验:在node1的sda上创建一个10G的分区,如果创建失败,改为创建4G大小的分区,无论哪种都格式化为ext4文件系统,并挂载到/mnt/ext4上
---
- name: CREATE PARTITION AND MAKE FILESYSTEMhosts: node1vars:tasks:- name: CREATE PARTITION AND MAKE FILESYSTEMblock:- name: CREATE 10GB PARTITIONparted:device: /dev/sdanumber: 2state: presentpart_start: 10GiBpart_end: 20GiBrescue:- name: CREATE 4GB PARTITIONparted:device: /dev/sdanumber: 2state: presentpart_start: 10GiBpart_end: 14GiBalways:- name: MAKE FILESYSTEM EXT4filesystem:fstype: ext4dev: /dev/sda2- name: CREATE DIRECTORYfile:path: /mnt/ext4state: directory- name: MOUNT FILESYSTEMmount:path: /mnt/ext4src: /dev/sda2fstype: ext4state: mounted
如果不会用控制任务,可以在/user/shar/ansible/roles下,grep -r when/loop .来查询相关的示例
修改的地方离代码执行区域越远越安全,最远的是文件,所以把部分变量等写在文件中,在修改时最不易出错
Chapter Ⅵ 在被管理节点上创建文件或目录
对文件或目录的常用操作
| 模块 | 说明 |
|---|---|
| copy | 从本地到被管机的操作 对单个文件 也可以讲内容复制到文件中(覆盖) |
| Synchronize | 支持文件和目录的上传和下载 围绕指令rsync(需安装rsync) |
| fetch | 与copy相反,相当于下载 |
| lineinfile | 修改文件内容 regexp:匹配的对象 line:替换的内容 regexp+insertbefore或regexp+insertafter:regexp匹配到时正常执行line的内容;未匹配到时,按照insert的匹配要求,在前或后一行插入line的内容 |
示例:修改apache端口为82
---
- name:hosts: allvars:tasks:- name: MODIFY APACHE PORTlineinfile:path: /etc/httpd/conf/httpd.confregex: '^#Listen 80'insertafter: '^#Listen 12.34.56.78:80'line: Listen 82

示例
delegate_to: servera
指定执行的主机,就算servera未在hosts中定义,也可以执行,且只在该主机上执行
---
- name:hosts: node1, node2vars: tasks:- name: INSTALL APACHEyum:name: httpdstate: presentdelegate_to: node3
JINJA2模板
○ 优势:
1、动态的引用变量
2、可以使用条件、循环语句
非常适合于做复杂的配置文件初始化
○ JINJA2语法规则:
1、变量的使用 {{ }}
2、判断、循环的使用 {% %}
{% if %}
{% endif %}{% for %}
{% endfor %}
3、注释的使用 {# #}
Chapter Ⅶ 管理大项目
ansible tower:web页面形式管理ansible,适用于大型项目管理
tower是付费的,免费版的是awx(搭建很麻烦,需要很多组件)
INVENTORY配置
一、静态配置
三种写法:
a、[]方式
mail.example.com[webservers]
foo.example.com
bar.example.com[dbservers]
one.example.com
two.example.com
three.example.com
b、等式写法
hostname dev=servera
c、JSON格式
all:hosts:mail.example.com:children:webservers:foo.example.com:bar.example.com:dbservers:one.example.com:two.example.com:three.example.com:
在编写inventory时候,可以使用通配符等方式:
1、通配符
- 匹配所有
[] 区间
2、逻辑关系
或用:
ansible "web1:web2" -m ping
非用!
webservers: !node3
与用&
webservers: &node3
- 3、正则(独立语法)
- 开始表示正则匹配
ansible "~(beta|web|green).example.(com|org)" -m ping
监测beta.example.com、web.example.com、green.example.com、beta.example.org、web.example.org、green.example.org主机的存活
ansible "~192.168.[0-9]{2}.[0-9]{2,}" -m ping
监测所有以192.168开头的主机存活
二、动态配置
使用python作为中间层,获取、处理数据(需要有Python基础)
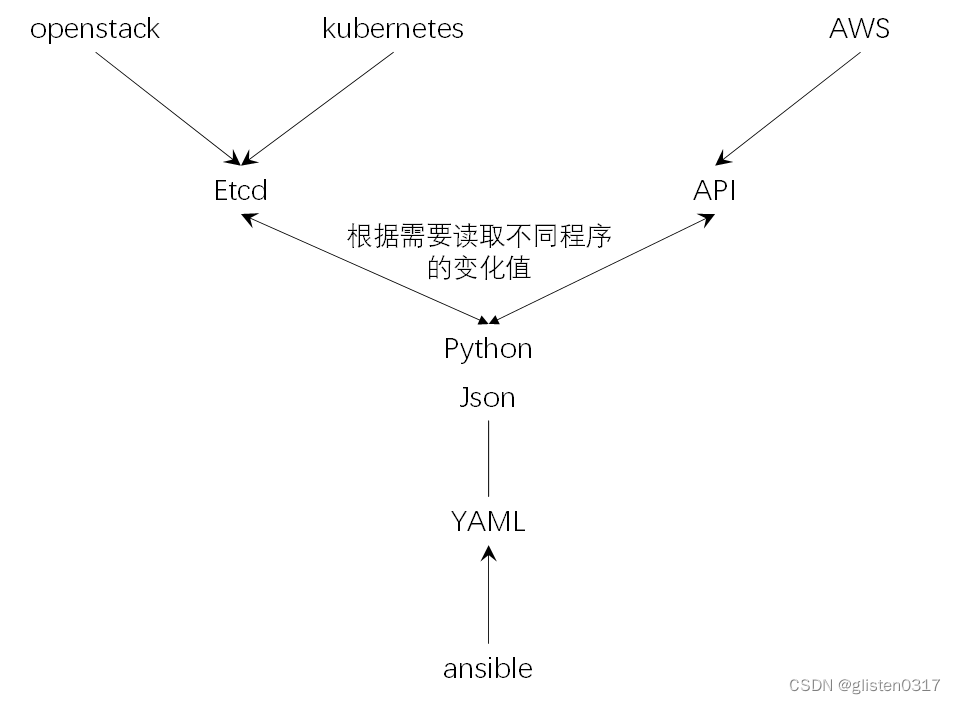
在使用YAML时,通过-i参数调用对应的python程序
ansible-playbook -I colletc.py test.yaml
ansible并发数
修改ansible.cfg中的fork,默认值为5
#forks = 5
一个fork一般会占用10-100MB的内存
滚动更新(分组执行)
https://docs.ansible.com/ansible/2.8/user_guide/playbooks_delegation.html#rolling-update-batch-size
将主机进行分组,每次以分组为单位进行执行
例如:10台机器,forks = 10(10台并发),serial = 2,执行顺序为2、2、1
- 固定模式:
- name: testhosts: allserial: 2
- 比率模式:
- name: testhosts: allserial: "30%"
- 阶梯模式:
- name: testhosts: allserial:- 1- 5- 10- name: testhosts: allserial:- "10%"- "20%"- "100%"- name: testhosts: allserial:- 1- 5- "20%"
通过最大失败率来控制任务什么时候停止
max_fail_percentage: 30
导入playbook
- playbook分级
1、导入playbook,可以用import和include(后续不再使用)
| import | include |
|---|---|
| 静态,在playbook被加载的时候就被展开,预处理 | 动态,在playbook运行时才被展开,实时处理 |
| 被导入的文件名不能使用动态变量替换 | 被导入的文件名可以使用任何变量替换 |
| 当对“import_tasks"使用when判断时,when对应的条件会应用于被导入的文件中每一个任务 | 当对“include_tasks"使用when判断时,when对应的条件只会应用于“include_tasks”任务本身 |
2、roles,类似于一个个小的项目,独立性更好,推荐优先使用
- 变量
分类管理
{ h o s t − v a r s g r o u p s − v a r s \left\{ \begin{matrix} host-vars \\ groups-vars \end{matrix} \right. {host−varsgroups−vars
Chapter Ⅷ 利用角色简化Playbook
https://galaxy.ansible.com
1、从网上下载:ansible-galaxy install
安装时可以使用-p参数指定安装位置,如果不过指定则由ansible.cfg中roles_path配置的内容作为默认位置
roles_path可以通过冒号分隔配置多个值,默认取第一个
/usr/share/ansible/roles,系统预设值的角色,yum install rhel-system-roles
/etc/ansible/roles,安装ansbile时所带
ansible-galaxy list 查看可使用的roles
2、自己编写role:ansible-galaxy init
外部yml调用的入口文件时tasks/main.yml,main.yml调用var、template的时候会自动去文件夹下寻找
vars/main.yml是自定义的变量
defaults/main.yml是自定义找不到的时候定义的变量
Ansible角色子目录
| 子目录 | 功能 |
|---|---|
| defaults | 变量的默认值,优先级低,会被其他覆盖 |
| files | 静态文件 |
| handlers | 处理程序定义 |
| meta | 一般写作者、许可证、平台等信息 |
| tasks | 主文件 |
| templates | Jinja2模板文件 |
| tests | 包含inventory和test.yml,用于测试 |
| vars | 变量值 |
roles的几种调用方法
1、role方式
roles:- role: apacheroles: - { role: foo, when: hostvars[ansible_hostname] }
2、列表方式
roles: - common- webservers
RHEL系统角色
| 名称 | 状态 | 角色描述 |
|---|---|---|
| rhel-system-roles.kdump | 全面支持 | 配置kdump崩溃恢复服务 |
| rhel-system-roles.network | 全面支持 | 配置网络接口 |
| rhel-system-roles.selinux | 全面支持 | 配置和管理SELinux自定义,包括SELinux模式、文件和端口上下文、布尔值设置,以及SELinux用户 |
| rhel-system-roles.timesync | 全面支持 | 使用网络时间协议或精确时间协议配置时间同步 |
| rhel-system-roles.postfix | 技术预览 | 使用Postfix服务将每个主机配置为邮件传输代理 |
| rhel-system-roles.firewall | 开发中 | 配置主机的防火墙 |
| rhel-system-roles.tuned | 开发中 | 配置tuned服务,以调优系统性能 |
tasks和roles一起使用,配置NTP时钟(系统角色)及时区(模块)
- name: Time Synchronization Playhosts: serversvars:timesync_ntp_servers:- hostname: 0.rhel.pool.ntp.orgiburst: yes- hostname: 1.rhel.pool.ntp.orgiburst: yes- hostname: 2.rhel.pool.ntp.orgiburst: yestimezone: UTCroles:- rhel-system-roles.timesynctasks:- name: Set timezonetimezone:name: "{{ timezone }}"
Chapter Ⅸ 对Ansible进行故障排除
【排错工具】
1、自带工具
语法检查: ansible-playbook --syntax-check
模拟执行: ansible-playbook --check/-C
打印详细: ansible-playbook -vvv
单步执行: ansible-playbook --step
指定执行: ansible-playbook --start-at-task(从指定的模块开始执行)
2、三方工具(推荐)
ansible-lint
yamllint
https://ansible-lint.readthedocs.io/en/latest/
pip3 install ansible-lint
打开日志
ansible.cfg

Chapter Ⅹ 自动执行Linux管理任务
yum模块
s t a t e { p r e s e n t :安装 l a t e s t :更新 state\left\{ \begin{matrix} present:安装 \\ latest:更新 \end{matrix} \right. state{present:安装latest:更新
导入gpgkey:rpm_key和yum_repository
- name: Deoploy the GPG public key By rpm_keyrpm_key:key: http://materials.example.com/yum/repository/RPM-GPG-KEY-examplestate: present
- name: Deoploy the GPG public key By yum_repositoryyum_repository:name: example-interneldescription: Example Inc.Internal YUM repobaseurl: http://materials.example.com/yum/repository/gpgkey: http://materials.example.com/yum/repository/RPM-GPG-KEY-exampleenabled: yesgpgcheck: yes
known_hosts模块
允许在被管主机上的known_hosts文件中添加或删除主机密钥
- name: copy host keys to remote serversknown_hosts:path: /etc/ssh/ssh_known_hostsname: user1key: "{{ lookup('file', 'pubkeys/user1') }}"
authorized_key模块
允许为各个用户账户添加或删除SSH授权密钥
- name: Set authorized keyauthorized_key:user: user1state: presentkey: "{{ lookup('file', '/home/user1/.ssh/id_rsa.pub') }}"
parted模块
| 参数名称 | 描述 |
|---|---|
| align | 配置分区对齐 |
| device | 块设备 |
| flags | 分区的标志 |
| number | 分区编号 |
| part_start | 分区开始位置 |
| part_end | 以parted支持单位指定的从磁盘开头开始的分区大小 |
| state | 创建或删除分区 |
| unit | 分区信息的大小单位 |
mount模块
state:
- present:只修改fstab文件,但不触发挂载行为
- mounted:既修改fstab文件,同时立刻触发挂载行为
nmcli模块
| 参数名称 | 描述 |
|---|---|
| conn_name | 配置连接名称 |
| autoconnect | 启用在引导时自动激活连接 |
| dns4 | 配置IPv4的DNS服务器(最多3个) |
| gw4 | 配置IPv4网关 |
| ifname | 要绑定到连接的接口 |
| ip4 | 接口的IPv4地址 |
| state | 启用或禁用该网络接口 |
| type | 设备或网络连接的类型 |
这篇关于RHCE学习笔记(RHEL8) - RH294的文章就介绍到这儿,希望我们推荐的文章对编程师们有所帮助!


