本文主要是介绍rt-thread(5.0版本)之sfud组件的使用问题记录(w25q128存储模块),希望对大家解决编程问题提供一定的参考价值,需要的开发者们随着小编来一起学习吧!
前言
- 记录一下5.0版本时使用官方推荐的函数与底层驱动存在的不兼容问题
相关宏定义
// -----------------------------SPI 组件
#define RT_USING_SPI
#define RT_USING_SFUD
#define RT_SFUD_USING_SFDP
#define RT_SFUD_USING_FLASH_INFO_TABLE
#define RT_SFUD_SPI_MAX_HZ 50000000
#define RT_DEBUG_SFUD
使用旧的api函数
硬件驱动(使用的SPI1)
//
// Created by shchl on 2024/3/20.
//
#include "board.h"
#ifdef RT_USING_SPI
/**
* @brief SPI MSP Initialization
* This function configures the hardware resources used in this example
* @param hspi: SPI handle pointer
* @retval None
*/
void HAL_SPI_MspInit(SPI_HandleTypeDef* hspi)
{GPIO_InitTypeDef GPIO_InitStruct = {0};if(hspi->Instance==SPI1){
#ifdef BSP_USING_SPI1/* USER CODE BEGIN SPI1_MspInit 0 *//* USER CODE END SPI1_MspInit 0 *//* Peripheral clock enable */__HAL_RCC_SPI1_CLK_ENABLE();__HAL_RCC_GPIOB_CLK_ENABLE();/**SPI1 GPIO ConfigurationPB3     ------> SPI1_SCKPB4     ------> SPI1_MISOPB5     ------> SPI1_MOSI*/GPIO_InitStruct.Pin = GPIO_PIN_3|GPIO_PIN_4|GPIO_PIN_5;GPIO_InitStruct.Mode = GPIO_MODE_AF_PP;GPIO_InitStruct.Pull = GPIO_NOPULL;GPIO_InitStruct.Speed = GPIO_SPEED_FREQ_VERY_HIGH;GPIO_InitStruct.Alternate = GPIO_AF5_SPI1;HAL_GPIO_Init(GPIOB, &GPIO_InitStruct);/* USER CODE BEGIN SPI1_MspInit 1 *//* USER CODE END SPI1_MspInit 1 */
#endif}}#endif
w25q128驱动组件
//
// Created by shchl on 2024/3/20.
//#include "board_w25q128.h"
#include "board.h"
#include "drv_spi.h"
#include "spi_flash_sfud.h"static int rt_hw_spi_flash_init(void) {if (RT_EOK != rt_hw_spi_device_attach("spi1", "spi10", GPIOB, GPIO_PIN_14)) {LOG_E("Failed to attach the spi device.");return -RT_ERROR;}if (RT_NULL == rt_sfud_flash_probe("W25Q128BV", "spi10")) {LOG_E("Failed to probe the W25Q128.");return -RT_ERROR;};return RT_EOK;
}/* 导出到自动初始化 */
INIT_COMPONENT_EXPORT(rt_hw_spi_flash_init);
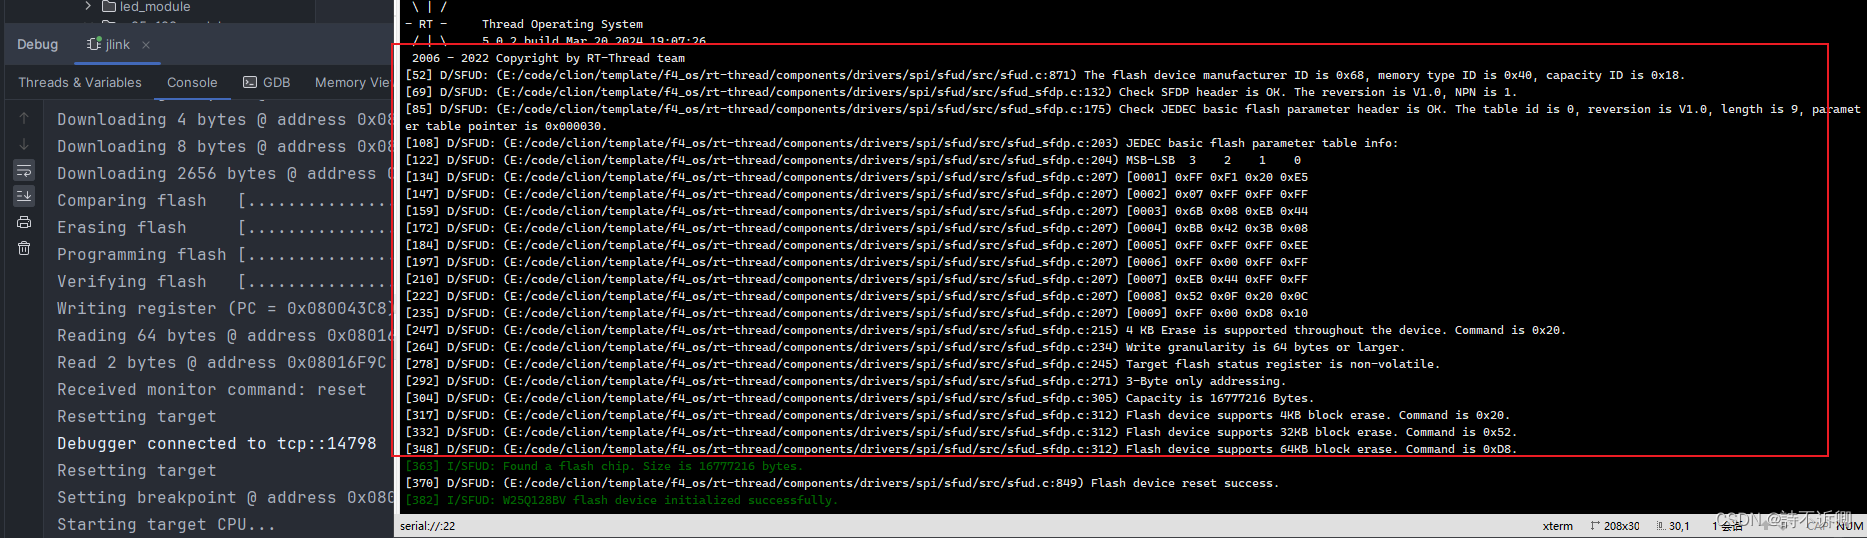
测试结果(ok)
使用5.0版本之后(官方推荐函数)
硬件驱动(同上)
w25q128驱动组件
//
// Created by shchl on 2024/3/20.
//#include "board_w25q128.h"
#include "board.h"
#include "drv_spi.h"
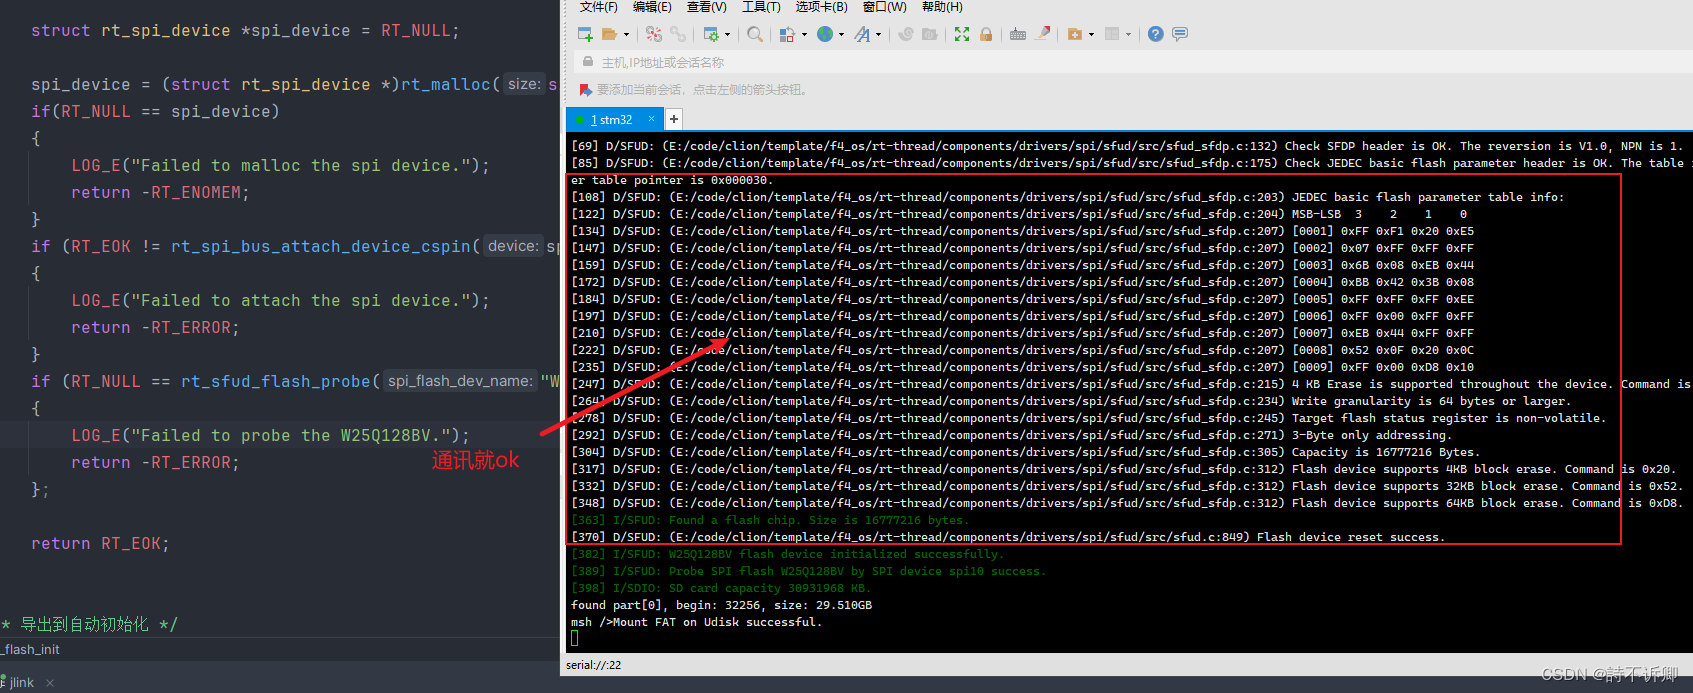
#include "spi_flash_sfud.h"static int rt_hw_spi_flash_init(void)
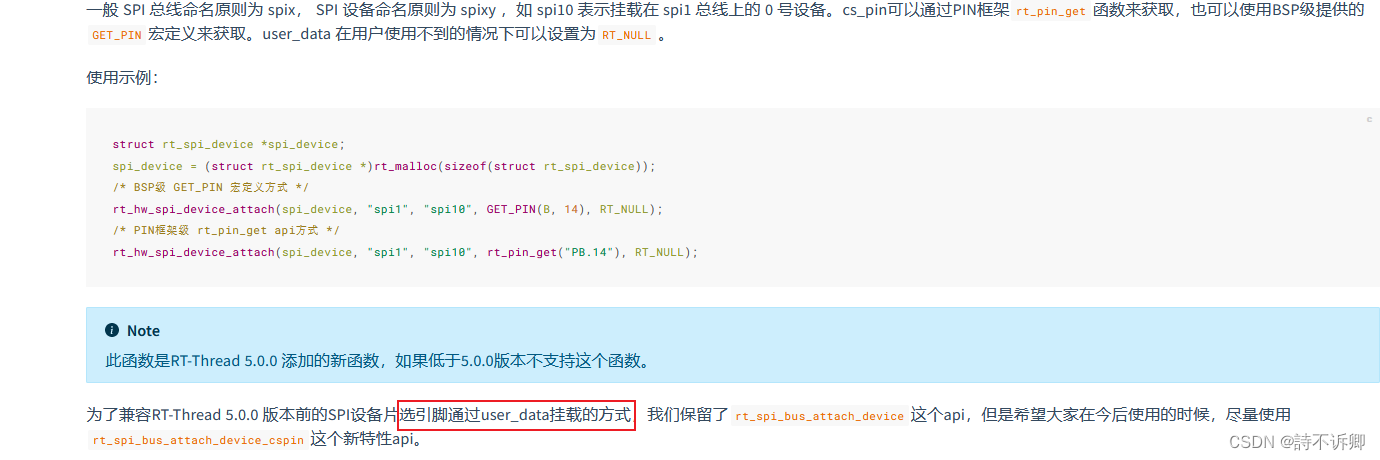
{struct rt_spi_device *spi_device = RT_NULL;spi_device = (struct rt_spi_device *)rt_malloc(sizeof(struct rt_spi_device));if(RT_NULL == spi_device){LOG_E("Failed to malloc the spi device.");return -RT_ENOMEM;}if (RT_EOK != rt_spi_bus_attach_device_cspin(spi_device, "spi10", "spi1",GET_PIN(B, 14), RT_NULL)){LOG_E("Failed to attach the spi device.");return -RT_ERROR;}if (RT_NULL == rt_sfud_flash_probe("W25Q128BV", "spi10")){LOG_E("Failed to probe the W25Q128BV.");return -RT_ERROR;};return RT_EOK;
}/* 导出到自动初始化 */
INIT_COMPONENT_EXPORT(rt_hw_spi_flash_init);
运行结果(出现错误)
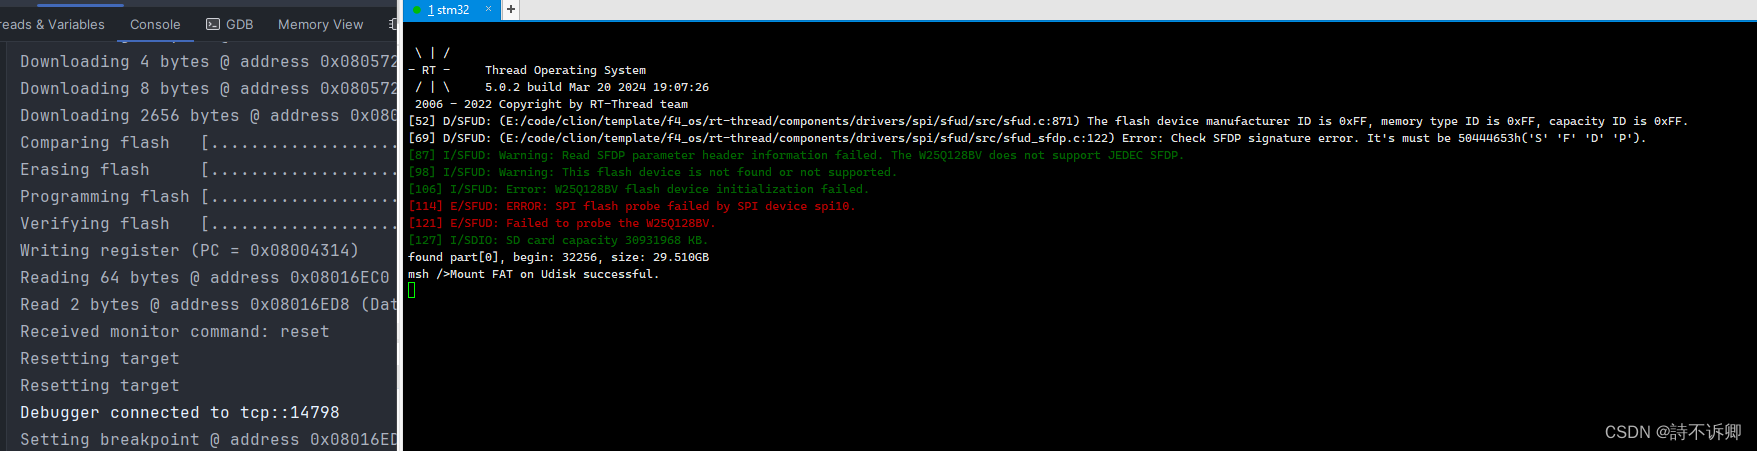
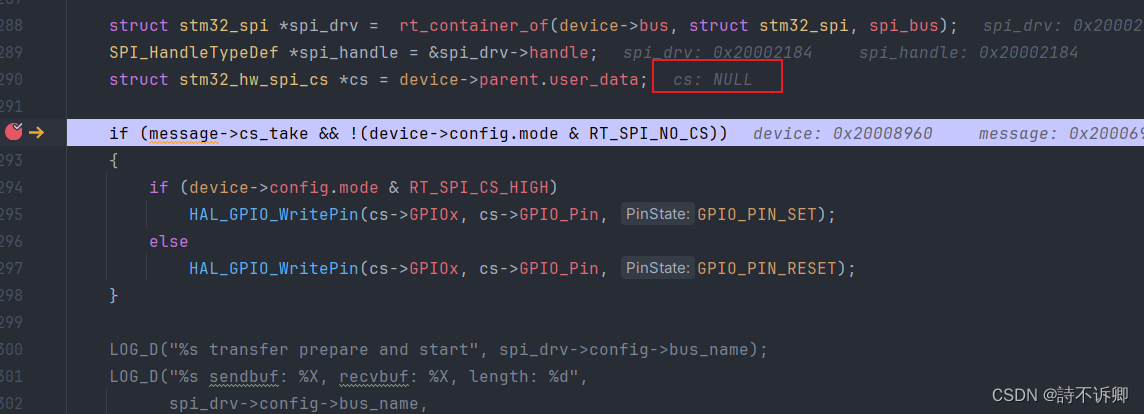
原因分析
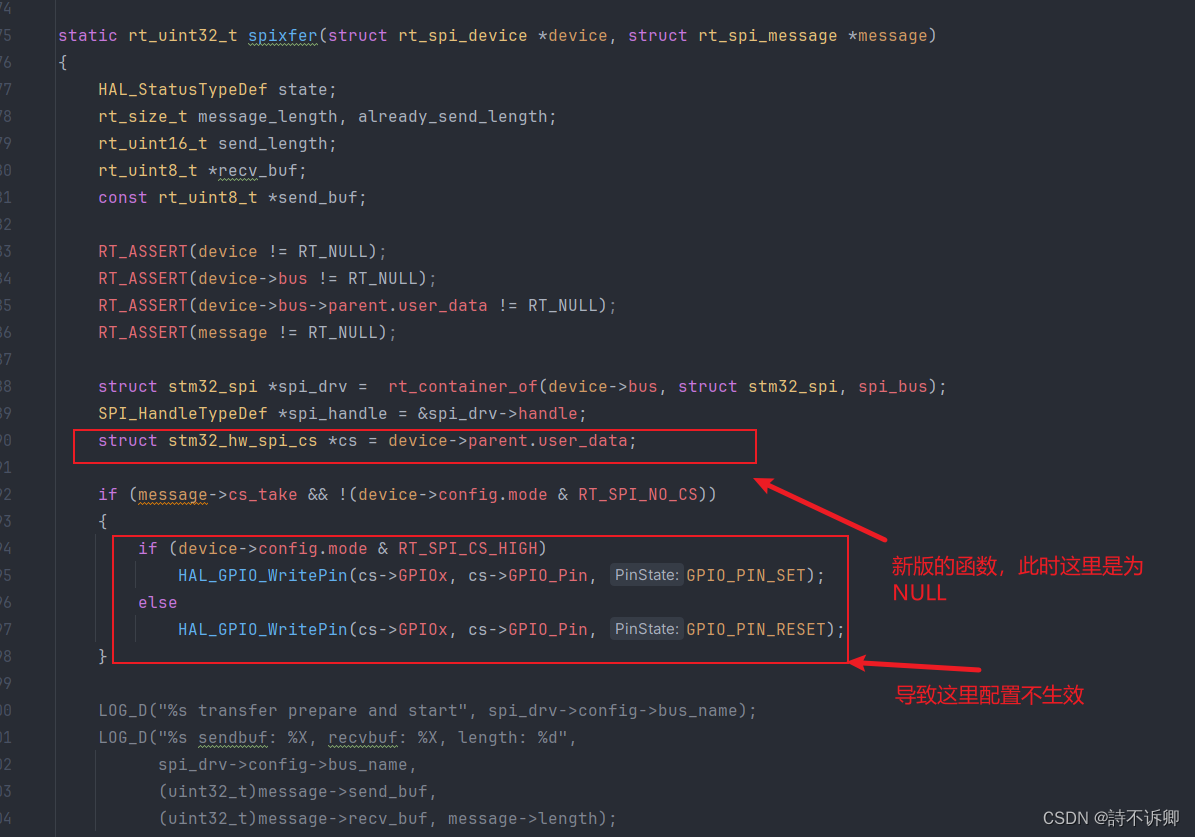
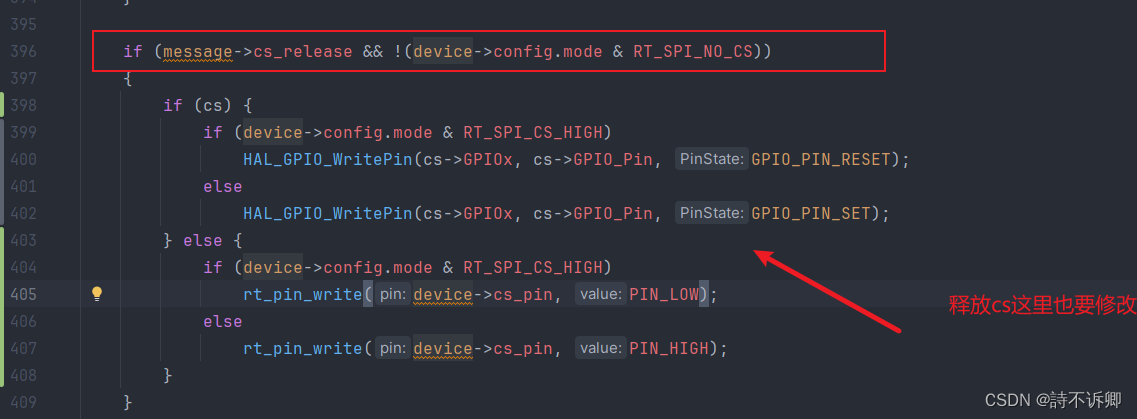
驱动调整(针对5.0版本,总共修改2处)
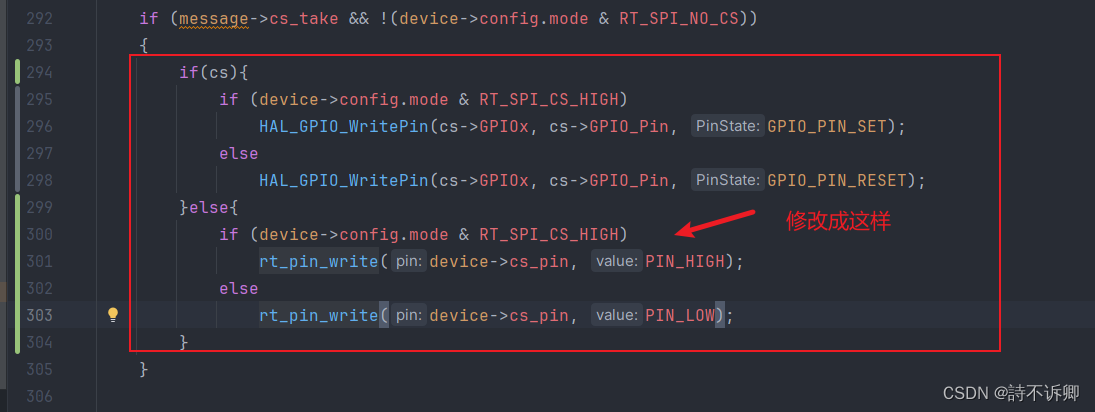
修改后的函数
static rt_uint32_t spixfer(struct rt_spi_device *device, struct rt_spi_message *message)
{HAL_StatusTypeDef state;rt_size_t message_length, already_send_length;rt_uint16_t send_length;rt_uint8_t *recv_buf;const rt_uint8_t *send_buf;RT_ASSERT(device != RT_NULL);RT_ASSERT(device->bus != RT_NULL);RT_ASSERT(device->bus->parent.user_data != RT_NULL);RT_ASSERT(message != RT_NULL);struct stm32_spi *spi_drv =  rt_container_of(device->bus, struct stm32_spi, spi_bus);SPI_HandleTypeDef *spi_handle = &spi_drv->handle;struct stm32_hw_spi_cs *cs = device->parent.user_data;if (message->cs_take && !(device->config.mode & RT_SPI_NO_CS)){if (cs) {if (device->config.mode & RT_SPI_CS_HIGH)HAL_GPIO_WritePin(cs->GPIOx, cs->GPIO_Pin, GPIO_PIN_SET);elseHAL_GPIO_WritePin(cs->GPIOx, cs->GPIO_Pin, GPIO_PIN_RESET);} else {if (device->config.mode & RT_SPI_CS_HIGH)rt_pin_write(device->cs_pin, PIN_HIGH);elsert_pin_write(device->cs_pin, PIN_LOW);}}LOG_D("%s transfer prepare and start", spi_drv->config->bus_name);LOG_D("%s sendbuf: %X, recvbuf: %X, length: %d",spi_drv->config->bus_name,(uint32_t)message->send_buf,(uint32_t)message->recv_buf, message->length);message_length = message->length;recv_buf = message->recv_buf;send_buf = message->send_buf;while (message_length){/* the HAL library use uint16 to save the data length */if (message_length > 65535){send_length = 65535;message_length = message_length - 65535;}else{send_length = message_length;message_length = 0;}/* calculate the start address */already_send_length = message->length - send_length - message_length;send_buf = (rt_uint8_t *)message->send_buf + already_send_length;recv_buf = (rt_uint8_t *)message->recv_buf + already_send_length;/* start once data exchange in DMA mode */if (message->send_buf && message->recv_buf){if ((spi_drv->spi_dma_flag & SPI_USING_TX_DMA_FLAG) && (spi_drv->spi_dma_flag & SPI_USING_RX_DMA_FLAG)){state = HAL_SPI_TransmitReceive_DMA(spi_handle, (uint8_t *)send_buf, (uint8_t *)recv_buf, send_length);}else{state = HAL_SPI_TransmitReceive(spi_handle, (uint8_t *)send_buf, (uint8_t *)recv_buf, send_length, 1000);}}else if (message->send_buf){if (spi_drv->spi_dma_flag & SPI_USING_TX_DMA_FLAG){state = HAL_SPI_Transmit_DMA(spi_handle, (uint8_t *)send_buf, send_length);}else{state = HAL_SPI_Transmit(spi_handle, (uint8_t *)send_buf, send_length, 1000);}if (message->cs_release && (device->config.mode & RT_SPI_3WIRE)){/* release the CS by disable SPI when using 3 wires SPI */__HAL_SPI_DISABLE(spi_handle);}}else{memset((uint8_t *)recv_buf, 0xff, send_length);if (spi_drv->spi_dma_flag & SPI_USING_RX_DMA_FLAG){state = HAL_SPI_Receive_DMA(spi_handle, (uint8_t *)recv_buf, send_length);}else{/* clear the old error flag */__HAL_SPI_CLEAR_OVRFLAG(spi_handle);state = HAL_SPI_Receive(spi_handle, (uint8_t *)recv_buf, send_length, 1000);}}if (state != HAL_OK){LOG_I("spi transfer error : %d", state);message->length = 0;spi_handle->State = HAL_SPI_STATE_READY;}else{LOG_D("%s transfer done", spi_drv->config->bus_name);}/* For simplicity reasons, this example is just waiting till the end of thetransfer, but application may perform other tasks while transfer operationis ongoing. */while (HAL_SPI_GetState(spi_handle) != HAL_SPI_STATE_READY);}if (message->cs_release && !(device->config.mode & RT_SPI_NO_CS)){if (cs) {if (device->config.mode & RT_SPI_CS_HIGH)HAL_GPIO_WritePin(cs->GPIOx, cs->GPIO_Pin, GPIO_PIN_RESET);elseHAL_GPIO_WritePin(cs->GPIOx, cs->GPIO_Pin, GPIO_PIN_SET);} else {if (device->config.mode & RT_SPI_CS_HIGH)rt_pin_write(device->cs_pin, PIN_LOW);elsert_pin_write(device->cs_pin, PIN_HIGH);}}return message->length;
}
测试结果
这篇关于rt-thread(5.0版本)之sfud组件的使用问题记录(w25q128存储模块)的文章就介绍到这儿,希望我们推荐的文章对编程师们有所帮助!


