本文主要是介绍andrid实践项目四-对话框Dialog的各种用法,希望对大家解决编程问题提供一定的参考价值,需要的开发者们随着小编来一起学习吧!
先来个简单的列子熟悉dialog是如何创建使用的
老规矩 先看dailog的继承关系
java.lang.Objectandroid.app.Dialogdialog是直接继承object 与view没有半毛钱关系。
一。先来看看最常见的dialog,也就是AlertDialog(警告框),alertdialog是非阻塞式的。
public class AlertDialogtest extends Activity {@Overrideprotected void onCreate(Bundle savedInstanceState) {// TODO Auto-generated method stubsuper.onCreate(savedInstanceState);setContentView(R.layout.dailog);Button btn1=(Button) findViewById(R.id.btn1);btn1.setOnClickListener(new OnClickListener() {@Overridepublic void onClick(View v) {// TODO Auto-generated method stubDialog();}});}public void Dialog(){AlertDialog.Builder bulider = new AlertDialog.Builder(this);bulider.setIcon(R.drawable.ic_launcher);bulider.setMessage("你什么时候回寝室");bulider.setTitle("标准对话框");bulider.setCancelable(false);// 设置是否可以取消对话框//bulider.setPositiveButton("取消", new DialogInterface.OnClickListener() {@Overridepublic void onClick(DialogInterface dialog, int which) {// TODO Auto-generated method stub}});// 设置及其按钮bulider.setNegativeButton("取消", new DialogInterface.OnClickListener() {@Overridepublic void onClick(DialogInterface dialog, int which) {// TODO Auto-generated method stub}});AlertDialog dialog = bulider.create();dialog.show();}}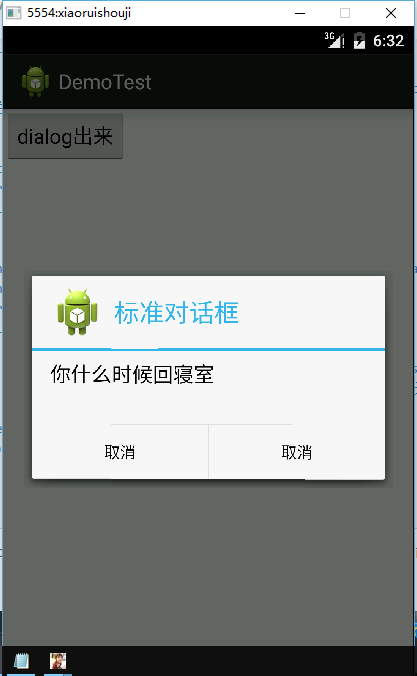
代码逻辑还是很清楚的,设置button的点击事件。然后再写个dialog方法构建一个alretdialog。构建dialog时一定要引用builder
AlertDialog.Builder bulider = new AlertDialog.Builder(this);
builder.set~***
builder.set~***//这几句话都是用来设置dialog的属性
builder.set~***
然后用builder.creat();和builder.show();将builder显示出来。
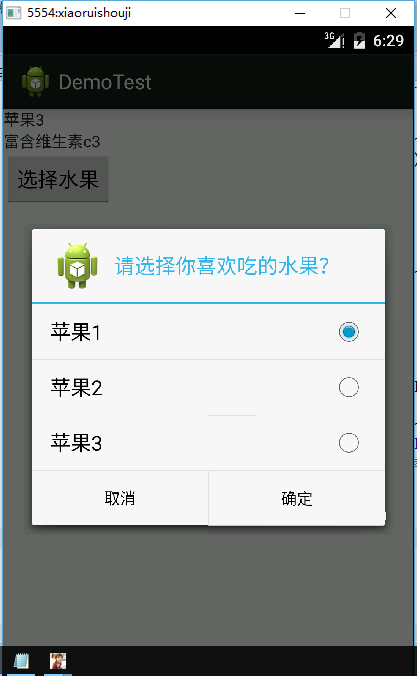
再来设置一个类似listview 风格的alertdialog
代码如下
public class AlertDialogtest2 extends Activity {private TextView text1;private TextView text2;private String[] data = { "苹果1", "苹果2", "苹果3", };private String[] datadetails = { "富含维生素c1", "富含维生素c2", "富含维生素c3", };private int NUM = 0;@Overrideprotected void onCreate(Bundle savedInstanceState) {// TODO Auto-generated method stubsuper.onCreate(savedInstanceState);setContentView(R.layout.dailog2);text1 = (TextView) findViewById(R.id.mych);text2 = (TextView) findViewById(R.id.mytext);Button btn1 = (Button) findViewById(R.id.btn1);btn1.setOnClickListener(new OnClickListener() {@Overridepublic void onClick(View v) {// TODO Auto-generated method stubDialog();}});}public void Dialog() {Dialog dialog = new AlertDialog.Builder(AlertDialogtest2.this).setIcon(R.drawable.ic_launcher).setTitle("请选择你喜欢吃的水果?").setPositiveButton("确定", new DialogInterface.OnClickListener() {@Overridepublic void onClick(DialogInterface dialog, int which) {text1.setText(data[NUM]);}}).setNegativeButton("取消", new DialogInterface.OnClickListener() {@Overridepublic void onClick(DialogInterface dialog, int which) {}}).setSingleChoiceItems(AlertDialogtest2.this.data, 0, new DialogInterface.OnClickListener() {// setSingleChoiceItems()方法@Overridepublic void onClick(DialogInterface dialog, int which) {text2.setText(datadetails[which]);NUM = which; // 保存选项的索引}}).create();dialog.show();}}相比之前的标准框多了一个setSingleChoiceItems()方法,其中which指定了当前选择的是那一项。
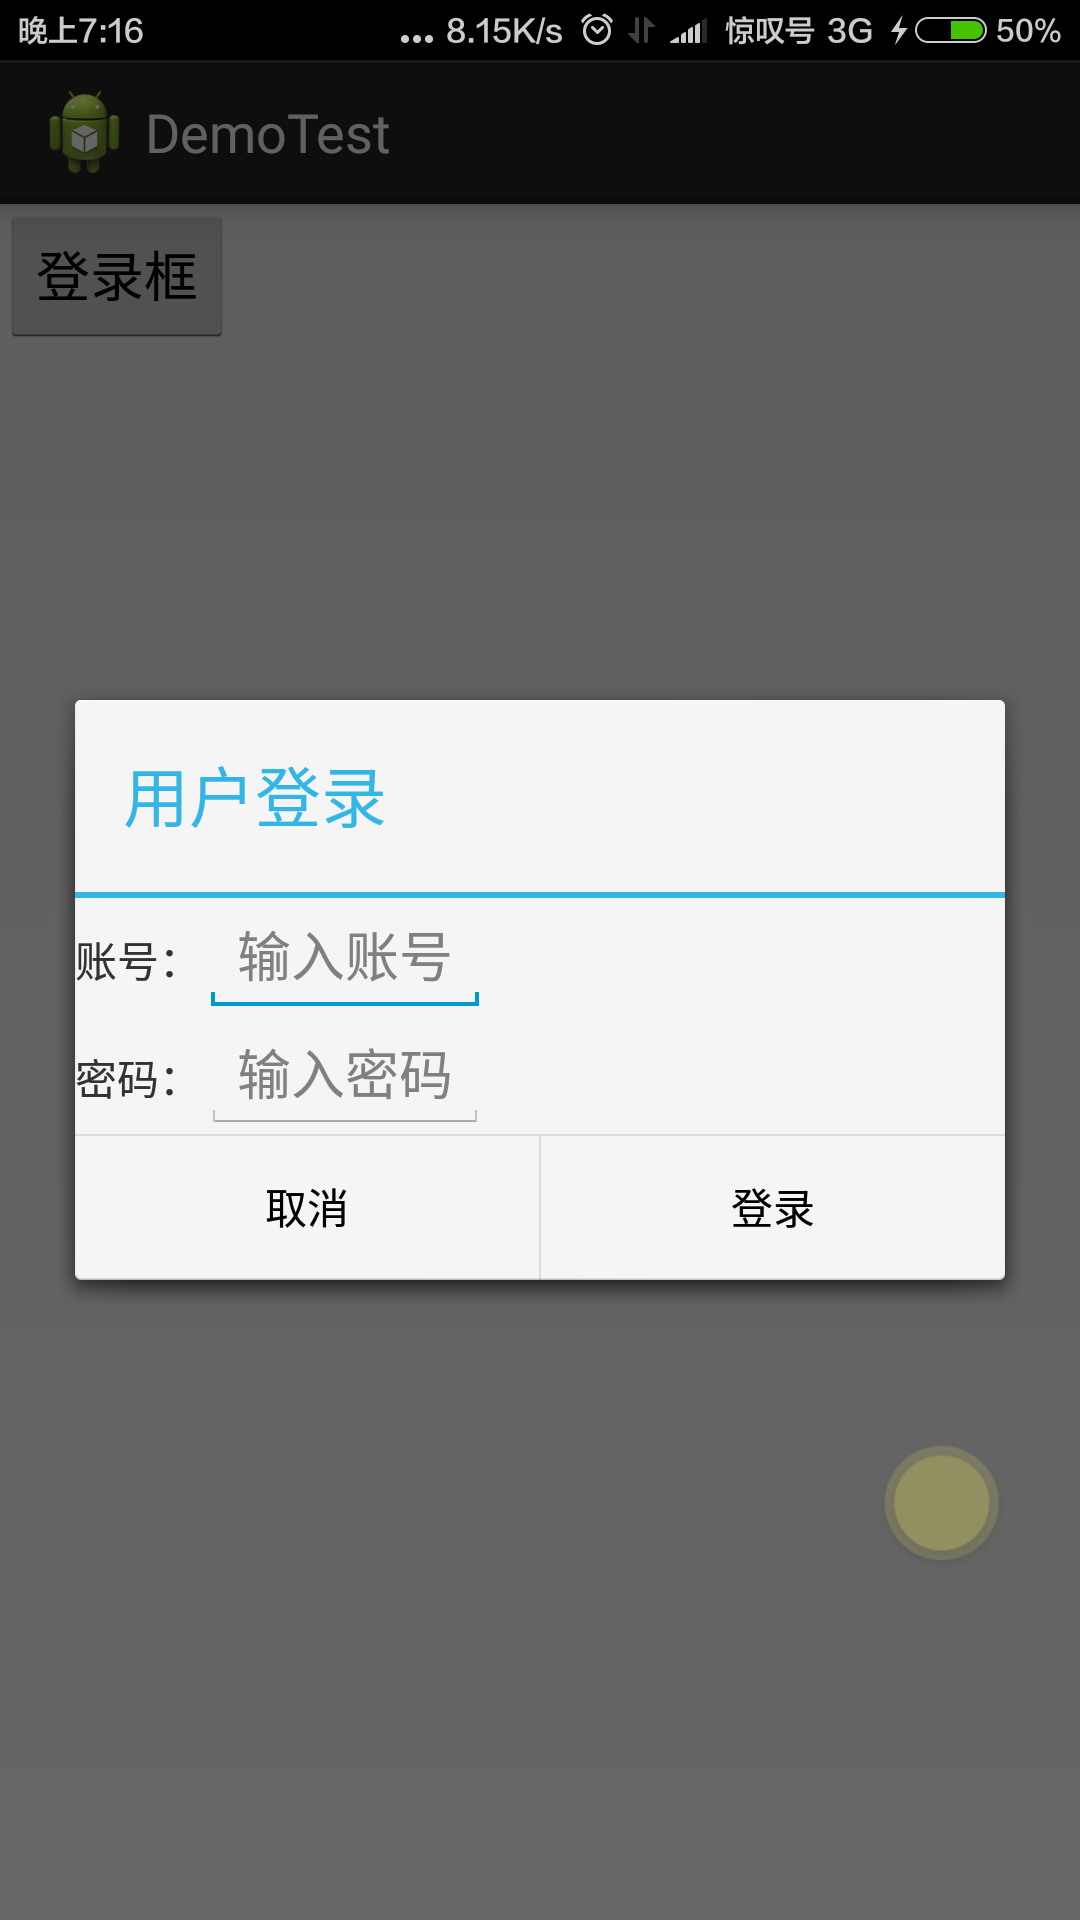
DIY登录框和LayoutInflater
先写布局文件xml 只需要一个按钮就行了
然后写要引入的弹出框的布局文件login.xml
<LinearLayout xmlns:android="http://schemas.android.com/apk/res/android"xmlns:tools="http://schemas.android.com/tools"android:layout_width="match_parent"android:layout_height="match_parent"android:orientation="vertical"tools:context="com.example.demotest.MainActivity" ><LinearLayout
        android:layout_width="wrap_content"android:layout_height="wrap_content"android:orientation="horizontal" ><TextView
            android:layout_width="wrap_content"android:layout_height="wrap_content" android:text="账号:"/><EditText
            android:id="@+id/edtlogin"android:layout_width="0dp"android:layout_height="wrap_content"android:layout_weight="1000"android:hint="输入账号" /></LinearLayout><LinearLayout
        android:layout_width="wrap_content"android:layout_height="wrap_content"android:orientation="horizontal" ><TextView
            android:layout_width="wrap_content"android:layout_height="wrap_content"android:text="密码:" /><EditText
            android:id="@+id/edtpassword"android:layout_width="0dp"android:layout_height="wrap_content"android:layout_weight="1000"android:hint="输入密码" /></LinearLayout></LinearLayout>``````
在builder alertdialog 的时候引入一句就可以导入登录布局了
.setView(R.layout.login)
然后验证登陆的代码如下
public class AlertDialogtest3 extends Activity {private EditText edt1;private EditText edt2;private String string_userString;private String string_passwdString;@Overrideprotected void onCreate(Bundle savedInstanceState) {// TODO Auto-generated method stubsuper.onCreate(savedInstanceState);setContentView(R.layout.dailog3);Button btn1 = (Button) findViewById(R.id.btn1);btn1.setOnClickListener(new OnClickListenerImpl());}private class OnClickListenerImpl implements OnClickListener{ @Override public void onClick(View v) { LayoutInflater layoutInflater=LayoutInflater.from(AlertDialogtest3.this);//获得layoutInflater对象 View view=layoutInflater.from(AlertDialogtest3.this).inflate(R.layout.login, null);//获得view对象 EditText edit_user=(EditText)view.findViewById(R.id.edtlogin);//获取控件 EditText edit_passwd=(EditText)view.findViewById(R.id.edtpassword); //拿到输入的账号密码 string_userString=edit_user.getText().toString(); string_passwdString=edit_passwd.getText().toString(); Dialog dialog=new AlertDialog.Builder(AlertDialogtest3.this).setTitle("用户登录").setView(view).setPositiveButton("登录", new DialogInterface.OnClickListener() { public void onClick(DialogInterface dialog, int which) { if(string_userString.equals("admin")&&string_passwdString.equals("4011")){ Toast.makeText(AlertDialogtest3.this, "登录成功", Toast.LENGTH_SHORT).show(); }else{ Toast.makeText(AlertDialogtest3.this, "登录失败", Toast.LENGTH_SHORT).show(); } } }).setNegativeButton("取消", new DialogInterface.OnClickListener() { @Override public void onClick(DialogInterface dialog, int which) { // 取消按钮事件 } }).create(); dialog.show(); } } 拿到输入的账号密码 ,那是个坑。有兴趣的自己把gettext()换个位置试试……
这篇关于andrid实践项目四-对话框Dialog的各种用法的文章就介绍到这儿,希望我们推荐的文章对编程师们有所帮助!


