本文主要是介绍每篇半小时1天入门MongoDB——4.MongoDB索引介绍及数据库命令操作,希望对大家解决编程问题提供一定的参考价值,需要的开发者们随着小编来一起学习吧!
准备工作
继续连接到mongo
C:\Users\zouqi>mongo
MongoDB shell version: 3.0.7
connecting to: test
查看数据库和集合
> show dbs
demo        0.078GB
local       0.078GB
myDatabase  0.078GB
myTest      0.078GB
> use myTest
switched to db myTest
> show collections
persons
system.indexes
创建简单索引
数据准备,在CMD命令窗口中输入如下初始化脚本:
for(var i=0;i<200000;i++){db.books.insert({number:i,name:"book"+i})}
1、先检查一下查询性能
执行如下脚本:
var start=new Date()
db.books.find({number:20540})
var end=new Date()
end - start
> db.books.find({number:20540})
{ "_id" : ObjectId("5953c63a797216100b773acb"), "number" : 20540, "name" : "book20540" }
> var start=new Date()
> db.books.find({number:20540})
{ "_id" : ObjectId("5953c63a797216100b773acb"), "number" : 20540, "name" : "book20540" }
> var end=new Date()
> end - start
110
2、为number创建索引
(1代表升序,-1代表降序),在创建索引的时候,由于数据量比较大,会比较耗时,我们会看到执行创建索引脚本的时候,光标会有一定的延时。
> db.books.ensureIndex({number:1})
{"createdCollectionAutomatically" : false,"numIndexesBefore" : 1,"numIndexesAfter" : 2,"ok" : 1
}
>
3、再执行第一步的代码可以看出有数量级的性能提升
> var start=new Date()
> db.books.find({number:20540})
{ "_id" : ObjectId("5953c63a797216100b773acb"), "number" : 20540, "name" : "book20540" }
> var end=new Date()
> end - start
15
>
之前耗时是110毫秒,创建索引号耗时是15毫秒。
索引使用需要注意的地方
- 创建索引的时候要注意后面参数:1是正序 -1是倒序
- 索引的创建在提高查询性能的同时会影响插入的性能,对于经常查询少超入的文档可以考虑用索引。
- 组合索引要注意索引的先后顺序
- 每个键都创建索引不一定就能够提高性能
- 在做排序工作的时候,如果是超大数据量也是可以考虑加上索引用来提高排序的性能。
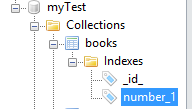
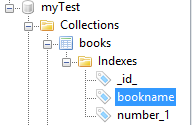
索引的名称可以用MongoVUE来查看

创建索引的同时我们还可以指定索引的名字
db.booksensureIndex({name:1},{name:"bookname")

4、唯一索引
如何解决文档books不能插入重复的数值?建立唯一索引
db.books.ensureIndex({name:-1},{unique:true}) 测试:db.books.insert({name:"hello"})
运行结果如下:
> db.books.insert({name:"hello"})
WriteResult({ "nInserted" : 1 })
> db.books.insert({name:"hello"})
WriteResult({"nInserted" : 0,"writeError" : {"code" : 11000,"errmsg" : "E11000 duplicate key error index: myTest.books.$name_-1 dup key: { : \"hello\" }"}
})
>
5、删除重复值
如果创建唯一索引之前已经存在重复数值该如何处理
db.books.ensureIndex({name:-1},{unique:true,dropDups:true}) 6.Hint
如何强制查询使用指定的索引?
db.books.find({name:"hello",number:1}).hint({name:-1}) 注意:指定索引必须是已经创建了的索引
7、Expain
如何详细查看本次查询使用哪个索引和查询数据的状态信息
db.books.find({name:"hello"}).explain()
> db.books.find({name:"hello"}).explain()
{"queryPlanner" : {"plannerVersion" : 1,"namespace" : "myTest.books","indexFilterSet" : false,"parsedQuery" : {"name" : {"$eq" : "hello"}},"winningPlan" : {"stage" : "FETCH","inputStage" : {"stage" : "IXSCAN","keyPattern" : {"name" : 1},"indexName" : "bookname","isMultiKey" : false,"direction" : "forward","indexBounds" : {"name" : ["[\"hello\", \"hello\"]"]}}},"rejectedPlans" : [{"stage" : "FETCH","inputStage" : {"stage" : "IXSCAN","keyPattern" : {"name" : -1},"indexName" : "name_-1","isMultiKey" : false,"direction" : "forward","indexBounds" : {"name" : ["[\"hello\", \"hello\"]"]}}}]},"serverInfo" : {"host" : "DESKTOP-V7CFIC3","port" : 27017,"version" : "3.0.7","gitVersion" : "6ce7cbe8c6b899552dadd907604559806aa2e9bd"},"ok" : 1
}
索引管理
1、system.indexes
在shell查看数据库中已经建立的索引
db.system.indexes.find()
> db.system.indexes.find()
{ "v" : 1, "key" : { "_id" : 1 }, "name" : "_id_", "ns" : "myTest.persons" }
{ "v" : 1, "key" : { "_id" : 1 }, "name" : "_id_", "ns" : "myTest.books" }
{ "v" : 1, "key" : { "number" : 1 }, "name" : "number_1", "ns" : "myTest.books" }
{ "v" : 1, "key" : { "name" : 1 }, "name" : "bookname", "ns" : "myTest.books" }
{ "v" : 1, "unique" : true, "key" : { "name" : -1 }, "name" : "name_-1", "ns" : "myTest.books" }
>
db.system.namespaces.find()
> db.system.namespaces.find()
{ "name" : "myTest.system.indexes" }
{ "name" : "myTest.persons" }
{ "name" : "myTest.persons.$_id_" }
{ "name" : "myTest.books" }
{ "name" : "myTest.books.$_id_" }
{ "name" : "myTest.books.$number_1" }
{ "name" : "myTest.books.$bookname" }
{ "name" : "myTest.books.$name_-1" }
>
2、后台执行
执行创建索引的过程中会暂时锁表,此问题如何解决?
为了不影响查询,我们可以让索引的创建过程在后台执行
db.books.ensureIndex({number:1},{background:true})
3、删除索引
批量和精确删除索引
db.runCommand({dropIndexes:"books",index:"name_-1"})
> db.runCommand({dropIndexes:"books",index:"name_-1"})
{ "nIndexesWas" : 4, "ok" : 1 }
> db.system.indexes.find()
{ "v" : 1, "key" : { "_id" : 1 }, "name" : "_id_", "ns" : "myTest.persons" }
{ "v" : 1, "key" : { "_id" : 1 }, "name" : "_id_", "ns" : "myTest.books" }
{ "v" : 1, "key" : { "number" : 1 }, "name" : "number_1", "ns" : "myTest.books" }
{ "v" : 1, "key" : { "name" : 1 }, "name" : "bookname", "ns" : "myTest.books" }
>
db.runCommand({dropIndexes:"books",index:"*"})
> db.runCommand({dropIndexes:"books",index:"*"})
{"nIndexesWas" : 3,"msg" : "non-_id indexes dropped for collection","ok" : 1
}
> db.system.indexes.find()
{ "v" : 1, "key" : { "_id" : 1 }, "name" : "_id_", "ns" : "myTest.persons" }
{ "v" : 1, "key" : { "_id" : 1 }, "name" : "_id_", "ns" : "myTest.books" }
>
Count&Distinct&Group
1、Count
请查询persons中美国学生的人数
db.persons.find({country:"USA"}).count()
2、Distinct
请查询出persons中一共有多少个国家分别是什么
db.runCommand({distinct:"persons",key:"country"}).values
3、Group
语法:
db.runCommand({group:{
ns:集合名称,
Key:分组的键对象,
Initial:初始化累加器,
$reduce:组分解器,
Condition:条件,
Finalize:组玩传奇
}})
分组首先会按照key进行分组,每组的每一个文档都要执行$reduce的方法,它接收2个参数,一个是组内本条记录,一个是累加器数据。
请查出persons中每隔国家学生数学成绩最好的学生信息(必须在90分以上)
db.runCommand({group:{
ns:"persons",
key:{"country":true},
initial:{m:0},
$reduce:function(doc,prev){
if(doc.m>prev.m){
prev.m=doc.m;
prev.name=doc.name;
prev.country=doc.country;
}
},
condition:{m:{$gt:90}}
}})
在上面实例的基础之上把每个人的信息连接起来写一个描述赋值到m上
finalize:function(prev){
prev.m=prev.name+"Math scores"+prev.m
}
数据库命令操作
1、用命令执行一次删除表操作
db.runCommand({drop:"map"}) 2、如何查询mongoDB为我们提供额命令
db.listCommands()
3、常用命令举例
查询服务器版本号和主机操作系统
db.runCommand({buildInfo:1}) 查询执行集合的详细信息,大小、空间、索引等
db.runCommand({collStats:"persons"}) 查看操作本集合最后一次错误信息
db.runCommand({getLastError:"persons"}) 本文转自邹琼俊博客园博客,原文链接:http://www.cnblogs.com/jiekzou/p/7092158.html,如需转载请自行联系原作者
这篇关于每篇半小时1天入门MongoDB——4.MongoDB索引介绍及数据库命令操作的文章就介绍到这儿,希望我们推荐的文章对编程师们有所帮助!


