本文主要是介绍专治Java底子差,线程操作篇(1),希望对大家解决编程问题提供一定的参考价值,需要的开发者们随着小编来一起学习吧!
💗推荐阅读文章💗
- 🌸JavaSE系列🌸👉1️⃣《JavaSE系列教程》
- 🌺MySQL系列🌺👉2️⃣《MySQL系列教程》
- 🍀JavaWeb系列🍀👉3️⃣《JavaWeb系列教程》
- 🌻SSM框架系列🌻👉4️⃣《SSM框架系列教程》
🎉本博客知识点收录于🎉👉🚀《JavaSE系列教程》🚀—>✈️12【多线程、锁机制、lock锁】✈️
视频配套教程:https://www.bilibili.com/video/BV1ia4y1k75v/?p=12
文章目录
2.3 线程的操作
2.3.1 线程的休眠
public static void sleep(long millis):让当前线程睡眠指定的毫秒数
测试代码:
package com.dfbz.demo02_线程的操作;/*** @author lscl* @version 1.0* @intro:*/
public class Demo01_线程的休眠 {public static void main(String[] args) {Thread t1 = new Thread(() -> {for (int i = 0; i < 100; i++) {// 如果线程休眠了,会把CPU的执行权限让出来try {Thread.sleep(100);} catch (InterruptedException e) {throw new RuntimeException(e);}System.out.println("t1...");}});t1.start();for (int i = 0; i < 100; i++) {try {Thread.sleep(100);} catch (InterruptedException e) {throw new RuntimeException(e);}System.out.println("main...");}}
}
在JDK1.5推出了TimeUnit类,该类可以根据时间单位来对线程进行睡眠操作;
示例代码:
public static void main(String[] args) {Thread t1 = new Thread(() -> {for (int i = 0; i < 100; i++) {try {// 睡眠1sTimeUnit.SECONDS.sleep(1);} catch (InterruptedException e) {throw new RuntimeException(e);}System.out.println("t1...");}});t1.start();for (int i = 0; i < 100; i++) {try {// 睡眠1sTimeUnit.SECONDS.sleep(1);} catch (InterruptedException e) {throw new RuntimeException(e);}System.out.println("main...");}
}
2.3.2 线程的加入
多条线程时,当指定线程调用join方法时,线程执行权交给该线程,必须等到调用join方法的线程执行完全部任务后才会释放线程的执行权,其他线程才有可能争抢到线程执行权;
public final void join():让调用join方法的线程在当前线程优先执行,直至调用join方法的线程执行完毕时,再执行本线程;public final void join(long millis):让线程执行millis毫秒,然后将线程执行权抛出,给其他线程争抢
1) join方法示例
【示例代码】:
package com.dfbz.demo02_线程的操作;/*** @author lscl* @version 1.0* @intro:*/
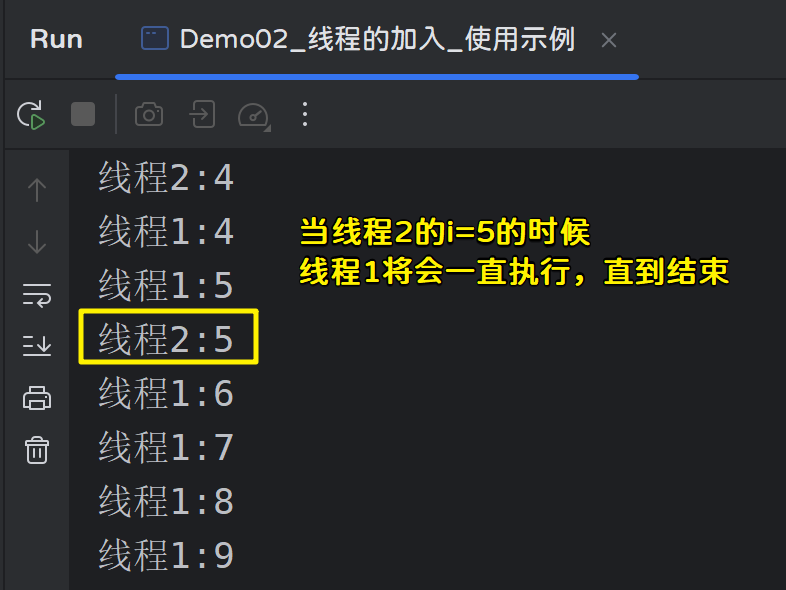
public class Demo02_join_使用示例 {public static void main(String[] args) {//创建线程1Thread t1 = new Thread(new Runnable() {@Overridepublic void run() {for (int i = 0; i < 1000; i++) {System.out.println("线程1:" + i);try {Thread.sleep(500);} catch (InterruptedException e) {e.printStackTrace();}}}});//创建线程2Thread t2 = new Thread(new Runnable() {@Overridepublic void run() {for (int i = 0; i < 1000; i++) {System.out.println("线程2:" + i);try {Thread.sleep(500);} catch (InterruptedException e) {e.printStackTrace();}if (i == 5) {try {//当i等于5的时候,让t1线程加入执行,直至执行完毕t1.join();//当i等于500的时候,让t1线程加入执行,执行10毫秒之后交出执行权
// t1.join(10);} catch (InterruptedException e) {e.printStackTrace();}}}}});t1.start();t2.start();}
}
执行效果:
2) join方法的应用场景
【join方法小案例】:
static int num = 0;
public static void main(String[] args) {Thread t1 = new Thread() {@Overridepublic void run() {try {Thread.sleep(10);} catch (InterruptedException e) {e.printStackTrace();}num=10;}};t1.start();System.out.println(num);            // ?
}
我们在main线程中开启了一个新的线程(t1),t1线程对num进行赋值,然后在main线程中进行打印,很显然num的值为0,因为t1线程的阻塞不会让main线程也阻塞,当t1线程阻塞时,main线程会继续往下执行;
【使用join方法改造】:
package com.dfbz.demo02_线程的操作;/*** @author lscl* @version 1.0* @intro:*/
public class Demo03_join_应用场景 {static int num = 0;// 使用join改造public static void main(String[] args) {Thread t1 = new Thread() {@Overridepublic void run() {try {Thread.sleep(10);} catch (InterruptedException e) {e.printStackTrace();}num = 10;}};t1.start();try {// 必须让t1线程执行完毕才能执行下面的代码t1.join();} catch (InterruptedException e) {e.printStackTrace();}System.out.println(num);            // 10}
}
Tips:join方法一般应用于线程2依赖于线程1执行的返回结果时;
3) join方法注意事项
【注意事项1】:当线程执行join方法传递时间参数时,如果join线程任务执行完毕,则不必等待join时间结束;
package com.dfbz.demo02_线程的操作;/*** @author lscl* @version 1.0* @intro: 当线程执行join方法传递时间参数时,如果join线程任务执行完毕,则不必等待join时间结束;*/
public class Demo04_join_注意事项_01 {static int count = 0;public static void main(String[] args) throws InterruptedException {Thread t1 = new Thread() {@Overridepublic void run() {try {Thread.sleep(2000);} catch (InterruptedException e) {e.printStackTrace();}count = 10;}};long startTime = System.currentTimeMillis();t1.start();// 让t1线程执行完毕
//    t1.join();// 让t1线程执行1s,然后代码继续往下执行
//        t1.join(1000);// 让t1线程执行3s,但如果t1线程执行完毕了,该方法也会结束t1.join(3000);long endTime = System.currentTimeMillis();// count【10】,time【2011】System.out.println("count【" + count + "】,time【" + (endTime - startTime) + "】");}
}
- 执行效果如下:
t1.join();
count【10】,time【2003】
----------------------------------------t1.join(1000);
count【0】,time【1005】----------------------------------------
t1.join(3000);
count【10】,time【2006】
【注意事项2】:当线程执行join方法时,优先执行join线程的任务,等到join线程任务执行完毕时才会执行本线程。但如果还有其他线程与执行join方法的线程同时存在时,则其他线程与join线程交替执行;
package com.dfbz.demo02_线程的操作;/*** @author lscl* @version 1.0* @intro:*/
public class Demo05_join_注意事项_02 {public static void main(String[] args) {Thread t1 = new Thread("t1") {@Overridepublic void run() {while (true) {try {Thread.sleep(500);} catch (InterruptedException e) {e.printStackTrace();}System.out.println(Thread.currentThread().getName());}}};Thread t2 = new Thread("t2") {@Overridepublic void run() {while (true) {System.out.println("t2");try {// 让t1优先执行,但是如果还有其他线程和t1线程同时存在,那么其他线程将和t1线程交替执行t1.join();} catch (InterruptedException e) {e.printStackTrace();}}}};Thread t3 = new Thread("t3") {@Overridepublic void run() {while (true) {try {Thread.sleep(500);} catch (InterruptedException e) {e.printStackTrace();}System.out.println(Thread.currentThread().getName());}}};t1.start();t2.start();t3.start();}
}
执行代码,发现t1和t3线程交替执行;
2.3.3 守护线程
1) 守护线程的使用
public final void setDaemon(boolean on):设置线程是否为守护线程
当用户线程(非守护线程)运行完毕时,守护线程也会停止执行,但由于CPU运行速度太快,当用户线程执行完毕时,将信息传递给守护线程,会有点时间差,而这些时间差会导致还会执行一点守护线程;
守护线程的主要用途是在后台执行一些辅助任务,如清理工作、监控状态等。因为它们没有影响应用程序主要功能的能力,所以它们可以随时被中断和终止。
【示例代码】
package com.dfbz.demo02_线程的操作;/*** @author lscl* @version 1.0* @intro:*/
public class Demo06_守护线程的使用 {public static void main(String[] args) {Thread t1 = new Thread(new Runnable() {@Overridepublic void run() {for (int i = 0; i < 2000000; i++) {System.out.println("守护线程: " + i);}}});//将t1设置为守护线程t1.setDaemon(true);Thread t2 = new Thread(new Runnable() {@Overridepublic void run() {for (int i = 0; i < 10; i++) {System.out.println("用户线程: " + i);}}});t1.start();t2.start();}
}
2) 守护线程的退出
当一个用户线程(也称为非守护线程)结束其运行后,其他用户线程和守护线程仍将继续运行,直到所有用户线程都已结束其运行为止。 ==只有当没有任何用户线程处于活动状态(即所有用户线程都已经结束其运行)时,JVM才会退出,并在此过程中终止任何剩余的守护线==程。 因此,如果有多个用户线程正在运行,即使其中一个用户线程结束了其运行,只要还有至少一个用户线程处于活动状态,那么所有的守护线程都将继续运行。
【示例代码】
package com.dfbz.demo02_线程的操作;/*** @author lscl* @version 1.0* @intro:*/
public class Demo07_守护线程的退出 {public static void main(String[] args) {Thread t1 = new Thread(() -> {for (int i = 0; i < 2000000; i++) {System.out.println("守护线程: " + i);}});//将t1设置为守护线程t1.setDaemon(true);Thread t2 = new Thread(()->{for (int i = 0; i < 10; i++) {System.out.println("用户线程1: " + i);}});Thread t3 = new Thread(()->{for (int i = 0; i < 1000000; i++) {System.out.println("用户线程2: " + i);}});t1.start();t2.start();t3.start();}
}
执行代码,发现【用户线程1】执行完毕后,守护线程并不会被退出;而是要等到所有的用户线程执行完毕后守护线程才会退出。
2.3.4 线程优先级
默认情况下,所有的线程优先级默认为5,最高为10,最低为1。优先级高的线程更容易让线程在抢到线程执行权;
通过如下方法可以设置指定线程的优先级:
public final void setPriority(int newPriority):设置线程的优先级。
示例代码:
package com.dfbz.demo02_线程的操作;/*** @author lscl* @version 1.0* @intro:*/
public class Demo08_线程优先级 {public static void main(String[] args) {Thread t1 = new Thread(() -> {for (int i = 0; i <= 10000; i++) {System.out.println("线程2: " + i);}});Thread t2 = new Thread(() -> {for (int i = 0; i <= 10000; i++) {System.out.println("线程2: " + i);}});// 设置优先级t1.setPriority(1);t2.setPriority(10);t1.start();t2.start();}
}
2.3.5 线程礼让
在多线程执行时,线程礼让,告知当前线程可以将执行权礼让给其他线程,礼让给优先级相对高一点的线程,==但仅仅是一种告知,并不是强制将执行权转让给其他线程,当前线程将CPU执行权礼让出去后,也有可能下次的执行权还在原线程这里;==如果想让原线程强制让出执行权,可以使用join()方法
public static void yield():将当前线程的CPU执行权礼让出来;
示例代码:
package com.dfbz.demo02_线程的操作;/*** @author lscl* @version 1.0* @intro:*/
public class Demo09_线程礼让 {public static void main(String[] args) {Thread t1 = new Thread(()->{for (int i = 0; i < 100; i++) {System.out.println("线程1: " + i);if (i == 10) {// 当i等于10的时候该线程礼让(礼让之后有可能下次线程执行权还被线程2抢到了)Thread.yield();}}});Thread t2 = new Thread(() -> {for (int i = 0; i < 100; i++) {System.out.println("线程2: " + i);}});t1.start();t2.start();}
}
2.3.6 线程中断
当一个线程接收到中断请求后,它的中断状态将会被设置为“已中断”,并且如果该线程正在睡眠、等待某个锁、I/O事件或其他同步对象,则它将收到一个InterruptedException异常。
需要注意的是:中断并不是立即停止线程的执行,而是通知线程它已经被中断,并给出一个机会让它自己去处理这个中断请求。具体的响应方式由开发者自行定义。
1) interrupt中断线程
public void interrupt():发送一个中断请求给指定线程。 将线程的中断状态设置为true;如果被中断的线程正在sleep、wait、join等操作,那么将会出现InterruptedException异常,并且重置中断状态(重置为false),相当于中断失败;public boolean isInterrupted():获取当前线程的中断状态;public static boolean interrupted():获取当前线程的中断状态,并清空中断状态(设置为false)
示例代码:
package com.dfbz.demo03_线程的中断;/*** @author lscl* @version 1.0* @intro:*/
public class Demo01_线程中断 {public static void main(String[] args) throws Exception {Thread t1 = new Thread(() -> {while (true) {// 模拟任务}}, "t1");t1.start();System.out.println(t1.isInterrupted());         // falset1.interrupt();         // 中断线程,将中断状态设置为trueSystem.out.println(t1.isInterrupted());         // true}
}
Tips:中断线程并且不是将线程停止,只是将线程的中断状态设置为true;
借助中断状态,我们可以采用如下的方式来停止线程:
package com.dfbz.demo03_线程的中断;/*** @author lscl* @version 1.0* @intro:*/
public class Demo02_使用中断来停止线程 {public static void main(String[] args) throws Exception {Thread t1 = new Thread(() -> {while (true) {// 获取当前线程的中断状态boolean interrupted = Thread.currentThread().isInterrupted();if (interrupted) {System.out.println("线程被中断【" + interrupted + "】....");System.out.println("释放资源....");break;} else {System.out.println("执行任务【" + interrupted + "】.....");}}}, "t1");t1.start();Thread.sleep(10);   	// 让t1线程执行10mst1.interrupt();         // 中断线程,将中断状态设置为true}
}
2) isInterrupted和interrupted方法
isInterrupted和interrupted方法都可以获取当前线程的中断状态,但不同的是isInterrupted只会返回线程的中断状态,并不会对中断状态发送改变,interrupted方法首先返回线程的中断状态,然后将线程的中断状态设置为false(清除中断状态)
【小案例】
需求:一个生产线程一直生产菜包,生产一定时间后生产一个肉包,然后在继续生产菜包;
package com.dfbz.demo03_线程的中断;/*** @author lscl* @version 1.0* @intro:*/
public class Demo03_中断线程小案例 {public static void main(String[] args) throws InterruptedException {Thread t1 = new Thread(() -> {long startTime = System.currentTimeMillis();// 让while循环执行5mswhile (System.currentTimeMillis() - startTime < 5) {/*1. 一开始中断状态为false,执行生产菜包2. 1ms过去之后,main线程对生产线程进行中断,中断状态设置为true3. 执行Thread.interrupted()语句返回true,然后把中断状态设置为false,生产线程开始生产肉包*/if (Thread.currentThread().isInterrupted()) {         // 如果使用isInterrupted方法只是获取线程的中断状态,并不会清除中断状态
//                if (Thread.interrupted()) {System.out.println(System.currentTimeMillis() + ": 生产肉包...");} else {System.out.println(System.currentTimeMillis() + ": 生产菜包...");}}});t1.start();// 生产线程执行3ms后对线程进行中断Thread.sleep(3);// 对线程进行中断t1.interrupt();}
}
2.3.7 中断sleep线程
1) 中断sleep线程
需要注意的是,被中断的线程如果正在处于sleep、wait、join等操作中,将会抛出InterruptedException异常,然后重置中断状态(重置为false);
package com.dfbz.demo03_线程的中断;/*** @author lscl* @version 1.0* @intro:*/
public class Demo04_中断sleep线程 {public static void main(String[] args) throws Exception {Thread t1 = new Thread(() -> {try {Thread.sleep(1000);} catch (InterruptedException e) {e.printStackTrace();}}, "t1");// 启动线程t1.start();Thread.sleep(50);       // 确保t1线程首先运行// 中断t1线程,将中断标记设置为true(但此时t1线程正在sleep,因此线程会出现异常,并且中断标记还是false)t1.interrupt();// 让main线程睡眠一小会再去查看中断状态,否则有可能出现中断状态还未设置为false就被main线程抢先打印了中断状态Thread.sleep(10);System.out.println(t1.isInterrupted());     // false(相当于中断失败)}
}

2) 中断sleep线程注意事项
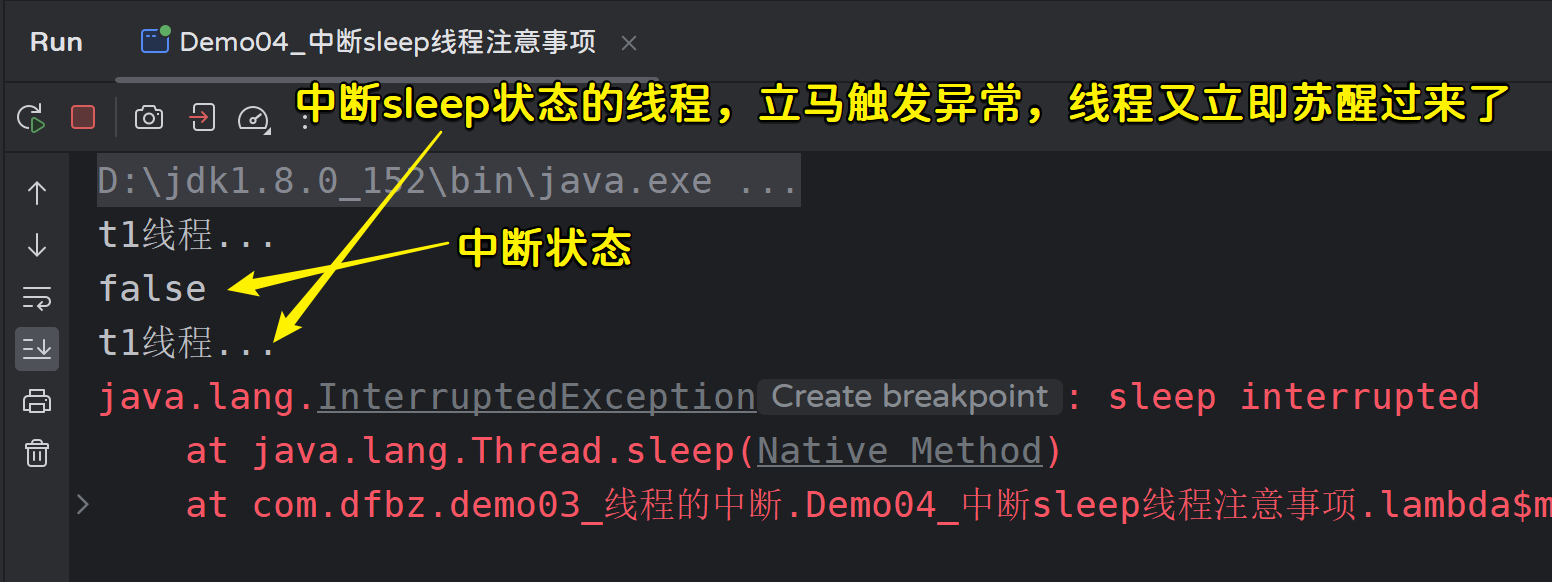
中断sleep、wait、join等状态的线程都将会抛出InterruptedException异常,然后重置中断状态(重置为false),相当于中断失败,同时InterruptedException异常的出现相当于重新唤醒了线程;
package com.dfbz.demo03_线程的中断;/*** @author lscl* @version 1.0* @intro:*/
public class Demo05_中断sleep线程注意事项 {public static void main(String[] args) throws Exception {Thread t1 = new Thread(() -> {while (true) {try {System.out.println("t1线程...");Thread.sleep(5000);} catch (InterruptedException e) {e.printStackTrace();}}}, "t1");// 启动线程t1.start();Thread.sleep(50);       // 确保t1线程首先运行// 中断t1线程,将中断标记设置为true(但此时t1线程正在sleep,因此线程会出现异常,并且中断标记还是false)t1.interrupt();// 让main线程睡眠一小会再去查看中断状态,否则有可能出现中断状态还未设置为false就被main线程抢先打印了中断状态Thread.sleep(10);System.out.println(t1.isInterrupted());         // false(相当于中断失败)}
}
2.3.8 线程的其他方法
1) 线程退出
public final void stop():退出当前线程
stop()方法曾经是用来强制停止一个正在运行的线程的方法,但是这个方法现在已经过时,并且被强烈反对使用。这是因为,强制停止一个线程可能会导致一些不可预料的结果,例如数据损坏、资源泄漏和其他并发问题。
此外,stop()方法还可能会抛出未经检查的安全异常,这可能会破坏程序的健壮性和安全性。
由于以上原因,从Java 1.1开始,stop()方法就被正式废弃,并不再推荐使用。取而代之的是,开发者应该使用更安全和可控的方式来进行线程的中断,例如使用interrupt()方法和适当的同步机制来实现线程间的协作。
示例代码:
package com.dfbz.demo04_线程的其他操作;/*** @author lscl* @version 1.0* @intro:*/
public class Demo01_线程的退出 {public static void main(String[] args) throws InterruptedException {Thread t1 = new Thread(() -> {for (int i = 0; i < 1000; i++) {System.out.println("hello【" + i + "】");try {Thread.sleep(1000);} catch (InterruptedException e) {e.printStackTrace();}}}, "t1");t1.start();Thread.sleep(2000);     // 让t1线程执行2s// 退出线程(这个做法是非常不可取的,好端端运行的线程被强制终止了)t1.stop();System.out.println("end");}
}
2) 线程挂起
public final void suspend():暂停当前线程的执行;public final void resume():恢复被暂停的线程;
suspend()和resume()方法曾经是用来暂时挂起和恢复线程运行的方法,但是这两个方法现在也已经过时,并且被强烈反对使用。
这是因为,挂起一个线程可能会导致一些不可预料的结果,例如死锁、数据损坏和其他并发问题。此外,suspend()和resume()方法的操作也不能保证原子性,这可能会导致竞态条件和数据不一致等问题。
由于以上原因,从Java 1.2开始,suspend()和resume()方法就被正式废弃,并不再推荐使用。取而代之的是,开发者应该使用更安全和可控的方式来进行线程的控制和同步,例如使用interrupt()方法和适当的同步机制来实现线程间的协作。
示例代码:
package com.dfbz.demo04_线程的其他操作;/*** @author lscl* @version 1.0* @intro:*/
public class Demo02_线程的挂起与恢复 {public static void main(String[] args) throws InterruptedException {Thread t1 = new Thread(() -> {while (true){System.out.println("hello");try {Thread.sleep(500);} catch (InterruptedException e) {throw new RuntimeException(e);}}});t1.start();Thread.sleep(2000);     // 让t1线程执行2s// 挂起线程t1.suspend();System.out.println("线程挂起...");Thread.sleep(2000);             // main线程睡眠2s,t1线程被挂起,此时没有线程在执行t1.resume();System.out.println("线程恢复....");}
}
这篇关于专治Java底子差,线程操作篇(1)的文章就介绍到这儿,希望我们推荐的文章对编程师们有所帮助!


