本文主要是介绍Spring4入门之第一章IOC和DI,希望对大家解决编程问题提供一定的参考价值,需要的开发者们随着小编来一起学习吧!
Spring4入门之第一章
Spring的概述
Spring的概述
-
什么是Spring
Spring框架是Java平台的一个开源的全栈(Full-stack)应用程序框架和控制反转(IOC)容器实现,一般被直接称为 Spring。该框架的一些核心功能理论上可用于任何 Java 应用,但 Spring 还为基于java企业版平台构建的 Web 应用提供了大量的拓展支持。虽然 Spring 没有直接实现任何的编程模型,但它已经在 Java 社区中广为流行,基本上完全代替了企业级JavaBeans(EJB)模型。
-
Spring:SE/EE开发的一站式框架。
- 一站式框架:有EE开发的每一层解决方案。
- WEB层 :SpringMVC
- Service层 :Spring的Bean管理,Spring声明式事务
- DAO层 :Spring的Jdbc模板,Spring的ORM模块
-
为什么学习Spring

Spring的入门(IOC XMl方式)
-
IOC: Inversion of Control(控制反转)。将对象的创建权反转给(交给)Spring。
-
下载Spring的开发包
https://blog.csdn.net/SYJ_1835_NGE/article/details/89415506
-
Spring的开发包

docs :Spring的开发规范和API
libs :Spring的开发的jar和源码
schema :Spring的配置文件的约束
-
创建web项目,引入jar包(红框内为必须部分)

-
传统方式和将控制权交给Spring管理的区别
假设一个场景:Service层调用Dao层的代码实现某个功能
-
传统的方式:
//创建一个接口
public interface UserDao {public void save();
}
//-------------------------------
//创建一个实现类
public class UserDaoImpl implements UserDao {@Overridepublic void save() {System.out.println("UserDaoImpl执行了。。。。");}
}
在进行某功能实现的时候我们可以直接调用,但是,如果要求在Dao的是实现方式上,要求使用Hibernate实现和数据库的交互,我们需要修改源代码,显然是不合理的。
-

-
Spring方式实现
要想使用Spring框架去管理我们的实现类,我们需要去创建一个配置文件一般以applicationContext.xml进行命名(但不是必须的)
在applicationContext.xml文件中的一些注意的细节:
引入schema约束:在spring-framework-4.2.4\spring-framework-4.2.4.RELEASE\docs\spring-framework-reference\html\xsd-configuration.html,在最下面,里面有多种schema约束
the beans schema
<?xml version="1.0" encoding="UTF-8"?>
<beans xmlns="http://www.springframework.org/schema/beans"xmlns:xsi="http://www.w3.org/2001/XMLSchema-instance"xsi:schemaLocation="http://www.springframework.org/schema/beans http://www.springframework.org/schema/beans/spring-beans.xsd"></beans>
关于在Eclipse中Spring约束提示问题:
对bean进行配置
<!-- Spring IOC的入门配置 -->
<bean id="userDao" class="com.syj.spring.demo1.UserDaoImpl" />
<bean id="userDaoHibernate" class="com.syj.spring.demo1.UserDaoHibernateImpl" />
测试类:
@Test/*** Sring的IOC方式*/public void demo2() {ApplicationContext applicationContext = new ClassPathXmlApplicationContext("applicationContext.xml");UserDao userDao = (UserDao) applicationContext.getBean("userDao");UserDao userDaoHibernate = (UserDao) applicationContext.getBean("userDaoHibernate");userDaoHibernate.save();userDao.save();}
IOC和DI的区别和联系
-
IOC:控制反转,将对象的创建权反转给了Spring
- DI:依赖注入,前提必须有IOC的环境,Spring管理这个类的时候将类的依赖的属性注入(设置)进来。
-
面向对象的时候
-
依赖
Class A{} //B依赖于A Class B{public void xxx(A a){} } -
继承:is a
Class A{} Class B extends A{} -
聚合:has a
根据紧密程度分:
一个人必须有一个脑袋
一个篮球队有没有中锋都可以打比赛
-
-
依赖注入的简单演示
public class UserDaoImpl implements UserDao {//为name属性进行赋值private String name;public void setName(String name) {this.name = name;}@Overridepublic void save() {System.out.println("UserDaoImpl执行了。。。。" + name);}
}
我们只需要在配置文件中添加一段配置即可(不需要修改源码)
<bean id="userDao" class="com.syj.spring.demo1.UserDaoImpl" ><property name="name" value="孙悟空" />
</bean>
Spring的工厂类
- 首先记住一个图。Spring工程类的结构图

-
ApplicationContext继承BeanFactory
-
BeanFactory:老版本的工厂类
BeanFactory:调用getBean的时候,才会生成类的实例
-
ApplicationContext:新版本的工厂类
ApplicationContext:加载配置文件的时候,就会将Spring管理的类都实例化
ApplicationContext有两个实现类
- ClassPathXmlApplicationContext :加载类路径下的配置文件
- FileSystemXmlApplicationContext :加载文件系统下的配置文件
-
Spring中的Bean
Bean的相关配置
-
bean标签的id和name的配置
id :使用了约束中的唯一约束。里面不能出现特殊字符的。
name :没有使用约束中的唯一约束(理论上可以出现重复的,但是实际开发不能出现的)。里面可以出现特殊字符。
<bean name=”/user” class=””/> -
Bean的生命周期的配置
init-method :Bean被初始化的时候执行的方法
destroy-method :Bean被销毁的时候执行的方法(Bean是单例创建,工厂关闭)
-
Bean的作用范围的配置(重点)
scope — > Bean的作用范围
scope取值 描述 singleton 默认的,Spring会采用单例模式创建这个对象 prototype 多例模式。(Struts2和Spring整合一定会用到) request 应用在web项目中,Spring创建这个类以后,将这个类存入到request范围中。 session 应用在web项目中,Spring创建这个类以后,将这个类存入到session范围中。 globalsession 应用在web项目中,必须在porlet环境下使用。但是如果没有这种环境,相对于session。(登录腾讯之后旗下的子项目qq空间等不需要再进行登录)
Bean的管理(XML方式)
-
Spring的Bean的实例化方式(了解)
Bean已经都交给Spring管理,Spring创建这些类的时候,有几种方式:
- 无参构造方法的方式(默认)
public class Bean1 {public Bean1() {super();System.out.println("Bean1的无参数的构造方法执行了...");} } //----------applicationContext.xml配置------------------ <bean id="bean1" class="com.syj.spring.demo2.Bean1" ></bean>- 静态工厂实例化的方式
public class Bean2Factory {public static Bean2 createBean2() {System.out.println("Bean2Factory中方法执行了...");return new Bean2();}}//----------applicationContext.xml配置------------------<bean id="bean2Factory" class="com.syj.spring.demo2.Bean2Factory" factory-method="createBean2" ></bean>- 实例工厂实例化的方式
public class Bean3Factory {public Bean3 createBean3() {System.out.println("Bean3Factory中方法执行了...");return new Bean3();}}//----------applicationContext.xml配置------------------<bean id="bean3Factory" class="com.syj.spring.demo2.Bean3Factory" ></bean><bean id="bean3" factory-bean="bean3Factory" factory-method="createBean3" ></bean>
Spring的属性注入

-
构造方法的方式注入普通属性
public class Car {/** 属性注入(构造方式)*/private String name;private double price;public Car(String name, double price) {super();this.name = name;this.price = price;} } //----------applicationContext.xml配置------------------ <bean id="car" class="com.syj.spring.demo3.Car" ><constructor-arg name="name" value="宝马" /><constructor-arg name="price" value="800000" /> </bean> -
构造方法的方式注入对象属性
public class Employee {private String name;private Car car;public Employee(String name, Car car) {super();this.name = name;this.car = car;} } //----------applicationContext.xml配置------------------ <bean id="employee" class="com.syj.spring.demo3.Employee" ><constructor-arg name="name" value="张三" /><constructor-arg name="car" ref="car" /> </bean> -
set方法的普通属性注入
public class Car2 {/** 属性注入(构造方式)*/private String name;private double price;public void setName(String name) {this.name = name;}public void setPrice(double price) {this.price = price;} //----------applicationContext.xml配置------------------ <bean id="car2" class="com.syj.spring.demo3.Car2" ><property name="name" value="奔驰" /><property name="price" value="1000000" /> </bean> -
set方法的对象引用的属性注入
public class Employee2 {private String name;private Car2 car2;public void setName(String name) {this.name = name;}public void setCar2(Car2 car2) {this.car2 = car2;} } //----------applicationContext.xml配置------------------ <bean id="employee2" class="com.syj.spring.demo3.Employee2" ><property name="name" value="李四" /><property name="car2" ref="car2" /> </bean> -
p命名空间的属性注入
xmlns="http://www.springframework.org/schema/beans"xmlns:p="http://www.springframework.org/schema/p"<!-- 增加p命名空间-->xmlns:xsi="http://www.w3.org/2001/XMLSchema-instance"xsi:schemaLocation="http://www.springframework.org/schema/beans http://www.springframework.org/schema/beans/spring-beans.xsd">
使用p名称空间
<!-- p命名空间的属性注入======================= --><bean id="car2" class="com.syj.spring.demo3.Car2" p:name="大众" p:price="300000" ></bean>
-
SpEL的属性注入(Spring3.0以后)
Spring Expression Language,Spring的表达式语言。
语法: #{SpEL}
public class CarInfo {private String name;public String getName() {return "电车";}public double calculatorPrice() {return Math.random() * 3000;}
}
//----------applicationContext.xml配置------------------
<!--  SpEL的属性注入(Spring3.0以后)可以调用方法-->
<bean  id="carinfo" class="com.syj.spring.demo3.CarInfo" ></bean><bean  id="car2" class="com.syj.spring.demo3.Car2" ><property name="name" value="#{carinfo.name}" /><property name="price" value="#{carinfo.calculatorPrice()}" />
</bean><bean  id="employee2" class="com.syj.spring.demo3.Employee2" ><property name="name" value="#{'李四'}" /><property name="car2" value="#{car2}" />
</bean>
集合类型的属性注入
配置:
public class CollectionBean {private String[] strs;private List<String> list;private Set<String> set;private Map<String, String> map;public void setMap(Map<String, String> map) {this.map = map;}public void setSet(Set<String> set) {this.set = set;}public void setList(List<String> list) {this.list = list;}public void setStrs(String[] strs) {this.strs = strs;}@Overridepublic String toString() {return "CollectionBean [strs=" + Arrays.toString(strs) + ", list=" + list + ", set=" + set + ", map=" + map+ "]";}
}
//----------applicationContext.xml配置------------------
<!-- 复杂类型的属性注入=============== --><bean  id="collectionBean" class="com.syj.spring.demo4.CollectionBean" ><property name="strs"><list><value>张三</value><value>李四</value><value>王五</value></list></property><property name="list"><list><value>111</value><value>222</value><value>333</value></list></property><property name="set"><set><value>aaa</value><value>bbb</value><value>ccc</value></set></property><property name="map"><map><entry key="张三" value="奥迪" ></entry><entry key="李四" value="奔驰" ></entry><entry key="王五" value="宝马" ></entry></map></property></bean>
分模块开发
-
在加载配置文件的时候,加载多个
@Test// 分模块开发(多个参数)public void demo1() {ApplicationContext applicationContext = new ClassPathXmlApplicationContext("applicationContext.xml","applicationContext2.xml");CollectionBean collectionBean = (CollectionBean) applicationContext.getBean("collectionBean");System.out.println(collectionBean);} -
在一个配置文件中引入多个配置文件
<!-- 在其中一个引入另外一个-->
<import resource="applicationContext2.xml"/>
Spring小练习(模拟保存用户关系)
-
传统的保存客户关系,是在web层new出CustomerServiceImpl对象,然后Service层的。最后Service层调用Dao层。每次在new对象的时候,当需求发生改变的时候我们就需要修改源代码。极其的不合适,于是我们可以通过Spring为我们管理Service层和Dao层的创建,
-
Action实现调用由Spring管理的Service层和在Service注入的Dao层
-
此项目前台已经基本完成,只需要简单引入即可进行后台的测试
链接:https://pan.baidu.com/s/1ph1NQ2HDbl3PPqpnJGDTkQ 密码:7oia
主要引入红色部位

步骤:
-
创建web项目,引入相应的jar包
-
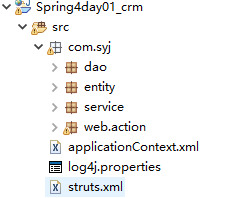
包结构

-
创建配置文件Struts2的(web.xml,struts.xml)Spring的(applicationContext.xml)和日志的(log4j.properties)
-
对页面进行修改menu.jsp的【新增客户】按钮

-
创建action
com.syj.web.action.CustomerAction
public class CustomerAction extends ActionSupport implements ModelDriven<Customer> {private Customer customer = new Customer();public String saveUI() {System.out.println("CustomerAction的saveUI方法执行了。。。");return "saveUI";}@Overridepublic Customer getModel() {return customer;}}struts.xml配置
<package name="crm" extends="struts-default" namespace="/" ><action name="customer_*" class="com.syj.web.action.CustomerAction" method="{1}" ><result name="saveUI" >/jsp/customer/add.jsp</result></action> </package> -
创建Service层和Dao层,全都交给Spring管理
CustomerServiceImpl.java
public class CustomerServiceImpl implements CustomerService {private CustomerDao customerDao;public void setCustomerDao(CustomerDao customerDao) {this.customerDao = customerDao;}@Overridepublic void save(Customer customer) {System.out.println("CustomerServiceImpl的save执行了。。。");customerDao.save(customer);}
}
CustomerDaoImpl.java
public class CustomerDaoImpl implements CustomerDao {@Overridepublic void save(Customer customer) {System.out.println("CustomerDaoImpl的save方法执行了。。。");System.out.println(customer);}}对Spring的applicationContext.xml文件进行配置
<!-- 将CustomerService交给Spring进行管理 --><bean id="customerService" class="com.syj.service.CustomerServiceImpl" ><!-- 在Service层注入CustomerDaoImpl属性 --><property name="customerDao" ref="customerDao" /></bean><!-- 将CustomerDao交给Spring进行管理 --><bean id="customerDao" class="com.syj.dao.CustomerDaoImpl" ></bean>
这篇关于Spring4入门之第一章IOC和DI的文章就介绍到这儿,希望我们推荐的文章对编程师们有所帮助!


