本文主要是介绍第一章 Java核心内容,希望对大家解决编程问题提供一定的参考价值,需要的开发者们随着小编来一起学习吧!
一、数据结构
1. 数组
2. 链表
2.1 单链表


2.2 双向链表


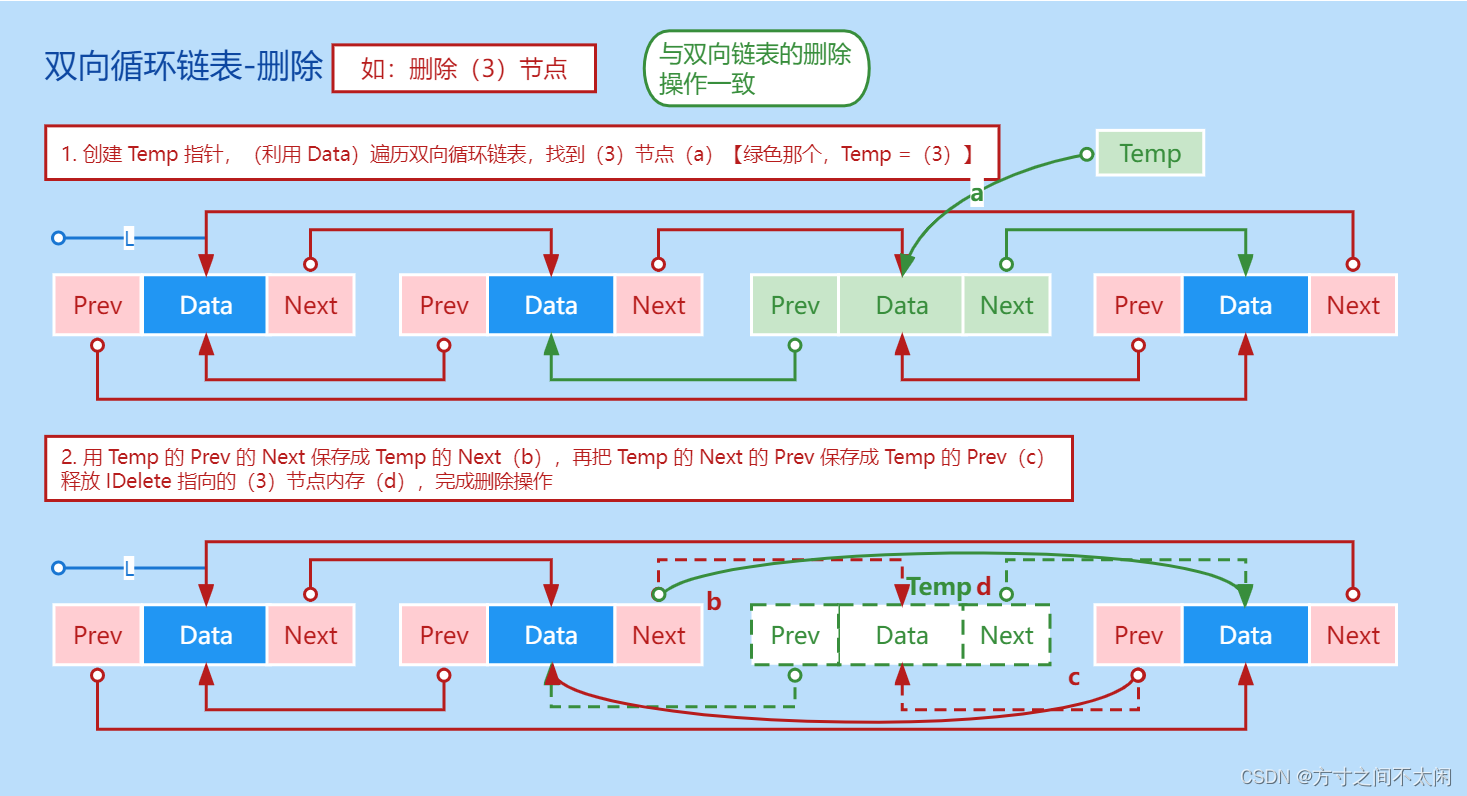
2.3 循环链表


3. 树
| 方法名               | 描述 |
| ------------------- | ----------------------------------------------- |
| getElement()        | 返回存放于当前节点处的对象 |
| setElement(e)       | 将对象 e 存入当前节点,并返回其中此前所存的内容 |
| getParent()         | 返回当前节点的父节点 |
| getFirstChild()     | 返回当前节点的长子 |
| getNextSibling()    | 返回当前节点的最大弟弟 |
3.1 树的实现
3.1.1 使用数组实现
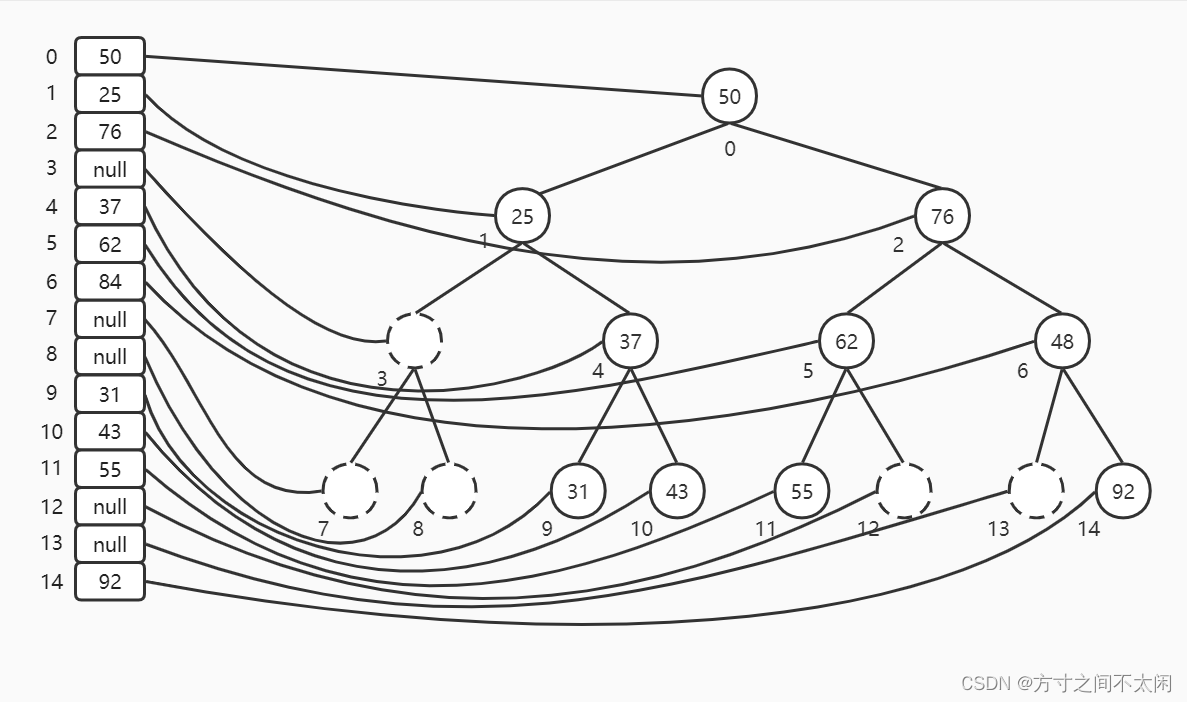
基于这种思想,找节点的子节点和父节点可以利用简单的算术计算它们在数组中的索引值。设节点索引值为 index,则节点的左子节点是: 2 * index + 1,它的右子节点是 **2 * index + 2**,它的父节点是(index - 1)/ 2。
3.1.2 使用链表实现
public interface Tree {/*** 返回当前节点中存放的对象** @return Object */Object getElem();/*** 将对象 obj 存入当前节点,并返回此前的内容** @return Object */Object setElem(Object obj);/*** 返回当前节点的父节点** @return TreeLinkedList */TreeLinkedList getParent();/*** 返回当前节点的长子** @return TreeLinkedList */TreeLinkedList getFirstChild();/*** 返回当前节点的最大弟弟** @return TreeLinkedList */TreeLinkedList getNextSibling();/*** 返回当前节点后代元素的数目,即以当前节点为根的子树的规模** @return int */int getSize();/*** 返回当前节点的高度** @return int */int getHeight();/*** 返回当前节点的深度** @return int */int getDepth();
}
public class TreeLinkedList implements Tree {/*** 树根节点*/private Object element;/*** 父节点、长子及最大的弟弟*/private TreeLinkedList parent, firstChild, nextSibling;/*** (单节点树)构造方法*/public TreeLinkedList() {this(null, null, null, null);}/*** 构造方法** @param object 树根节点* @param parent 父节点* @param firstChild 长子* @param nextSibling 最大的弟弟*/public TreeLinkedList(Object object, TreeLinkedList parent, TreeLinkedList firstChild, TreeLinkedList nextSibling) {this.element = object;this.parent = parent;this.firstChild = firstChild;this.nextSibling = nextSibling;}public Object getElem() {return element;}public Object setElem(Object obj) {Object bak = element;element = obj;return bak;}public TreeLinkedList getParent() {return parent;}public TreeLinkedList getFirstChild() {return firstChild;}public TreeLinkedList getNextSibling() {return nextSibling;}public int getSize() {//当前节点也是自己的后代int size = 1;//从长子开始TreeLinkedList subtree = firstChild;//依次while (null != subtree) {//累加size += subtree.getSize();//所有孩子的后代数目subtree = subtree.getNextSibling();}//得到当前节点的后代总数return size;}public int getHeight() {int height = -1;//从长子开始TreeLinkedList subtree = firstChild;while (null != subtree) {//在所有孩子中取最大高度height = Math.max(height, subtree.getHeight());subtree = subtree.getNextSibling();}//即可得到当前节点的高度return height + 1;}public int getDepth() {int depth = 0;//从父亲开始TreeLinkedList p = parent;while (null != p) {depth++;//访问各个真祖先p = p.getParent();}//真祖先的数目,即为当前节点的深度return depth;}
}
3.1.3 树的遍历


3.2 二叉树
3.2.1 二叉树的实现
import lombok.Data;@Data
public class Node<T> {/*** 角标*/private Integer index;/*** 数据*/private T data;/*** 左节点*/private Node leftChild;/*** 右节点*/private Node rightChild;/*** 构造函数** @param index 角标* @param data 数据*/public Node(Integer index, T data) {this.index = index;this.data = data;this.leftChild = null;this.rightChild = null;}
}public class Tree<T> {private Node<T> root;public Node<T> find(int key) {return null;}public void insert(int id, T data) {}public Node delete(int id) {return null;}
}3.2.2 遍历二叉树
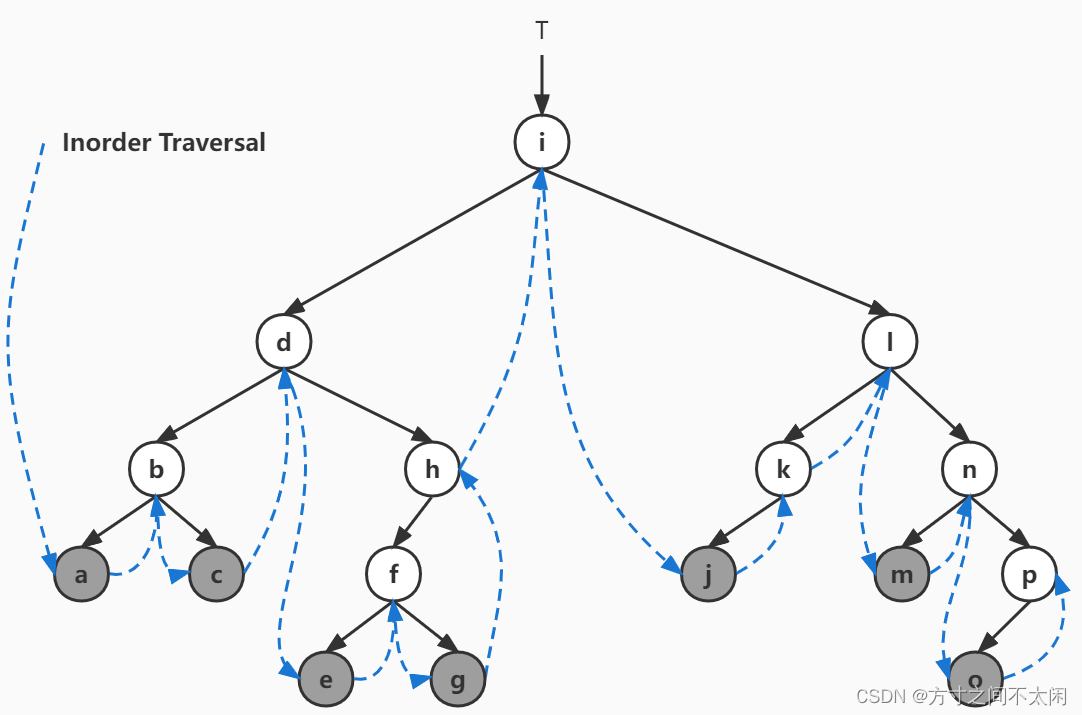
private void inOrder(Node<T> localRoot) {if (null != localRoot) {inOrder(localRoot.getLeftChild());System.out.println(localRoot.getIndex());inOrder(localRoot.getRightChild());}
}
3.2.3 二叉搜索树
3.2.4 在二叉搜索树插入节点的算法
public class Tree<T> {private Node<T> root;public Node<T> find(int key) {return null;}public void insert(int id, T data) {Node<T> newNode = new Node<>();newNode.setIndex(id);newNode.setData(data);if (null == root) {root = newNode;}else {//从根节点开始查找Node<T> current = root;//声明父节点的引用Node<T> parent;while (true) {//父节点的引用指向当前节点parent = current;//如果角标小于当前节点,插入到左节点if (id < current.getIndex()) {current = current.getLeftChild();//节点为空才进行赋值,否则继续查找if (null == current) {parent.setLeftChild(newNode);return;}}else {//否则插入到右节点current = current.getRightChild();if (null == current) {parent.setRightChild(newNode);return;}}}}}public Node delete(int id) {return null;}
}
3.2.5 二叉搜索树的查找算法
public Node<T> find(int key) {if (null == root) {return null;}Node<T> current = root;//如果不是当前节点while (current.getIndex() != key) {if (key < current.getIndex()) {current = current.getLeftChild();}else {current = current.getRightChild();}//如果左右节点均为 null,查找失败if (null == current) {return null;}}return current;
}
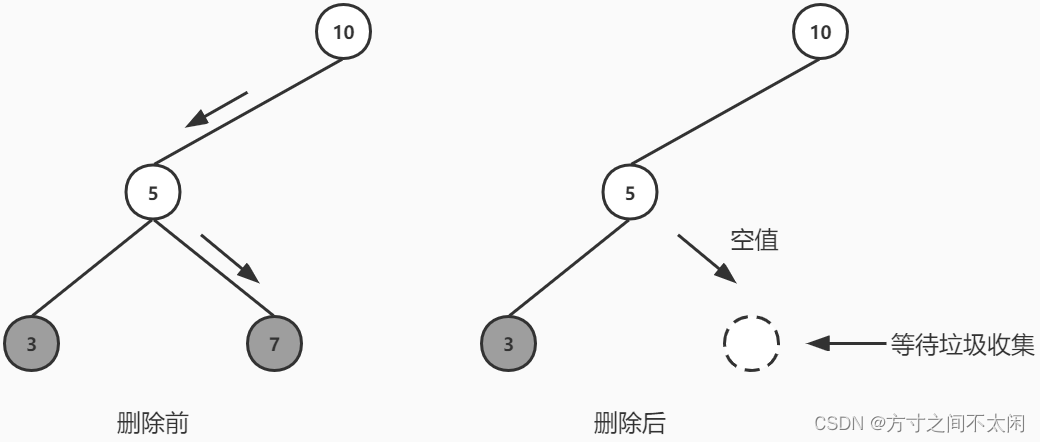
3.2.6 在二叉查找树删除结点的算法
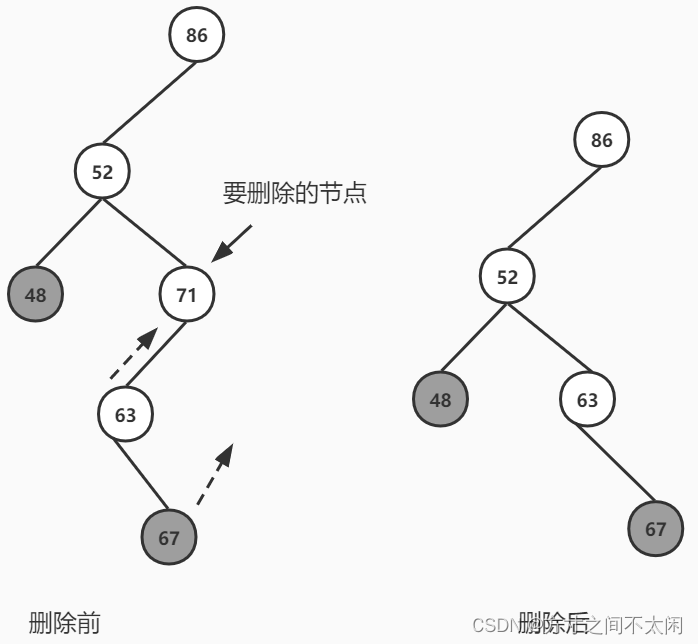
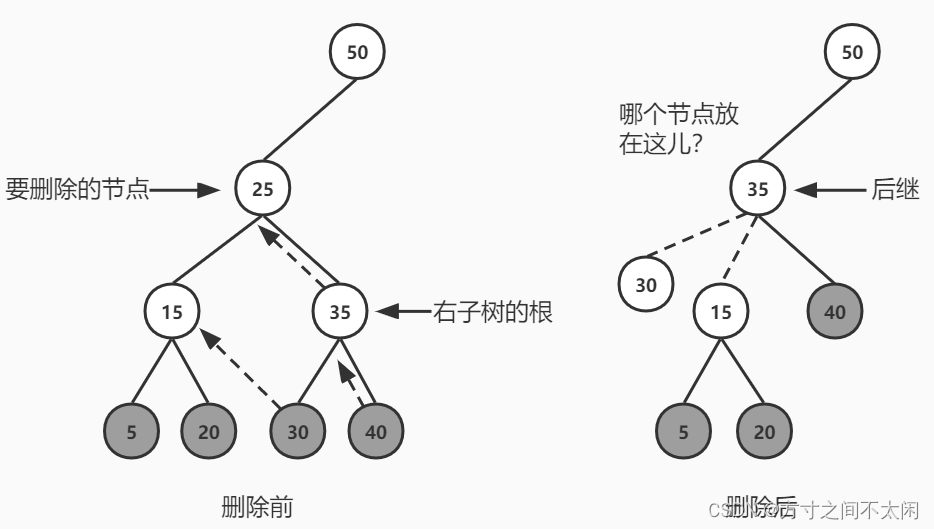

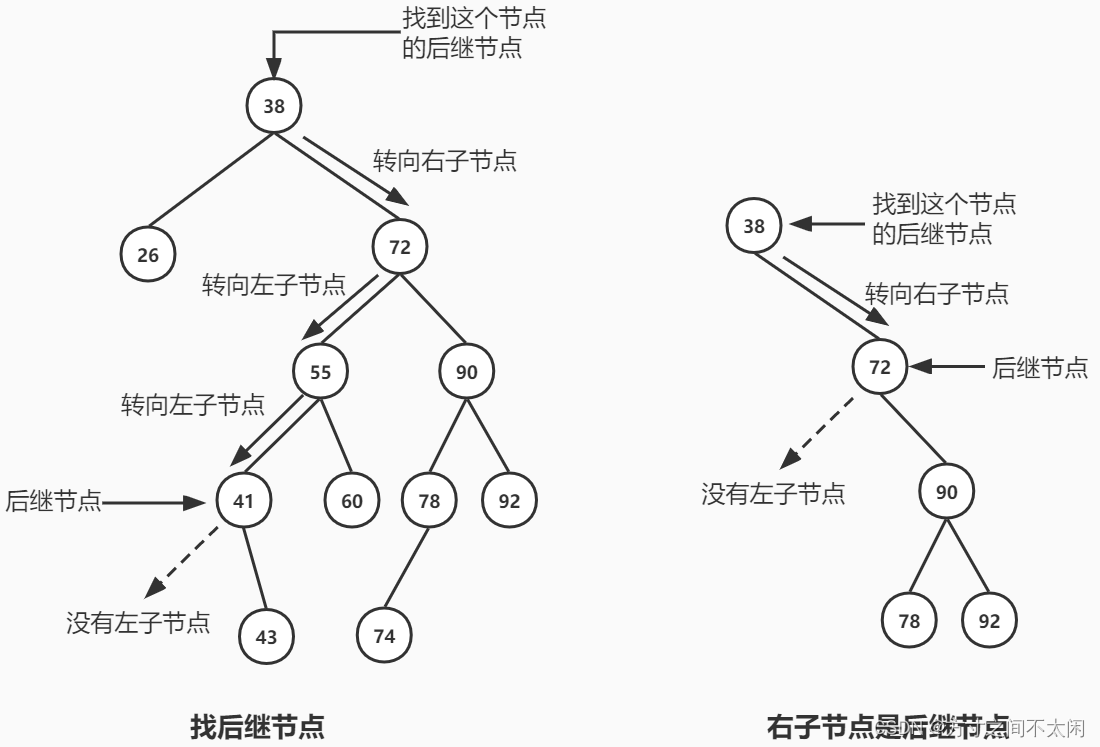
private Node<T> getSuccessor(Node<T> delNode) {Node<T> successorParent = delNode;Node<T> successor = delNode;//go to rightChildNode<T> current = delNode.getRightChild();while (current != null) {//一直往下找左节点successorParent = successor;successor = current;current = current.getLeftChild();}//跳出循环,此时 successor 为最后的一个左节点,也就是被删除节点的后继节点//这里的判断先忽视,在后面会讲if (successor != delNode.getRightChild()) {successorParent.setLeftChild(successor.getRightChild());successor.setRightChild(delNode.getRightChild());}return successor;
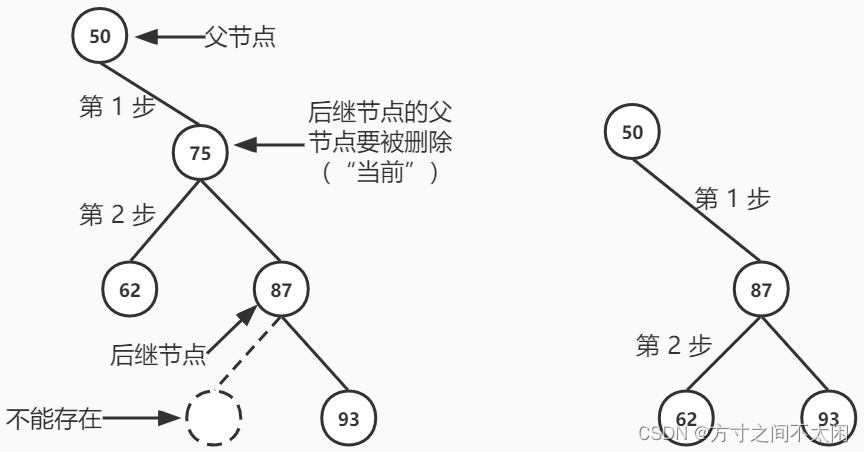
}
public Node<T> delete(int key) {//...接前面的 else ifelse {//查找后继节点Node<T> successor = getSuccessor(current);//情况 3.1 如果如果删除节点有两个子节点且后继节点是删除节点的右子节点if (current == root) {root = successor;} else if (isLeftChild) {parent.setLeftChild(successor);} else {parent.setRightChild(successor);}successor.setLeftChild(current.getLeftChild());}return current;
}
这样,删除的节点不会改变树的结构。当然,这样做存储中还保留着这种“己经删除”的节点。
public Node<T> delete(int key) {if (null == root) {return null;}Node<T> current = root;Node<T> parent = root;boolean isLeftChild = true;//删除操作第一步,查找要删除的节点while (current.getIndex() != key) {parent = current;if (key < current.getIndex()) {isLeftChild = true;current = current.getLeftChild();} else {isLeftChild = false;current = current.getRightChild();}//如果左右节点均为 null,没有找到要删除的元素if (null == current) {return null;}}//跳出循环,找到要删除的元素:currentif (null == current.getLeftChild() && null == current.getRightChild()) {//情况 1:如果当前节点没有子节点if (current == root) {//如果当前节点是根节点,将树清空root = null;return current;} else if (isLeftChild) {//如果当前节点是其父节点的做节点,将父节点的左节点清空parent.setLeftChild(null);} else {parent.setRightChild(null);}} else if (null == current.getRightChild()) {//情况 2.1:如果删除节点只有一个子节点且没有右节点if (current == root) {root = current.getLeftChild();} else if (isLeftChild) {parent.setLeftChild(current.getLeftChild());} else {parent.setRightChild(current.getLeftChild());}} else if (null == current.getLeftChild()) {//情况 2.2 如果删除节点只有一个子节点且没有左节点if (current == root) {root = current.getRightChild();} else if (isLeftChild) {parent.setLeftChild(current.getRightChild());} else {parent.setRightChild(current.getRightChild());}} else {//查找后继节点Node<T> successor = getSuccessor(current);//情况 3.1 如果如果删除节点有两个子节点且后继节点是删除节点的右子节点if (current == root) {root = successor;} else if (isLeftChild) {parent.setLeftChild(successor);} else {parent.setRightChild(successor);}successor.setLeftChild(current.getLeftChild());}return current;
}
private Node<T> getSuccessor(Node<T> delNode) {Node<T> successorParent = delNode;Node<T> successor = delNode;//go to rightChildNode<T> current = delNode.getRightChild();while (current != null) {//一直往下找左节点successorParent = successor;successor = current;current = current.getLeftChild();}//跳出循环,此时 successor 为最后的一个左节点,也就是被删除节点的后继节点//如果 successor 是要删除节点右子节点的左后代if (successor != delNode.getRightChild()) {//把后继节点的父节点的 leftChild 字段置为 successor 的右子节点successorParent.setLeftChild(successor.getRightChild());//把 successor 的 rightChild 字段置为要删除节点的右子节点。successor.setRightChild(delNode.getRightChild());}return successor;
}
3.3 红黑树
3.3.1 红黑规则

3.3.2 红黑树的应用
3.3.3 红黑树的定义
class RedBlackTreeNode {public int val;public RedBlackTreeNode left;public RedBlackTreeNode right;// 记录节点颜色的 color 属性,暂定 true 表示红色public boolean color;// 为了方便迭代插入,所需的 parent 属性public RedBlackTreeNode parent;// 一些构造函数,根据实际需求构建public RedBlackTreeNode() {}
}
public class RedBlackTree {// 当前红黑树的根节点,默认为 nullprivate RedBlackTreeNode root;
}
3.3.4 红黑树的左旋

public void leftRotate(RedBlackTreeNode p) {// 在当前节点不为 null 时,才进行左旋操作if (p != null) {// 先记录 p 的右儿子RedBlackTreeNode rightChild = p.right;// 1. 空出右儿子的左子树p.right = rightChild.left;// 左子树不为空,需要更新父节点if (rightChild.left != null) {rightChild.left.parent = p;}// 2. 空出根节点的父节点rightChild.parent = p.parent;// 父节点指向右儿子if (p.parent == null) { // 右儿子成为新的根节点this.root = rightChild;} else if (p == p.parent.left) { // 右儿子成为父节点的左儿子p.parent.left = rightChild;} else { // 右儿子成为父节点的右儿子p.parent.right = rightChild;}// 3. 右儿子和根节点成功会师,根节点成为左子树rightChild.left = p;p.parent = rightChild;}
}
3.3.5 红黑树的右旋

public void rightRotate(RedBlackTreeNode p) {if (p != null) {// 记录 p 的左儿子RedBlackTreeNode leftChild = p.left;// 1. 空出左儿子的右子树p.left = leftChild.right;// 右子树不为空,需要更新父节点if (leftChild.right != null) {leftChild.right.parent = p;}// 2. 空出根节点的父节点leftChild.parent = p.parent;// 父节点指向左儿子if (p.parent == null) { // 左儿子成为整棵树根节点this.root = leftChild;} else if (p.parent.left == p) { // 左儿子成为父节点左儿子p.parent.left = leftChild;} else { // 左儿子成为父节点的右儿子p.parent.right = leftChild;}// 3. 顺利会师leftChild.right = p;p.parent = leftChild;}
}
3.3.6 新增节点
3.3.6.1 父亲为祖父的左儿子


3.3.6.2 父亲为祖父的右儿子


3.3.6.3 规律总结
3.3.6.4 代码实现
public void fixAfterInsert(RedBlackTreeNode x) {// 新插入的节点,默认为红色x.color = RED;// p 不为 null、不是整棵树的根节点、父亲为红色,需要调整while (x != null && this.root != x && x.parent.color == RED) {// 父亲是祖父的左儿子if (parentOf(x) == parentOf(parentOf(x)).left) {// 父亲和叔叔都是红色RedBlackTreeNode uncle = parentOf(parentOf(x)).right;if (uncle.color == RED) {// 父亲和叔叔都变成黑色parentOf(x).color = BLACK;uncle.color = BLACK;// 祖父变成红色,继续从祖父开始进行调整parentOf(parentOf(x)).color = RED;x = parentOf(parentOf(x));} else { // 叔叔为黑色// 自己是父亲的右儿子,需要对父亲左旋if (x == parentOf(x).right) {x = parentOf(x);leftRotate(x);}// 自己是父亲的左儿子,变色后右旋,保持黑色高度parentOf(x).color = BLACK;parentOf(parentOf(x)).color = RED;rightRotate(parentOf(parentOf(x)));}} else { //父亲是祖父的右儿子RedBlackTreeNode uncle = parentOf(parentOf(x)).left;// 父亲和叔叔都是红色if (uncle.color == RED) {// 叔叔和父亲变成黑色parentOf(x).color = BLACK;uncle.color = BLACK;// 祖父变为红色,从祖父开始继续调整parentOf(parentOf(x)).color = RED;x = parentOf(parentOf(x));} else {// 自己是父亲的左儿子,以父亲为中心右旋if (parentOf(x).left == x) {x = parentOf(x);rightRotate(x);}// 自己是父亲的右儿子,变色后左旋,保持黑色高度parentOf(x).color = BLACK;parentOf(parentOf(x)).color = RED;leftRotate(parentOf(parentOf(x)));}}}// 最后将根节点置为黑色,以满足红黑规则 1,又不会破坏规则 5this.root.color = BLACK;
}
private static RedBlackTreeNode parentOf(RedBlackTreeNode p) {return (p == null ? null : p.parent);
}
3.3.7 删除节点
3.3.7.1 自己是父亲的左儿子


3.3.7.2 自己是父亲的右儿子

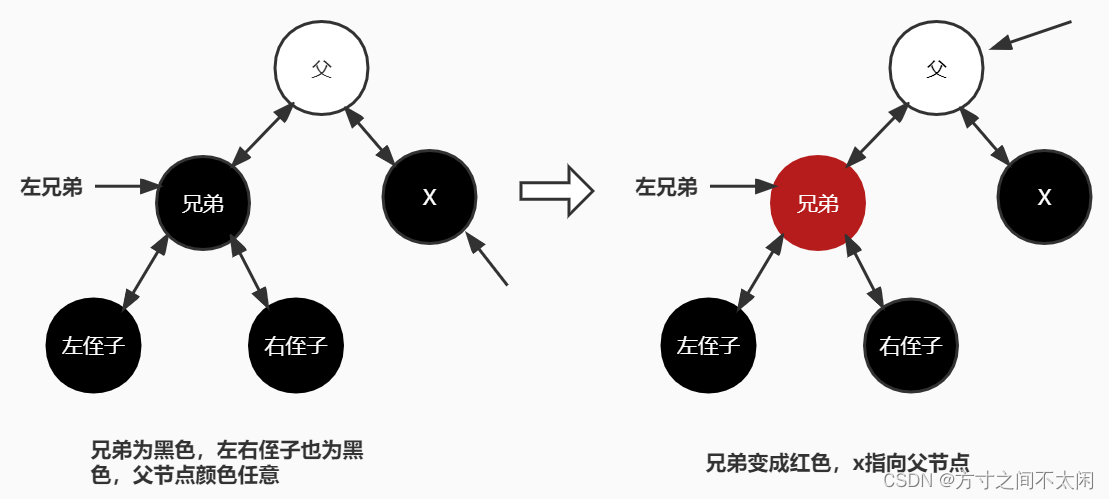


3.3.7.3 规律总结
3.3.7.4 代码实现
public void fixAfterDeletion(RedBlackTreeNode x) {// x 不是根节点且颜色为黑色,开始循环调整while (x != root && x.color == BLACK) {// x 是父亲的左儿子if (x == parentOf(x).left) {RedBlackTreeNode brother = parentOf(x).right;// 兄弟为红色if (brother.color == RED) {// 兄弟变成黑色,父节点变成红色brother.color = BLACK;parentOf(x).color = RED;// 父节点左旋,恢复左子树的黑色高度leftRotate(parentOf(x));// 更新兄弟brother = parentOf(x).right;}// 兄弟为黑色,左右侄子为黑色if (brother.left.color == BLACK && brother.right.color == BLACK) {// 兄弟变成红色brother.color = RED;// 从父节点开始继续调整x = parentOf(x);} else {// 右侄子为黑色(左侄子为红色)if (brother.right.color == BLACK) {// 左侄子变为黑色,兄弟变成红色brother.left.color = BLACK;brother.color = RED;// 兄弟右旋,恢复右子树黑色高度rightRotate(brother);// 左侄子成为新的兄弟brother = parentOf(x).right;}// 右侄子为红色,兄弟变成父节点颜色brother.color = parentOf(x).color;// 父节点和右侄子变成黑色parentOf(x).color = BLACK;brother.right.color = BLACK;// 父节点左旋leftRotate(parentOf(x));// x 指向根节点x = root;}} else {RedBlackTreeNode brother = parentOf(x).left;// 兄弟为红色if (brother.color == RED) {// 兄弟变黑色,父亲变红色brother.color = BLACK;parentOf(x).color = RED;// 父亲右旋,恢复红黑色高度rightRotate(parentOf(x));// 更新兄弟为右侄子brother = parentOf(x).left;}// 兄弟的左右儿子为黑色if (brother.left.color == BLACK && brother.right.color == BLACK) {// 兄弟变为红色brother.color = RED;// x 指向父节点,继续进行调整x = parentOf(x);} else {// 左侄子为黑色(右侄子为红色)if (brother.left.color == BLACK) {// 右侄子变黑色,兄弟变红色brother.right.color = BLACK;brother.color = RED;// 对兄弟左旋leftRotate(brother);// 右侄子成为新的兄弟brother = parentOf(x).left;}// 左侄子为红色,兄弟改为父节点颜色brother.color = parentOf(x).color;// 父节点和左侄子变成黑色brother.left.color = BLACK;parentOf(x).color = BLACK;// 兄弟节点上提(右旋父节点)rightRotate(parentOf(x));// x 指向根节点x = root;}}}// 更新 x 为黑色x.color = BLACK;
}
二、集合
1. Collection 接口

public boolean add(E e) : 把给定的对象添加到当前集合中 。
public void clear() :清空集合中所有的元素。
public boolean remove(E e) : 把给定的对象在当前集合中删除。
public boolean contains(Object obj) : 判断当前集合中是否包含给定的对象。
public boolean isEmpty() : 判断当前集合是否为空。
public int size() : 返回集合中元素的个数。
public Object[] toArray() : 把集合中的元素,存储到数组中public void addFirst(E e) :将指定元素插入此列表的开头。
public void addLast(E e) :将指定元素添加到此列表的结尾。
public E getFirst() :返回此列表的第一个元素。
public E getLast() :返回此列表的最后一个元素。
public E removeFirst() :移除并返回此列表的第一个元素。
public E removeLast() :移除并返回此列表的最后一个元素。
public E pop() :从此列表所表示的堆栈处弹出一个元素。
public void push(E e) :将元素推入此列表所表示的堆栈。
public boolean isEmpty() :如果列表不包含元素,则返回 true。2. Map 接口

2.1 Map 接口概述
2.2 常用实现类结构
2.3 存储结构的理解

2.4 常用方法
3. Iterator 迭代
4. 工具类
4.1 Collections
4.1.1 概述
4.1.2 排序操作 (均为 static 方法)
4.1.3 查找和替换
ArrayList list = new ArrayList();
list.add(123);
list.add(43);
list.add(765);
list.add(-97);
list.add(0);
List dest = Arrays.asList(new Object[list.size()]);
Collections.copy(dest,list);
4.1.4 同步控制
List list1 = Collections.synchronizedList(list); // 返回的 list1 即使线程安全的。4.2 Arrays
4.2.1 常用的方法表
| **方法声明** | **功能描述**
|
| :----------------------------------------------------------- | :------------------------------------- |
| public static List asList(T… a)                              | 返回由指定数组支持的固定大小的列表 |
| public static String toString(int[] a)                       | 返回指定数组的内容的字符串表示形式 |
| public static void sort(int[] a)                             | 按照数字顺序排列指定的数组 |
| public static int binarySearch(Object[] a, Object key)       | 使用二叉搜索算法搜索指定对象的指定数组 |
| public static int[] copyOfRange(int[] original, int from, int to) | 将指定数组的指定范围复制到新数组中 |
| public static void fill(Object[] a, Object val)              | 将指定数组的指定范围复制到新数组中 |
4.2.2 数组转集合
import java.util.*;
import java.io.*;public class Example{public static void main(String args[]) throws IOException{int n = 5; // 5 个元素String[] name = new String[n];for(int i = 0; i < n; i++){name[i] = String.valueOf(i);}List<String> list = Arrays.asList(name);System.out.println();for(String li: list){String str = li;System.out.print(str + " ");}}
}
4.2.3 集合转数组
import java.util.*;public class Main{public static void main(String[] args){List<String> list = new ArrayList<String>();list.add("咕");list.add("泡");list.add("教");list.add("育");list.add("https://www.gupaoedu.cn");String[] s1 = list.toArray(new String[0]);for(int i = 0; i < s1.length; ++i){String contents = s1[i];System.out.print(contents);}}
}
4.2.4 数组转换为字符串
import java.util.*;public class Example {public static void main(String[] args){int[] arr = {9, 8, 3, 5, 2};String arrString = Arrays.toString(arr);System.out.println(arrString);}
}4.2.5 排序
import java.util.*;public class Example {public static void main(String[] args){int[] arr = {9, 8, 3, 5, 2}; //初始化一个数组System.out.print("排序前:");printArray(arr);Arrays.sort(arr);System.out.print("排序后:");printArray(arr);}public static void printArray(int[] arr){ //定义打印数组方法System.out.print("[");for(int x=0; x<arr.length; x++){if(x != arr.length - 1){System.out.print(arr[x] + ",");} else {System.out.println(arr[x] + "]");}}}
}
4.2.6 查找元素
import java.util.*;public class Example {public static void main(String[] args){int[] arr = {9, 8, 3, 5, 2}; //初始化一个数组Arrays.sort(arr);int index = Arrays.binarySearch(arr, 3);//输出元素所在的索引位置System.out.println("数组排序后元素 3 的索引是:" + index);}
}
4.2.7 拷贝元素
import java.util.*;public class Example {public static void main(String[] args){int[] arr = {9, 8, 3, 5, 2}; //初始化一个数组int[] copied = Arrays.copyOfRange(arr, 1, 7);for(int i=0; i<copied.length; i++){System.out.print(copied[i] + " ");}}
}
4.2.8 填充元素
import java.util.*;public class Example {public static void main(String[] args){int[] arr = {1, 2, 3, 4}; //初始化一个数组Arrays.fill(arr, 8);for(int i=0; i<arr.length; i++){System.out.println(i + ": " +arr[i]);}}
}
5. 比较器
5.1 Comparable
5.1.1 Comparable 简介
5.1.2 Comparable 定义
package java.lang;import java.util.*;public interface Comparable<T> {public int compareTo(T o);
}5.2 Comparator
5.1.3 Comparator 简介
5.1.4 Comparator 定义
package java.util;public interface Comparator<T> {int compare(T o1, T o2);boolean equals(Object obj);
}5.3 Comparator 和 Comparable 比较
5.4 利用Comparable排序
package com.gupaoedu;public class Person implements Comparable<Person> {private String name;private int age;public Person(){}public Person(String name, int age) {this.name = name;this.age = age;}public String getName() {return name;}public void setName(String name) {this.name = name;}public int getAge() {return age;}public void setAge(int age) {this.age = age;}@Overridepublic String toString() {return "Person{" +"name='" + name + '\'' +", age=" + age +'}';}/*** 实现 “Comparable<String>” 的接口,即重写compareTo<T t>函数。* 这里是通过“person的名字”进行比较的* @param person* @return*/@Overridepublic int compareTo(Person person) {return name.compareTo(person.name);//return this.name - person.name;}
}@org.junit.Test
public void test01(){ArrayList<Person> list = new ArrayList<>();list.add(new Person("ccc", 20));list.add(new Person("AAA", 30));list.add(new Person("bbb", 10));list.add(new Person("ddd", 40));System.out.println("-----原始排序开始-----");for(Person person : list){System.out.println(person.toString());}System.out.println("-----原始排序结束-----");Collections.sort(list);System.out.println("-----名字排序开始-----");for(Person person : list){System.out.println(person.toString());}System.out.println("-----名字排序结束-----");
}-----原始排序开始-----
Person{name='ccc', age=20}
Person{name='AAA', age=30}
Person{name='bbb', age=10}
Person{name='ddd', age=40}
-----原始排序结束-----
-----名字排序开始-----
Person{name='AAA', age=30}
Person{name='bbb', age=10}
Person{name='ccc', age=20}
Person{name='ddd', age=40}
-----名字排序结束-----
5.5 利用Comparator排序
5.5.1 通书写方式
package com.gupaoedu;public class Person {private String name;private int age;public Person() {}public Person(String name, int age) {this.name = name;this.age = age;}public String getName() {return name;}public void setName(String name) {this.name = name;}public int getAge() {return age;}public void setAge(int age) {this.age = age;}@Overridepublic String toString() {return "Person{" +"name='" + name + '\'' +", age=" + age +'}';}
}package com.zhangzemin;import java.util.Comparator;public class AscAgeComparator implements Comparator<Person> {@Overridepublic int compare(Person p1, Person p2) {//升序排序return p1.getAge() - p2.getAge();//降序排序//return p2.getAge() - p1.getAge();}
}@org.junit.Test
public void test02(){ArrayList<Person> list = new ArrayList<>();list.add(new Person("ccc", 20));list.add(new Person("AAA", 30));list.add(new Person("bbb", 10));list.add(new Person("ddd", 40));System.out.println("-----原始排序开始-----");for(Person person : list){System.out.println(person.toString());}System.out.println("-----原始排序结束-----");Collections.sort(list,new AscAgeComparator());System.out.println("-----年龄排序开始-----");for(Person person : list){System.out.println(person.toString());}System.out.println("-----年龄排序结束-----");
}
运行结果:
shell
-----原始排序开始-----
Person{name='ccc', age=20}
Person{name='AAA', age=30}
Person{name='bbb', age=10}
Person{name='ddd', age=40}
-----原始排序结束-----
-----年龄排序开始-----
Person{name='bbb', age=10}
Person{name='ccc', age=20}
Person{name='AAA', age=30}
Person{name='ddd', age=40}
-----年龄排序结束-----
5.5.2 匿名内部类书写方式
package com.gupaoedu;public class Person {private String name;private int age;public Person() {}public Person(String name, int age) {this.name = name;this.age = age;}public String getName() {return name;}public void setName(String name) {this.name = name;}public int getAge() {return age;}public void setAge(int age) {this.age = age;}@Overridepublic String toString() {return "Person{" +"name='" + name + '\'' +", age=" + age +'}';}
}@org.junit.Test
public void test03() {ArrayList<Person> list = new ArrayList<>();list.add(new Person("ccc", 20));list.add(new Person("AAA", 30));list.add(new Person("bbb", 10));list.add(new Person("ddd", 40));System.out.println("-----原始排序开始-----");for (Person person : list) {System.out.println(person.toString());}System.out.println("-----原始排序结束-----");Collections.sort(list, new Comparator<Person>() {@Overridepublic int compare(Person p1, Person p2) {//升序排序return p1.getAge() - p2.getAge();//降序排序//return p2.getAge() - p1.getAge();}});System.out.println("-----年龄升序排序开始-----");for (Person person : list) {System.out.println(person.toString());}System.out.println("-----年龄升序排序结束-----");
}-----原始排序开始-----
Person{name='ccc', age=20}
Person{name='AAA', age=30}
Person{name='bbb', age=10}
Person{name='ddd', age=40}
-----原始排序结束-----
-----年龄排序开始-----
Person{name='bbb', age=10}
Person{name='ccc', age=20}
Person{name='AAA', age=30}
Person{name='ddd', age=40}
-----年龄排序结束-----
三、ArrayList源码
3.1 初始化
```java
/**
* 一些初始化的信息
*/
// 序列化 ID
private static final long serialVersionUID = 8683452581122892189L;// 初始容量
private static final int DEFAULT_CAPACITY = 10;// 用于空实例的共享数组实例
private static final Object[] EMPTY_ELEMENTDATA = {};// 用于默认大小的空实例的数组,区别于 EMPTY_ELEMENTDATA[] 数组
private static final Object[] DEFAULTCAPACITY_EMPTY_ELEMENTDATA = {};//  真实存储 ArrayList元素的数组缓冲区,其长度即为 ArrayList的容量,在第一次添加元素时就会扩展为 DEFAULT_CAPACITY
transient Object[] elementData;//  ArrayList的实际长度(保存的元素的个数)
private int size;// 当前 ArrayList被结构化修改的次数,结构化修改指的是 修改了列表长度或者以某种方式扰乱了列表使之在迭代时不安全的操作
//  该字段由 Iterator或者 ListIterator或返回以上二者的方法使用,如果这个值发生了意料之外的改变,迭代器就会报并发修改异常。这提供了快速失败解决方案
// 在其子类下使用 modCound是可选择的(protected修饰了),如果子类希望提供快速失败的迭代那么它也可以在它的 add()等结构化修改方法中修改 modCount的值,单次的结构修改方法的调用最多只能修改一次 modCount的值;但是如果不希望提供 快速失败 的迭代器,子类可以忽略 modCount
// 我之前一直以为 modCount定义在 迭代器中。。。,现在才知道定义在被迭代的对象内
protected transient int modCount; // 定义在 AbstractList中//  列表最大能分配的量
private static final int MAX_ARRAY_SIZE = Integer.MAX_VALUE - 8;
3.2 构造方法
public ArrayList() {this.elementData = DEFAULTCAPACITY_EMPTY_ELEMENTDATA;
}public ArrayList(int initialCapacity) {if (initialCapacity > 0) {// 依据输入的大小,初始化 elementData[] 数组(真实存储元素的数组)this.elementData = new Object[initialCapacity];} else if (initialCapacity == 0) {// 使用默认的大小(也就是 10)this.elementData = EMPTY_ELEMENTDATA;} else {// 针对负数等随便输入的东西,报错非法参数异常(非法的初始容量:xxx)throw new IllegalArgumentException("Illegal Capacity: "+initialCapacity);}
}public ArrayList(Collection<? extends E> c) {// 将参数集合转为数组elementData = c.toArray();// 判断数组大小if ((size = elementData.length) != 0) {// c.toArray might (incorrectly) not return Object[] (see 6260652)if (elementData.getClass() != Object[].class) {elementData = Arrays.copyOf(elementData, size, Object[].class);}} else {// 如果传参的集合为空,当前 ArrayList的 elementData[]数组就是空的this.elementData = EMPTY_ELEMENTDATA;}
}3.3 add方法
public boolean add(E e) {//  判断列表容量够不够,实际判断 elementData[]数组里还有没有多余的空闲空间ensureCapacityInternal(size + 1); // increments modCountelementData[size++] = e;return true;
}private void ensureCapacityInternal(int minCapacity) {// 确保容量够用,calculateCapacity()计算扩容ensureExplicitCapacity(calculateCapacity(elementData, minCapacity));
}private static int calculateCapacity(Object[] elementData, int minCapacity) {// 如果列表是默认空参构造创建的,并且本次是第一次 addif (elementData == DEFAULTCAPACITY_EMPTY_ELEMENTDATA) {// 那么会直接把容量加到 10return Math.max(DEFAULT_CAPACITY, minCapacity);}// 否则就正常 +1就行return minCapacity;
}private void ensureExplicitCapacity(int minCapacity) {// 结构化修改,增加该值,保证该集合是快速失败的modCount++;// overflow-conscious code// 判断是否会溢出if (minCapacity - elementData.length > 0)// 如果会溢出,就需要扩容了(也就是说 原有的 size+1 > capacity了,装不下了)grow(minCapacity);
}private void grow(int minCapacity) {    // overflow-conscious code    // 获取原来的容量    int oldCapacity = elementData.length;    // 获取常规的扩容大小    int newCapacity = oldCapacity + (oldCapacity >> 1);    // 如果常规扩容之后还不够大,索性就你要多少就给你多少吧    if (newCapacity - minCapacity < 0)        newCapacity = minCapacity;    //  MAX_ARRAY_SIZE = Integer.MAX_VALUE - 8,也就是说如果你要的容量很大,那么就调用 另一个方法    if (newCapacity - MAX_ARRAY_SIZE > 0)        // 定义放在下面        newCapacity = hugeCapacity(minCapacity);    // minCapacity is usually close to size, so this is a win:    // 真实的数组拷贝  elementData = Arrays.copyOf(elementData, newCapacity);
}
3.4 get方法
public E get(int index) {    // 检查索引是否正常,定义放在下面    rangeCheck(index);    // 返回 elementData[]数组中,该下标的元素    return elementData(index);
}private void rangeCheck(int index) {    // 如果指定的值大于数组的最大下标,就抛出异常    if(index >= size) {        // 抛出异常,outOfBoudnsMsg()方法定义放在下面        throw new IndexOutOfBoundsException(outOfBoundsMsg(index));    }
}private String outOfBoundsMsg(int index) {    return "Index: " + index + ", Size: " + size;
}
3.5 set方法
public E set(int index, E element) {// 同 get()方法一样,先检查 index是不是比 size小rangeCheck(index);// 获取该位置上原来的值E oldValue = elementData[index];// 在 elementData[]数组中替换该位置下的值elementData[index] = element;// 返回原来的值return oldValue;
}
3.6 remove方法
public E remove(int index) {// 检查索引越界rangeCheck(index);// 结构化修改,变更 modCount的值modCount++;// 获取旧的值E oldValue = elementData(index);// 计算需要移动的数字的个数int numMoved = size - index - 1;if(numMoved > 0) {// 通过数组拷贝的形式,将从待移除位置开始往后的所有元素前移一位System.arraycopy(elementData, index+1, elementData, index, numMoved);}// 将最后一个元素置为 null(因为数组拷贝的关系,在 elementData[size-1] 和 elementData[size-2]中存的都是最后一个值,重复了)elementData[--size] = null; // clear to let GC do its work// 返回旧的值return oldValue;
}
3.7 FailFast机制
import java.util.Iterator;
import java.util.List;public class ThreadIterate extends Thread {private List list;public ThreadIterate(List list){this.list = list;}@Overridepublic void run() {while(true){for (Iterator iteratorTmp = list.iterator();iteratorTmp.hasNext();) {iteratorTmp.next();try {Thread.sleep(5);} catch (InterruptedException e) {e.printStackTrace();}}}}
}
public class ThreadAdd extends Thread{private List list;public ThreadAdd(List list){this.list = list;}public void run(){for (int i = 0; i < 100; i++) {System.out.println("loop execute : " + i);try {Thread.sleep(5);list.add(i);}catch (Exception e){}}}
}import java.util.ArrayList;
import java.util.List;public class ThreadMain {private static List list = new ArrayList();public static void main(String[] args) {new ThreadAdd(list).start();new ThreadIterate(list).start();}
}loop execute : 0
loop execute : 1
loop execute : 2
Exception in thread "Thread-1" java.util.ConcurrentModificationException
at java.util.ArrayList$Itr.checkForComodification(ArrayList.java:911)
at java.util.ArrayList$Itr.next(ArrayList.java:861)
at com.gupao.arraylist.ThreadIterate.run(ThreadIterate.java:18)
loop execute : 3
loop execute : 4
loop execute : 5
loop execute : 6
loop execute : 7
四、LinkedList源码
private static class Node<E> {E item;//节点值Node<E> next;//后继节点Node<E> prev;//前驱节点Node(Node<E> prev, E element, Node<E> next) {this.item = element;this.next = next;this.prev = prev;}
}
4.1 构造方法
public LinkedList() {
}public LinkedList(Collection<? extends E> c) {this();addAll(c);
}4.2 add方法
public boolean add(E e) {linkLast(e);//这里就只调用了这一个方法return true;
}void linkLast(E e) {final Node<E> l = last;final Node<E> newNode = new Node<>(l, e, null);last = newNode;//新建节点if (l == null)first = newNode;elsel.next = newNode;//指向后继元素也就是指向下一个元素size++;modCount++;
}public void add(int index, E element) {checkPositionIndex(index); //检查索引是否处于[0-size]之间if (index == size)//添加在链表尾部linkLast(element);else//添加在链表中间linkBefore(element, node(index));
}public boolean addAll(Collection<? extends E> c) {return addAll(size, c);
}public boolean addAll(int index, Collection<? extends E> c) {//1:检查index范围是否在size之内checkPositionIndex(index);//2:toArray()方法把集合的数据存到对象数组中Object[] a = c.toArray();int numNew = a.length;if (numNew == 0)return false;//3:得到插入位置的前驱节点和后继节点Node<E> pred, succ;//如果插入位置为尾部,前驱节点为last,后继节点为nullif (index == size) {succ = null;pred = last;}//否则,调用node()方法得到后继节点,再得到前驱节点else {succ = node(index);pred = succ.prev;}// 4:遍历数据将数据插入for (Object o : a) {@SuppressWarnings("unchecked") E e = (E) o;//创建新节点Node<E> newNode = new Node<>(pred, e, null);//如果插入位置在链表头部if (pred == null)first = newNode;elsepred.next = newNode;pred = newNode;}//如果插入位置在尾部,重置last节点if (succ == null) {last = pred;}//否则,将插入的链表与先前链表连接起来else {pred.next = succ;succ.prev = pred;}size += numNew;modCount++;return true;
}- 检查index范围是否在size之内。
- toArray()方法把集合的数据存到对象数组中。
- 得到插入位置的前驱和后继节点。
- 遍历数据,将数据插入到指定位置。
public void addFirst(E e) {linkFirst(e);}
addLast(E e): 将元素添加到链表尾部,与 add(E e) 方法一样。
public void addLast(E e) {linkLast(e);
}
4.3 根据位置取数据的方法
public E get(int index) {//检查index范围是否在size之内checkElementIndex(index);//调用Node(index)去找到index对应的node然后返回它的值return node(index).item;
}public E getFirst() {final Node<E> f = first;if (f == null)throw new NoSuchElementException();return f.item;
}public E element() {return getFirst();
}public E peek() {final Node<E> f = first;return (f == null) ? null : f.item;
}public E peekFirst() {final Node<E> f = first;return (f == null) ? null : f.item;
}public E getLast() {final Node<E> l = last;if (l == null)throw new NoSuchElementException();return l.item;
}
public E peekLast() {final Node<E> l = last;return (l == null) ? null : l.item;
}4.4 根据对象得到索引的方法
public int indexOf(Object o) {int index = 0;if (o == null) {//从头遍历for (Node<E> x = first; x != null; x = x.next) {if (x.item == null)return index;index++;}} else {//从头遍历for (Node<E> x = first; x != null; x = x.next) {if (o.equals(x.item))return index;index++;}}return -1;
}public int lastIndexOf(Object o) {int index = size;if (o == null) {//从尾遍历for (Node<E> x = last; x != null; x = x.prev) {index--;if (x.item == null)return index;}} else {//从尾遍历for (Node<E> x = last; x != null; x = x.prev) {index--;if (o.equals(x.item))return index;}}return -1;
}public boolean contains(Object o) {return indexOf(o) != -1;
}4.5 删除方法
public E pop() {return removeFirst();
}public E remove() {return removeFirst();
}public E removeFirst() {final Node<E> f = first;if (f == null)throw new NoSuchElementException();return unlinkFirst(f);
}public E removeLast() {final Node<E> l = last;if (l == null)throw new NoSuchElementException();return unlinkLast(l);
}public E pollLast() {final Node<E> l = last;return (l == null) ? null : unlinkLast(l);
}public boolean remove(Object o) {//如果删除对象为nullif (o == null) {//从头开始遍历for (Node<E> x = first; x != null; x = x.next) {//找到元素if (x.item == null) {//从链表中移除找到的元素unlink(x);return true;}}} else {//从头开始遍历for (Node<E> x = first; x != null; x = x.next) {//找到元素if (o.equals(x.item)) {//从链表中移除找到的元素unlink(x);return true;}}}return false;
}E unlink(Node<E> x) {// assert x != null;final E element = x.item;final Node<E> next = x.next;//得到后继节点final Node<E> prev = x.prev;//得到前驱节点//删除前驱指针if (prev == null) {first = next;//如果删除的节点是头节点,令头节点指向该节点的后继节点} else {prev.next = next;//将前驱节点的后继节点指向后继节点x.prev = null;}//删除后继指针if (next == null) {last = prev;//如果删除的节点是尾节点,令尾节点指向该节点的前驱节点} else {next.prev = prev;x.next = null;}x.item = null;size--;modCount++;return element;
}public E remove(int index) {//检查index范围checkElementIndex(index);//将节点删除return unlink(node(index));
}4.6 LinkedList类常用方法测试
import java.util.Iterator;
import java.util.LinkedList;public class LinkedListDemo {public static void main(String[] srgs) {//创建存放int类型的linkedListLinkedList<Integer> linkedList = new LinkedList<>();/************************** linkedList的基本操作 ************************/linkedList.addFirst(0); // 添加元素到列表开头linkedList.add(1); // 在列表结尾添加元素linkedList.add(2, 2); // 在指定位置添加元素linkedList.addLast(3); // 添加元素到列表结尾System.out.println("LinkedList(直接输出的): " + linkedList);System.out.println("getFirst()获得第一个元素: " + linkedList.getFirst()); // 返回此列表的第一个元素System.out.println("getLast()获得第最后一个元素: " + linkedList.getLast()); // 返回此列表的最后一个元素System.out.println("removeFirst()删除第一个元素并返回: " + linkedList.removeFirst()); // 移除并返回此列表的第一个元素System.out.println("removeLast()删除最后一个元素并返回: " + linkedList.removeLast()); // 移除并返回此列表的最后一个元素System.out.println("After remove:" + linkedList);System.out.println("contains()方法判断列表是否包含1这个元素:" + linkedList.contains(1)); // 判断此列表包含指定元素,如果是,则返回trueSystem.out.println("该linkedList的大小 : " + linkedList.size()); // 返回此列表的元素个数/************************** 位置访问操作 ************************/System.out.println("-----------------------------------------");linkedList.set(1, 3); // 将此列表中指定位置的元素替换为指定的元素System.out.println("After set(1, 3):" + linkedList);System.out.println("get(1)获得指定位置(这里为1)的元素: " + linkedList.get(1)); // 返回此列表中指定位置处的元素/************************** Search操作 ************************/System.out.println("-----------------------------------------");linkedList.add(3);System.out.println("indexOf(3): " + linkedList.indexOf(3)); // 返回此列表中首次出现的指定元素的索引System.out.println("lastIndexOf(3): " + linkedList.lastIndexOf(3));// 返回此列表中最后出现的指定元素的索引/************************** Queue操作 ************************/System.out.println("-----------------------------------------");System.out.println("peek(): " + linkedList.peek()); // 获取但不移除此列表的头System.out.println("element(): " + linkedList.element()); // 获取但不移除此列表的头linkedList.poll(); // 获取并移除此列表的头System.out.println("After poll():" + linkedList);linkedList.remove();System.out.println("After remove():" + linkedList); // 获取并移除此列表的头linkedList.offer(4);System.out.println("After offer(4):" + linkedList); // 将指定元素添加到此列表的末尾/************************** Deque操作 ************************/System.out.println("-----------------------------------------");linkedList.offerFirst(2); // 在此列表的开头插入指定的元素System.out.println("After offerFirst(2):" + linkedList);linkedList.offerLast(5); // 在此列表末尾插入指定的元素System.out.println("After offerLast(5):" + linkedList);System.out.println("peekFirst(): " + linkedList.peekFirst()); // 获取但不移除此列表的第一个元素System.out.println("peekLast(): " + linkedList.peekLast()); // 获取但不移除此列表的第一个元素linkedList.pollFirst(); // 获取并移除此列表的第一个元素System.out.println("After pollFirst():" + linkedList);linkedList.pollLast(); // 获取并移除此列表的最后一个元素System.out.println("After pollLast():" + linkedList);linkedList.push(2); // 将元素推入此列表所表示的堆栈(插入到列表的头)System.out.println("After push(2):" + linkedList);linkedList.pop(); // 从此列表所表示的堆栈处弹出一个元素(获取并移除列表第一个元素)System.out.println("After pop():" + linkedList);linkedList.add(3);linkedList.removeFirstOccurrence(3); // 从此列表中移除第一次出现的指定元素(从头部到尾部遍历列表)System.out.println("After removeFirstOccurrence(3):" + linkedList);linkedList.removeLastOccurrence(3); // 从此列表中移除最后一次出现的指定元素(从尾部到头部遍历列表)System.out.println("After removeFirstOccurrence(3):" + linkedList);/************************** 遍历操作 ************************/System.out.println("-----------------------------------------");linkedList.clear();for (int i = 0; i < 100000; i++) {linkedList.add(i);}// 迭代器遍历long start = System.currentTimeMillis();Iterator<Integer> iterator = linkedList.iterator();while (iterator.hasNext()) {iterator.next();}long end = System.currentTimeMillis();System.out.println("Iterator:" + (end - start) + " ms");// 顺序遍历(随机遍历)start = System.currentTimeMillis();for (int i = 0; i < linkedList.size(); i++) {linkedList.get(i);}end = System.currentTimeMillis();System.out.println("for:" + (end - start) + " ms");// 另一种for循环遍历start = System.currentTimeMillis();for (Integer i : linkedList);end = System.currentTimeMillis();System.out.println("for2:" + (end - start) + " ms");// 通过pollFirst()或pollLast()来遍历LinkedListLinkedList<Integer> temp1 = new LinkedList<>();temp1.addAll(linkedList);start = System.currentTimeMillis();while (temp1.size() != 0) {temp1.pollFirst();}end = System.currentTimeMillis();System.out.println("pollFirst()或pollLast():" + (end - start) + " ms");// 通过removeFirst()或removeLast()来遍历LinkedListLinkedList<Integer> temp2 = new LinkedList<>();temp2.addAll(linkedList);start = System.currentTimeMillis();while (temp2.size() != 0) {temp2.removeFirst();}end = System.currentTimeMillis();System.out.println("removeFirst()或removeLast():" + (end - start) + " ms");}
}
五、Vector
List syncList = Collections.synchronizedList(list);public E get(int index) {synchronized (mutex) {return list.get(index);}
}public E set(int index, E element) {synchronized (mutex) {return list.set(index, element);}
}public void add(int index, E element) {synchronized (mutex) {list.add(index, element);}
}public E remove(int index) {synchronized (mutex) {return list.remove(index);}
}六、Set接口和Map接口
6.1 HashSet
public HashSet() {map = new HashMap<>();
}// add方法
public boolean add(E e) {return map.put(e, PRESENT)==null;
}
6.2 TreeSet
public TreeSet() {this(new TreeMap<E,Object>());
}
6.3 HashMap
6.3.1 特点:
static class Node<K,V> implements Map.Entry<K,V> {final int hash;final K key;V value;Node<K,V> next;
}6.3.2 数据结构:
6.3.3 HashMap存储元素的过程
HashMap<String,String> map = new HashMap<String,String>();
map.put("刘德华","张惠妹");
map.put("张学友","大S");调用这个方法会生成一个int型的整数,我们叫它哈希码,哈希码和调用它的对象地址和内容有关。
2. 已经有元素占据了索引为1的位置,这种情况下我们需要判断一下该位置的元素和当前元素是否相等,使用equals来比较。
6.3.4 HashMap中有两个重要的参数
6.3.5 HashMap的put()和get()的实现
如果要插入的键值对要存放的这个位置刚好没有元素,那么把他封装成Node对象,放在这个位置上即可。
如果这个元素的key与要插入的一样,那么就替换一下。
如果当前节点是TreeNode类型的数据,执行putTreeVal方法。
遍历这条链子上的数据,完成了操作后多做了一件事情,判断,并且可能执行treeifyBin方法。
6.3.6 java 1.7 和 java1.8 HashMap 的区别
jdk1.8中采用的是位桶+链表/红黑树的方式,也是非线程安全的。当某个位桶的链表的长度达到某个阀值(8)的时候,这个链表就将转换成红黑树。
在jdk1.8中,如果链表长度大于8且节点数组长度大于64的时候,就把链表下所有的节点转为红黑树。
树形化还有一个要求就是数组长度必须大于等于64,否则继续采用扩容策略
总的来说,HashMap默认采用数组+单链表方式存储元素,当元素出现哈希冲突时,会存储到该位置的单链表中。但是单链表不会一直增加元素,当元素个数超过8个时,会尝试将单链表转化为红黑树存储。但是在转化前,会再判断一次当前数组的长度,只有数组长度大于64才处理。否则,进行扩容操作。
static final int TREEIFY_THRESHOLD = 8;public V put(K key, V value) {return putVal(hash(key), key, value, false, true);
}final V putVal(int hash, K key, V value, boolean onlyIfAbsent,boolean evict) {Node<K,V>[] tab;Node<K,V> p;int n, i;//如果当前map中无数据,执行resize方法。并且返回nif ((tab = table) == null || (n = tab.length) == 0)n = (tab = resize()).length;//如果要插入的键值对要存放的这个位置刚好没有元素,那么把他封装成Node对象,放在这个位置上即可if ((p = tab[i = (n - 1) & hash]) == null)tab[i] = newNode(hash, key, value, null);//否则的话,说明这上面有元素else {Node<K,V> e; K k;//如果这个元素的key与要插入的一样,那么就替换一下。if (p.hash == hash &&((k = p.key) == key || (key != null && key.equals(k))))e = p;//1.如果当前节点是TreeNode类型的数据,执行putTreeVal方法else if (p instanceof TreeNode)e = ((TreeNode<K,V>)p).putTreeVal(this, tab, hash, key, value);else {//还是遍历这条链子上的数据,跟jdk7没什么区别for (int binCount = 0; ; ++binCount) {if ((e = p.next) == null) {p.next = newNode(hash, key, value, null);//2.完成了操作后多做了一件事情,判断,并且可能执行treeifyBin方法if (binCount >= TREEIFY_THRESHOLD - 1) // -1 for 1sttreeifyBin(tab, hash);break;}if (e.hash == hash &&((k = e.key) == key || (key != null && key.equals(k))))break;p = e;}}if (e != null) { // existing mapping for keyV oldValue = e.value;if (!onlyIfAbsent || oldValue == null) //true || --e.value = value;//3.afterNodeAccess(e);return oldValue;}}++modCount;//判断阈值,决定是否扩容if (++size > threshold)resize();//4.afterNodeInsertion(evict);return null;}
6.4 TreeMap
可以插入null键,null值;
可以对元素进行排序;
无序集合(插入和遍历顺序不一致);
6.4.1 构造函数
`TreeMap(Comparator<? super K> comparator)` 带比较器(`comparator`)的构造函数,用户可以自定义比较器,按照自己的需要对TreeMap进行排序;
`TreeMap(Map<? extends K, ? extends V> copyFrom)` 基于一个map创建一个新的TreeMap,使用默认比较器升序排序;
`TreeMap(SortedMap<K, ? extends V> copyFrom)` 基于一个SortMap创建一个新的TreeMap(SortMap是有序的)。
import java.util.HashMap;
import java.util.Map;
import java.util.TreeMap;public class TreeMapTest {public static void main(String[] args) {HashMap<Integer, String> hmap = new HashMap<>();hmap.put(13, "Yellow");hmap.put(3, "Red");hmap.put(2, "Green");hmap.put(33, "Blue");System.out.println("key & values in hmap:");for (Map.Entry entry : hmap.entrySet()) {System.out.println("key: " + entry.getKey() + ", value: " + entry.getValue());}TreeMap<Integer, String> tmap = new TreeMap<>(hmap);System.out.println("key & values in tmap:");for (Map.Entry entry : tmap.entrySet()) {System.out.println("key: " + entry.getKey() + ", value: " + entry.getValue());}}
}key & values in hmap:
key: 33, value: Blue
key: 2, value: Green
key: 3, value: Red
key: 13, value: Yellow
key & values in tmap:
key: 2, value: Green
key: 3, value: Red
key: 13, value: Yellow
key: 33, value: Blue
import java.util.Iterator;
import java.util.Map;
import java.util.TreeMap;public class TreeMapTest {public static void main(String[] args) {TreeMap<Integer, String> tmap = new TreeMap<>();System.out.println("tmap is empty: " + tmap.isEmpty());tmap.put(13, "Yellow");tmap.put(3, "Red");tmap.put(2, "Green");tmap.put(33, "Blue");System.out.println("key & values in tmap:");for (Map.Entry entry : tmap.entrySet()) {System.out.println("key: " + entry.getKey() + ", value: " + entry.getValue());}System.out.println("size of tmap is: " + tmap.size());System.out.println("tmap contains value Purple: " + tmap.containsValue("Purple"));System.out.println("tmap contains key 12: " + tmap.containsKey(12));System.out.println("last key in tmap is: " + tmap.lastKey());System.out.println("key is 14 & value is " + tmap.get(14));System.out.println("remove key 13");tmap.remove(13);System.out.println("tmap contains key 13: " + tmap.containsKey(13));System.out.println("key in tmap:");Iterator iterator = tmap.keySet().iterator();while (iterator.hasNext()) {System.out.println(iterator.next());}System.out.println("clear tmap");tmap.clear();System.out.println("size of tmap: " + tmap.size());}
}key & values in tmap:
key: 2, value: Green
key: 3, value: Red
key: 13, value: Yellow
key: 33, value: Blue
size of tmap is: 4
tmap contains value Purple: false
tmap contains key 12: false
last key in tmap is: 33
key is 14 & value is null
remove key 13
tmap contains key 13: false
key in tmap:
2
3
33
clear tmap
size of tmap: 0
6.5 TreeSet和TreeMap的区别
2、TreeMap是TreeSet的底层结构。
3、运行速度都比hash慢。
2、TreeSet中不能有重复对象,而TreeMap中可以存在。
3、TreeMap的底层采用红黑树的实现,完成数据有序的插入,排序。
2:根节点是黑色的。
3:所有的叶节点都是黑色空节点。
4:每个红色节点的两个子节点都是黑色。(从每个叶子到根的路径上不会有两个连续的红色节点)。
5:从任一节点到其子树中每个叶子节点的路径都包含相同数量的黑色节点。
6.6 HashSet和HashMap的区别
| HashMap                                     | HashSet                                                      |
| ------------------------------------------- | ------------------------------------------------------------ |
| HashMap实现了Map接口                         | HashSet实现了Set接口                                         |
| HashMap储存键值对                            | HashSet仅仅存储对象                                          |
| 使用put()方法将元素放入map中                  | 使用add()方法将元素放入set中                                 |
| HashMap中使用键对象来计算hashcode值           | HashSet使用成员对象来计算hashcode值,对于两个对象来说hashcode可能相同,所以equals()方法用来判断对象的相等性,如果两个对象不同的化,那么返回false |
| HashMap比较快,因为是使用唯一的键来获取对象    | HashSet较HashMap来说比较慢                                   |
七、泛型
7.1 为什么使用泛型
public static void main(String[] args) {//测试一下泛型的经典案例ArrayList arrayList = new ArrayList();arrayList.add("helloWorld");arrayList.add("taiziyenezha");arrayList.add(88);//由于集合没有做任何限定,任何类型都可以给其中存放for (int i = 0; i < arrayList.size(); i++) {//需求:打印每个字符串的长度,就要把对象转成String类型String str = (String) arrayList.get(i);System.out.println(str.length());}
}ArrayList<String> arrayList = new ArrayList<>();
arrayList.add("helloWorld");
arrayList.add("taiziyenezha");
arrayList.add(88);// 在编译阶段,编译器就会报错7.2 什么是泛型
7.3 使用泛型的好处
它提供了编译期的**类型安全**,确保在泛型类型(通常为泛型集合)上只能使用正确类型的对象,避免了在运行时出现ClassCastException。
7.4 泛型的使用
7.4.1 泛型类
/*** @param <T> 这里解释下<T>中的T:*           此处的T可以随便写为任意标识,常见的有T、E等形式的参数表示泛型*           泛型在定义的时候不具体,使用的时候才变得具体。*           在使用的时候确定泛型的具体数据类型。即在创建对象的时候确定泛型。*/
public class GenericsClassDemo<T> {//t这个成员变量的类型为T,T的类型由外部指定private T t;//泛型构造方法形参t的类型也为T,T的类型由外部指定public GenericsClassDemo(T t) {this.t = t;}//泛型方法getT的返回值类型为T,T的类型由外部指定public T getT() {return t;}
}public class GenericsClassDemo<String> {private String t;public GenericsClassDemo(String t) {this.t = t;}public String getT() {return t;}
}注意:定义的泛型类,就一定要传入泛型类型实参么?
7.4.2 泛型方法
/**** @param t 传入泛型的参数* @param <T> 泛型的类型* @return T 返回值为T类型* 说明:*   1)public 与 返回值中间<T>非常重要,可以理解为声明此方法为泛型方法。*   2)只有声明了<T>的方法才是泛型方法,泛型类中的使用了泛型的成员方法并不是泛型方法。*   3)<T>表明该方法将使用泛型类型T,此时才可以在方法中使用泛型类型T。*   4)与泛型类的定义一样,此处T可以随便写为任意标识,常见的如T、E等形式的参数常用于表示泛型。*/
public <T> T genercMethod(T t){System.out.println(t.getClass());System.out.println(t);return t;
}// 调用方法时,确定泛型的类型
public static void main(String[] args) {GenericsClassDemo<String> genericString  = new GenericsClassDemo("helloGeneric"); //这里的泛型跟下面调用的泛型方法可以不一样。String str = genericString.genercMethod("hello");//传入的是String类型,返回的也是String类型Integer i = genericString.genercMethod(123);//传入的是Integer类型,返回的也是Integer类型
}hello
class java.lang.Integer
123
7.4.3 泛型接口
/*** 定义一个泛型接口*/
public interface GenericsInteface<T> {public abstract void add(T t);
}public class GenericsImp implements GenericsInteface<String> {@Overridepublic void add(String s) {System.out.println("设置了泛型为String类型");}
}public class GenericsImp<T> implements GenericsInteface<T> {@Overridepublic void add(T t) {System.out.println("没有设置类型");}
}public class GenericsTest {public static void main(String[] args) {GenericsImp<Integer> gi = new GenericsImp<>();gi.add(66);}
}7.4.4 泛型通配符
// ?代表可以接收任意类型
// 泛型不存在继承、多态关系,泛型左右两边要一样
//ArrayList<Object> list = new ArrayList<String>();这种是错误的
//泛型通配符?:左边写<?> 右边的泛型可以是任意类型
ArrayList<?> list1 = ``new` `ArrayList<Object>();
ArrayList<?> list2 = ``new` `ArrayList<String>();
ArrayList<?> list3 = ``new` `ArrayList<Integer>();public static void main(String[] args) {ArrayList<Integer> list1 = new ArrayList<Integer>();test(list1);ArrayList<String> list2 = new ArrayList<String>();test(list2);
}
public static void test(ArrayList<?> coll){
}意义: 只能接收该类型及其子类。
意义:只能接收该类型及其父类型。
class Animal{}//父类
class Dog extends Animal{}//子类
class Cat extends Animal{}//子类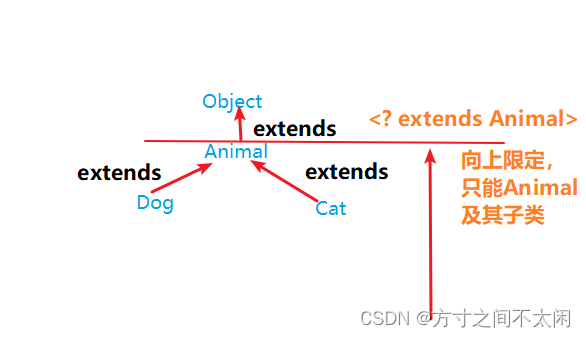
ArrayList<? super Animal> list5 = new ArrayList<Object>();
ArrayList<? super Animal> list6 = new ArrayList<Animal>();
// ArrayList<? super Animal> list7 = new ArrayList<Dog>();//报错
// ArrayList<? super Animal> list8 = new ArrayList<Cat>();//报错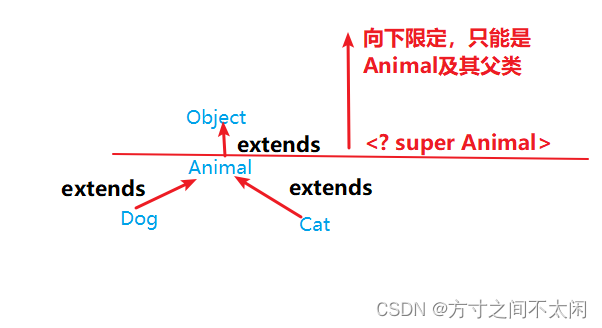
public static void main(String[] args) {Collection<Integer> list1 = new ArrayList<Integer>();Collection<String> list2 = new ArrayList<String>();Collection<Number> list3 = new ArrayList<Number>();Collection<Object> list4 = new ArrayList<Object>();getElement(list1);getElement(list2);//报错getElement(list3);getElement(list4);//报错getElement2(list1);//报错getElement2(list2);//报错getElement2(list3);getElement2(list4);
}
// 泛型的上限:此时的泛型?,必须是Number类型或者Number类型的子类
public static void getElement1(Collection<? extends Number> coll){}
// 泛型的下限:此时的泛型?,必须是Number类型或者Number类型的父类
public static void getElement2(Collection<? super Number> coll){}八、反射
8.1 反射机制原理
8.2 Java反射机制可以哪些
在运行时构造任意一个类的对象。
在运行时得到任意一个类所具有的成员变量和方法。
在运行时调用任意一个对象的成员变量和方法。
生成动态代理。
8.3 反射相关的主要类
- java. lang.reflec.Method:代表类的方法,Method对象表示某个类的方法。
- java.lng.reflect.Field:代表类的成员变量,Field对象表示,某个类的成员变量。
- java.lang.reflect.Constructor:代表类的构造方法,Constructor对象表示构造器。
8.4 如何使用反射
8.4.1 实例化对象
class Person {}
public class TestDemo {public static void main(String[] args) throwsException {Person per = newPerson() ; // 正着操作Class<?> cls = per.getClass() ; // 取得Class对象System.out.println(cls.getName()); // 反着来}
}class Person {}
public class TestDemo { public static void main(String[] args) throwsException {Class<?> cls = Person.class; // 取得Class对象System.out.println(cls.getName()); // 反着来}
}class Person {}
public class TestDemo {public static void main(String[] args) throwsException {Class<?> cls = Class.forName("cn.mldn.demo.Person") ; // 取得Class对象System.out.println(cls.getName()); // 反着来}
}8.4.2 简单应用
interface Fruit {public void eat();
}
class Apple implements Fruit{public void eat() {System.out.println("吃苹果。");}
}
class Factory {public static Fruit getInstance (String className){if ("apple".equals(className)) {returnnewApple();}return null;}
}
public class Factory Demo {public static void main(String[]args){Fruit f = Factory.getInstance("apple");f.eat();}
}interface Fruit {public void eat();
}
class Apple implements Fruit {public void eat() {System.out.println("吃苹果。");}
}
class Orange implements Fruit {public void eat() {System.out.println("吃橘子。");}
}
class Factory {public static Fruit getInstance(String className) {Fruit f = null;try {f = (Fruit) Class.forName(className).newInstance();} catch (Exception e) {e.printStackTrace();}return f;}
}
public class Factory Demo {public static void main(String[] args) {Fruit f = Factory.getInstance("cn.mldn.demo.Orange");f.eat();}
}8.4.3 反射优化
8.4.4 获取Class对象
`Class clazz4 = cl. loadclass(“类的全类名”);`
8.4.5 类的加载过程
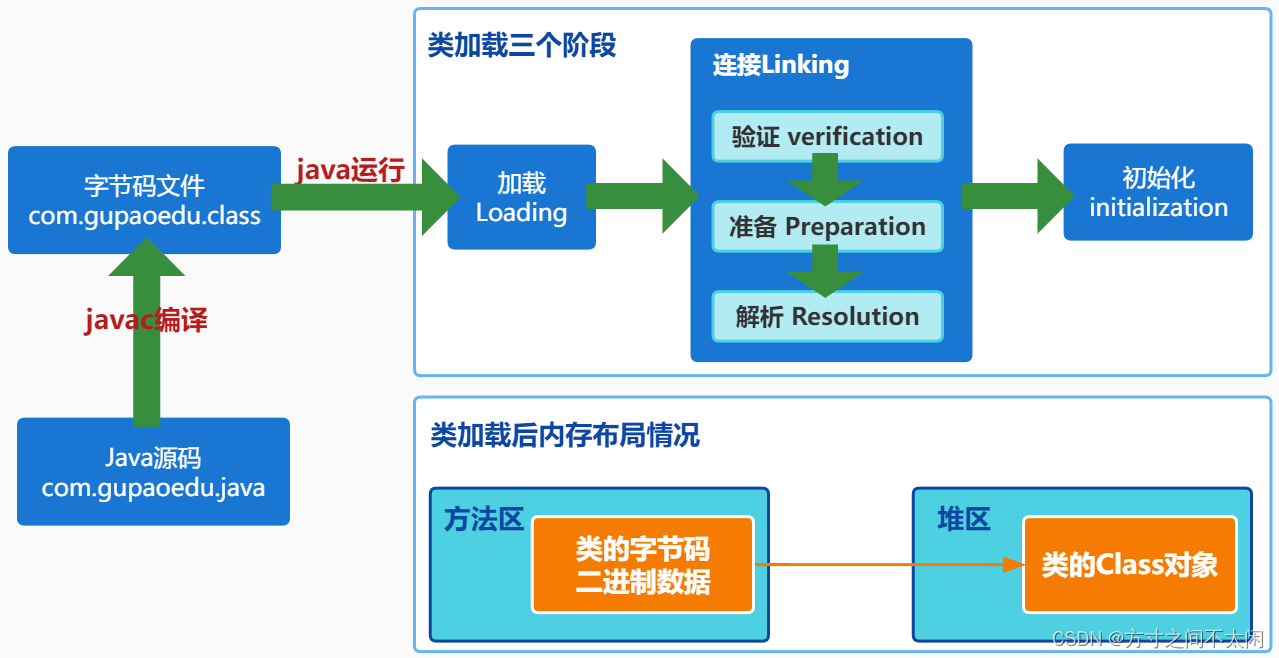
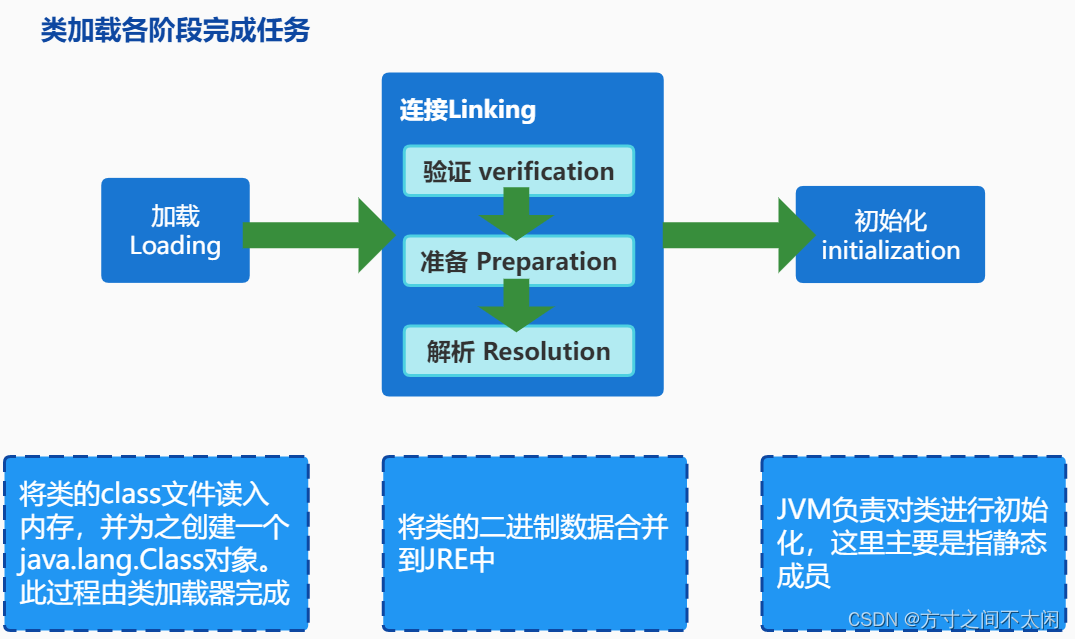
目的是为了确保 Class文件的字节流中包含的信息符合当前虚拟机的要求,井且不会危害虚拟机自身的安全。
包括:文件格式验证(是否以魔数 oxcafebabe开头)、元数据验证、字节码验证和符号引用验证
可以考虑使用 -Xverify:none参数来关闭大部分的类验证措施,缩短虚拟机类加载。
2. 准备
JVM会在该阶段对静态变量,分配内存并默认初始化(对应数据类型的默认初始值如0、0L、null、 false等)。这些变量所使用的内存都将在方法区中进行分配。
3. 解析
符号引用替换为直接引用。
(1)初始化阶段
到初始化阶段,オ真正开始执行类中定义的Java程序代码,此阶段是执行< clinit>( )方法的过程( )方法是由编译器按语句在源文件中出现的顺序,依次自动收集类中的所有静态变量的赋值动作和静态代码块中的语句,并进行合并。
虚拟机会保证一个类的( )方法在多线程环境中被正确地加锁、同步,如果多个线程同时去初始化一个类。那么只会有一个线程去执行这个类的( )方法,其他线程都需要阻塞等待,直到活动线程执行( )方法完毕。
九、注解
- 代码分析:通过代码里标识的元数据对代码进行分析【使用反射】
- 编译检查:通过代码里标识的元数据让编译器能够实现基本的编译检查【Override】
9.1 内置注解
- @Override - 检查该方法是否是重写方法。如果发现其父类,或者是引用的接口中并没有该方法时,会报编译错误。
- @Deprecated - 标记过时方法。如果使用该方法,会报编译警告。
- @SuppressWarnings - 指示编译器去忽略注解中声明的警告。- all to suppress all warnings (抑制所有警告)- boxing to suppress warnings relative to boxing/unboxing operations(抑制装箱、拆箱操作时候的警告)- cast to suppress warnings relative to cast operations (抑制映射相关的警告)- dep-ann to suppress warnings relative to deprecated annotation(抑制启用注释的警告)- deprecation to suppress warnings relative to deprecation(抑制过期方法警告)- fallthrough to suppress warnings relative to missing breaks in switch statements(抑制确在switch中缺失breaks的警告)- finally to suppress warnings relative to finally block that don’t return (抑制finally模块没有返回的警告)- hiding to suppress warnings relative to locals that hide variable()- incomplete-switch to suppress warnings relative to missing entries in a switch statement (enum case)(忽略没有完整的switch语句)- nls to suppress warnings relative to non-nls string literals(忽略非nls格式的字符)- null to suppress warnings relative to null analysis(忽略对null的操作)- rawtypes to suppress warnings relative to un-specific types when using generics on class params(使用generics时忽略没有指定相应的类型)- restriction to suppress warnings relative to usage of discouraged or forbidden references- serial to suppress warnings relative to missing serialVersionUID field for a serializable class(忽略在serializable类中没有声明serialVersionUID变量)- static-access to suppress warnings relative to incorrect static access(抑制不正确的静态访问方式警告)- synthetic-access to suppress warnings relative to unoptimized access from inner classes(抑制子类没有按最优方法访问内部类的警告)- unchecked to suppress warnings relative to unchecked operations(抑制没有进行类型检查操作的警告)- unqualified-field-access to suppress warnings relative to field access unqualified (抑制没有权限访问的域的警告)- unused to suppress warnings relative to unused code (抑制没被使用过的代码的警告)- @Retention - 标识这个注解怎么保存,是只在代码中,还是编入class文件中,或者是在运行时可以通过反射访问。
- @Documented - 标记这些注解是否包含在用户文档中。
- @Target - 标记这个注解应该是哪种 Java 成员。
- @Inherited - 标记这个注解是继承于哪个注解类(默认 注解并没有继承于任何子类)- @SafeVarargs - Java 7 开始支持,忽略任何使用参数为泛型变量的方法或构造函数调用产生的警告。
- @FunctionalInterface - Java 8 开始支持,标识一个匿名函数或函数式接口。
- @Repeatable - Java 8 开始支持,标识某注解可以在同一个声明上使用多次。这篇关于第一章 Java核心内容的文章就介绍到这儿,希望我们推荐的文章对编程师们有所帮助!


