本文主要是介绍Android自定控件感觉无从下手看这里,希望对大家解决编程问题提供一定的参考价值,需要的开发者们随着小编来一起学习吧!
文章目录
- 三个方法
- 标准自定义控件的要求
- 一、自定义View
- 二、测量:onMeasure
- 2.1、测量并得到高度和宽度后的运行效果
- 2.2、此外我们还要加上pading的距离,否则我们在xml中设置的padding就不会生效
- 2.3、 至此一个简单的自定义View已经完成,自定义View的核心就是测量方法 onMeasure
- 三、自定义ViewGroup
- 3.1、 跟自定义View不同,onMeasure测量时首先根据子View个数区分两种情况:
- 3.2、计算没有子View时的宽度和高度
- 3.3、计算有子View时的高度和宽度
- 3.4、计算宽度
- 3.5、计算高度
- 3.6、根据父控件中设置的宽度和高度(即xml中设置的)计算自身宽度和高度
- 3.7、onLayout 用来布局各个子控件的位置
- 3.8、最后来个效果图
- 四、到此为止最基本的自定义知识就完了
- 五、最后就要考虑性能问题
三个方法
onMesure:用来计算控件的宽和高,我们在xml中给控件设置的宽高就是通过这个来计算的。
onLayout:这个方法是用来摆放子控件的,所以自定义View中没有,自定义ViewGroup中才有。
onDraw:一般情况下自定View才有绘制,自定义ViewGroup默认不会调用此方法,因为ViewGroup的作用就是布局子控件,没什么可绘制的。
标准自定义控件的要求
1、xml可配置属性
2、代码动态设置属性
一、自定义View
public class LearnView extends View {private String text;private Paint mPaint;private Rect mTextBound;public LearnView(Context context) {this(context, null);}public LearnView(Context context, @Nullable AttributeSet attrs) {this(context, attrs, 0);}public LearnView(Context context, @Nullable AttributeSet attrs, int defStyleAttr) {super(context, attrs, defStyleAttr);TypedArray ta = context.obtainStyledAttributes(attrs, R.styleable.LearnView);text = ta.getString(R.styleable.LearnView_learn_text);ta.recycle();mPaint = new Paint();mPaint.setTextSize(50);mTextBound = new Rect(); //根据文字内容获取一个矩形mPaint.getTextBounds(text, 0, text.length(), mTextBound);}@Overrideprotected void onDraw(@NonNull Canvas canvas) {super.onDraw(canvas);canvas.drawText(text, 0, mTextBound.height(), mPaint);}
}
<?xml version="1.0" encoding="utf-8"?>
<LinearLayout xmlns:android="http://schemas.android.com/apk/res/android"xmlns:app="http://schemas.android.com/apk/res-auto"android:layout_width="match_parent"android:layout_height="match_parent"android:gravity="center"android:orientation="vertical"><com.yl.pictureeditordemo.ui.view.LearnViewandroid:layout_width="wrap_content"android:layout_height="wrap_content"app:learn_text="测试" /></LinearLayout>
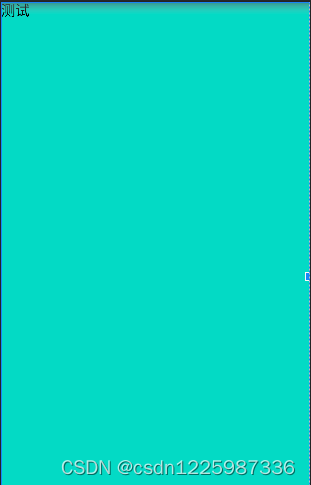
可以看到虽然设置的宽高都是“wrap_content”,却并没有起作用,这时候就需要 onMeasure 方法了
二、测量:onMeasure
@Overrideprotected void onMeasure(int widthMeasureSpec, int heightMeasureSpec) {super.onMeasure(widthMeasureSpec, heightMeasureSpec);int specMode = MeasureSpec.getMode(widthMeasureSpec);int specWidth = MeasureSpec.getSize(widthMeasureSpec);if (specMode == MeasureSpec.EXACTLY) {}else if (specMode==MeasureSpec.AT_MOST){}}
- 首先这里有两个参数:widthMeasureSpec、heightMeasureSpec,他们都是由父控件中传过来的值;
- 每一个参数中都封装了两个值,一个mode,一个size,说直白点就是将两个 int 值组合成为了一个 int 值,具体怎么封装的不用太关心;
- 这里的mode又对应了三个常量:MeasureSpec.UNSPECIFIED、MeasureSpec.EXACTLY、MeasureSpec.AT_MOST,我们以宽度为例来说明;
- MeasureSpec.UNSPECIFIED:不用关心,一般是系统级别才会使用;
- MeasureSpec.EXACTLY:代表设置了固定值,比如设置了100dp,如果是match_parent也算固定值,因为它代表充满父控件,就是父控件的宽度;
- MeasureSpec.AT_MOST:代表设置了wrap_content,此时宽度不固定,就需要通过实际情况计算来得到;
<?xml version="1.0" encoding="utf-8"?>
<LinearLayout xmlns:android="http://schemas.android.com/apk/res/android"xmlns:app="http://schemas.android.com/apk/res-auto"android:layout_width="match_parent"android:layout_height="match_parent"android:gravity="center"android:orientation="vertical"><!--宽度为MeasureSpec.AT_MOST模式--><com.yl.pictureeditordemo.ui.view.LearnViewandroid:layout_width="wrap_content"android:layout_height="wrap_content"android:background="@color/teal_200"app:learn_text="测试" /><!--宽度为MeasureSpec.EXACTLY模式--><com.yl.pictureeditordemo.ui.view.LearnViewandroid:layout_width="100dp"android:layout_height="wrap_content"android:background="@color/teal_200"app:learn_text="测试" /><!--宽度为MeasureSpec.EXACTLY模式--><com.yl.pictureeditordemo.ui.view.LearnViewandroid:layout_width="match_parent"android:layout_height="wrap_content"android:background="@color/teal_200"app:learn_text="测试" /></LinearLayout>
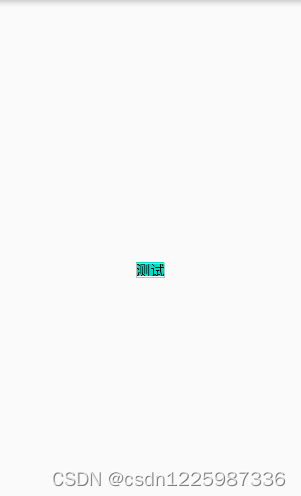
2.1、测量并得到高度和宽度后的运行效果
可以看到此时我们设置的 wrap_content 有效果了
@Overrideprotected void onMeasure(int widthMeasureSpec, int heightMeasureSpec) {super.onMeasure(widthMeasureSpec, heightMeasureSpec);//计算宽度int specWidthMode = MeasureSpec.getMode(widthMeasureSpec);int specWidth = MeasureSpec.getSize(widthMeasureSpec);if (specWidthMode == MeasureSpec.EXACTLY) {//固定宽度模式下直接赋值得到宽度width = specWidth;} else if (specWidthMode == MeasureSpec.AT_MOST) {//wrap_content模式下通过计算得到宽度width = mTextBound.width();}//计算高度int specHeightMode = MeasureSpec.getMode(heightMeasureSpec);int specHeight = MeasureSpec.getSize(heightMeasureSpec);if (specHeightMode == MeasureSpec.EXACTLY) {height = specHeight;} else if (specWidthMode == MeasureSpec.AT_MOST) {height = mTextBound.height();}//计算完成后使用setMeasuredDimension(width, height);}
<?xml version="1.0" encoding="utf-8"?>
<LinearLayout xmlns:android="http://schemas.android.com/apk/res/android"xmlns:app="http://schemas.android.com/apk/res-auto"android:layout_width="match_parent"android:layout_height="match_parent"android:gravity="center"android:orientation="vertical"><!--宽度为MeasureSpec.AT_MOST模式--><com.yl.pictureeditordemo.ui.view.LearnViewandroid:layout_width="wrap_content"android:layout_height="wrap_content"android:background="@color/teal_200"app:learn_text="测试" /><!--宽度为MeasureSpec.EXACTLY模式-->
<!--    <com.yl.pictureeditordemo.ui.view.LearnView-->
<!--        android:layout_width="100dp"-->
<!--        android:layout_height="wrap_content"-->
<!--        android:background="@color/teal_200"-->
<!--        app:learn_text="测试" />--><!--宽度为MeasureSpec.EXACTLY模式-->
<!--    <com.yl.pictureeditordemo.ui.view.LearnView--><!--        android:layout_width="match_parent"--><!--        android:layout_height="wrap_content"--><!--        android:background="@color/teal_200"--><!--        app:learn_text="测试" />--></LinearLayout>
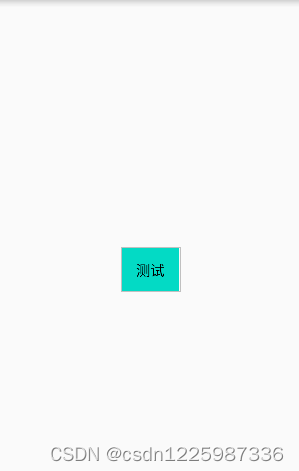
2.2、此外我们还要加上pading的距离,否则我们在xml中设置的padding就不会生效
@Overrideprotected void onMeasure(int widthMeasureSpec, int heightMeasureSpec) {super.onMeasure(widthMeasureSpec, heightMeasureSpec);//1、计算宽度int specWidthMode = MeasureSpec.getMode(widthMeasureSpec);int specWidth = MeasureSpec.getSize(widthMeasureSpec);if (specWidthMode == MeasureSpec.EXACTLY) {//固定宽度模式下直接赋值得到宽度width = specWidth;} else if (specWidthMode == MeasureSpec.AT_MOST) {//wrap_content模式下通过计算得到宽度width = mTextBound.width() + getPaddingLeft() + getPaddingRight();}//2、计算高度int specHeightMode = MeasureSpec.getMode(heightMeasureSpec);int specHeight = MeasureSpec.getSize(heightMeasureSpec);if (specHeightMode == MeasureSpec.EXACTLY) {height = specHeight;} else if (specWidthMode == MeasureSpec.AT_MOST) {height = mTextBound.height() + getPaddingTop() + getPaddingBottom();}//3、计算完成后使用setMeasuredDimension(width, height);}
要注意测量结果加上padding过后我们实际绘制时的位置也要改变
@Overrideprotected void onDraw(@NonNull Canvas canvas) {super.onDraw(canvas);canvas.drawText(text, getPaddingLeft(), mTextBound.height() + getPaddingTop(), mPaint);}
2.3、 至此一个简单的自定义View已经完成,自定义View的核心就是测量方法 onMeasure
<?xml version="1.0" encoding="utf-8"?>
<LinearLayout xmlns:android="http://schemas.android.com/apk/res/android"xmlns:app="http://schemas.android.com/apk/res-auto"android:layout_width="match_parent"android:layout_height="match_parent"android:gravity="center"android:orientation="vertical"><!--宽度为MeasureSpec.AT_MOST模式--><com.yl.pictureeditordemo.ui.view.LearnViewandroid:layout_width="wrap_content"android:layout_height="wrap_content"android:background="@color/teal_200"android:padding="20dp"app:learn_text="测试" /><!--宽度为MeasureSpec.EXACTLY模式--><!--    <com.yl.pictureeditordemo.ui.view.LearnView--><!--        android:layout_width="100dp"--><!--        android:layout_height="wrap_content"--><!--        android:background="@color/teal_200"--><!--        app:learn_text="测试" />--><!--宽度为MeasureSpec.EXACTLY模式--><!--    <com.yl.pictureeditordemo.ui.view.LearnView--><!--        android:layout_width="match_parent"--><!--        android:layout_height="wrap_content"--><!--        android:background="@color/teal_200"--><!--        app:learn_text="测试" />--></LinearLayout>
三、自定义ViewGroup
相对于自定义View来说,自定义ViewGroup不仅要考虑自身的高度和宽度,还要考虑各个子控件的高度和宽度,以及在自定义控件中的摆放位置。
public class LearnViewGroup extends ViewGroup {public LearnViewGroup(Context context) {this(context, null);}public LearnViewGroup(Context context, AttributeSet attrs) {this(context, attrs, 0);}public LearnViewGroup(Context context, AttributeSet attrs, int defStyleAttr) {super(context, attrs, defStyleAttr);}@Overrideprotected void onLayout(boolean changed, int l, int t, int r, int b) {}
}
3.1、 跟自定义View不同,onMeasure测量时首先根据子View个数区分两种情况:
- 有子View
- 没有子View
@Overrideprotected void onMeasure(int widthMeasureSpec, int heightMeasureSpec) {super.onMeasure(widthMeasureSpec, heightMeasureSpec);int childCount = getChildCount();if (childCount == 0) {//没有子View} else {//有子View}}
3.2、计算没有子View时的宽度和高度
没有子View时跟自定义View一样的方法获取高度和宽度
@Overrideprotected void onMeasure(int widthMeasureSpec, int heightMeasureSpec) {super.onMeasure(widthMeasureSpec, heightMeasureSpec);int childCount = getChildCount();if (childCount == 0) { //没有子ViewmWidth = measureWidthAndHeight(widthMeasureSpec);mHeight = measureWidthAndHeight(heightMeasureSpec);setMeasuredDimension(mWidth, mHeight);} else { //有子View}}
private int measureWidthAndHeight(int measureSpec) {int result = 0;int specMode = MeasureSpec.getMode(measureSpec);int specSize = MeasureSpec.getSize(measureSpec);if (specMode == MeasureSpec.EXACTLY) {//固定值模式,直接获取父控件传入的值result = specSize;} else if (specMode == MeasureSpec.AT_MOST) {//自定义ViewGroup在设置为wrap_content,并且没有子控件时高度/宽度直接设置为0result = 0;}return result;}
3.3、计算有子View时的高度和宽度
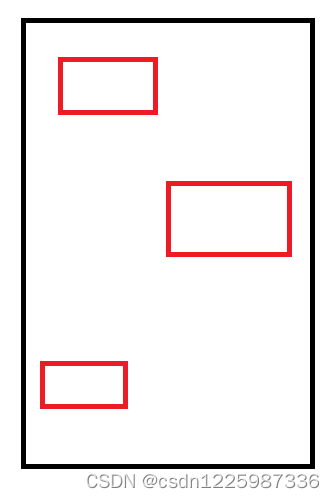
注意计算高度和宽度的方法不一样, 比如下面一个ViewGroup中有三个子View,我们这里的例子只考虑竖向排列
3.4、计算宽度
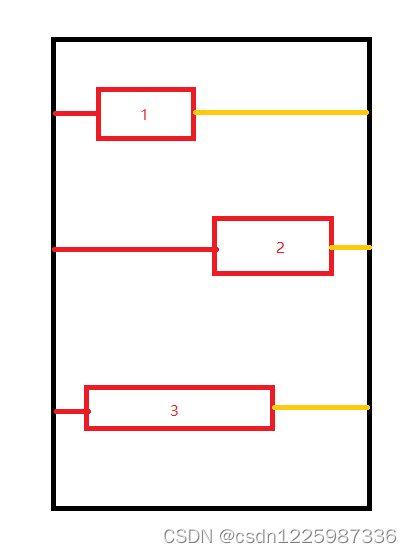
循环获取每个子控件的宽度并加上其左右的margin值,然后循环获取最大的子控件的宽度;
最后加上本身的leftPadding 和 rightPadding,就得到了我们最终需要得到的宽度;
左边红色的线代表 leftMargin,是一定有的,右边黄色的代表 rightMargin,至少存在一条,否则右边框就会紧贴最右边的第二个子控件,所以要这样算。
@Overrideprotected void onMeasure(int widthMeasureSpec, int heightMeasureSpec) {super.onMeasure(widthMeasureSpec, heightMeasureSpec);int childCount = getChildCount();if (childCount == 0) { //没有子ViewmWidth = measureWidthAndHeight(widthMeasureSpec);mHeight = measureWidthAndHeight(heightMeasureSpec);setMeasuredDimension(mWidth, mHeight);} else { //有子Viewint childViewsWidth = 0;for (int i = 0; i < childCount; i++) {View childView = getChildAt(i);//将widthMeasureSpec和heightMeasureSpec传入子控件,提供给子控件测量依据measureChild(childView, widthMeasureSpec, heightMeasureSpec);MarginLayoutParams lp = (MarginLayoutParams) childView.getLayoutParams();//获取每个子控件的宽度并得到最大的那个值childViewsWidth = Math.max(childViewsWidth, childView.getMeasuredWidth() + lp.leftMargin + lp.rightMargin);}//计算最终的宽度和高度,不要忘记加上本身的mWidth = childViewsWidth + getPaddingLeft() + getPaddingRight();}}
注意这里有句代码:MarginLayoutParams lp = (MarginLayoutParams) childView.getLayoutParams();
我们需要重写 generateLayoutParams 方法,不然会报类型转换错误。
@Overridepublic LayoutParams generateLayoutParams(AttributeSet attrs) {return new MarginLayoutParams(getContext(),attrs);}
3.5、计算高度
把所有子控件的高度累加,并算出每个子控件的 topMargin 和 BottomMarin,也累加起来;
最后加上本身的 topPadding 和 bottomPadding,就得到了我们最终需要得到的高度;
@Overrideprotected void onMeasure(int widthMeasureSpec, int heightMeasureSpec) {super.onMeasure(widthMeasureSpec, heightMeasureSpec);int childCount = getChildCount();if (childCount == 0) { //没有子ViewmWidth = measureWidthAndHeight(widthMeasureSpec);mHeight = measureWidthAndHeight(heightMeasureSpec);setMeasuredDimension(mWidth, mHeight);} else { //有子Viewint childViewsWidth = 0;int childViewsHeight = 0;int childViewsMarginTop = 0;int childViewsMarginBottom = 0;for (int i = 0; i < childCount; i++) {View childView = getChildAt(i);//将widthMeasureSpec和heightMeasureSpec传入子控件,提供给子控件测量依据measureChild(childView, widthMeasureSpec, heightMeasureSpec);MarginLayoutParams lp = (MarginLayoutParams) childView.getLayoutParams();//获取每个子控件的宽度并得到最大的那个值childViewsWidth = Math.max(childViewsWidth, childView.getMeasuredWidth() + lp.leftMargin + lp.rightMargin);//获取每个子控件的高度并累加childViewsHeight += childView.getMeasuredHeight();//累加margin值childViewsMarginTop += lp.topMargin;childViewsMarginBottom += lp.bottomMargin;}//计算最终的宽度和高度,不要忘记加上本身的mWidth = childViewsWidth + getPaddingLeft() + getPaddingRight();mHeight = childViewsHeight + childViewsMarginTop + childViewsMarginBottom + getPaddingTop() + getPaddingBottom();//使用setMeasuredDimension(mWidth, mHeight);}}
3.6、根据父控件中设置的宽度和高度(即xml中设置的)计算自身宽度和高度
上面的代码在有子控件时,最终使用的代码还未考虑到固定值还是 wrap_content,这样的情况在xml中设置的值是无效的;
所以根据子控件计算出了宽度和高度之后还要根据mode来决定最终的宽度和高度,也就是这里的方法 measureWidthAndHeight(int measureSpec,int size)的用处。
@Overrideprotected void onMeasure(int widthMeasureSpec, int heightMeasureSpec) {super.onMeasure(widthMeasureSpec, heightMeasureSpec);int childCount = getChildCount();if (childCount == 0) { //没有子ViewmWidth = measureWidthAndHeight(widthMeasureSpec);mHeight = measureWidthAndHeight(heightMeasureSpec);setMeasuredDimension(mWidth, mHeight);} else { //有子Viewint childViewsWidth = 0;int childViewsHeight = 0;int childViewsMarginTop = 0;int childViewsMarginBottom = 0;for (int i = 0; i < childCount; i++) {View childView = getChildAt(i);measureChild(childView, widthMeasureSpec, heightMeasureSpec);MarginLayoutParams lp = (MarginLayoutParams) childView.getLayoutParams();//获取每个子控件的宽度并得到最大的那个值childViewsWidth = Math.max(childViewsWidth, childView.getMeasuredWidth() + lp.leftMargin + lp.rightMargin);//获取每个子控件的高度并累加childViewsHeight += childView.getMeasuredHeight();//累加margin值childViewsMarginTop += lp.topMargin;childViewsMarginBottom += lp.bottomMargin;}//计算最终的宽度和高度,不要忘记加上本身的mWidth = childViewsWidth + getPaddingLeft() + getPaddingRight();mHeight = childViewsHeight + childViewsMarginTop + childViewsMarginBottom + getPaddingTop() + getPaddingBottom();//使用setMeasuredDimension(measureWidthAndHeight(widthMeasureSpec, mWidth), measureWidthAndHeight(heightMeasureSpec, mHeight));}}
private int measureWidthAndHeight(int measureSpec,int size) {int result = 0;int specMode = MeasureSpec.getMode(measureSpec);int specSize = MeasureSpec.getSize(measureSpec);if (specMode == MeasureSpec.EXACTLY) {//固定值模式,直接获取父控件传入的值result = specSize;} else if (specMode == MeasureSpec.AT_MOST) {//自定义ViewGroup在设置为wrap_content,宽度/高度就是根据子view和自身的padding计算出来的值result = size;}return result;}
3.7、onLayout 用来布局各个子控件的位置
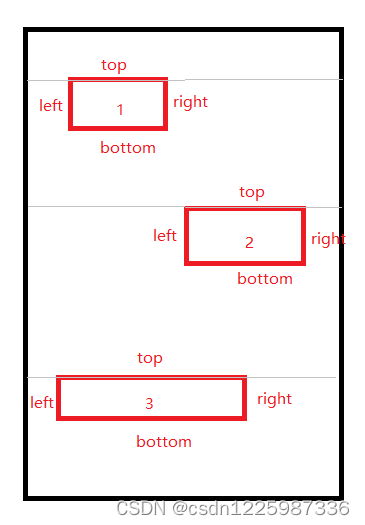
因为我们是垂直排列,所以这里每个子控件的左边位置、右边位置、下边位置都比较好理解。
左边位置:leftPadding + 子控件的leftMargin
右边位置:左边位置 + 子控件自身的宽度
下边位置:上边位置 + 子控件自身的高度
这里的上边位置需要计算每个子控件的高度及其topMargin、bottomMargin,然后用一个变量 countTop 用来记录累加的和。
countTop = 子控件高度(下边位置-上边位置)+ 子控件的topMargin + 子控件的bottomMargin
上边位置:countTop + 子控件自身高度
@Overrideprotected void onLayout(boolean changed, int l, int t, int r, int b) {int left, top, right, bottom;int childCount = getChildCount();int countTop = getPaddingTop();for (int i = 0; i < childCount; i++) {View view = getChildAt(i);MarginLayoutParams layoutParams = (MarginLayoutParams) view.getLayoutParams();left = getPaddingLeft() + layoutParams.leftMargin;top = countTop + layoutParams.topMargin;right = left + view.getMeasuredWidth();bottom = top + view.getMeasuredHeight();view.layout(left, top, right, bottom);countTop += (bottom - top) + layoutParams.topMargin + layoutParams.bottomMargin;}}
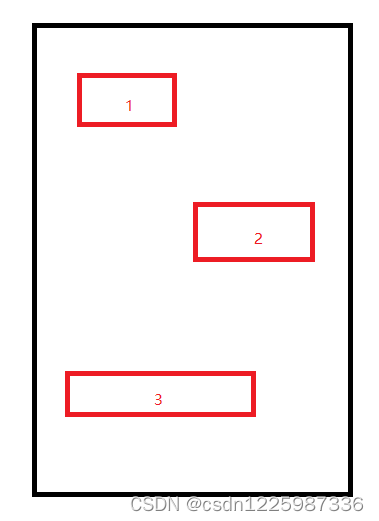
3.8、最后来个效果图

<?xml version="1.0" encoding="utf-8"?>
<LinearLayout xmlns:android="http://schemas.android.com/apk/res/android"xmlns:app="http://schemas.android.com/apk/res-auto"android:layout_width="match_parent"android:layout_height="match_parent"android:gravity="center"android:orientation="vertical"><com.yl.pictureeditordemo.ui.view.LearnViewGroupandroid:layout_width="wrap_content"android:layout_height="wrap_content"android:background="@color/purple_200"android:padding="20dp"><com.yl.pictureeditordemo.ui.view.LearnViewandroid:layout_width="wrap_content"android:layout_height="wrap_content"android:background="@color/teal_200"android:padding="15dp"app:learn_text="测试" /><com.yl.pictureeditordemo.ui.view.LearnViewandroid:layout_width="wrap_content"android:layout_height="wrap_content"android:layout_margin="20dp"android:background="@color/teal_200"app:learn_text="测试测试测试测试" /><com.yl.pictureeditordemo.ui.view.LearnViewandroid:layout_width="wrap_content"android:layout_height="wrap_content"android:layout_marginLeft="60dp"android:layout_marginTop="20dp"android:layout_marginBottom="20dp"android:background="@color/teal_200"app:learn_text="测试" /></com.yl.pictureeditordemo.ui.view.LearnViewGroup></LinearLayout>
四、到此为止最基本的自定义知识就完了
后面一切自定义控件都在上面的基础之上加工,比如自定义ViewPager,需要用到手势滑动等
五、最后就要考虑性能问题
这篇关于Android自定控件感觉无从下手看这里的文章就介绍到这儿,希望我们推荐的文章对编程师们有所帮助!


