本文主要是介绍dart中的事件队列与微任务,希望对大家解决编程问题提供一定的参考价值,需要的开发者们随着小编来一起学习吧!

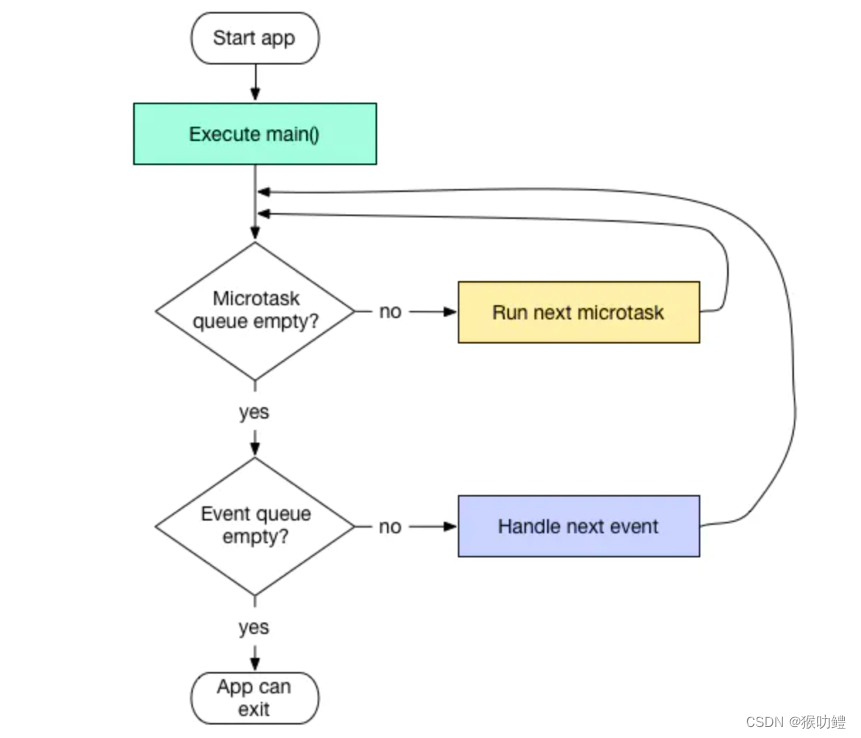
事件队列(event queue),包含所有的外来事件:I/O、mouse events、drawing events、timers、isolate之间的信息传递。
Future中的任务会加入下一轮的任务队列,then中的任务则是也会加入同样的任务队列。 Future中的任务和then后的任务可以理解为同步任务,因此,若Future嵌套微任务,会优先执行then中的代码, 然后分别是微任务队列中的代码、事件队列中的代码。
当前事件循环中的微任务,会在这一轮中继续执行。当前事件循环中嵌套的Future中的代码, 才会在下一轮事件循环中执行。
Future 是链式调用,意味着Future 的 then 未执行完,下一个then 不会执行。
看一个简单的例子:
void testFuture(){print('外部代码1');Future(()=>print('A')).then((value) => print('A结束'));Future(()=>print('B')).then((value) => print('B结束'));scheduleMicrotask((){print('微任务A');});sleep(Duration(seconds: 1));print('外部代码2');
}
打印结果:
外部代码1
外部代码2
微任务A
A
A结束
B
B结束
再看一个复杂点的例子:
void testFuture4(){Future x1 = Future(()=>null);x1.then((value){print('6');scheduleMicrotask(()=>print('7'));}).then((value) => print('8'));Future x = Future(()=>print('1'));x.then((value){print('4');Future(()=>print('9'));}).then((value) => print('10'));Future(()=>print('2'));scheduleMicrotask(()=>print('3'));print('5');
}
打印结果:
5,3, 6,8,7, 1,4,10,2 ,9
注意: 8先于7执行,因为已经调度到了当前队列中,8在6之后是立刻执行的,而7是异步执行的。
注意: 9不是在10之后执行,因为9是在嵌套中下一层的队列中,因此需要等下一个消息循环才会执行。
再看一个例子:
void testFuture() {Future f1 = new Future(() => print('f1'));Future f2 = new Future(() =>  null);Future f3 = new Future.delayed(Duration(seconds: 1) ,() => print('f2'));Future f4 = new Future(() => null);Future f5 = new Future(() => null);f5.then((_) => print('f3'));f4.then((_) {print('f4');new Future(() => print('f5'));f2.then((_) {print('f6');});});f2.then((m) {print('f7');});print('f8');
}
执行顺序: f8 、f1 、f7 、f4、f6、f3、f5、f2
因此可以解释:f4之后为什么直接是f6? 因为f2在前面已经执行过了,所以f6可以理解为一个同步任务,会被立刻执行。
再看一个更复杂的例子:
void testScheduleMicrotatsk() {scheduleMicrotask(() => print('1'));
//1.0new Future.delayed(new Duration(seconds: 1), () => print('2'));
//2.0new Future(() => print('3')).then((_) {print('4');scheduleMicrotask(() => print('5'));}).then((_) => print('6'));
//3.0new Future(() => print('7')).then((_) => new Future(() => print('8'))).then((_) => print('9'));
//3.1
//new Future(() => print('7'))
//      .then( (_) { new Future( () => print('8') );})
//      .then( (_) => print('9') ) ;
//4.0new Future(() => print('10'));scheduleMicrotask(() => print('11'));print('12');
}
注意:如果按照3.0的写法, 执行完7后, 由于then是直接返回一个Future,而不是嵌套一个新Future,9将被阻塞, 因此执行顺序为:12、1、11、3、4 、6、5、7、10、8、9 、2
3.0的写法等同于下述写法, then中是返回一个Future,而不是嵌套一个新的Future
new Future(() => print('7')).then( (_) { Future f = new Future( () => print('8') );return f;}).then( (_) => print('9') ) ;
而如果是3.1的写法,则不会阻塞。 因为3.1这里then是嵌套了一个新的Future, 与then直接返回一个Future不同。 其,执行顺序为12,1,11,3,4,6,5,7,9,10,8,2。
这篇关于dart中的事件队列与微任务的文章就介绍到这儿,希望我们推荐的文章对编程师们有所帮助!


