本文主要是介绍oracle11安装及使用,希望对大家解决编程问题提供一定的参考价值,需要的开发者们随着小编来一起学习吧!
安装oracle11
官网下载地址 Oracle Database 11g Release 2 for Microsoft Windows (x64)
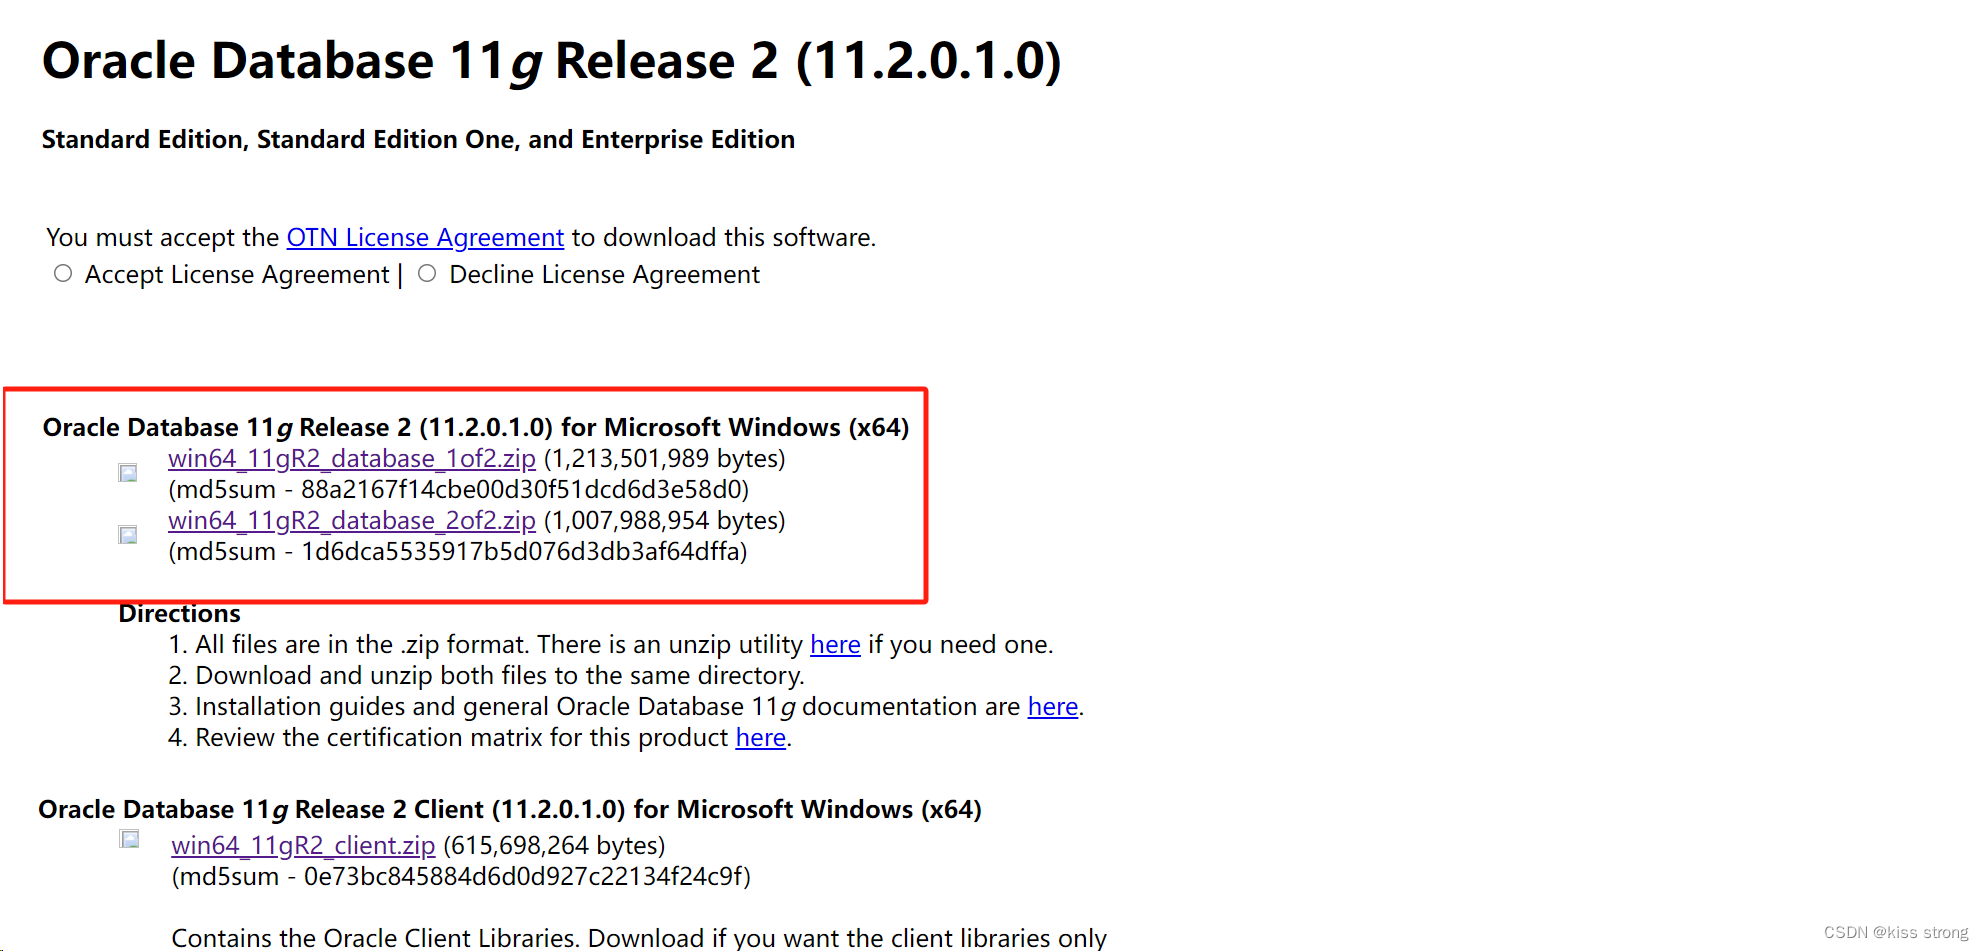
官网下载慢可访问我的资源

也可以网盘获取
链接:https://pan.baidu.com/s/1RDrGkqDA7tfKRnpJXUBMDw
提取码:z3na
上传安装包到服务器
在指定目录下创建文件夹installfile,我是在/newdisk/oracle/installfile,将安装文件上传到该文件夹
禁用防火墙
systemctl stop firewalld.servicesystemctl disable firewalld.service
安装依赖包
yum -y install binutils compat-libcap1 compat-libstdc++-33 compat-libstdc++-33*i686 compat-libstdc++-33*.devel compat-libstdc++-33 compat-libstdc++-33*.devel gcc gcc-c++ glibc glibc*.i686 glibc-devel glibc-devel*.i686 ksh libaio libaio*.i686 libaio-devel libaio-devel*.devel libgcc libgcc*.i686 libstdc++ libstdc++*.i686 libstdc++-devel libstdc++-devel*.devel libXi libXi*.i686 libXtst libXtst*.i686 make sysstat unixODBC unixODBC*.i686 unixODBC-devel unixODBC-devel*.i686
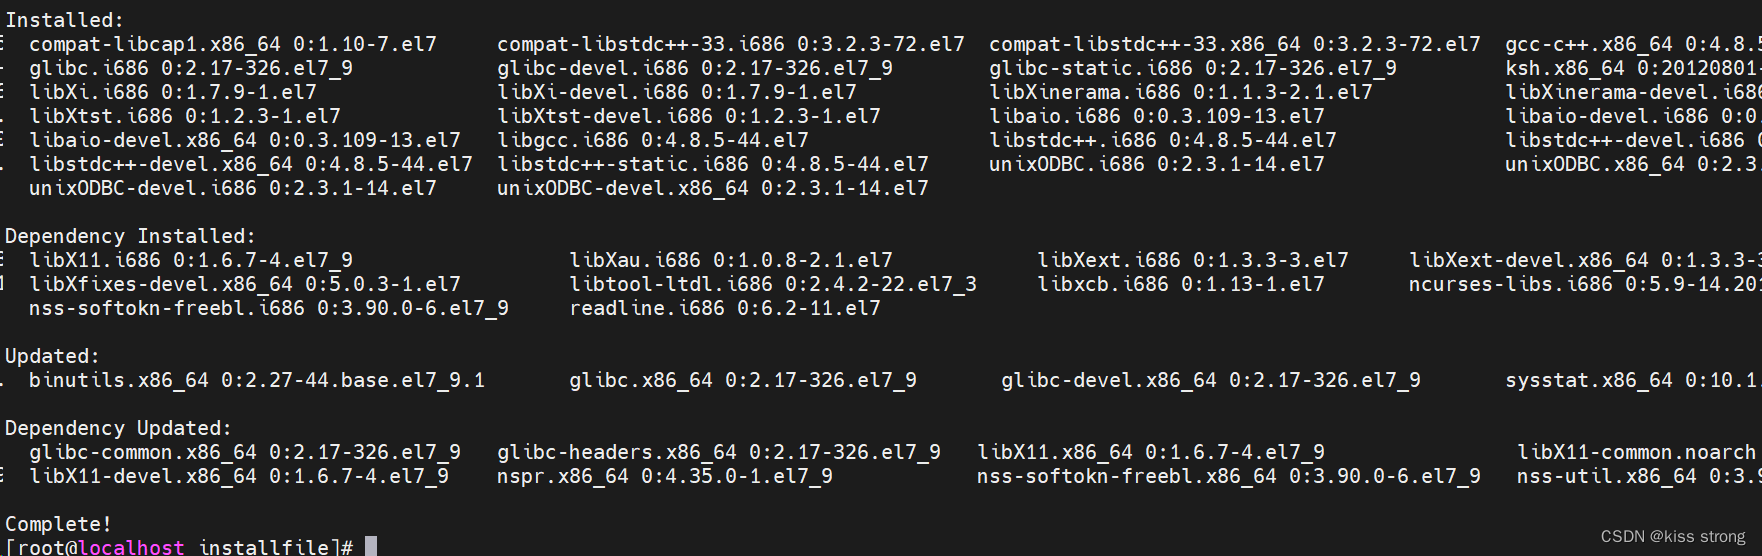
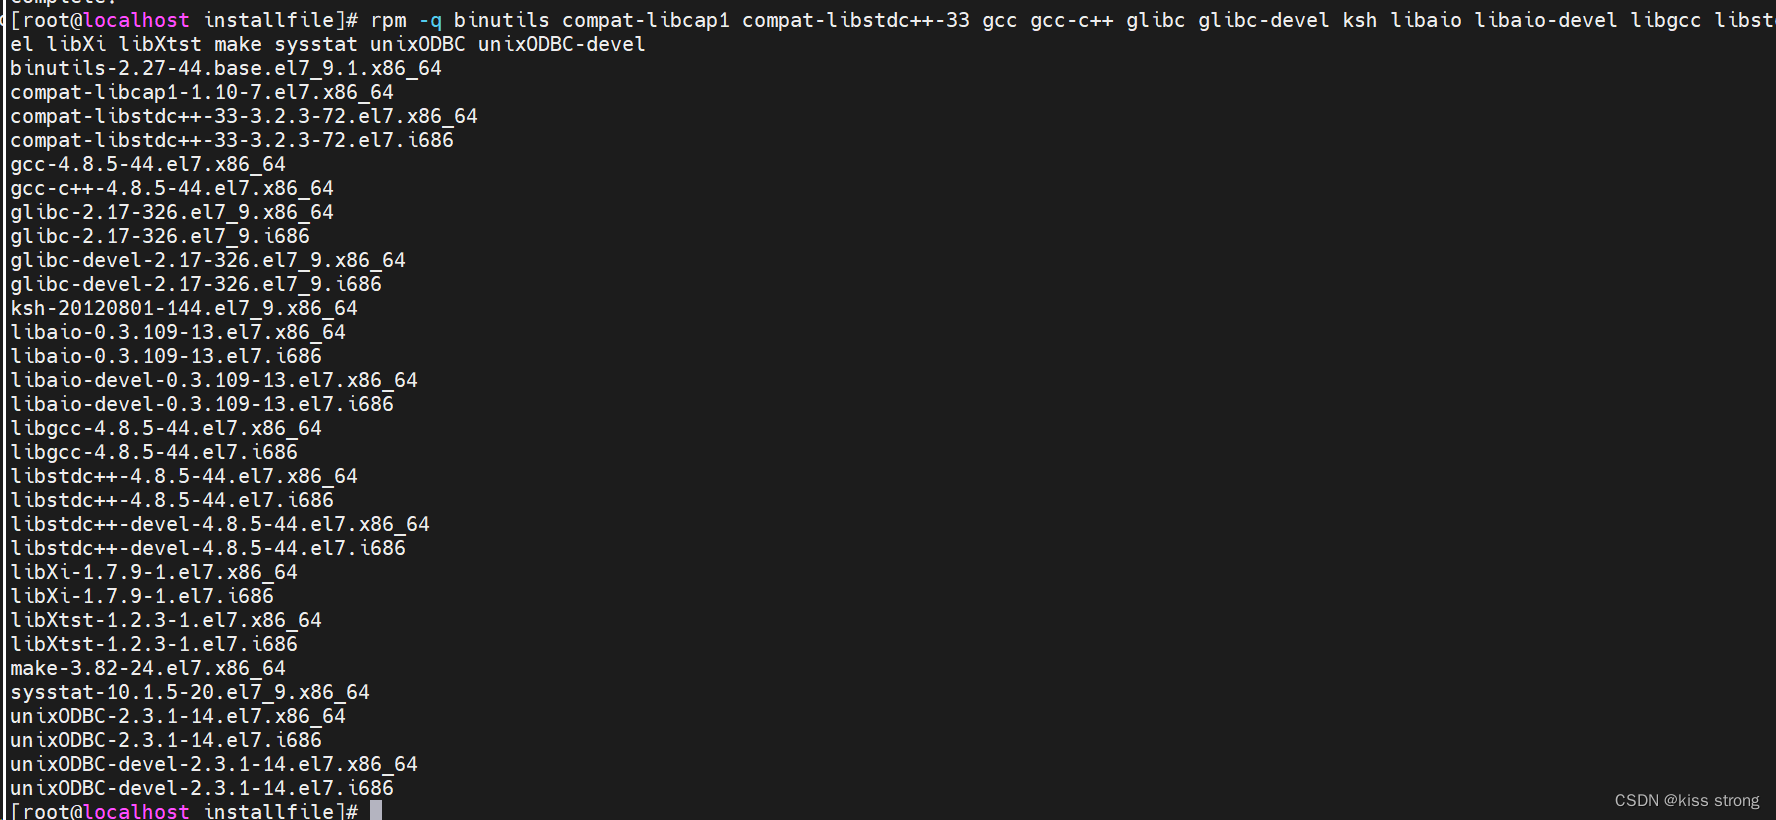
验证依赖包
rpm -q binutils compat-libcap1 compat-libstdc++-33 gcc gcc-c++ glibc glibc-devel ksh libaio libaio-devel libgcc libstdc++ libstdc++-devel libXi libXtst make sysstat unixODBC unixODBC-devel
 创建orcale用户
[root@localhost installfile]# groupadd -g 502 oinstall
[root@localhost installfile]# groupadd -g 503 dba
[root@localhost installfile]# groupadd -g 504 oper
[root@localhost installfile]# groupadd -g 505 asmadmin
[root@localhost oracle]# sudo useradd -u 502 -g oinstall -G oinstall,dba,asmadmin,oper -s /bin/bash -m oracle
[root@localhost oracle]# passwd oracle
Changing password for user oracle.
New password:
BAD PASSWORD: The password is shorter than 8 characters
Retype new password:
passwd: all authentication tokens updated successfully.
[root@localhost oracle]#
创建oradata目录,解压oracle安装包
mkdir /oradata将/newdisk/oracle/oradatainstallfile/文件夹下的压缩包剪切到/oradata下面
drwxr-xr-x. 2 root root 98 Feb 27 00:31 installfile
drwxr-xr-x. 2 root root  6 Feb 27 02:03 oradata
[root@localhost oracle]# cp installfile/* oradata/
[root@localhost oracle]# ls oradata/
p13390677_112040_Linux-x86-64_1of7.zip  p13390677_112040_Linux-x86-64_2of7.zip
[root@localhost oracle]#
将/newdisk/oracle/oradata上的目录内的所有文件和文件夹的归属都修改为oracle用户
chown -R oracle:oinstall /newdisk/oracle/oradata登录oracle用户将两个压缩文件解压
[root@localhost oradata]# su oracle
[oracle@localhost oradata]$ unzip p13390677_112040_Linux-x86-64_1of7.zip
[oracle@localhost oradata]$ unzip p13390677_112040_Linux-x86-64_2of7.zip
会多一个database文件夹

root用户下修改系统配置参数
[oracle@localhost oradata]$ su root
Password:
[root@localhost oradata]# vim /etc/security/limits.conf#在最后加上下面配置oracle          soft    nproc           2047
oracle          hard    nproc           16384
oracle          soft    nofile          1024
oracle          hard    nofile          65536
oracle          soft    stack           10240
配置oracle安装目录
用oracle用户并创建安装目录
[root@localhost oradata]# su oracle
[oracle@localhost oradata]$ pwd
/newdisk/oracle/oradata
[oracle@localhost oradata]$ mkdir -p /newdisk/oracle/oradata/oracle11g

配置环境变量
用oracle用户
[oracle@localhost /]$ cd
[oracle@localhost ~]$ vim .bash_profile
在最后一行输入下面的命令:
#这边地址根据安装目录定
export ORACLE_BASE=/newdisk/oracle/oradata/oracle11g
export ORACLE_HOME=$ORACLE_BASE/product/11.2.0.3/dbhome_1
export ORACLE_SID=prod
export NLS_LANG=.AL32UTF8
export PATH=${PATH}:${ORACLE_HOME}/bin:$ORACLE_HOME/lib64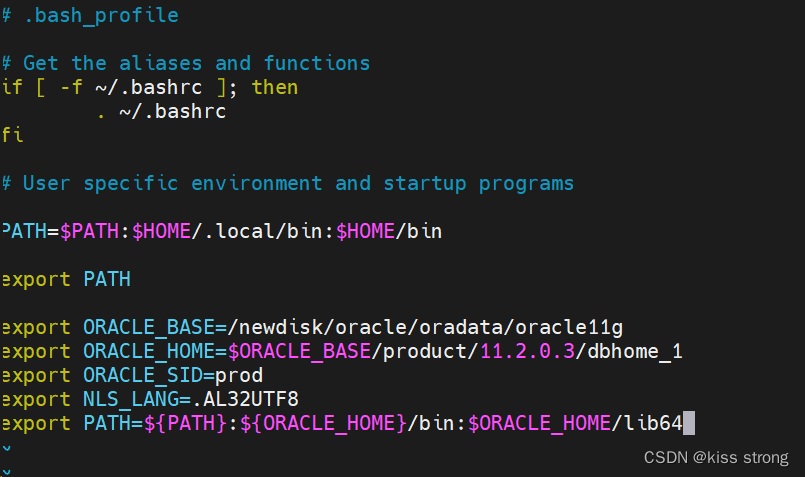
使环境变量生效
[oracle@localhost ~]$ source .bash_profile
修改安装配置文件
拷贝安装文件db_install.rsp到/newdisk/oracle/oradata/目录下
[oracle@localhost oradata]$ cp database/response/db_install.rsp /newdisk/oracle/oradata/
[oracle@localhost oradata]$ ll
total 2487228
drwxr-xr-x. 7 oracle oinstall        136 Aug 26  2013 database
-rw-r--r--. 1 oracle oinstall      25116 Feb 27 03:31 db_install.rsp
drwxr-xr-x. 2 oracle oinstall          6 Feb 27 03:29 oracle11g
-rw-r--r--. 1 oracle oinstall 1395582860 Feb 27 02:04 p13390677_112040_Linux-x86-64_1of7.zip
-rw-r--r--. 1 oracle oinstall 1151304589 Feb 27 02:04 p13390677_112040_Linux-x86-64_2of7.zip
编辑db_install.rsp
[oracle@localhost oradata]$ vim db_install.rsp
下面分别在文件中的对应行号内进行相应的设置
可以使用 :set number 显示行号
| 29 oracle.install.option=INSTALL_DB_AND_CONFIG |
| 37 ORACLE_HOSTNAME=你的虚拟机ip |
| 42 UNIX_GROUP_NAME=oinstall |
| 49 INVENTORY_LOCATION=/newdisk/oracle/oradata/oraInventory |
| 86 SELECTED_LANGUAGES=en,zh_CN |
| 91 ORACLE_HOME=/newdisk/oracle/oradata/oracle11g/product/11.2.0.3/dbhome_1 |
| 96 ORACLE_BASE=/newdisk/oracle/oradata/oracle11g |
| 107 oracle.install.db.InstallEdition=EE |
| 154 oracle.install.db.DBA_GROUP=dba |
| 160 oracle.install.db.OPER_GROUP=oper |
| 189 oracle.install.db.config.starterdb.type=GENERAL_PURPOSE |
| 194 oracle.install.db.config.starterdb.globalDBName=prod |
| 199 oracle.install.db.config.starterdb.SID=prod |
| 213 oracle.install.db.config.starterdb.characterSet=AL32UTF8 |
| 221 oracle.install.db.config.starterdb.memoryOption=true |
| 229 oracle.install.db.config.starterdb.memoryLimit=512 |
| 262 oracle.install.db.config.starterdb.password.ALL=oracle |
| 336 oracle.install.db.config.starterdb.storageType=FILE_SYSTEM_STORAGE |
| 344 oracle.install.db.config.starterdb.fileSystemStorage.dataLocation= /newdisk/oracle/oradata/oracle11g/data |
| 351 oracle.install.db.config.starterdb.fileSystemStorage.recoveryLocation= /newdisk/oracle/oradata/oracle11g/fast_recovery_area |
| 400 DECLINE_SECURITY_UPDATES=true |
开始安装oracle
输入下面的命令:
进入/newdisk/oracle/oradata/database目录

执行安装命令
./runInstaller -silent -ignoreSysPrereqs -responseFile /newdisk/oracle/oradata/db_install.rsp -ignorePrereq
等待直到出现下面代码就成功了

连接oracle
sqlplus / as sysdba
正常情况会连接成功,而我出现了如下的情况

这就是虽然安装成功了,但问题可能在于sqlplus命令未能正确添加到系统路径中
所以在安装目录找sqlplus命令
[oracle@localhost database]$ find /newdisk/ -name sqlplus
/newdisk/oracle/oradata/oracle11g/product/11.2.0.3/dbhome_1/bin/sqlplus
/newdisk/oracle/oradata/oracle11g/product/11.2.0.3/dbhome_1/sqlplus
我们先打印ORACLE_HOME

发现和我们安装的目录不一样,查看~/.bash_profile文件

在打印ORACLE_BASE

发现是空,查看 ~/.bash_profile文件

发现是有值的,那就是没有刷新配置,刷新一下配置,在查看

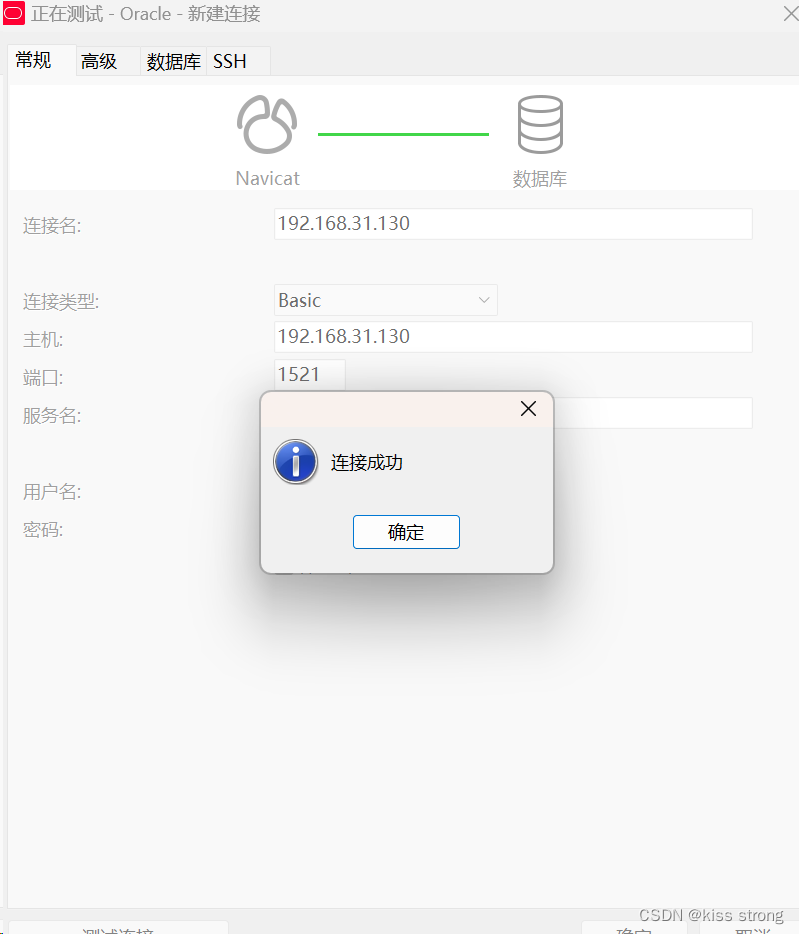
再次连接oracle,成功

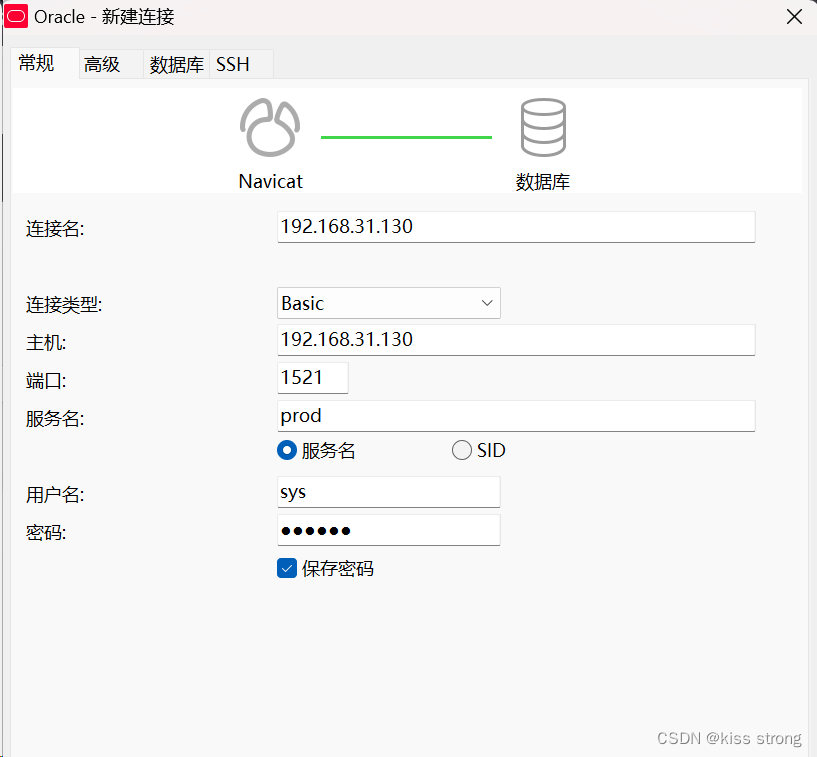
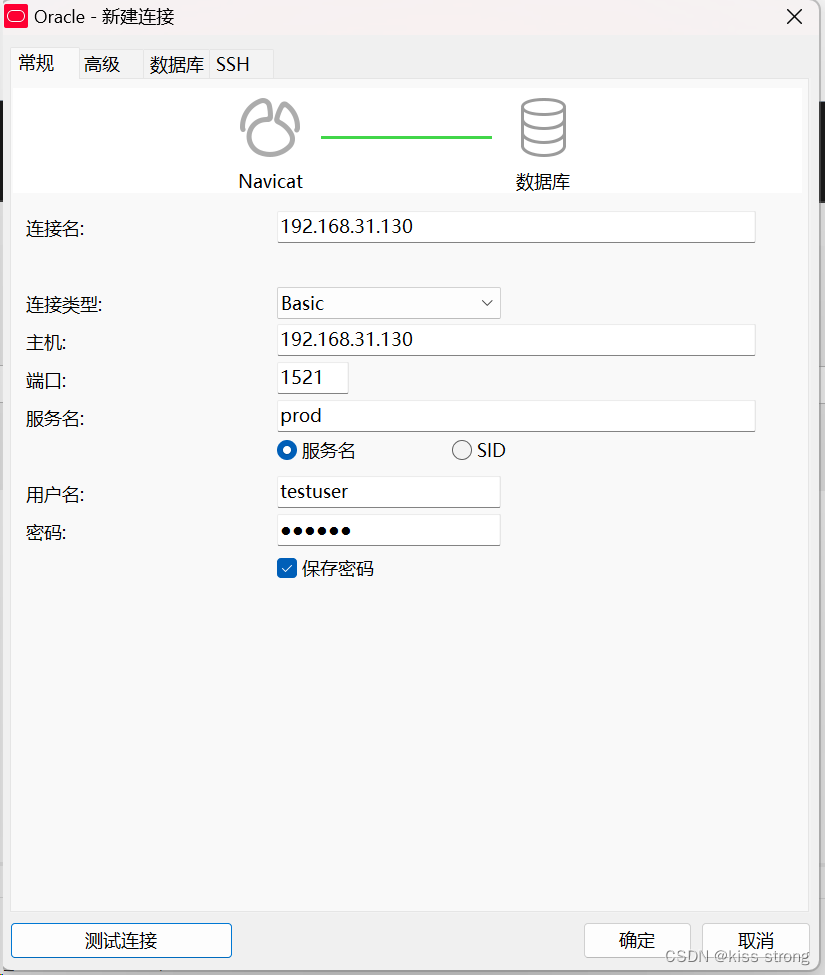
navicat连接测试
使用sys用户密码是上面设置的oracle,
oracle.install.db.config.starterdb.password.ALL=oracle
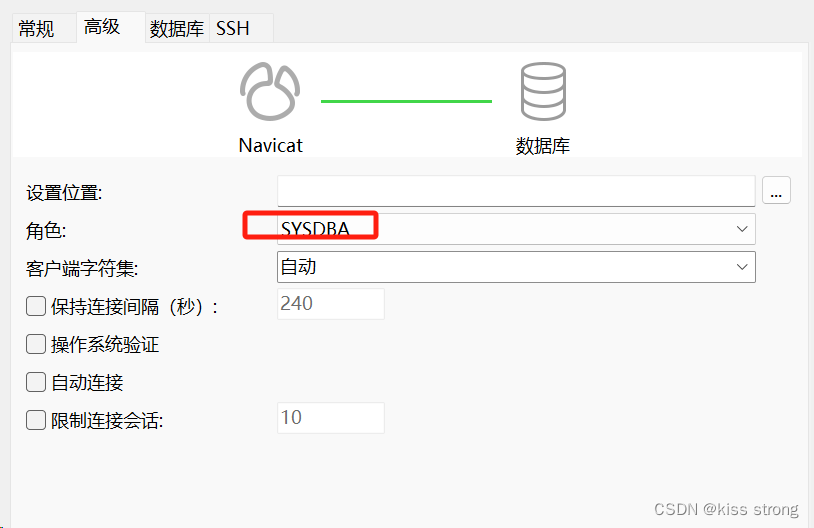
使用sys登录需要时sysdba角色,如下

卸载oracle
以root用户身份登录系统
停止所有Oracle相关进程。您可以使用以下命令来列出所有Oracle进程并停止它们(请注意,这里假设您正在使用Oracle 11g):
ps -ef | grep oracle | grep -v grep然后,您可以使用kill命令停止每个进程。例如,如果您想要停止进程ID为1234的进程,可以使用以下命令
kill -9 1234停止监听
lsnrctl stop删除安装目录
rm -rf /newdisk/oracle/oradata/oracle11grm -rf /newdisk/oracle/oradata/oraInventory/创建用户并赋予权限
--创建用户
CREATE USER testuser IDENTIFIED BY 123456;--分配连接权限GRANT CONNECT TO testuser;-- 分配创建会话权限
GRANT CREATE SESSION TO testuser;--把所有权限都给用户
GRANT ALL PRIVILEGES TO testuser;
查询所有表空间
SELECT --B.file_name "文件名",A.TABLESPACE_NAME "表空间名",TOTAL "表空间大小",FREE "表空间剩余大小",(TOTAL - FREE) "表空间使用大小",TOTAL / (1024 * 1024 * 1024) "表空间大小(G)",FREE / (1024 * 1024 * 1024) "表空间剩余大小(G)",(TOTAL - FREE) / (1024 * 1024 * 1024) "表空间使用大小(G)",ROUND((TOTAL - FREE) / TOTAL, 4) * 100 "使用率 %"
FROM   (SELECT TABLESPACE_NAME,SUM(BYTES) FREEFROM   DBA_FREE_SPACEGROUP  BY TABLESPACE_NAME) A,(SELECT TABLESPACE_NAME,--  file_name,SUM(BYTES) TOTALFROM   DBA_DATA_FILESGROUP  BY TABLESPACE_NAME/*,file_name*/) B
WHERE  A.TABLESPACE_NAME = B.TABLESPACE_NAME;
创建表空间
CREATE TABLESPACE 表空间名称 LOGGING DATAFILE 挂载地址 SIZE 大小 ;--举例
CREATE TABLESPACE TBS_INDEX_ITMS LOGGING DATAFILE '/export/home/oradata/TBS_INDEX_ITMS' SIZE 5120M ;
删除表空间
--删除空的表空间,但是不包含物理文件
drop tablespace tablespace_name;
--删除非空表空间,但是不包含物理文件
drop tablespace tablespace_name including contents;
--删除空表空间,包含物理文件
drop tablespace tablespace_name including datafiles;
--删除非空表空间,包含物理文件
drop tablespace tablespace_name including contents and datafiles;
--如果其他表空间中的表有外键等约束关联到了本表空间中的表的字段,就要加上CASCADE CONSTRAINTS
drop tablespace tablespace_name including contents and datafiles CASCADE CONSTRAINTS;
执行sql文件
-bash-4.2$ sqlplus gtmsmanager/gtmsmanager@10.21.1.176:1521/gtmsdbSQL*Plus: Release 11.2.0.4.0 Production on Tue Feb 27 09:34:03 2024Copyright (c) 1982, 2013, Oracle.  All rights reserved.Connected to:
Oracle Database 11g Enterprise Edition Release 11.2.0.4.0 - 64bit Production
With the Partitioning, OLAP, Data Mining and Real Application Testing optionsSQL> @/root/oracle/insert.sql
如果没有权限,给所有用户赋予文件夹的所有权限,再次执行就行了
chmod o+w /root/oracle/导入导出dmp
更多导出查看 exp help=y
导出dmp
导出数据库全部数据
仅输入数据库连接串和文件导出路径就可以执行导出,导出文件后缀为dmp
exp  用户名/密码@IP/服务名  FILE=导出文件路径 exp testuser/123456@192.168.31.130/prod FILE=/newdisk/oracle/oradata/dmpdir/cyz_expdp_all.dmp;[oracle@localhost oradata]$ exp testuser/123456@192.168.31.130/prod FILE=/newdisk/oracle/oradata/dmpdir/cyz_expdp_all.dmp;Export: Release 11.2.0.4.0 - Production on Tue Feb 27 22:29:54 2024Copyright (c) 1982, 2011, Oracle and/or its affiliates.  All rights reserved.Connected to: Oracle Database 11g Enterprise Edition Release 11.2.0.4.0 - 64bit Production
With the Partitioning, OLAP, Data Mining and Real Application Testing options
Export done in AL32UTF8 character set and AL16UTF16 NCHAR character set
. exporting pre-schema procedural objects and actions
. exporting foreign function library names for user TESTUSER
. exporting PUBLIC type synonyms
. exporting private type synonyms
. exporting object type definitions for user TESTUSER
About to export TESTUSER's objects ...
. exporting database links
. exporting sequence numbers
. exporting cluster definitions
. about to export TESTUSER's tables via Conventional Path ...
. . exporting table                        STUDENT          0 rows exported
. . exporting table                       TESTUSER          0 rows exported
. exporting synonyms
. exporting views
. exporting stored procedures
. exporting operators
. exporting referential integrity constraints
. exporting triggers
. exporting indextypes
. exporting bitmap, functional and extensible indexes
. exporting posttables actions
. exporting materialized views
. exporting snapshot logs
. exporting job queues
. exporting refresh groups and children
. exporting dimensions
. exporting post-schema procedural objects and actions
. exporting statistics
Export terminated successfully without warnings.
[oracle@localhost oradata]$ ls dmpdir
cyz_expdp_all.dmp  cyz_expdp.dmp
按表名导出
exp user/pwd@ip/service FILE=导出文件地址 TABLES=表名1,表名2;exp testuser/123456@192.168.31.130/prod FILE=/newdisk/oracle/oradata/dmpdir/cyz_expdp.dmp TABLES=STUDENT,TESTUSER;[oracle@localhost oradata]$ exp testuser/123456@192.168.31.130/prod FILE=/newdisk/oracle/oradata/dmpdir/cyz_expdp.dmp TABLES=STUDENT,TESTUSER;Export: Release 11.2.0.4.0 - Production on Tue Feb 27 22:23:48 2024Copyright (c) 1982, 2011, Oracle and/or its affiliates.  All rights reserved.Connected to: Oracle Database 11g Enterprise Edition Release 11.2.0.4.0 - 64bit Production
With the Partitioning, OLAP, Data Mining and Real Application Testing options
Export done in AL32UTF8 character set and AL16UTF16 NCHAR character setAbout to export specified tables via Conventional Path ...
. . exporting table                        STUDENT          0 rows exported
. . exporting table                       TESTUSER          0 rows exported
Export terminated successfully without warnings.
[oracle@localhost oradata]$ ls dmpdir
cyz_expdp.dmp
导入dmp
更多导入查看 imp help=y
导入整个文件
imp user/pwd@ip/service FILE=导出文件地址  FULL=Yimp testuser/123456@192.168.31.130/prod  FILE=/newdisk/oracle/oradata/dmpdir/cyz_expdp_all.dmp   FULL=Y[oracle@localhost oradata]$ imp testuser/123456@192.168.31.130/prod  FILE=/newdisk/oracle/oradata/dmpdir/cyz_expdp_all.dmp   FULL=YImport: Release 11.2.0.4.0 - Production on Tue Feb 27 22:37:45 2024Copyright (c) 1982, 2011, Oracle and/or its affiliates.  All rights reserved.Connected to: Oracle Database 11g Enterprise Edition Release 11.2.0.4.0 - 64bit Production
With the Partitioning, OLAP, Data Mining and Real Application Testing optionsExport file created by EXPORT:V11.02.00 via conventional path
import done in AL32UTF8 character set and AL16UTF16 NCHAR character set
. importing TESTUSER's objects into TESTUSER
. . importing table                      "STUDENT"          0 rows imported
. . importing table                     "TESTUSER"          0 rows imported
Import terminated successfully without warnings.
按表名导入
导入文件中的多个表
imp user/pwd@ip/service FILE=/newdisk/oracle/oradata/dmpdir/cyz_expdp.dmp  TABLES=STUDENT,TESTUSERimp testuser/123456@192.168.31.130/prod  FILE=/newdisk/oracle/oradata/dmpdir/cyz_expdp.dmp  TABLES=STUDENT,TESTUSER[oracle@localhost oradata]$ imp testuser/123456@192.168.31.130/prod  FILE=/newdisk/oracle/oradata/dmpdir/cyz_expdp.dmp  TABLES=STUDENT,TESTUSERImport: Release 11.2.0.4.0 - Production on Tue Feb 27 22:42:07 2024Copyright (c) 1982, 2011, Oracle and/or its affiliates.  All rights reserved.Connected to: Oracle Database 11g Enterprise Edition Release 11.2.0.4.0 - 64bit Production
With the Partitioning, OLAP, Data Mining and Real Application Testing optionsExport file created by EXPORT:V11.02.00 via conventional path
import done in AL32UTF8 character set and AL16UTF16 NCHAR character set
. importing TESTUSER's objects into TESTUSER
. importing TESTUSER's objects into TESTUSER
. . importing table                      "STUDENT"          0 rows imported
. . importing table                     "TESTUSER"          0 rows imported
Import terminated successfully without warnings.
导入文件中的一个表
imp user/pwd@ip/service FILE=/newdisk/oracle/oradata/dmpdir/cyz_expdp.dmp  TABLES=STUDENTimp testuser/123456@192.168.31.130/prod  FILE=/newdisk/oracle/oradata/dmpdir/cyz_expdp.dmp  TABLES=STUDENT[oracle@localhost oradata]$ imp testuser/123456@192.168.31.130/prod  FILE=/newdisk/oracle/oradata/dmpdir/cyz_expdp.dmp  TABLES=STUDENT,TESTUSERImport: Release 11.2.0.4.0 - Production on Tue Feb 27 22:42:07 2024Copyright (c) 1982, 2011, Oracle and/or its affiliates.  All rights reserved.Connected to: Oracle Database 11g Enterprise Edition Release 11.2.0.4.0 - 64bit Production
With the Partitioning, OLAP, Data Mining and Real Application Testing optionsExport file created by EXPORT:V11.02.00 via conventional path
import done in AL32UTF8 character set and AL16UTF16 NCHAR character set
. importing TESTUSER's objects into TESTUSER
. importing TESTUSER's objects into TESTUSER
. . importing table                      "STUDENT"          0 rows imported
Import terminated successfully without warnings.
修改用户密码
sqlplus  SYS/oracle@gtmsdb as sysdbaalter user GTMSMANAGER identified  by 123456;--例子
-bash-4.2$ sqlplus  SYS/oracle@gtmsdb as sysdbaSQL*Plus: Release 11.2.0.4.0 Production on Tue Feb 27 09:59:06 2024Copyright (c) 1982, 2013, Oracle.  All rights reserved.Connected to:
Oracle Database 11g Enterprise Edition Release 11.2.0.4.0 - 64bit Production
With the Partitioning, OLAP, Data Mining and Real Application Testing optionsSQL> alter user GTMSMANAGER identified  by 123456;User altered.SQL>
序列操作
新建序列
-- Create sequence  testseq是序列名
create sequence testseq
minvalue 1
maxvalue 999999999999999999999999999
start with 1
increment by 1
cache 20;
查询序列当前值(必须执行一次nextval,否则会报错)
--testseq是名称
select testseq.currval  from dual
查询序列下一个值
--testseq序列名
select testseq.nextval from dual
删除序列
--testseq序列名
DROP SEQUENCE testseq;
这篇关于oracle11安装及使用的文章就介绍到这儿,希望我们推荐的文章对编程师们有所帮助!


