本文主要是介绍UniversalImageLoader源码解析之 DiskCache,希望对大家解决编程问题提供一定的参考价值,需要的开发者们随着小编来一起学习吧!
转载请注明出处:http://blog.csdn.net/crazy1235/article/details/70472306
-
- FileNameGenerator
- DiskCache
- tryLoadBitmap
- UnlimitedDiskCache
- BaseDiskCache
- LimitedAgeDiskCache
- LruDiskCache
- get
- save
- remove
- clear
上上一篇介绍了 UIL的总体流程源码分析
上一篇blog主要分析了 UIL的任务执行流程!包括 ProcessAndDisplayImageTask & LoadAndDisplayImageTask & DisplayBitmapTask
那么这篇文章说说它的磁盘缓存相关内容!

disc包下面包含两大部分,其一是磁盘缓存的策略,就是DiskCache及其相关实现类!
其二是 FileNameGenerator 及其相关子类!
FileNameGenerator
磁盘缓存需要把文件保存在手机存储上!所以得需要个文件名啊!
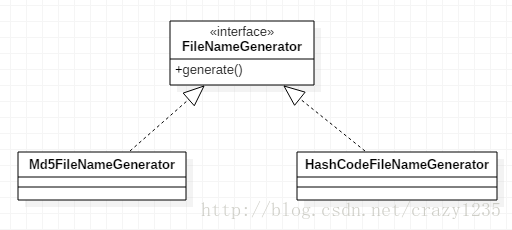
FileNameGenerator默认有两个实现类!
一种是MD5机密的文件名,一种是Hash加密的文件名!
public class Md5FileNameGenerator implements FileNameGenerator {private static final String HASH_ALGORITHM = "MD5";private static final int RADIX = 10 + 26; // 10 digits + 26 letters@Overridepublic String generate(String imageUri) {byte[] md5 = getMD5(imageUri.getBytes());BigInteger bi = new BigInteger(md5).abs();return bi.toString(RADIX);}private byte[] getMD5(byte[] data) {byte[] hash = null;try {MessageDigest digest = MessageDigest.getInstance(HASH_ALGORITHM);digest.update(data);hash = digest.digest();} catch (NoSuchAlgorithmException e) {L.e(e);}return hash;}
}
public class HashCodeFileNameGenerator implements FileNameGenerator {@Overridepublic String generate(String imageUri) {return String.valueOf(imageUri.hashCode());}
}
DiskCache
先来看张UML图!

从上面的图可以看出,磁盘缓存最主要的函数就是 save() 、get() 、remove() 、clear() !
还是先来看总体流程,然后在针对不同的实现类策略具体分析!
tryLoadBitmap()
上一篇介绍 LoadAndDisplayImageTask 的时候说到,当从尝试从内存缓存中获取bitmap失败时,会调用tryLoadBitmap() 函数!
private Bitmap tryLoadBitmap() throws TaskCancelledException {Bitmap bitmap = null;try {// 1. 首先尝试从磁盘缓存中获取对应的缓存文件File imageFile = configuration.diskCache.get(uri);if (imageFile != null && imageFile.exists() && imageFile.length() > 0) {loadedFrom = LoadedFrom.DISC_CACHE;// 2. 获取成功则解码bitmap = decodeImage(Scheme.FILE.wrap(imageFile.getAbsolutePath())); // FILE模式包装路径}// 3. 从磁盘缓存读取失败if (bitmap == null || bitmap.getWidth() <= 0 || bitmap.getHeight() <= 0) {loadedFrom = LoadedFrom.NETWORK;String imageUriForDecoding = uri;// 4. 访问网络下载图片文件并保存到磁盘上if (options.isCacheOnDisk() && tryCacheImageOnDisk()) {imageFile = configuration.diskCache.get(uri);if (imageFile != null) {imageUriForDecoding = Scheme.FILE.wrap(imageFile.getAbsolutePath()); // FILE模式包装路径}}// 5. 解码文件bitmap = decodeImage(imageUriForDecoding);if (bitmap == null || bitmap.getWidth() <= 0 || bitmap.getHeight() <= 0) {fireFailEvent(FailType.DECODING_ERROR, null);}}} catch (IllegalStateException e) {// 省略代码}return bitmap;}上面的方法体,我在重要地方都加了注释!
关键点如下:
diskCache.get(uri)
decodeImage()
Scheme.FILE.wrap(imageFile.getAbsolutePath())
tryCacheImageOnDisk()
diskCache.get(uri) 表示从磁盘缓存中根据uri地址来获取对应的文件!不同的缓存策略有不同的get()实现,这个后面再分析!
Scheme.FILE.wrap(imageFile.getAbsolutePath()) 将图片的路径再包装一下。
Scheme 是一个枚举类!
HTTP("http"), HTTPS("https"), FILE("file"), CONTENT("content"), ASSETS("assets"), DRAWABLE("drawable"), UNKNOWN("");private String scheme;private String uriPrefix;Scheme(String scheme) {this.scheme = scheme;uriPrefix = scheme + "://";}public String wrap(String path) {return uriPrefix + path;}比如,我们将缓存到的文件路径为
/data/data/com.jacksen.uildemo/cache/uil-images/sldjk8923
包装之后变成了
file:///data/data/com.jacksen.uildemo/cache/uil-images/sldjk8923
每次包装都伴随着解码decodeImage()
接着来看默认的解码器 – BaseImageDecoder
@Overridepublic Bitmap decode(ImageDecodingInfo decodingInfo) throws IOException {Bitmap decodedBitmap;ImageFileInfo imageInfo;// 1. 获取图片流InputStream imageStream = getImageStream(decodingInfo);if (imageStream == null) {L.e(ERROR_NO_IMAGE_STREAM, decodingInfo.getImageKey());return null;}// 2. 如果有需要图片大小和旋转,则这里处理一下!try {imageInfo = defineImageSizeAndRotation(imageStream, decodingInfo);imageStream = resetStream(imageStream, decodingInfo);// 3. 生成解码条件Options decodingOptions = prepareDecodingOptions(imageInfo.imageSize, decodingInfo);// 4. 流 转成 BitmapdecodedBitmap = BitmapFactory.decodeStream(imageStream, null, decodingOptions);} finally {IoUtils.closeSilently(imageStream);}return decodedBitmap;}重点看getImageStream()
protected InputStream getImageStream(ImageDecodingInfo decodingInfo) throws IOException {return decodingInfo.getDownloader().getStream(decodingInfo.getImageUri(), decodingInfo.getExtraForDownloader());}这里通过下载器的getStream获取输入流!
上上篇文章中提到,UIL类库有个默认的下载器实现类 – BaseImageDownloader
内部有6个函数分别从不同的位置获取输入流。
@Overridepublic InputStream getStream(String imageUri, Object extra) throws IOException {switch (Scheme.ofUri(imageUri)) {case HTTP:case HTTPS:return getStreamFromNetwork(imageUri, extra);case FILE:return getStreamFromFile(imageUri, extra);case CONTENT:return getStreamFromContent(imageUri, extra);case ASSETS:return getStreamFromAssets(imageUri, extra);case DRAWABLE:return getStreamFromDrawable(imageUri, extra);case UNKNOWN:default:return getStreamFromOtherSource(imageUri, extra);}}刚才缓存的地址被包装了一次!!
可以看到这里对包装的地址解析了一次
public static Scheme ofUri(String uri) {if (uri != null) {for (Scheme s : values()) {if (s.belongsTo(uri)) {return s;}}}return UNKNOWN;}private boolean belongsTo(String uri) {return uri.toLowerCase(Locale.US).startsWith(uriPrefix);}然后通过swich语句判断 进而 调用了 getStreamFromFile()
protected InputStream getStreamFromFile(String imageUri, Object extra) throws IOException {String filePath = Scheme.FILE.crop(imageUri); // 将包装的地址解析出来if (isVideoFileUri(imageUri)) { // 判断是否是video文件return getVideoThumbnailStream(filePath); // 如果是则返回video的缩略图文件} else {BufferedInputStream imageStream = new BufferedInputStream(new FileInputStream(filePath), BUFFER_SIZE);return new ContentLengthInputStream(imageStream, (int) new File(filePath).length());}}OK。分析到这里,通过地址得到了文件流,然后 ImageDecoder 的实现类中解码称为Bitmap对象!
再回到tryLoadBitmap()中,当磁盘缓存读取失败了,就会从网络获取!
private boolean tryCacheImageOnDisk() throws TaskCancelledException {boolean loaded;try {loaded = downloadImage(); // !!!// 省略代码} catch (IOException e) {L.e(e);loaded = false;}return loaded;}重点关注 downloadImage() – 从网络(不一定是)下载图片
private boolean downloadImage() throws IOException {InputStream is = getDownloader().getStream(uri, options.getExtraForDownloader()); // !!!if (is == null) {L.e(ERROR_NO_IMAGE_STREAM, memoryCacheKey);return false;} else {try {return configuration.diskCache.save(uri, is, this);} finally {IoUtils.closeSilently(is);}}}还是调用的下载器的 getStream() 函数!
此时传入的uri 是没有包装过的。
比如:http://site.com/image.png", "file:///mnt/sdcard/image.png
所以如果是一个网络图片地址
则会调用 getStreamFromNetwork()
如果是手机图片地址
则会调用 getStreamFromFile()
protected InputStream getStreamFromNetwork(String imageUri, Object extra) throws IOException {HttpURLConnection conn = createConnection(imageUri, extra);int redirectCount = 0;while (conn.getResponseCode() / 100 == 3 && redirectCount < MAX_REDIRECT_COUNT) {conn = createConnection(conn.getHeaderField("Location"), extra);redirectCount++;}InputStream imageStream;try {imageStream = conn.getInputStream();} catch (IOException e) {// Read all data to allow reuse connection (http://bit.ly/1ad35PY)IoUtils.readAndCloseStream(conn.getErrorStream());throw e;}if (!shouldBeProcessed(conn)) {IoUtils.closeSilently(imageStream);throw new IOException("Image request failed with response code " + conn.getResponseCode());}return new ContentLengthInputStream(new BufferedInputStream(imageStream, BUFFER_SIZE), conn.getContentLength());}从网络获取输入流 通过 HttpURLConnection 方式!
上面分析了从磁盘或者网络加载图片并显示的过程!
这里看下UIL的缓存路径的构建!
public static DiskCache createDiskCache(Context context, FileNameGenerator diskCacheFileNameGenerator,long diskCacheSize, int diskCacheFileCount) {// 1. File reserveCacheDir = createReserveDiskCacheDir(context);// 2. 如果设置了磁盘缓存的大小或者磁盘缓存最大文件数,则创建LruDiskCache缓存策略if (diskCacheSize > 0 || diskCacheFileCount > 0) {File individualCacheDir = StorageUtils.getIndividualCacheDirectory(context);try {return new LruDiskCache(individualCacheDir, reserveCacheDir, diskCacheFileNameGenerator, diskCacheSize,diskCacheFileCount);} catch (IOException e) {L.e(e);// continue and create unlimited cache}}// 3. 否则创建UnlimitedDiskCache 缓存策略File cacheDir = StorageUtils.getCacheDirectory(context);return new UnlimitedDiskCache(cacheDir, reserveCacheDir, diskCacheFileNameGenerator);}private static File createReserveDiskCacheDir(Context context) {File cacheDir = StorageUtils.getCacheDirectory(context, false);File individualDir = new File(cacheDir, "uil-images");if (individualDir.exists() || individualDir.mkdir()) {cacheDir = individualDir;}return cacheDir;}
两种都涉及到 StorageUtils.getCacheDirectory() 函数!
public static File getCacheDirectory(Context context, boolean preferExternal) {File appCacheDir = null;String externalStorageState;try {externalStorageState = Environment.getExternalStorageState();} catch (NullPointerException e) { // (sh)it happens (Issue #660)externalStorageState = "";} catch (IncompatibleClassChangeError e) { // (sh)it happens too (Issue #989)externalStorageState = "";}if (preferExternal && MEDIA_MOUNTED.equals(externalStorageState) && hasExternalStoragePermission(context)) {appCacheDir = getExternalCacheDir(context);}if (appCacheDir == null) {appCacheDir = context.getCacheDir();}if (appCacheDir == null) {String cacheDirPath = "/data/data/" + context.getPackageName() + "/cache/";L.w("Can't define system cache directory! '%s' will be used.", cacheDirPath);appCacheDir = new File(cacheDirPath);}return appCacheDir;}UnlimitedDiskCache
当没有设置磁盘缓存文件个数,没有设置磁盘缓存大小的话,UIL创建的就是这个策略。
public class UnlimitedDiskCache extends BaseDiskCache {public UnlimitedDiskCache(File cacheDir) {super(cacheDir);}public UnlimitedDiskCache(File cacheDir, File reserveCacheDir) {super(cacheDir, reserveCacheDir);}public UnlimitedDiskCache(File cacheDir, File reserveCacheDir, FileNameGenerator fileNameGenerator) {super(cacheDir, reserveCacheDir, fileNameGenerator);}
}
但是这个实现类并没有什么东西!调用的都是父类方法!
BaseDiskCache
public static final int DEFAULT_BUFFER_SIZE = 32 * 1024; // 默认buffer大小32 Kb
public static final Bitmap.CompressFormat DEFAULT_COMPRESS_FORMAT = Bitmap.CompressFormat.PNG; // 默认存储图片类型
public static final int DEFAULT_COMPRESS_QUALITY = 100; // 默认图片质量
private static final String TEMP_IMAGE_POSTFIX = ".tmp";
缓存一张图片
@Overridepublic boolean save(String imageUri, InputStream imageStream, IoUtils.CopyListener listener) throws IOException {File imageFile = getFile(imageUri); // 根据uri地址生成目标文件File tmpFile = new File(imageFile.getAbsolutePath() + TEMP_IMAGE_POSTFIX); // 临时文件boolean loaded = false;try {OutputStream os = new BufferedOutputStream(new FileOutputStream(tmpFile), bufferSize);try {loaded = IoUtils.copyStream(imageStream, os, listener, bufferSize);} finally {IoUtils.closeSilently(os);}} finally {if (loaded && !tmpFile.renameTo(imageFile)) {loaded = false;}if (!loaded) {tmpFile.delete();}}return loaded;}
先根据imageUri得到目标文件,将imageStream先写入与目标文件同一文件夹的 .tmp 结尾的临时文件内,若写入成功则将临时文件重命名为目标文件并返回 true,否则删除临时文件并返回 false!
@Overridepublic boolean save(String imageUri, Bitmap bitmap) throws IOException {File imageFile = getFile(imageUri);File tmpFile = new File(imageFile.getAbsolutePath() + TEMP_IMAGE_POSTFIX);OutputStream os = new BufferedOutputStream(new FileOutputStream(tmpFile), bufferSize);boolean savedSuccessfully = false;try {savedSuccessfully = bitmap.compress(compressFormat, compressQuality, os);} finally {IoUtils.closeSilently(os);if (savedSuccessfully && !tmpFile.renameTo(imageFile)) {savedSuccessfully = false;}if (!savedSuccessfully) {tmpFile.delete();}}bitmap.recycle();return savedSuccessfully;}移除一个缓存文件,直接删除文件即可!
@Overridepublic boolean remove(String imageUri) {return getFile(imageUri).delete();}@Overridepublic void clear() {File[] files = cacheDir.listFiles();if (files != null) {for (File f : files) {f.delete();}}}清空缓存,则直接遍历缓存文件夹,一个个的删除文件即可!
LimitedAgeDiskCache
限制缓存存活周期策略! 它的父类也是 BaseDiskCache !
private final long maxFileAge; // 文件最大存活时长
private final Map<File, Long> loadingDates = Collections.synchronizedMap(new HashMap<File, Long>());@Overridepublic boolean save(String imageUri, InputStream imageStream, IoUtils.CopyListener listener) throws IOException {boolean saved = super.save(imageUri, imageStream, listener);rememberUsage(imageUri);return saved;}@Overridepublic boolean save(String imageUri, Bitmap bitmap) throws IOException {boolean saved = super.save(imageUri, bitmap);rememberUsage(imageUri);return saved;}调用的都是父类的save() 方法!
private void rememberUsage(String imageUri) {File file = getFile(imageUri);long currentTime = System.currentTimeMillis();file.setLastModified(currentTime);loadingDates.put(file, currentTime);}rememberUsage() 函数的作用是 将当前时间作为文件的最后修改时间,并将【文件–当前时间】作为键值对放到loadingDates中!
再来看移除一个缓存的函数,很简单!
@Overridepublic boolean remove(String imageUri) {loadingDates.remove(getFile(imageUri));return super.remove(imageUri);}@Overridepublic File get(String imageUri) {File file = super.get(imageUri);if (file != null && file.exists()) {boolean cached;Long loadingDate = loadingDates.get(file);if (loadingDate == null) {cached = false;loadingDate = file.lastModified();} else {cached = true;}if (System.currentTimeMillis() - loadingDate > maxFileAge) {file.delete();loadingDates.remove(file);} else if (!cached) {loadingDates.put(file, loadingDate);}}
return file;}判断如果缓存对象的存活时间已经超过设置的最长时间,则删除。
LruDiskCache
LRU – Least Recently Used – 最近最少使用!!
UIL框架中Lru磁盘缓存的主要实现是在 DiskLruCache 类中!
请注意区分这两个类!!
构造函数:
public LruDiskCache(File cacheDir, File reserveCacheDir, FileNameGenerator fileNameGenerator, long cacheMaxSize,int cacheMaxFileCount) throws IOException {// 省略代码this.reserveCacheDir = reserveCacheDir;this.fileNameGenerator = fileNameGenerator;initCache(cacheDir, reserveCacheDir, cacheMaxSize, cacheMaxFileCount);}private void initCache(File cacheDir, File reserveCacheDir, long cacheMaxSize, int cacheMaxFileCount)throws IOException {try {cache = DiskLruCache.open(cacheDir, 1, 1, cacheMaxSize, cacheMaxFileCount);} catch (IOException e) {L.e(e);if (reserveCacheDir != null) {initCache(reserveCacheDir, null, cacheMaxSize, cacheMaxFileCount);}if (cache == null) {throw e; //new RuntimeException("Can't initialize disk cache", e);}}}DiskLruCache.open
LruDiskCache 涉及到一个文件 journal
先来看一下这个文件!
libcore.io.DiskLruCache
1
1
1DIRTY rmceh4pqdt0ks6jse5jmuttr
CLEAN rmceh4pqdt0ks6jse5jmuttr 0
READ rmceh4pqdt0ks6jse5jmuttr
READ rmceh4pqdt0ks6jse5jmuttr
DIRTY rmceh4pqdt0ks6jse5jmuttr
CLEAN rmceh4pqdt0ks6jse5jmuttr 0
READ rmceh4pqdt0ks6jse5jmuttr
READ rmceh4pqdt0ks6jse5jmuttr
DIRTY rmceh4pqdt0ks6jse5jmuttr
CLEAN rmceh4pqdt0ks6jse5jmuttr 0
READ rmceh4pqdt0ks6jse5jmuttr
第一行 – libcore.io.DiskLruCache ,是一个固定的字符串!
第二行 – 1 , 表示DiskLruCache的版本号! 固定值
static final String VERSION_1 = “1”;
第三行 – 1 ,appVersion, 表示当前app的版本号!
第四行 – 1,表示每个entry对应的value个数,一般都是1
第五行 – 一个空行!
其实 LruDiskCache 的主要实现方法都在 DiskLruCache.java 里面!
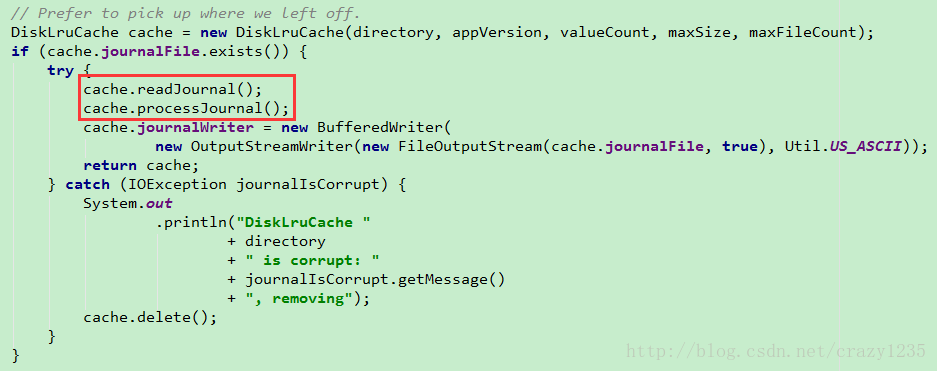
public static DiskLruCache open(File directory, int appVersion, int valueCount, long maxSize, int maxFileCount)throws IOException {// 省略代码// 1. File backupFile = new File(directory, JOURNAL_FILE_BACKUP);if (backupFile.exists()) {File journalFile = new File(directory, JOURNAL_FILE);if (journalFile.exists()) {backupFile.delete();} else {renameTo(backupFile, journalFile, false);}}// 2. 创建DiskLruCache对象DiskLruCache cache = new DiskLruCache(directory, appVersion, valueCount, maxSize, maxFileCount);// 3. 如果journal文件存在if (cache.journalFile.exists()) {try {cache.readJournal();cache.processJournal();cache.journalWriter = new BufferedWriter(new OutputStreamWriter(new FileOutputStream(cache.journalFile, true), Util.US_ASCII));return cache;} catch (IOException journalIsCorrupt) {System.out.println("DiskLruCache "+ directory+ " is corrupt: "+ journalIsCorrupt.getMessage()+ ", removing");cache.delete();}}// 3. journal文件不存在directory.mkdirs();cache = new DiskLruCache(directory, appVersion, valueCount, maxSize, maxFileCount);cache.rebuildJournal();return cache;}static final String JOURNAL_FILE = "journal";
static final String JOURNAL_FILE_TEMP = "journal.tmp";
static final String JOURNAL_FILE_BACKUP = "journal.bkp";在open() 函数内部:
首先,如果 JOURNAL_FILE_BACKUP (备份文件)存在,当 JOURNAL_FILE 也存在,则将备份文件删除,否则将备份文件重命名为原始文件!
journal.bkp –> journal
接着,构造了DiskLruCache 对象!
然后当 JOURNAL_FILE 存在时,读取文件处理,这里先不细说!
不存在或者读取操作文件异常时,将文件删除!重新创建!并 重建journal 文件!
private final LinkedHashMap<String, Entry> lruEntries = new LinkedHashMap<String, Entry>(0, 0.75f, true);private synchronized void rebuildJournal() throws IOException {if (journalWriter != null) {journalWriter.close();}Writer writer = new BufferedWriter(new OutputStreamWriter(new FileOutputStream(journalFileTmp), Util.US_ASCII));try {writer.write(MAGIC); // libcore.io.DiskLruCachewriter.write("\n");writer.write(VERSION_1); // 1writer.write("\n");writer.write(Integer.toString(appVersion)); // 1writer.write("\n");writer.write(Integer.toString(valueCount)); // 1writer.write("\n");writer.write("\n"); // 空行// 遍历map对象,写入文件! DIRTY 或者 CLEAN for (Entry entry : lruEntries.values()) {if (entry.currentEditor != null) {writer.write(DIRTY + ' ' + entry.key + '\n');} else {writer.write(CLEAN + ' ' + entry.key + entry.getLengths() + '\n');}}} finally {writer.close();}// 当原始文件存在时,原始文件更名为备份文件,作为备份文件!if (journalFile.exists()) {renameTo(journalFile, journalFileBackup, true);}// 将生成的文件作为原始文件renameTo(journalFileTmp, journalFile, false);journalFileBackup.delete();journalWriter = new BufferedWriter(new OutputStreamWriter(new FileOutputStream(journalFile, true), Util.US_ASCII));}从这里可以看出journal文件其实正是上面分析的那五行数据!!!
接着来分析上面略过的那段代码
主要就是那两行!
- readJournal()
private void readJournal() throws IOException {StrictLineReader reader = new StrictLineReader(new FileInputStream(journalFile), Util.US_ASCII);// 首先去校验journal的前五行!如果失败则抛出IO异常try {String magic = reader.readLine();String version = reader.readLine();String appVersionString = reader.readLine();String valueCountString = reader.readLine();String blank = reader.readLine();if (!MAGIC.equals(magic)|| !VERSION_1.equals(version)|| !Integer.toString(appVersion).equals(appVersionString)|| !Integer.toString(valueCount).equals(valueCountString)|| !"".equals(blank)) {throw new IOException("unexpected journal header: [" + magic + ", " + version + ", "+ valueCountString + ", " + blank + "]");}// 校验成功之后,则while循环按行读取journal文件!lineCount计数!int lineCount = 0;while (true) {try {readJournalLine(reader.readLine());lineCount++;} catch (EOFException endOfJournal) {break;}}redundantOpCount = lineCount - lruEntries.size(); // redundantOpCount表示剩余操作个数} finally {Util.closeQuietly(reader);}}- readJournalLine()
private void readJournalLine(String line) throws IOException {int firstSpace = line.indexOf(' ');if (firstSpace == -1) {throw new IOException("unexpected journal line: " + line);}int keyBegin = firstSpace + 1;int secondSpace = line.indexOf(' ', keyBegin);final String key;if (secondSpace == -1) {key = line.substring(keyBegin);// REMOVE 开头的行需要被移除!if (firstSpace == REMOVE.length() && line.startsWith(REMOVE)) {lruEntries.remove(key);return;}} else {key = line.substring(keyBegin, secondSpace);}// 添加到map中!Entry entry = lruEntries.get(key);if (entry == null) {entry = new Entry(key);lruEntries.put(key, entry);}if (secondSpace != -1 && firstSpace == CLEAN.length() && line.startsWith(CLEAN)) {String[] parts = line.substring(secondSpace + 1).split(" ");entry.readable = true;entry.currentEditor = null; // CLEAN 标志的数据editor为空entry.setLengths(parts); // 如果有长度就设置到entry中} else if (secondSpace == -1 && firstSpace == DIRTY.length() && line.startsWith(DIRTY)) { // DIRTY 标志的数据 editor不为空,表示当前有编辑对象!entry.currentEditor = new Editor(entry);} else if (secondSpace == -1 && firstSpace == READ.length() && line.startsWith(READ)) {// This work was already done by calling lruEntries.get().} else {throw new IOException("unexpected journal line: " + line);}}- processJournal()
private void processJournal() throws IOException {deleteIfExists(journalFileTmp); // 删除临时文件for (Iterator<Entry> i = lruEntries.values().iterator(); i.hasNext(); ) {Entry entry = i.next();if (entry.currentEditor == null) {for (int t = 0; t < valueCount; t++) {size += entry.lengths[t];fileCount++;}} else { // 遇到DIRTY 数据 将editor置为空entry.currentEditor = null;for (int t = 0; t < valueCount; t++) {deleteIfExists(entry.getCleanFile(t));deleteIfExists(entry.getDirtyFile(t));}i.remove();}}}DiskLruCache 涉及到两个静态内部类! Entry & Editor
每个Entry对象都对应一个Editor对象
private final class Entry {private final String key;/** entry对应文件的长度 */private final long[] lengths;private boolean readable;/** 对应的编辑对象 */private Editor currentEditor;/** 序列号 */private long sequenceNumber;private Entry(String key) {this.key = key;this.lengths = new long[valueCount]; // valueCount通常为1}// 省略代码...}public final class Editor {private final Entry entry;private final boolean[] written;private boolean hasErrors;private boolean committed;private Editor(Entry entry) {this.entry = entry;this.written = (entry.readable) ? null : new boolean[valueCount];}/*** 读取CLEAN文件流*/public InputStream newInputStream(int index) throws IOException {synchronized (DiskLruCache.this) {if (entry.currentEditor != this) {throw new IllegalStateException();}if (!entry.readable) {return null;}try {return new FileInputStream(entry.getCleanFile(index));} catch (FileNotFoundException e) {return null;}}}/*** InputStream -> String*/public String getString(int index) throws IOException {InputStream in = newInputStream(index);return in != null ? inputStreamToString(in) : null;}/*** 返回一个输出流*/public OutputStream newOutputStream(int index) throws IOException {synchronized (DiskLruCache.this) {if (entry.currentEditor != this) {throw new IllegalStateException();}if (!entry.readable) {written[index] = true;}File dirtyFile = entry.getDirtyFile(index);FileOutputStream outputStream;try {outputStream = new FileOutputStream(dirtyFile);} catch (FileNotFoundException e) {// Attempt to recreate the cache directory.directory.mkdirs();try {outputStream = new FileOutputStream(dirtyFile);} catch (FileNotFoundException e2) {// We are unable to recover. Silently eat the writes.return NULL_OUTPUT_STREAM;}}return new FaultHidingOutputStream(outputStream); // FaultHidingOutputStream封装了OutputStream的基本操作!!!}}/** */public void set(int index, String value) throws IOException {Writer writer = null;try {writer = new OutputStreamWriter(newOutputStream(index), Util.UTF_8);writer.write(value);} finally {Util.closeQuietly(writer);}}/*** 提交一次修改!*/public void commit() throws IOException {if (hasErrors) {completeEdit(this, false);remove(entry.key); // The previous entry is stale.} else {completeEdit(this, true);}committed = true;}/*** 中断修改*/public void abort() throws IOException {completeEdit(this, false);}public void abortUnlessCommitted() {if (!committed) {try {abort();} catch (IOException ignored) {}}}}不管提交修改还是中断修改都是调用的 completeEdit() 函数!
private synchronized void completeEdit(Editor editor, boolean success) throws IOException {Entry entry = editor.entry;if (entry.currentEditor != editor) { // entry的编辑对象不对应时抛出异常!throw new IllegalStateException();}// ...for (int i = 0; i < valueCount; i++) {File dirty = entry.getDirtyFile(i);if (success) { // 如果编辑成功!if (dirty.exists()) { // 将DIRTY文件转成CLEANFile clean = entry.getCleanFile(i);dirty.renameTo(clean);long oldLength = entry.lengths[i];long newLength = clean.length();entry.lengths[i] = newLength;size = size - oldLength + newLength;fileCount++;}} else {deleteIfExists(dirty);}}redundantOpCount++;entry.currentEditor = null; // 编辑完毕将editor置空if (entry.readable | success) {entry.readable = true;// journal中写入一条CLEAN记录journalWriter.write(CLEAN + ' ' + entry.key + entry.getLengths() + '\n');if (success) {entry.sequenceNumber = nextSequenceNumber++;}} else { // 移除一条记录并写入REMOVE lruEntries.remove(entry.key);journalWriter.write(REMOVE + ' ' + entry.key + '\n');}journalWriter.flush();// !!! journalRebuildRequiredif (size > maxSize || fileCount > maxFileCount || journalRebuildRequired()) {executorService.submit(cleanupCallable);}}在方法最后调用了 journalRebuildRequired() ,用来判断是否需要重建journal文件!
private boolean journalRebuildRequired() {final int redundantOpCompactThreshold = 2000; // 阈值为2000return redundantOpCount >= redundantOpCompactThreshold //&& redundantOpCount >= lruEntries.size();}其实在DiskLruCache中 remove、get、editor操作都会使 redundantOpCount + 1。
当超过设置的阈值2000时,就会执行清空任务!
private final Callable<Void> cleanupCallable = new Callable<Void>() {public Void call() throws Exception {synchronized (DiskLruCache.this) {if (journalWriter == null) {return null; // Closed.}trimToSize();trimToFileCount();if (journalRebuildRequired()) {rebuildJournal();redundantOpCount = 0;}}return null;}};任务中执行了 rebuildJournal() 重新生成journal文件!
get()
获取一个缓存
DiskLruCache.get()
public synchronized Snapshot get(String key) throws IOException {checkNotClosed(); // 1. 首先检查writer对象是否已经被关闭。validateKey(key); // 2. 验证key 是否符合规则Entry entry = lruEntries.get(key);// ... 省略代码File[] files = new File[valueCount];InputStream[] ins = new InputStream[valueCount];try {File file;for (int i = 0; i < valueCount; i++) {file = entry.getCleanFile(i);files[i] = file;ins[i] = new FileInputStream(file);}} catch (FileNotFoundException e) {// ... 省略代码}redundantOpCount++; // +1journalWriter.append(READ + ' ' + key + '\n'); // 写入READ操作if (journalRebuildRequired()) { // 是否需要重建journal文件!如果是则执行cleanup!executorService.submit(cleanupCallable);}// 返回一个Snapshot对象!return new Snapshot(key, entry.sequenceNumber, files, ins, entry.lengths);}// 正则验证是否合乎规则!
private void validateKey(String key) {Matcher matcher = LEGAL_KEY_PATTERN.matcher(key);if (!matcher.matches()) {throw new IllegalArgumentException("keys must match regex [a-z0-9_-]{1,64}: \"" + key + "\"");}}重点看SnapShot对象! – 快照!– 用来保存entry的快照信息!
内部封装了getInputStream() getLength() getFile() 等操作
public final class Snapshot implements Closeable {private final String key;private final long sequenceNumber;private File[] files;private final InputStream[] ins;private final long[] lengths;private Snapshot(String key, long sequenceNumber, File[] files, InputStream[] ins, long[] lengths) {this.key = key;this.sequenceNumber = sequenceNumber;this.files = files;this.ins = ins;this.lengths = lengths;}public Editor edit() throws IOException {return DiskLruCache.this.edit(key, sequenceNumber);}public File getFile(int index) {return files[index];}public InputStream getInputStream(int index) {return ins[index];}public String getString(int index) throws IOException {return inputStreamToString(getInputStream(index));}// ...}此时在LruDiskCache中调用get()函数,就是通过DiskLruCache.Snapshot的get()函数得到缓存文件
LruDiskCache.get()
@Overridepublic File get(String imageUri) {DiskLruCache.Snapshot snapshot = null;try {snapshot = cache.get(getKey(imageUri));return snapshot == null ? null : snapshot.getFile(0);} catch (IOException e) { }}save()
保存一个缓存
LruDiskCache.save()
@Overridepublic boolean save(String imageUri, InputStream imageStream, IoUtils.CopyListener listener) throws IOException {DiskLruCache.Editor editor = cache.edit(getKey(imageUri));OutputStream os = new BufferedOutputStream(editor.newOutputStream(0), bufferSize);copied = IoUtils.copyStream(imageStream, os, listener, bufferSize);if (copied) {editor.commit();} else {editor.abort();}return copied;}可见将输入流转成输出流然后通过editor对象执行commit()操作或者abort()操作~!
remove()
@Overridepublic boolean remove(String imageUri) {try {return cache.remove(getKey(imageUri));} catch (IOException e) {L.e(e);return false;}}调用DiskLruCache中的remove() 函数!
public synchronized boolean remove(String key) throws IOException {checkNotClosed(); // 验证writervalidateKey(key); // 验证keyEntry entry = lruEntries.get(key);for (int i = 0; i < valueCount; i++) {File file = entry.getCleanFile(i);if (file.exists() && !file.delete()) { // 删除CLEAN文件throw new IOException("failed to delete " + file);}size -= entry.lengths[i];fileCount--;entry.lengths[i] = 0;}redundantOpCount++; // +1journalWriter.append(REMOVE + ' ' + key + '\n'); // 写入REMOVE操作记录lruEntries.remove(key);if (journalRebuildRequired()) { // 是否需要重建journalexecutorService.submit(cleanupCallable);}return true;}clear()
清空缓存
@Overridepublic void clear() {try {cache.delete();} catch (IOException e) {L.e(e);}try {initCache(cache.getDirectory(), reserveCacheDir, cache.getMaxSize(), cache.getMaxFileCount());} catch (IOException e) {L.e(e);}}显示调用DiskLruCache的delete() 函数,接着又执行了一遍初始化缓存到 操作!
public void delete() throws IOException {close();Util.deleteContents(directory);}delete() 函数很简单,直接将缓存目录删除!包括缓存的图片文件和journal文件!
然后调用 initCache 函数重加缓存目录和journal文件!!
终于写完了!!!


这篇关于UniversalImageLoader源码解析之 DiskCache的文章就介绍到这儿,希望我们推荐的文章对编程师们有所帮助!


