本文主要是介绍TP6上传图片到OSS(记录贴),希望对大家解决编程问题提供一定的参考价值,需要的开发者们随着小编来一起学习吧!
1,先安装,我使用composer安装
在项目的根目录运行composer require aliyuncs/oss-sdk-php
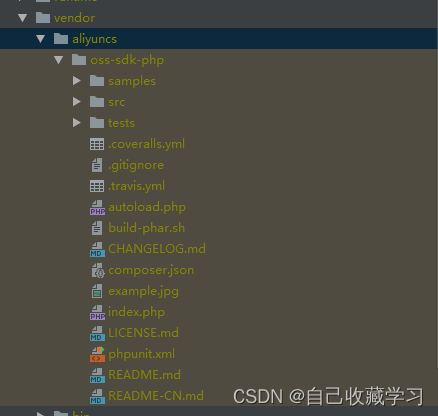
2,安装成功以后vendor目录下可以看到如图:

3,上传图片代码如下:
<?php
namespace app\controller;use app\BaseController;use OSS\OssClient;
use OSS\Core\OssException;class Index extends BaseController
{/** 图片上传,将图片上传至阿里云oss* */public function upload(){$files = $_FILES['file'];$name = $files['name'];$format = strrchr($name, '.');//截取文件后缀名如 (.jpg)// 阿里云主账号AccessKey拥有所有API的访问权限,风险很高。强烈建议您创建并使用RAM账号进行API访问或日常运维,请登录RAM控制台创建RAM账号。$accessKeyId = "<yourAccessKeyId>";$accessKeySecret = "<yourAccessKeySecret>";// Endpoint以杭州为例,其它Region请按实际情况填写。$endpoint = "http://oss-cn-hangzhou.aliyuncs.com";// 设置存储空间名称。$bucket= "<yourBucketName>";// 设置文件名称。//这里是由sha1加密生成文件名 之后连接上文件后缀,生成文件规则根据自己喜好,也可以用md5//前面video/head/ 这是我的oss目录$object = 'video/head/'.sha1(date('YmdHis', time()) . uniqid()) . $format;;// <yourLocalFile>由本地文件路径加文件名包括后缀组成,例如/users/local/myfile.txt。$filePath = $files['tmp_name'];try{$ossClient = new OssClient($accessKeyId, $accessKeySecret, $endpoint);$result = $ossClient->uploadFile($bucket, $object, $filePath);if(!$result){return json(['status'=>1,'message'=>'上传失败']);}else{return json(['status'=>2,'message'=>'上传成功','url'=>$result['info']['url']]);}} catch(OssException $e) {printf(__FUNCTION__ . ": FAILED\n");printf($e->getMessage() . "\n");return;}print(__FUNCTION__ . ": OK" . "\n");}
}
中途遇到的一些问题
1.没安装或没启用curl拓展,PHP安装curl拓展就好
upload: FAILED
Extension {curl} is not installed or not enabled, please check your php env.
2.上传后地址打开不正确,Bucket权限可能是私有,改成正常读,不然就地址要加权限验证

-------------------------------------------------------------------------------------------------------------------------------
另一种方式:(会先传到本地服务器文件夹再传到oss);
1.公共方法
<?phpuse OSS\OssClient;
use OSS\Core\OssException;
use think\facade\Config;
//阿里云OSS
if (!function_exists('aliyun')) {/*** @param $savePath 文件名称* @param string $category oss存储目录* @param bool $isunlink* @param string $bucket 存储空间名称* @return string* @throws OssException* @throws \OSS\Http\RequestCore_Exception*/function aliyun($savePath,$category='',$isunlink=false,$bucket=""){$accessKeyId = Config::get('app.aliyun_oss.accessKeyId');//去阿里云后台获取秘钥$accessKeySecret = Config::get('app.aliyun_oss.accessKeySecret');//去阿里云后台获取秘钥$endpoint = Config::get('app.aliyun_oss.endpoint');//你的阿里云OSS地址$ossClient = new OssClient($accessKeyId, $accessKeySecret, $endpoint);//        判断bucketname是否存在,不存在就去创建if( !$ossClient->doesBucketExist($bucket)){$ossClient->createBucket($bucket);}$category=empty($category)?$bucket:$category;$savePath = str_replace("\\","/",$savePath);$object = $category.'/'.$savePath;//想要保存文件的名称
//        $file = './upload\\'.$savePath;//文件路径,必须是本地的。//发现这个不行,要用绝对路径$file = app()->getRootPath() ."public/storage/upload\\".$savePath;//文件路径,必须是本地的。try{$ossClient->uploadFile($bucket,$object,$file);if ($isunlink==true){unlink($file);}}catch (OssException $e){$e->getErrorMessage();}$oss=Config::get('aliyun_oss.url');$web = "http://test.oss-cn-hangzhou.aliyuncs.com.aliyuncs.com";//这里是你阿里云oss外网访问的Bucket域名return $web.$oss."/".$object;}
}
2.在config app中配置阿里云参数
//阿里云配置'aliyun_oss' => ['accessKeyId' => '', //您的Access Key ID'accessKeySecret' => '', //您的Access Key Secret'endpoint' => 'oss-cn-shanghai.aliyuncs.com', //阿里云oss 外网地址endpoint'bucket' => '', //Bucket名称'url' => '' // 访问的地址 (可不配置)]3.封装tp6的文件上传方法 并上传oss (也可以放公共文件里)
<?phpuse think\facade\Filesystem;if (!function_exists('uplodeOss')) {function uplodeOss($file){//上传到public目录下的storage下的upload目录$path = Filesystem::disk('public')->putFile('upload', $file);
//图片路径,Filesystem::getDiskConfig('public','url')功能是获取public目录下的storage,$ossPath = substr(strrchr($path, "/"), 1);
//结果是 $picCover = storage/upload/20200825/***.jpg$picCover = '/' . str_replace('\\', '/', $path);//图片上传到本地的路径
//上传OSS 并获取阿里云OSS地址$image = aliyun($ossPath, '', '', '<yourBucketName>');//第一个参数为图片地址 最后一个为bucket名字 具体参数在上个方法中if($image){return $image;}}
}
4.方法中调用
public function upload(){$files = request()->file('file');$result = uplodeOss($files);var_dump($result);
}
不能用 $_FILES,要用request()->file('');
这篇关于TP6上传图片到OSS(记录贴)的文章就介绍到这儿,希望我们推荐的文章对编程师们有所帮助!


