本文主要是介绍MontionLayout:打开动画新世界大门(其一,附小技巧,希望对大家解决编程问题提供一定的参考价值,需要的开发者们随着小编来一起学习吧!
MotionLayout 基础
首先,我们需要从 MotionLayout 的一些基本属性和用法讲起,这样对于我们后面的实际操作将会很有帮助。
引入 MotionLayout 库
1dependencies {
2 implementation ‘com.android.support.constraint:constraint-layout:2.0.0-beta2’
3}
4复制代码
目前,MotionLayout 仍处于 beta 版本,虽然官方之前说过 MotionLayout 的动画辅助工具将会在 beta``ConstraintLayout
在布局文件中使用 MotionLayout
想要使用 MotionLayout,只需要在布局文件中作如下声明即可:
1<android.support.constraint.motion.MotionLayout
2 xmlns:android=“http://schemas.android.com/apk/res/android”
3 xmlns:tools=“http://schemas.android.com/tools”
4 xmlns:app=“http://schemas.android.com/apk/res-auto”
5 android:layout_width=“match_parent”
6 android:layout_height=“match_parent”
7 app:layoutDescription="@xml/scene1">
8
9</android.support.constraint.motion.MotionLayout>
10复制代码
由于 MotionLayout 作为 ConstraintLayout 的子类,那么就自然而然地可以像 ConstraintLayout``Motio nLayout 的用处可远不止这些。我们先来看看 MotionLayout 的构成:

由上图可知,MotionLayout 可分为 <View> 和 <Helper> 两个部分。 <View> 部分可简单理解为一个ConstraintLayout,至于 <Helper> 其实就是我们的“动画层”了。MotionLayout 为我们提供了layoutDescription 属性,我们需要为它传入一个 MotionScene 包裹的 XML
MotionScene:传说中的“百宝袋”
什么是 MotionScene?结合上图 MotionScene 主要由三部分组成: StateSet 、ConstraintSet 和 Transition 。为了让大家快速理解和使用 MotionScene,本文将重点讲解ConstarintSet 和 Transition,至于 StateSet
首先,我们从实现下面这个简单的效果讲起:
GIF 画质有点渣,见谅,但从上图我们可以发现这是一个简单的平移动画,通过点击自身(篮球)来触发,让我们来通过 MotionLayout
1<?xml version=“1.0” encoding=“utf-8”?>
2<android.support.constraint.motion.MotionLayout
3 xmlns:android=“http://schemas.android.com/apk/res/android”
4 xmlns:tools=“http://schemas.android.com/tools”
5 xmlns:app=“http://schemas.android.com/apk/res-auto”
6 android:layout_width=“match_parent”
7 android:layout_height=“match_parent”
8 app:layoutDescription="@xml/step1"
9 tools:context=".practice.MotionSampleActivity">
10 <ImageView
11 android:id="@+id/ball"
12 android:layout_width=“wrap_content”
13 android:layout_height=“wrap_content”
14 android:src="@drawable/ic_basketball"/>
15</android.support.constraint.motion.MotionLayout>
16复制代码
布局文件很简单,只不过你可能会注意到,我们对 ImageView 并没有添加任何约束,原因在于:我们会在 MotionScene 中声明ConstraintSet,里面将包含该 ImageView 的“运动”起始点和终点的约束信息。当然你也可以在布局文件中对其加以约束,但MotionScene 中对于控件约束的优先级会高于布局文件中的设定 。这里我们通过 layoutDescription 来为MotionLayout 设置它的 MotionScene 为 step1,接下来就让我们一睹 MotionScene 的芳容:
1<?xml version=“1.0” encoding=“utf-8”?>
2<!–describe the animation for activity_motion_sample_step1.xml–>
3<MotionScene xmlns:android=“http://schemas.android.com/apk/res/android”
4 xmlns:app=“http://schemas.android.com/apk/res-auto”>
5 <!-- A transition describes an animation via start and end state -->
6 <Transition
7 app:constraintSetStart="@id/start"
8 app:constraintSetEnd="@id/end"
9 app:duration=“2200”>
10 <OnClick
11 app:targetId="@id/ball"
12 app:clickAction=“toggle” />
13 </Transition>
14
15 <!-- Constraints to apply at the start of the animation -->
16 <ConstraintSet android:id="@+id/start">
17 <Constraint
18 android:id="@+id/ball"
19 android:layout_width=“48dp”
20 android:layout_height=“48dp”
21 android:layout_marginStart=“12dp”
22 android:layout_marginTop=“12dp”
23 app:layout_constraintStart_toStartOf=“parent”
24 app:layout_constraintTop_toTopOf=“parent”/>
25 </ConstraintSet>
26
27 <!-- Constraints to apply at the end of the animation -->
28 <ConstraintSet android:id="@+id/end">
29 <Constraint
30 android:id="@+id/ball"
31 android:layout_width=“48dp”
32 android:layout_height=“48dp”
33 android:layout_marginEnd=“12dp”
34 android:layout_marginBottom=“12dp”
35 app:layout_constraintEnd_toEndOf=“parent”
36 app:layout_constraintBottom_toBottomOf=“parent”/>
37 </ConstraintSet>
38
39</MotionScene>
40复制代码
首先,可以发现我们定义了两个 <ConstraintSet> ,分别描述了这个? ImageView<Transition> 元素了。事实上,我们都知道,动画都是有开始位置和结束位置的,而 MotionLayoutPath
回到上面这个例子,我们只需要为 Transition 设置起始位置和结束位置的 ConstraintSet 并设置动画时间即可,剩下的都交给MotionLayout 自动去帮我们完成。当然你也可以通过 onClick 点击事件来触发动画,绑定目标控件的 id 以及通过clickAction 属性来设置点击事件的类型,这里我们设置的是toggle,即通过反复点击控件来切换动画的状态,其他还有很多属性可以参照官方文档去研究,比较简单,这里就不一一讲解它们的效果了。如此一来,运行一下就能看到上面的效果了。另外,为了方便测试,我们可以给MotionLayout 加上调试属性: app:motionDebug="SHOW_PATH" ,然后就能轻易的查看其动画内部的运动轨迹:

什么?你说这个动画效果太基础?那好,我就来个简陋版的“百花齐放”效果吧,比如下面这样:
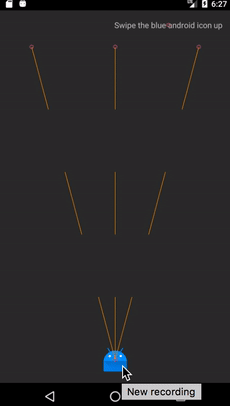
首先,让我们分析一下这个效果:仔细看我们可以发现,通过向上滑动蓝色的 Android
1<?xml version=“1.0” encoding=“utf-8”?>
2<android.support.constraint.motion.MotionLayout
3 xmlns:android=“http://schemas.android.com/apk/res/android”
4 xmlns:tools=“http://schemas.android.com/tools”
5 xmlns:app=“http://schemas.android.com/apk/res-auto”
6 android:layout_width=“match_parent”
7 android:layout_height=“match_parent”
8 app:motionDebug=“SHOW_PATH”
9 app:layoutDescription="@xml/step2"
10 tools:context=".practice.MotionSampleActivity">
11 <ImageView
12 android:id="@+id/ic_android_blue"
13 android:layout_width=“42dp”
14 android:layout_height=“42dp”
15 android:src="@mipmap/android_icon_blue"/>
16 <ImageView
17 android:id="@+id/ic_android_left"
18 android:layout_width=“42dp”
19 android:layout_height=“42dp”
20 android:src="@mipmap/android_icon_purple"/>
21 <ImageView
22 android:id="@+id/ic_android_right"
23 android:layout_width=“42dp”
24 android:layout_height=“42dp”
25 android:src="@mipmap/android_icon_orange"/>
26 <TextView
27 android:id="@+id/tipText"
28 android:text=“Swipe the blue android icon up”
29 android:layout_width=“wrap_content”
30 android:layout_height=“wrap_content”
31 app:layout_constraintEnd_toEndOf=“parent”
32 android:layout_marginEnd=“16dp”
33 android:layout_marginTop=“16dp”
34 app:layout_constraintTop_toTopOf=“parent”/>
35</android.support.constraint.motion.MotionLayout>
36复制代码
下面我们来看下 step2 中的 MotionScene:
1<?xml version=“1.0” encoding=“utf-8”?>
2<!–describe the animation for activity_motion_sample_step2.xml–>
3<!–animate by dragging target view–>
4<MotionScene xmlns:android=“http://schemas.android.com/apk/res/android”
5 xmlns:app=“http://schemas.android.com/apk/res-auto”>
6 <!–At the start, all three stars are centered at the bottom of the screen.–>
7 <ConstraintSet android:id="@+id/start">
8 <Constraint
9 android:id="@+id/ic_android_blue"
10 android:layout_width=“42dp”
11 android:layout_height=“42dp”
12 android:layout_marginBottom=“20dp”
13 app:layout_constraintStart_toStartOf=“parent”
14 app:layout_constraintEnd_toEndOf=“parent”
15 app:layout_constraintBottom_toBottomOf=“parent”/>
16 <Constraint
17 android:id="@+id/ic_android_left"
18 android:layout_width=“42dp”
19 android:layout_height=“42dp”
20 android:alpha=“0.0”
21 android:layout_marginBottom=“20dp”
22 app:layout_constraintStart_toStartOf=“parent”
23 app:layout_constraintEnd_toEndOf=“parent”
24 app:layout_constraintBottom_toBottomOf=“parent”/>
25 <Constraint
26 android:id="@+id/ic_android_right"
27 android:layout_width=“42dp”
28 android:layout_height=“42dp”
29 android:layout_marginBottom=“20dp”
30 android:alpha=“0.0”
31 app:layout_constraintStart_toStartOf=“parent”
32 app:layout_constraintEnd_toEndOf=“parent”
33 app:layout_constraintBottom_toBottomOf=“parent”/>
34 </ConstraintSet>
35
36 <!–Define the end constraint to set use a chain to position all three stars together below @id/tipText.–>
37 <ConstraintSet android:id="@+id/end">
38 <Constraint
39 android:id="@+id/ic_android_left"
40 android:layout_width=“58dp”
41 android:layout_height=“58dp”
42 android:layout_marginEnd=“90dp”
43 android:alpha=“1.0”
44 app:layout_constraintHorizontal_chainStyle=“packed”
45 app:layout_constraintStart_toStartOf=“parent”
46 app:layout_constraintEnd_toStartOf="@id/ic_android_blue"
47 app:layout_constraintTop_toBottomOf="@id/tipText"/>
48 <Constraint
49 android:id="@+id/ic_android_blue"
50 android:layout_width=“58dp”
51 android:layout_height=“58dp”
52 app:layout_constraintEnd_toStartOf="@id/ic_android_right"
53 app:layout_constraintStart_toEndOf="@id/ic_android_left"
54 app:layout_constraintTop_toBottomOf="@id/tipText"/>
55 <Constraint
56 android:id="@+id/ic_android_right"
57 android:layout_width=“58dp”
58 android:layout_height=“58dp”
59 android:layout_marginStart=“90dp”
60 android:alpha=“1.0”
61 app:layout_constraintStart_toEndOf="@id/ic_android_blue"
62 app:layout_constraintEnd_toEndOf=“parent”
63 app:layout_constraintTop_toBottomOf="@id/tipText"/>
64 </ConstraintSet>
65 <!-- A transition describes an animation via start and end state -->
66 <Transition
67 app:constraintSetStart="@id/start"
68 app:constraintSetEnd="@id/end">
69 <!-- MotionLayout will track swipes relative to this view -->
70 <OnSwipe app:touchAnchorId="@id/ic_android_blue"/>
71 </Transition>
72</MotionScene>
73复制代码
上面代码其实很好理解,之前我们定义了一个控件的 Constraint,现在只需要多加两个即可。由于三个 AndroidConstraintLayout 的基础,就不多说了。接着将结束位置的左、右 Android 机器人透明度设置为MotionLayout 会自动处理目标控件 alpha 属性的变化效果,让其看起来依旧丝滑。
另外,我们这里没有再通过 <OnClick> 来触发动画效果,类似的,我们使用了 <OnSwipe> 手势滑动来触发动画,只需要指定touchAnchorId 为蓝色小机器人即可,怎么样,是不是有种“拍案惊奇”的感觉?。此外,你可以通过指定 touchAnchorSide 和dragDirection
到这里,你可能会说:前面两个示例的动画轨迹一直是"直线",如果想要某段动画过程的轨迹是"曲线"效果可以吗?当然没问题! Keyframes
这篇关于MontionLayout:打开动画新世界大门(其一,附小技巧的文章就介绍到这儿,希望我们推荐的文章对编程师们有所帮助!


