本文主要是介绍嵌入式学习第二十二天!(继续学习线程),希望对大家解决编程问题提供一定的参考价值,需要的开发者们随着小编来一起学习吧!
线程相关函数接口:
1. 线程分离属性:
线程结束后,自动回收线程空间
1. pthread_attr_init:
int pthread_attr_init(pthread_attr_t *attr);功能:线程属性初始化
2. pthread_attr_destroy:
int pthread_attr_destroy(pthread_attr_t *attr);功能:线程属性销毁
3. pthread_attr_setdetachstate:
int pthread_attr_setdetachstate(pthread_attr_t *attr, int detachstate);功能:设置分离属性
PTHREAD_CREATE_DETACHED 分离属性
PTHREAD_CREATE_JOINABLE 加入属性(默认)
练习:
1. 利用线程的分离属性创建三个线程,打印线程id
#include "head.h"void *thread1(void *arg)
{printf("stat to thread1(tid:%#x)\n", (unsigned int)pthread_self());return NULL;
}void *thread2(void *arg)
{printf("stat to thread2(tid:%#x)\n", (unsigned int)pthread_self());return NULL;
}void *thread3(void *arg)
{printf("stat to thread2(tid:%#x)\n", (unsigned int)pthread_self());return NULL;
}int main(void)
{int i = 0;pthread_t thread[3];void *(*p[3])(void *) = {thread1, thread2, thread3};pthread_attr_t attr;pthread_attr_init(&attr);pthread_attr_setdetachstate(&attr, PTHREAD_CREATE_DETACHED);for(i = 0; i < 3; i++){pthread_create(&thread[i], &attr, p[i], NULL);}pthread_attr_destroy(&attr);while(1){}}
2. 首先定义一个学生结构体,包含姓名、性别、年龄、分数。再创建两个两个线程,线程1负责从终端接收学生信息,线程2负责将学生信息打印在终端。
#include "head.h"struct studet
{char name[100];char sex;int age;int score;
};void *InputInfo(void *arg)
{struct studet *stu = arg;char *ptmp = stu->name;fgets(stu->name, 100, stdin);ptmp[strlen(ptmp)-1] = '\0';scanf("%c", &stu->sex);scanf("%d", &stu->age);scanf("%d", &stu->score);return NULL;
}void *OutputInfo(void *arg)
{struct studet *stu = arg;sleep(5);printf("%s\n", stu->name);printf("%c\n", stu->sex);printf("%d\n", stu->age);printf("%d\n", stu->score);return NULL;
}int main(void)
{struct studet t;pthread_t input;pthread_t output;pthread_create(&input, NULL, InputInfo, &t);pthread_create(&output, NULL, OutputInfo, &t);pthread_join(input, NULL);pthread_join(output, NULL);return 0;
}

2. 线程互斥:
1. 互斥锁:
防止资源竞争
2. 函数接口:
1. pthread_mutex_init:
int pthread_mutex_init(pthread_mutex_t *restrict mutex,const pthread_mutexattr_t *restrict attr);功能:互斥锁初始化
参数:
mutex:互斥锁空间首地址
attr:互斥锁的属性(默认为NULL)
返回值:
成功返回0
失败返回错误码
2. pthread_mutex_destroy:
int pthread_mutex_destroy(pthread_mutex_t *mutex);功能:互斥锁销毁
参数:
mutex:互斥锁空间首地址
返回值:
成功返回0
失败返回错误码
3. pthread_mutex_lock:
int pthread_mutex_lock(pthread_mutex_t *mutex);功能:上锁
4. pthread_mutex_unlock:
int pthread_mutex_unlock(pthread_mutex_t *mutex);功能:解锁
3. 临界资源、临界区:
加锁解锁中间的代码称为临界资源、临界区
同一时刻临界资源不能同时执行,只能执行其中一个临界资源代码
4. 原子操作:
CPU最小的一次不能被任务调度打断的操作称为原子操作
5. 注意:
互斥锁只能解决资源竞争的问题,无法同步代码(没有先后执行的顺序关系)
练习:
定义三个整型的全局变量Num1, Num2,val,创建两个线程,一个线程循环令Num1=val,Num2=val,val自加;另一个线程,循环判断:当Num1不等于Num2的时候,输出Num1和Num2的值。利用互斥锁,让Num1始终等于Num2,使终端没有输出。
#include "head.h"int val = 0;
int Num1 = 0;
int Num2 = 0;
pthread_mutex_t lock;void *thread1(void *arg)
{while(1){pthread_mutex_lock(&lock);Num1 = val;Num2 = val;pthread_mutex_unlock(&lock);val++;}return NULL;
}
void *thread2(void *arg)
{while(1){pthread_mutex_lock(&lock);if(Num1 != Num2){printf("Num1 = %d, Num2 = %d\n", Num1, Num2);}pthread_mutex_unlock(&lock);}return NULL;
}int main(void)
{pthread_t tid1;pthread_t tid2;pthread_mutex_init(&lock, NULL);pthread_create(&tid1, NULL, thread1, NULL);pthread_create(&tid2, NULL, thread2, NULL);pthread_join(tid1, NULL);pthread_join(tid2, NULL);pthread_mutex_destroy(&lock);return 0;
}
3. 死锁:
多线程操作互斥锁,导致多个线程均违法向下执行的状态称为死锁状态,简称为死锁
1. 死锁产生的四个必要条件:
1. 互斥条件
2. 不可剥夺条件
3. 请求保持
4. 循环等待
2. 如何避免产生死锁:
1. pthread_mutex_trylock 替代 pthread_mutex_lock
2. 加锁顺序保持一致
4. 信号量:
信号量是一种资源,可以被初始化、申请、释放、销毁
P操作:申请资源
V操作:释放资源
1. sem_init:
int sem_init(sem_t *sem, int pshared, unsigned int value);功能:初始化信号量
参数:
sem:信号量空间首地址
pshared:为0的话,是一个进程中的所有线程间共享;非0的话,则是进程间共享
value:初始化的值
返回值:
成功返回0
失败返回-1
2. sem_destory:
int sem_destroy(sem_t *sem);功能:信号量的销毁
参数:
sem:信号量空间首地址
返回值:
成功返回0
失败返回-1
3. sem_wait:
int sem_wait(sem_t *sem);功能:申请信号量
4. sem_post:
int sem_post(sem_t *sem);功能:释放信号量
作业:
1. 创建三个线程分别循环打印 A B C,要求打印出来的顺序总是 A -> B -> C
#include "head.h"sem_t sem_a;
sem_t sem_b;
sem_t sem_c;void *thread1(void* arg)
{while(1){sem_wait(&sem_a);printf("A\n");sem_post(&sem_b);}return NULL;
}
void *thread2(void* arg)
{while(1){sem_wait(&sem_b);printf("B\n");sem_post(&sem_c);}return NULL;
}
void *thread3(void* arg)
{while(1){sem_wait(&sem_c);printf("C\n");sem_post(&sem_a);}return NULL;
}int main(void)
{int i = 0;pthread_t tid[3];void *(*p[3])(void *) = {thread1, thread2, thread3};sem_init(&sem_a, 0, 1);sem_init(&sem_b, 0, 0);sem_init(&sem_c, 0, 0);for(i = 0; i < 3; i++){pthread_create(&tid[i], NULL, p[i], NULL);}for(i = 0; i < 3; i++){pthread_join(tid[i], NULL);}sem_destroy(&sem_a);sem_destroy(&sem_b);sem_destroy(&sem_c);return 0;}

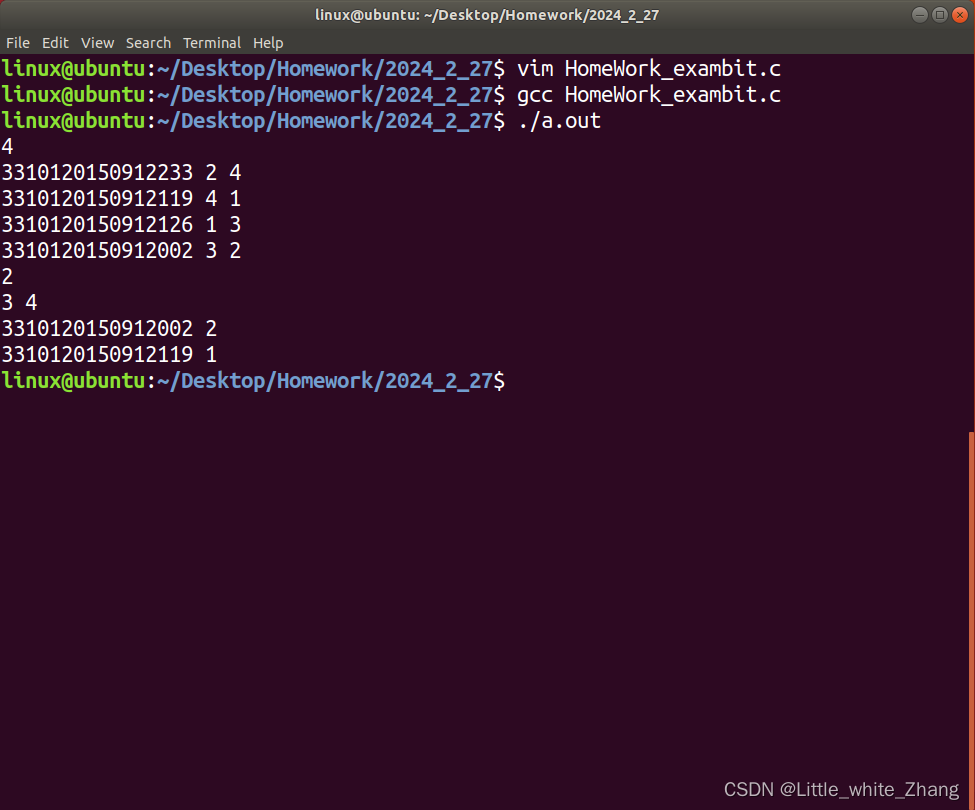
2. PTA | 程序设计类实验辅助教学平台

#include <stdio.h>struct student
{char number[20];int testbit;int exambit;
};int GetStudentBit(struct student *pstu, int maxlen)
{int n = 0;int i = 0;scanf("%d", &n);if(n > maxlen){perror("Over to limit");return -1;}for(i = 0; i < n; i++){scanf("%s %d %d", pstu[i].number, &pstu[i].testbit, &pstu[i].exambit);}return n;
}
int GetFoundBit(int *pbit, int maxlen)
{int m = 0;int i = 0;scanf("%d", &m);if(m > maxlen){perror("Over to limit");return -1;}for(i = 0; i < m; i++){scanf("%d", &pbit[i]);}return m;
}int PrintStudentBit(struct student *pstu, int curlen, int *pfound, int m)
{int i = 0;int j = 0;for(i = 0; i < m; i++){for(j = 0; j < curlen; j++){if(pstu[j].testbit == pfound[i]){printf("%s %d\n", pstu[j].number, pstu[j].exambit);}}}return 0;}int main(void)
{struct student stu[1000];int curlen = 0;int bitinfo[1000];int foundnum = 0;curlen = GetStudentBit(stu, 1000);foundnum = GetFoundBit(bitinfo, 1000);PrintStudentBit(stu, curlen, bitinfo, foundnum);return 0;
}

这篇关于嵌入式学习第二十二天!(继续学习线程)的文章就介绍到这儿,希望我们推荐的文章对编程师们有所帮助!


