本文主要是介绍Ansible playbook和Ansible Roles(三),希望对大家解决编程问题提供一定的参考价值,需要的开发者们随着小编来一起学习吧!
文章目录
- 1. playbook判断语句
- 2. playbook循环语句
- 3. playbook handlers
- 4. Playbook任务标签
- 5. Playbook文件复用
- 6. Playbook忽略错误
- 7. Playbook异常处理
- 8. Ansible Valut概述
- 8.1 Ansible Valut实践
- 9. Ansible Jinja2模板
- 10. Ansible Roles
- 11. AnsibleGalaxy
- 12. 自我总结
1. playbook判断语句
判断在Ansible任务中得使用频率非常高。比如yum模块可以检测软件包是否已被安装,而在这个过程中我们不用做太多得人工干预
但是也有不放呢任务需要进行判断,比如:web服务器角色都需要安装nginx仓库,但其他服务器角色并不需要,此时就会用到when判断。
比如:Centos与Ubuntu系统都需要安装httpd服务,那么就需要使用when判断主机系统,然后调用不同得模块执行。
实践案例1: 根据不同操作系统,安装相同的软件包
[root@m01 when]# cat when.yml
- hosts: webserverstasks:- name: Install httpd Serveryum: name=httpd state=presentwhen: ansible_distribution == "CentOS"- name: Install httpd Serverapt: name=httpd2 state=presentwhen: ansible_distribution == "Ubuntu"
实践案例2:所有为web主机名的添加nginx仓库,其余的都跳过添加
	1.如何添加yum仓库2.如何判断,判断什么内容
---
[root@m01 when]# cat when.yml
- hosts: webtasks:- name: Add Nginx Reposyum_repository:          #模块name: nginx_tet        #它代表/etc/yum.repos.d/nginx_tet.repodescription: Nginx YUM repo      #描述  (不加会报错)baseurl: http://nginx.org/packages/centos/7/$basearch/gpgcheck: no           #把效验本地给关掉when: (ansible_hostname is match ("web*")) or (ansible_hostname is match ("lb*"))     #根据官方的写法
1.通过register将命令执行结果保存至变量,然后通过when语句进行判断
- hosts: webserverstasks:- name: Check Httpd Servercommand: systemctl is-active httpdignore_errors: yesregister: check_httpd#- name: debug outprint #仅仅只是输出结果# debug: var=check_httpd- name: Httpd Restartservice: name=httpd state=restartedwhen: check_httpd.rc == 0
==========================================
(1)按照不同的主机名称进行判断
[root@m01 when]# cat when.yml
- hosts: webvars:remote_ip: "{{ ansible_default_ipv4.address }}"host_name: "{{ ansible_fqdn }}"tasks:- name: Print ip    # 进行测试的debug:msg:  - "{{ remote_ip }}" - "{{ host_name }}"- name: Reboot Servercommand: rebootwhen: ansible_fqdn  == "web02"
(2)按照不同的IP地址进行判断
[root@m01 when]# cat when.yml
- hosts: webvars:remote_ip: "{{ ansible_default_ipv4.address }}"host_name: "{{ ansible_fqdn }}"tasks:- name: Print ipdebug:msg:  - "{{ remote_ip }}" - "{{ host_name }}"- name: Reboot Servercommand: rebootwhen: ansible_default_ipv4.address  == "10.0.0.7"
(3)按照获取客户端的某参数值得大小判断
- hosts: webvars:remote_ip: "{{ ansible_default_ipv4.address }}"host_name: "{{ ansible_fqdn }}"host_mem: "{{ ansible_memtotal_mb }}"tasks:- name: Print ipdebug:msg: - "{{ remote_ip }}" - "{{ host_name }}"- "{{ host_mem }}"- name: Reboot Servercommand: rebootwhen: ansible_memtotal_mb|int < "2000"
(4)列表方式判断 and关系 并且关系
[root@m01 when]# cat when.yml
- hosts: webvars:remote_ip: "{{ ansible_default_ipv4.address }}"host_name: "{{ ansible_fqdn }}"host_mem: "{{ ansible_memtotal_mb }}"host_ver: "{{ ansible_distribution }}"tasks:- name: Print ipdebug:msg:  - "{{ remote_ip }}" - "{{ host_name }}"- "{{ host_mem }}"- "{{ host_ver }}"- name: Reboot Serverfile: path: /root/web01.txtstate: touchwhen: - ansible_distribution == "CentOS"- ansible_fqdn == "web01"
(6)或者关系判断
[root@m01 when]# cat when.yml
- hosts: webvars:remote_ip: "{{ ansible_default_ipv4.address }}"host_name: "{{ ansible_fqdn }}"host_mem: "{{ ansible_memtotal_mb }}"host_ver: "{{ ansible_distribution }}"tasks:- name: Print ipdebug:msg:  - "{{ remote_ip }}" - "{{ host_name }}"- "{{ host_mem }}"- "{{ host_ver }}"- name: Reboot Serverfile: path: /root/web0102.txtstate: touchwhen: ansible_distribution == "CentOS" or ansible_fqdn == "web02"
(7) 修改Nginx配置文件 把Nginx从ansible服务器拷贝到web服务器
拷贝过去需要启动或者重启 如果Nginx配置文件不对 不让加载
   1. 安装Nginx 2. 拷贝文件到Nginx.conf 判断文件是否正确 ngixn -t 变量注册接收结果3. 启动 4. 重新加载  在重新加载的地方进行when判断
[root@m01 when]# cat nginx.yml
- hosts: web02tasks:- name: Install Nginxyum:name: nginxstate: present- name: scp configure Nginxcopy: src: ./nginx.j2dest: /etc/nginx/nginx.conf- name: Check Nginx Configurecommand: /usr/sbin/nginx -tregister: resultignore_errors: yes				# 忽略错误继续执行- name: print resultdebug:msg: "{{ result.rc }}"- name: Reload Nginxsystemd:name: nginxstate: reloadedwhen: result.rc == 0			    # 判断nginx -t执行结果 是否为0 通过变量注册获取的------------------------------ name: Reload Nginxsystemd:name: nginxstate: reloadedwhen: result.rc is match "0"
(8)rsync服务进行主机名的判断(rsync的优化)
[root@m01 rsync]# cat rsync.yml
- hosts: rsyncalltasks:- name: Install Rsyncd Serveryum:name: rsyncstate: present- name: Create  www Groupgroup:name: wwwgid: 666- name: Create User wwwuser:name: wwwuid: 666group: wwwcreate_home: falseshell: /sbin/nologin- name: Configure Rsync Servercopy:src: rsync.j2dest: /etc/rsyncd.confwhen: ansible_hostname == "backup"- name: Auth Passwordcopy:content: rsync_backup:123456dest: /etc/rsync.passwdmode: 0600when: ansible_hostname == "backup"- name: Create Dir /backupfile:path: /backupstate: directoryowner: wwwgroup: wwwrecurse: yeswhen: ansible_hostname == "backup"- name: Start Rsyncd Serversystemd:name: rsyncdstate: startedenabled: yeswhen: ansible_hostname == "backup"- name: clinet Auth Passwordcopy:content: 123456dest: /etc/rsync.passwdmode: 0600when: ansible_hostname == "web01" or ansible_hostname == "web02"
(9)判断http是否存活
- hosts: web02tasks:- name: Install Nginxyum:name: nginxstate: present- name: scp configure Nginxcopy: src: ./nginx.j2dest: /etc/nginx/nginx.conf- name: Check Nginx Configurecommand: /usr/sbin/nginx -tregister: resultignore_errors: yes- name: Check HTTP Servercommand: systemctl is-active httpdregister: result_httpignore_errors: yes - name: print resultdebug: var=result_http- name: Reload Nginxsystemd:name: nginxstate: reloadedwhen: result.rc == 02. playbook循环语句
有时候我们写playbook得时候发现了很多task都要重复引用某个模块,比如一次启动10个服务,或者一次拷贝10个文件,如果按照传统得写法最少要写10次,这样会显得playbook很臃肿。如果使用循环得方式来编写playbook,这样可以减少重复使用某个模块。
实践案例一、使用循环启动多个服务
[root@m01 project2]# cat with.yml
- hosts: webserverstasks:- name: Start httpd mariadbsystemd: name={{ item }} state=startedwith_items:- httpd- mariadb1.案例二、使用定义变量方式循环安装软件包。
- hosts: webserverstasks:- name: ensure a list of packages installedyum: name= "{{ packages }}" state=presentvars:packages:- httpd- httpd-tools#弃用的方式
- hosts: webserverstasks:- name: ensure a list of packages installedyum: name= "{{ item }}" state=presentwith_items:- httpd- httpd-tools实践案例三、使用字典循环方式创建用户和批量拷贝文件
[root@manager ~]# cat loop-user.yml
- hosts: webserverstasks:- name: Add Usersuser: name={{ item.name }} groups={{ item.groups }} state=presentwith_items:- { name: 'testuser1', groups: 'bin' }- { name: 'testuser2', groups: 'root' }[root@m01 project2]# cat with4.yml
- hosts: webserverstasks:- name: Copy Rsync configure and Rsync passwdcopy: src={{ item.src }} dest={{ item.dest }} mode={{ item.mode }}with_items:- { src: "./rsyncd.conf", dest: "/etc/rsyncd.conf", mode: "0644" }- { src: "./rsync.passwd", dest: "/tmp/rsync.passwd", mode: "0600" }
===============================================
官方推荐写法:
[root@m01 when]# vim when.yml
- hosts: webtasks:- name: Started Serveryum:                      # systemd 起不来name: "{{ packages }}"state: startedvars:packages:- httpd- mariadb也可以这样写:
[root@m01 when]# vim when.yml
- hosts: webtasks:- name: Started Serveryum:                      # systemd 起不来name: "{{ item }}"state: startedwith_items:- httpd- mariadb
(1)使用with_item循环列表
[root@m01 file]# cat create_file.yml
- hosts: webtasks:- name: Create filefile:path: "{{ item }}"state: touchwith_items:- file1.txt- file2.txt
(2)使用loop方式进行循环列表
[root@m01 file]# cat create_file.yml
- hosts: webtasks:- name: Create filefile:path: "{{ item }}"state: touchloop:- file1.txt- file2.txt
(3)循环启动列表 一次启动多个服务
[root@m01 file]# cat start.yml
- hosts: webtasks:- name: Install HTTPD Nginx Mariadb Serveryum:name: "{{ item }}"state: presentloop:- nginx- mariadb-server- name:  Start HTTP Nginx Mariadb Sever systemd:name: "{{ item }}"state: startedloop:- nginx- mariadb
(4)拷贝两个文件到目标
1.txt 到目标主机为600
2.txt 到目标主机为644
[root@m01 file]# cat scp.yml
- hosts: webtasks:- name: scp file dest web01 web02copy:src: "{{ item }}"dest: /root/loop:- 1.txt- 2.txt
(5)scp多个文件到目标主机 权限不同
[root@m01 file]# cat scp.yml
- hosts: webtasks:- name: scp file dest web01 web02copy:src: "{{ item.src }}"dest: "{{ item.dest }}"owner: "{{ item.owner }}"group: "{{ item.group }}"mode: "{{ item.mode }}"loop:- { src: 1.txt,dest: /root/,mode: '0600',owner: www,group: root }- { src: 2.txt,dest: /opt/,mode: '0000',owner: root,group: www }
(6)rsync拷贝文件(rsync优化)
[root@m01 rsync]# vim rsync.yml
[root@m01 rsync]# cat rsync.yml
- hosts: rsyncalltasks:- name: Install Rsyncd Serveryum:name: rsyncstate: present- name: Create  www Groupgroup:name: wwwgid: 666- name: Create User wwwuser:name: wwwuid: 666group: wwwcreate_home: falseshell: /sbin/nologin- name: Configure Rsync Servercopy:src: "{{ item.src }}"dest: "{{ item.dest }}"mode: "{{ item.mode }}"loop:- { src: rsync.j2, dest: /etc/rsyncd.conf,mode: '0644' }- { src: rsync_pass.j2, dest: /etc/rsync.passwd,mode: '0600' }when: ansible_hostname == "backup"- name: Create Dir /backupfile:path: /backupstate: directoryowner: wwwgroup: wwwrecurse: yeswhen: ansible_hostname == "backup"- name: Start Rsyncd Serversystemd:name: rsyncdstate: startedenabled: yeswhen: ansible_hostname == "backup"- name: clinet Auth Passwordcopy:content: 123456dest: /etc/rsync.passwdmode: 0600when: ansible_hostname == "web01" or ansible_hostname == "web02"
3. playbook handlers
handler用来执行某些条件下的任务,比如当配置文件发生变化的时候,通过notify触发handler去重启服务。
在saltstack中也有类似的触发器,写法相对Ansible简单,只需要watch,配置文件即可。
[root@m01 project2]# cat han.yml
- hosts: webserversvars:- http_port: 8083tasks:- name: Install Http Serveryum: name=httpd state=present- name: configure httpd servertemplate: src=./httpd.conf.j2 dest=/etc/httpd/conf/httpd.confnotify: - Restart Httpd Server- Restart PHP Server- name: start httpd serverservice: name=httpd state=started enabled=yeshandlers:- name: Restart Httpd Serversystemd: name=httpd state=restarted - name: Restart PHP Serversystemd: name=php-fpm state=restarted3.handlers注意事项
1.无论多少个task通知了相同的handlers,handlers仅会在所有tasks结束后运行一次。
2.只有task发生改变了才会通知handlers,没有改变则不会触发handlers
3.不能使用handlers替代tasks
====================================================
handle注意事项:
1.无论多少个task通知了相同的handlers,handlers仅会在所有tasks结束后运行一次。
2.只有task发生改变了才会通知handlers,没有改变则不会触发handlers
3.不能使用handlers替代tasks
(1)handlers触发修改
[root@m01 handlers]# cat handlers.yml
- hosts: web01vars: - http_port: 82tasks:- name: Install Nginxyum:name: nginxstate: present- name: Configure Nginx Servertemplate:   # 在剧本中可以使用变量,可以使用系统的变量,也可以使用自己定义的变量src: nginx_conf.j2dest: /etc/nginx/nginx.confnotify: Reload Nginx- name: Start Nginx Serversystemd:name: nginxstate: startedenabled: yeshandlers:- name: Reload Nginxsystemd:name: nginxstate: reloaded
(2)触发后重启nginx和mariadb
[root@m01 handlers]# cat handlers.yml
- hosts: web01vars: - http_port: 83tasks:- name: Install Nginxyum:name: nginxstate: present- name: Configure Nginx Servertemplate:src: nginx_conf.j2dest: /etc/nginx/nginx.confnotify: Reload Nginx- name: Start Nginx Serversystemd:name: nginxstate: startedenabled: yeshandlers:- name: Reload Nginxsystemd:name: "{{ item }}"state: restartedloop:- nginx- mariadb
(2)handlers触发nginx和mariadb重启 并且when判断nginx文件是否正确
[root@m01 handlers]# cat handlers.yml
- hosts: web01vars: - http_port: 85tasks:- name: Install Nginxyum:name: nginxstate: present- name: Configure Nginx Servertemplate:src: nginx_conf.j2dest: /etc/nginx/nginx.confnotify: Reload Nginx- name: Check Nginx Configuercommand: /usr/sbin/nginx -tignore_errors: yesregister: result- name: Start Nginx Serversystemd:name: nginxstate: startedenabled: yeshandlers:- name: Reload Nginxsystemd:name: "{{ item }}"state: restartedloop:- nginx- mariadbwhen: result.rc == 0
4. Playbook任务标签
默认情况下,Ansible在执行一个playbook时,会执行playbook中定义得多有任务。Ansible的标签(tags)功能可以给单独任务甚至整个playbook打上标签,然后利用这些标签来指定要运行playbook中的个别任务,或不执行指定的任务。(可以进行调试)
1. 打标签的方式有几种,比如:
对一个task打一个标签、对一个task打多个标签、对多个task打一个标签
2. 对task打完标签应该如何使用
-t : 执行指定的tag标签任务
--skip-tags : 执行--skip-tags之外的标签任务
ansible-playbook tag.yml --list-tags 查看有多少个tagstag标记(用于调试的场景下)
[root@m01 project2]# cat tag.yml
- hosts: webserversvars:- http_port: 8083tasks:- name: Install Http Serveryum: name=httpd state=presenttags: - install_httpd- httpd_server- name: configure httpd servertemplate: src=./httpd.conf.j2 dest=/etc/httpd/conf/httpd.confnotify: Restart Httpd Servertags: - confiure_httpd- httpd_server- name: start httpd serverservice: name=httpd state=started enabled=yestags: service_httpdhandlers:- name: Restart Httpd Serversystemd: name=httpd state=restarted [root@m01 project2]# ansible-playbook tag.yml --list-tags
[root@m01 project2]# ansible-playbook tag.yml -t httpd_server
[root@m01 project2]# ansible-playbook tag.yml -t install_httpd,confiure_httpd
[root@m01 project2]# ansible-playbook tag.yml --skip-tags httpd_server
5. Playbook文件复用
include用来动态额包含tasks任务列表include——tasks新版/include老版

Include包含
include(import_playbook)
include_tasks
[root@m01 project2]# cat task.yml
- hosts: webserversvars:- http_port: 801tasks:- include_tasks: task_install.yml- include_tasks: task_configure.yml- include_tasks: task_start.ymlhandlers:- name: Restart Httpd Serversystemd: name=httpd state=restarted[root@m01 project2]# cat task_install.yml
- name: Install Http Serveryum: name=httpd state=present[root@m01 project2]# cat task_configure.yml
- name: configure httpd servertemplate: src=./httpd.conf.j2 dest=/etc/httpd/conf/httpd.confnotify: Restart Httpd Server[root@m01 project2]# cat task_start.yml
- name: start httpd serverservice: name=httpd state=started enabled=yes
6. Playbook忽略错误
默认playbook会检查tasks执行的返回状态,如遇到错误则会立即种植playbook的后续的tasks执行。然而有些时候playbook即使执行错误了也要让其继续执行
加入参数:ignore_error:yes 忽略错误
- 编写playbook,当有task执行失败则会立即终止后续task运行
忽略错误ignore_errors
[root@manager ~]# cat f9.yml
---
- hosts: webserverstasks:- name: Ignore Falsecommand: /bin/falseignore_errors: yes- name: touch new filefile: path=/tmp/bgx_ignore state=touch
7. Playbook异常处理
通常情况下,当task失败后,play将会终止,任何在前面已经被tasks notify的handlers都不会被执行。如果你在play中设置了force_handlers: yes参数,被通知的handlers就会被强制执行。(有些特殊场景可能会使用到)
案例一: task执行失败强制调用handlers
案例二:控制task报告的状态,不一定必须时"changed"
异常处理
force_handlers: yes		强制调用handlers
changed_when: false		被管理主机没有发生变化,可以使用参数将change状态改为ok
changed_when: httpd_check.stdout.find('OK')			#查看变量中的某个字符串[root@m01 project2]# cat changed_when.yml
- hosts: webserversvars:- http_port: 8083tasks:- name: configure httpd servertemplate: src=./httpd.conf.j2 dest=/etc/httpd/conf/httpd.confnotify: Restart Httpd Server- name: Check HTTPDshell: /usr/sbin/httpd -tregister: httpd_checkchanged_when: - httpd_check.stdout.find('OK')- false- name: start httpd serverservice: name=httpd state=started enabled=yeshandlers:- name: Restart Httpd Serversystemd: name=httpd state=restarted failed_when
命令不依赖返回状态码来判定是否执行失败,而是要查看命令返回内容来决定,比如返回内容中包括 failed 字符串,则判定为失败。示例如下:
- name: this command prints FAILED when it fails command: /usr/bin/example-command -x -y -z register: command_result failed_when: "'FAILED' in command_result.stderr"
小总结:
-------tasl任务处理相关流程与控制参数when 判断item 循环handlers 触发器(需要task使用notify通知)tags 标签(调试使用)include_tasks 包含task任务ignore_errors 忽略错误错误处理force_handlers #扩展changed_when false 抑制改变的状态为ok(获取系统的状态信息时)------------------------------重要(检查服务的配置是否正常,正常则不处理,不正常则中断)register: httpd_checkchanged_when: - httpd_check.stdout.find('OK')- false
8. Ansible Valut概述
Ansible Vault作为ansible的一项新功能可将例如passwords,keys等敏感数据文件进行加密,而非存放在明文的playbooks或roles中
8.1 Ansible Valut实践
ansible加密模块
[root@m01 project2]# ansible-vault --help
Usage: ansible-vault [create|decrypt|edit|encrypt|encrypt_string|rekey|view] [options] [vaultfile.yml]加密一个文件
ansible-vault encrypt include.yml查看一个文件
[root@m01 project2]# ansible-vault view include.yml
Vault password:
- import_playbook: han.yml
- import_playbook: when2.yml 修改加密的文件内容
[root@m01 project2]# ansible-vault edit include.ymlrekey 修改密码
[root@m01 project2]# ansible-vault rekey include.yml
Vault password:
New Vault password:
Confirm New Vault password:
Rekey successful执行加密的playbook
echo "1" >pass
chmod 600 pass
ansible-playbook include.yml  --vault-password-file=pass
9. Ansible Jinja2模板


jinja模板
2.jinja 模板逻辑关系
{% for i in EXPR %}...{% endfor%} 作为循环表达式
{% if EXPR %}...{% elif EXPR  %}...{% endif%} 作为条件判断 --------------------------------------nginx
[root@m01 project2]# cat jinja_nginx.yml
- hosts: webserversvars:- http_port: 80- server_name: www.oldboyedu.comtasks:- name: Copy Nginx COnfiguretemplate: src=./oldboyedu.conf.j2 dest=/etc/nginx/conf.d/oldboyedu_proxy.conf[root@m01 project2]# cat oldboyedu.conf.j2
upstream {{ server_name }} {
{% for i in range(1,20) %}server 172.16.1.{{i}}:{{http_port}};
{%endfor%}
}
server {listen {{ http_port }};server_name {{ server_name }};location / {proxy_pass http://{{ server_name }};proxy_set_header Host $http_host;}
}--------------------------------------keepalived
[root@m01 project2]# cat jinja_keepalived.yml
- hosts: webserverstasks:- name: Copy Keepalived Configuretemplate: src=./kee.conf.j2 dest=/tmp/keepalived.conf[root@m01 project2]# cat kee.conf.j2
global_defs {     router_id {{ ansible_hostname }}
}vrrp_instance VI_1 {
{%if ansible_hostname =="web01" %}state MASTERpriority 150
{%elif ansible_hostname == "web02" %}state BACKUPpriority 100
{%endif%}interface eth0virtual_router_id 50advert_int 1authentication {auth_type PASSauth_pass 1111
}virtual_ipaddress {10.0.0.3}
}使用Ansible jinja IF 生成不同的mysql配置文件  (自定义变量)[root@m01 project2]# cat jinja_mysql.yml
- hosts: webserversgather_facts: novars:PORT: 13306# PORT: false  #相当于开关tasks:- name: Copy MySQL Configuretemplate: src=./my.cnf.j2 dest=/tmp/my.cnf[root@m01 project2]# cat my.cnf.j2
{% if PORT %}
bind-address=0.0.0.0:{{ PORT }}
{% else %}
bind-address=0.0.0.0:3306
{%endif%}
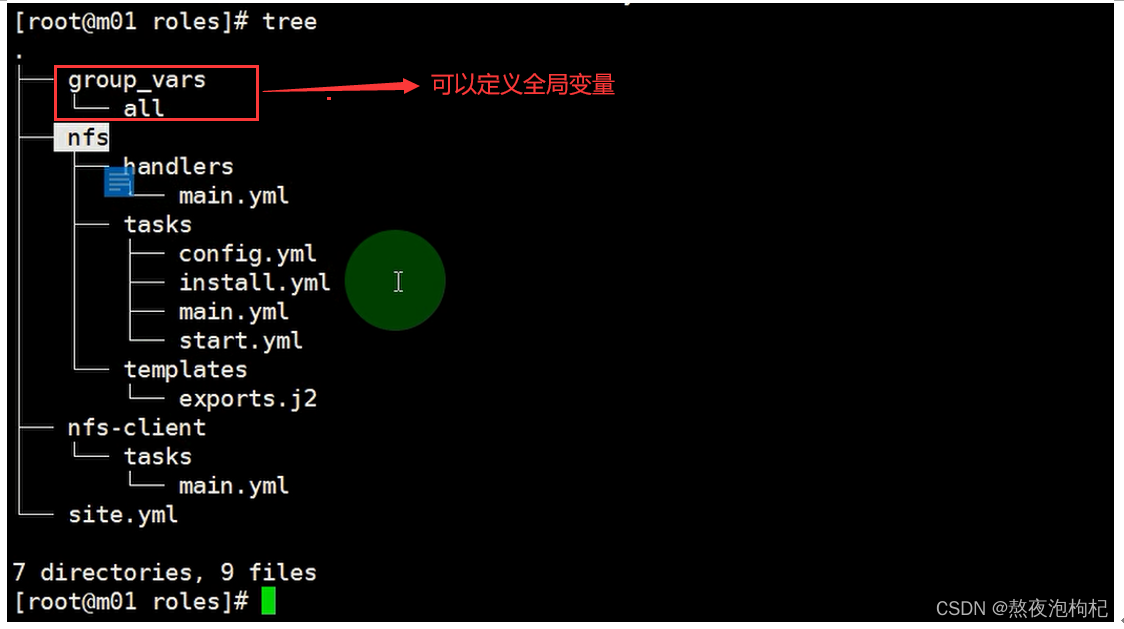
10. Ansible Roles

tasks目录中只能有一个main.yml
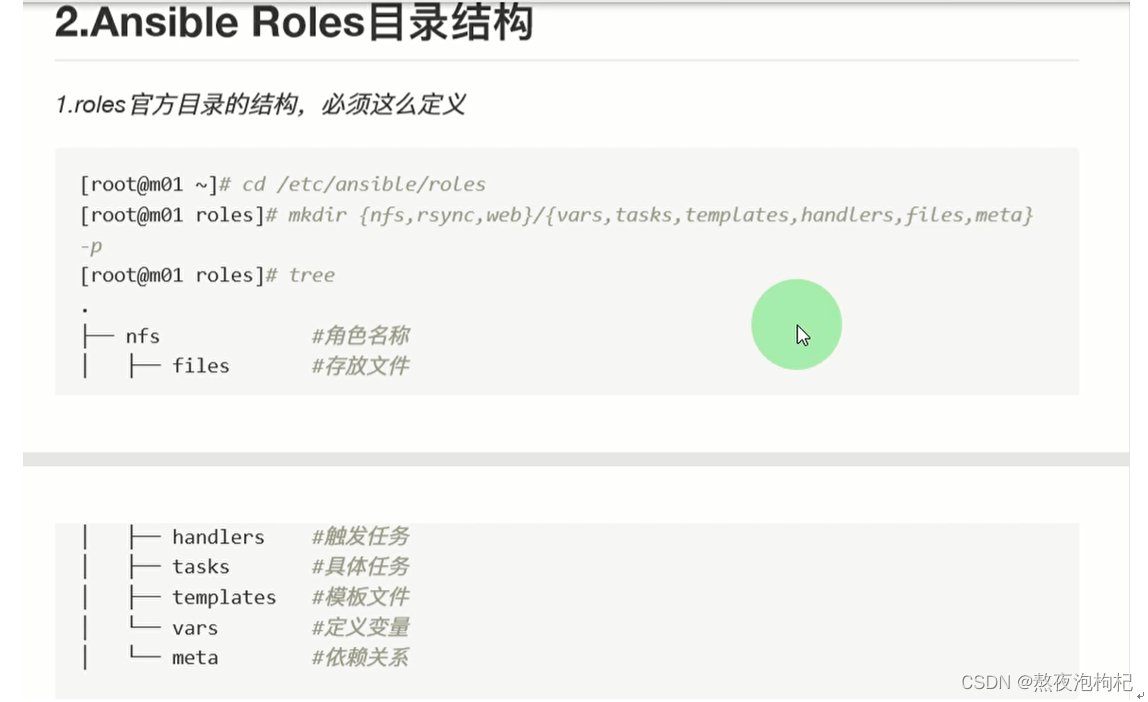


role角色
[root@m01 ~]# cd /etc/ansible/roles/
[root@m01 roles]# mkdir nfs/{tasks,handlers,templates} -pv
mkdir: created directory ‘nfs’
mkdir: created directory ‘nfs/tasks’
mkdir: created directory ‘nfs/handlers’
mkdir: created directory ‘nfs/templates’[root@m01 roles]# cat nfs/tasks/install.yml
- name: Install NFS-utils Serveryum: name=nfs-utils state=present[root@m01 roles]# cat nfs/tasks/config.yml
- name: Configure Nfs-utils Servertemplate: src=./exports.j2 dest=/etc/exports owner=root group=root mode=0644notify: Restart NFS Server[root@m01 roles]# cat nfs/tasks/start.yml
- name: Start NFS Serversystemd: name=nfs state=started enabled=yes[root@m01 roles]# cat nfs/tasks/main.yml
- include_tasks: install.yml
- include_tasks: config.yml
- include_tasks: start.yml[root@m01 roles]# cat nfs-client/tasks/main.yml
- name: Mount NFS Servermount: path=/opt src=172.16.1.7:/data fstype=nfs opts=defaults state=mounted
[root@m01 roles]#
[root@m01 roles]#
[root@m01 roles]# cat site.yml
- hosts: web01roles:- nfs- hosts: web02roles:- nfs-client----------------------------安装memcached
[root@m01 roles]# mkdir memcached/{tasks,handlers,templates} -pv
mkdir: created directory ‘memcached’
mkdir: created directory ‘memcached/tasks’
mkdir: created directory ‘memcached/handlers’
mkdir: created directory ‘memcached/templates’
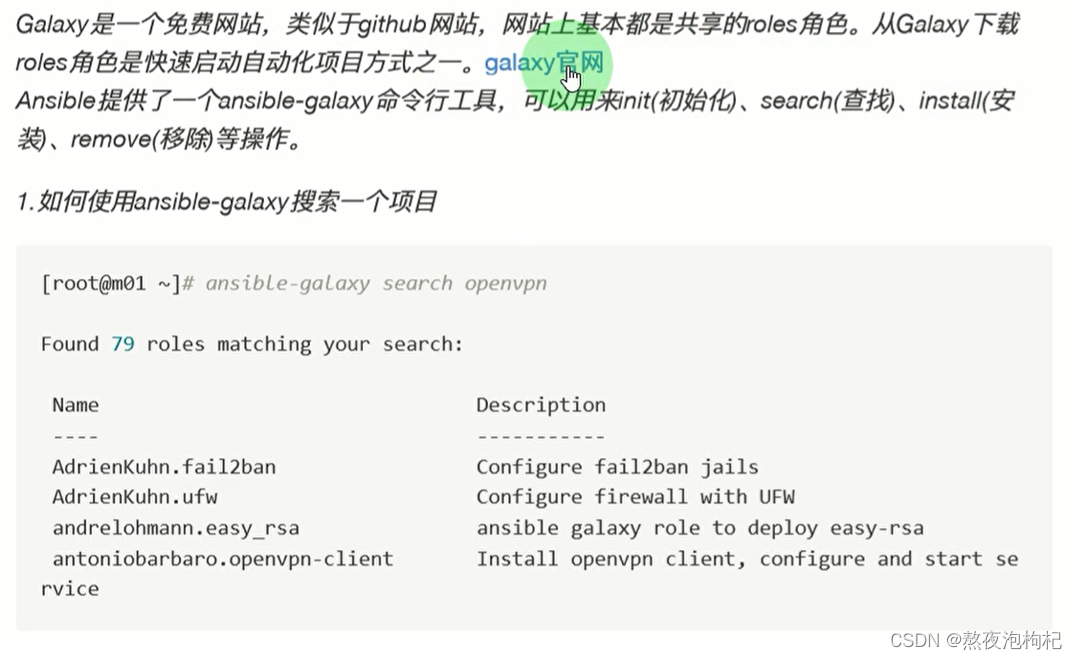
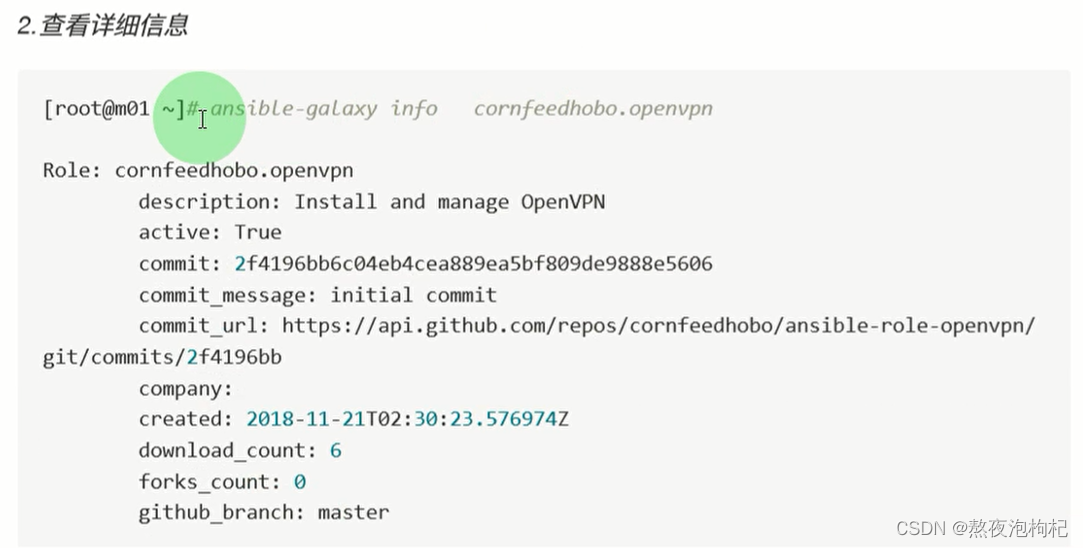
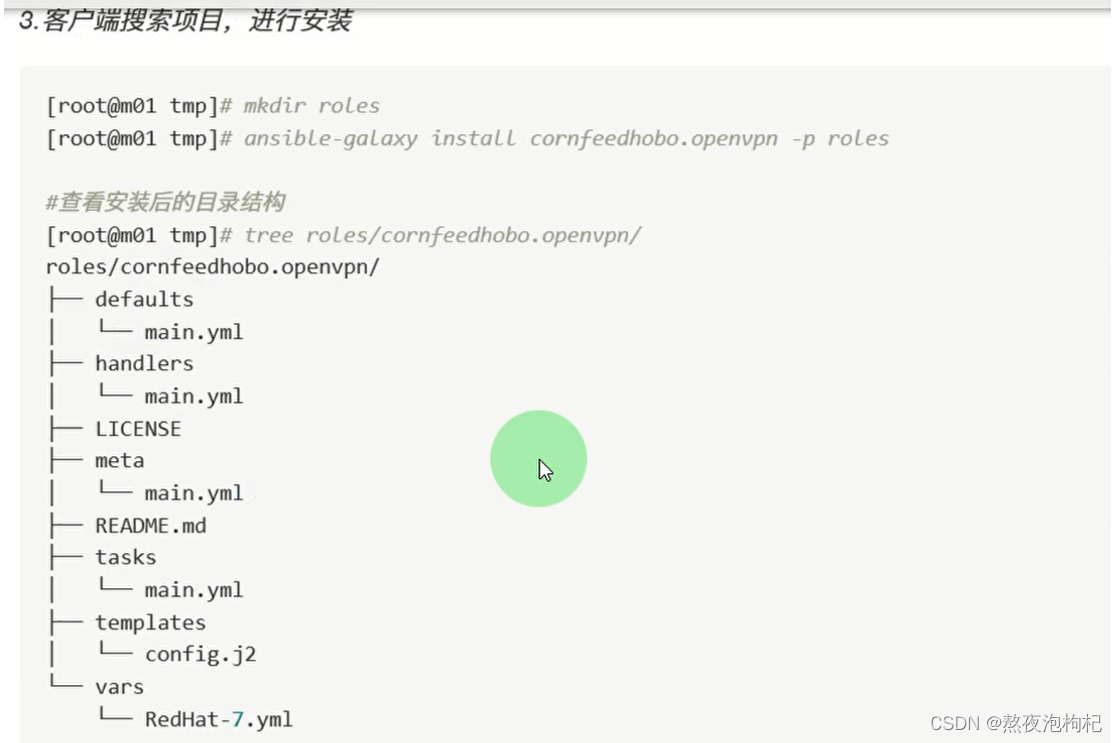
11. AnsibleGalaxy
12. 自我总结
条件语句:1. 一个条件的简单判断(1)根据主机判断(when、match)when ansible_distribution == "Ubuntu"根据主机判断-->matchwhen (ansible_hostname is match ("web"))  or (ansible_hostname is natch("lb"))(2)根据主机名进行判断when ansible_fqdn =="web02"(3)根据不同的ip地址进行判断when ansible_default_ipv4.address == "10.0.0.7"(4)根据内存值来进行大小判断when ansible_memtotal_mb | int < "2000"(5)判断nginx -t执行结果 是否为0,如果result.rc == 0 则执行正确(这个需要用到注册变量)when  result.rc == 0result.rc is match "0"2. 多个条件的判断(1)列表方式判断 and并且关系(或者两个关系用列表进行表示)when:- ansible_distribution == "CentOS"- ansible_fqdn == "web01"when: ansible_default_ipv4.address == "10.0.0.7" and ansible_fqdn == "web1"(2)或者or 关系判断when:ansible_distribution == "CentOS" or ansible_fqdn == "web02"循环语句: 1. with_item循环列表的写法file:path: "{{ item }}"state: touchwith_items:- file1.txt- file2.txt
2. 使用loop方式进行循环列表file:path: "{{ item }}"state: touchloop:- file1.txt- file2.txt
3. 字典的方式(一个循环可以写多个条件)copy:src: "{{ item.src }}"dest: "{{ item.dest }}"owner: "{{ item.owner }}"group: "{{ item.mode }}"mode: "{{ item.mode }}"loop:- { src: 1.txt , dest:/root/ , mode: '0600' , owner: www , group: root }- { src: 2.txt , dest: /opt/ , mode: '0000' , owner: root , group: www}playbook handlers
1. 需要监控的地方
notify: Reload  Nginx
2. 触发监控
handlers:- name Reload Nginxsystemd:name: "{{ item }}"state: restartedloop:- nginx- mariadbwhen: result.rc == 0    # 检查语法进行判断
这篇关于Ansible playbook和Ansible Roles(三)的文章就介绍到这儿,希望我们推荐的文章对编程师们有所帮助!