本文主要是介绍graphql和rest_不知道如何开始使用graphql做rest api的包装,希望对大家解决编程问题提供一定的参考价值,需要的开发者们随着小编来一起学习吧!
graphql和rest
Circa 2012 Facebook needed a data-fetching API that would keep up with developing needs of its mobile applications. This problem birthed GraphQL, a powerful query language and runtime environment for application data requests.
大约在2012年, Facebook需要一个数据提取API ,以适应其移动应用程序的不断发展的需求。 这个问题催生了GraphQL,GraphQL是一种功能强大的查询语言和应用程序数据请求的运行时环境。
But GraphQL’s meteoric rise in popularity — evidenced by now numerous libraries and tutorials supporting its implementation — has led to a sea of content that can be hard to parse, especially if you’re a new developer who just started programming RESTful APIs. If you happen to be primarily interested in client side querying, you will quickly notice there are very few open GraphQL APIs available for practice. And, as its name implies, GraphQL structures data into a graph and it is not always easy to conceptualize a graph structure when you’re a new developer.
但是GraphQL的Swift普及-现已被众多支持其实现的库和教程所证明-已导致大量内容难以解析,尤其是如果您是刚刚开始编写RESTful API的新开发人员。 如果您恰好对客户端查询感兴趣,您会很快注意到几乎没有开放的GraphQL API可供实践。 而且,顾名思义,GraphQL将数据结构化为图形,当您是新开发人员时,概念化图形结构并不总是那么容易。
So how do you get started?
那么如何开始呢?
GraphQL commonly is implemented as a layer on top of existing APIs, be they REST endpoints, relational or non-relational databases, or even a combination of all three. While this can be a complex task for apps in production and at scale, it’s pretty simple to build a GraphQL layer on top of one API endpoint, creating a wrapper of sorts. This will allow you to use third-party data to learn how to build a simple GraphQL server and query GraphQL as a client, without needing to find an open source GraphQL API.
GraphQL通常被实现为现有API之上的一层,无论它们是REST端点,关系数据库还是非关系数据库,甚至是这三者的组合。 对于生产和大规模应用而言,这可能是一项复杂的任务,但在一个API端点之上构建GraphQL层并创建各种包装非常简单。 这将允许您使用第三方数据来学习如何构建简单的GraphQL服务器并以GraphQL作为客户端进行查询,而无需查找开源的GraphQL API。
So let’s make a GraphQL weather app! We’ve got a lot to cover so feel free to come back to this table of contents if you need to navigate around.
因此,让我们制作一个GraphQL天气应用程序! 我们涵盖了很多内容,因此如果您需要四处浏览,请随时返回此目录。
Contents
内容
Quick Pre-work
快速上班
Getting Started — Back-end
入门-后端
OpenWeather API
OpenWeather API
Defining Our Schema
定义架构
Rest Data Source
休息数据源
Resolvers
解析器
Constructing the Server
构造服务器
Launching the Server
启动服务器
Apollo Playground
阿波罗游乐场
Getting Started — Front-end
入门-前端
Apollo Client
阿波罗客户
Client Query
客户查询
useQuery Hook
useQuery挂钩
Zip Code Input Form
邮政编码输入表格
Display Weather Data
显示天气数据
Final Touches
最后的润色
Conclusion
结论
快速上班(Quick Pre-work)
We’re going to be starting with Node.js and Apollo Server for our application. Apollo is one of the most prominent platforms for GraphQL in Node.js and the Apollo Client library supports client-side querying in Typescript or Javascript.
我们将从应用程序的Node.js和Apollo Server开始。 Apollo是Node.js中GraphQL最著名的平台之一,Apollo客户端库支持Typescript或Javascript的客户端查询。
Apollo is easy to use, wildly developer friendly and offers a lot of tools to get started quickly. It does though abstract away a bit of what GraphQL is on its own, so I’d suggest first doing this quick tutorial to see what a very simple “hello world” schema, resolver and query would look like in GraphQL.
Apollo易于使用,对开发人员非常友好,并提供了许多快速入门的工具。 尽管它确实抽象了一些GraphQL本身,但是我建议首先进行此快速教程,以了解GraphQL中非常简单的“ hello world”模式,解析器和查询的外观。
入门-后端 (Getting started — Back-end)
First we need to make a new directory for this application and create a package.json. To get started, in your terminal run:
首先,我们需要为此应用程序创建一个新目录并创建一个package.json。 首先,在终端运行:
~ mkdir my-weather-app~ cd my-weather-app~ npm init --yAdd dependencies apollo-server and apollo-datasource-rest via your package manager of choice.
通过您选择的包管理器添加依赖项apollo-server和apollo-datasource-rest。
~ npm i --save apollo-server apollo-datasource-restCreate a subfolder called server, change directory into this new server folder and add the files index.js, resolvers.js, schema.js and datasource.js.
创建一个名为server的子文件夹,将目录更改为该新服务器文件夹,并添加文件index.js,resolvers.js,schema.js和datasource.js。
We’re going to be using OpenWeather for our API. You can get an API key with their free tier for the purposes of this exercise.
我们将对API使用OpenWeather 。 在本练习中,您可以获得具有免费层的API密钥。
Make sure you protect your API key if you plan to push to Github! You can add a file called secrets.js to your application, add the below to secrets.js and then include it in a .gitignore file at the root of your project directory. Add your node_modules to the .gitignore as well.
如果您打算推送到Github,请确保保护您的API密钥! 您可以在应用程序中添加一个名为secrets.js的文件,将以下内容添加到secrets.js中,然后将其包含在项目目录根目录下的.gitignore文件中。 也将您的node_modules添加到.gitignore。
OpenWeatherAPI (OpenWeatherAPI)
We’re going to be using the OpenWeatherAPI to query by zip code. First, let’s see what information we get from an API call — feel free to use Postman for this get request, or a simple curl request will also work! Make sure you replace the below “insert api key” with your api key, and take a minute to look at data from different zip codes. In your terminal run:
我们将使用OpenWeatherAPI通过邮政编码进行查询。 首先,让我们看看我们从API调用中获得了什么信息-请随时使用Postman进行此get请求,否则简单的curl请求也将起作用! 确保将下面的“插入api密钥”替换为api密钥,并花一分钟时间查看来自不同邮政编码的数据。 在您的终端运行中:
~ curl http://api.openweathermap.org/data/2.5/weather\?zip\=10003,us\&units\=imperial\&appid\=YOUR_API_KEY | json_ppYou should see a response like the below.
您应该看到类似以下的响应。
~ curl http://api.openweathermap.org/data/2.5/weather\?zip\=10003,us\&units\=imperial\&appid\=YOUR_API_KEY | json_pp
  % Total    % Received % Xferd  Average Speed   Time    Time     Time  Current
                                 Dload  Upload   Total   Spent    Left  Speed
100   455  100   455    0     0   3273      0 --:--:-- --:--:-- --:--:--  3273
{
   "coord" : {
      "lat" : 40.73,
      "lon" : -73.99
   },
   "main" : {
      "humidity" : 83,
      "temp" : 72.66,
      "feels_like" : 75.67,
      "temp_max" : 73.99,
      "temp_min" : 72,
      "pressure" : 1023
   },
   "clouds" : {
      "all" : 1
   },
   "base" : "stations",
   "sys" : {
      "sunrise" : 1599561024,
      "country" : "US",
      "sunset" : 1599607013,
      "type" : 1,
      "id" : 4610
   },
   "wind" : {
      "deg" : 120,
      "speed" : 5.82
   },
   "dt" : 1599616264,
   "visibility" : 10000,
   "weather" : [
      {
         "id" : 800,
         "icon" : "01n",
         "description" : "clear sky",
         "main" : "Clear"
      }
   ],
   "timezone" : -14400,
   "cod" : 200,
   "name" : "New York",
   "id" : 0
}
A few things you might have observed:
您可能已经观察到一些事情:
- There are some duplicate terms that can be confusing (ie. “main” is both a key in the outermost data and a key within the “weather” object, and both contain data for the current weather for this zip code. 有一些重复的术语可能会引起混淆(例如,“ main”既是最外面的数据中的键,又是“ weather”对象中的键,并且都包含此邮政编码当前天气的数据。
- Times are in epoch time, not usually the most user friendly. 时间是时代,通常不是最人性化的。
- The data is quite nested, and it would probably be easier to parse the weather data if it was grouped together differently. 数据是非常嵌套的,如果将数据分组在一起,则解析天气数据可能会更容易。
With GraphQL, we can map this data to a schema that makes sense for our needs and also convert the data to formats that make sense for our users before data is sent to the client.
使用GraphQL,我们可以将这些数据映射到满足我们需求的模式,还可以在将数据发送到客户端之前将数据转换为对我们的用户有意义的格式。
定义架构 (Defining our schema)
Let’s first make the schema for the Apollo Server. We’ll need to import the gql template literal tag provided by Apollo to construct the schema. This tag helps the program identify the schema as a GraphQL string instead of an ordinary string.
首先让我们为Apollo服务器创建架构。 我们将需要导入Apollo提供的gql模板文字标记以构建模式。 此标记有助于程序将架构标识为GraphQL字符串,而不是普通字符串。
Schemas are written with types. The primary purpose of your GraphQL schema is to identify the roots for your data querying and then, if needed, create types for that root and any branches from it.
模式是用类型编写的。 GraphQL模式的主要目的是识别数据查询的根,然后根据需要为该根及其任何分支创建类型。
In our case, our one and only root will be the call for “weather”. It will require a zip code and return a type “Weather” that we will create next. Here is what the code will look like with just that query.
就我们而言,我们唯一的根源将是“天气”的呼唤。 它将需要一个邮政编码,并返回我们接下来要创建的“天气”类型。 这就是该查询的代码。
You will need to note the type for each property of the schema and each parameter for the query. The “!” at the end of a type signifies that that this field is required, i.e. like our require zip code string in the above. These types might be standard data types — strings, floats, ints — or can be a reference to other schema types, such as the Weather type we will now create.
您将需要注意模式的每个属性的类型以及查询的每个参数。 “!” 类型末尾的表示此字段是必填字段,即,如上述我们的require邮政编码字符串一样。 这些类型可以是标准数据类型(字符串,浮点数,整数),也可以是对其他架构类型的引用,例如我们现在将创建的Weather类型。
We have a lot of freedom with how we want to structure and name our data in our schema even though we are using a third party API. We don’t have to use the API’s inherent structure or names. We can pile all of the data we want into one type, or split it if that seems like a better structure for our data.
即使我们使用的是第三方API,我们在结构和名称方面也有很大的自由度。 我们不必使用API的固有结构或名称。 我们可以将所需的所有数据堆积为一种类型,或者如果对我们的数据而言似乎更好的结构,则可以将其拆分。
An example schema for the weather API is below, but feel free to move fields if you’d like to structure it differently. I chose to have a main “Weather” type with location and sunrise / sunset data and a separate “Current Weather” type for the present weather in a city.
下面是天气API的示例架构,但是如果您希望采用不同的结构,可以随意移动字段。 我选择了具有位置和日出/日落数据的主要“天气”类型,以及针对城市当前天气的单独的“当前天气”类型。
REST数据源 (REST Data Source)
Next we’ll head to our datasource.js file. The Apollo platform has a REST data source class that allows you to easily fetch data from a REST endpoint for your GraphQL server. We’re going to create our own WeatherAPI class that extends the REST data source class.
接下来,我们将转到我们的datasource.js文件。 Apollo平台具有REST数据源类,使您可以轻松地从GraphQL服务器的REST端点获取数据。 我们将创建自己的WeatherAPI类,以扩展REST数据源类。
The constructor has a property for the base URL of the REST API you will use. We will only be defining one API request, but this is helpful when using one class for multiple requests to a REST data source.
构造函数具有您将使用的REST API的基本URL的属性。 我们将仅定义一个API请求,但这在将一个类用于对REST数据源的多个请求时很有用。
Below our constructor we will write an async function to get our data. The get request method comes from the REST data source class. The data from the async call will then be passed to the weather reducer we will create next.
在构造函数下面,我们将编写一个异步函数来获取数据。 get request方法来自REST数据源类。 然后,来自异步调用的数据将被传递到下一步要创建的减雨器。
Our reducer maps the data to the schema we created in our schema.js file and returns it.
我们的化简器将数据映射到我们在schema.js文件中创建的模式,并返回它。
Some things to note about the above reducer:
有关上述reducer的一些注意事项:
- We have a field in our reducer for each field in our schema — this is important. 对于我们架构中的每个字段,我们在reducer中都有一个字段-这很重要。
- The reducer follows the shape of our schema — the main “weather” data is the root and it has a key for “current weather” that is an object with additional data fields. 减速器遵循我们模式的形状-主要的“天气”数据是根,并且具有“当前天气”的键,该键是带有其他数据字段的对象。
- We can modify names of the data returned from our API. This allows us to follow the paradigms of GraphQL — constructing a data graph based on the shape of data we want and what we feel will be easiest for our client — instead of being stuck with the data formatting we get directly from the API. 我们可以修改从API返回的数据的名称。 这使我们能够遵循GraphQL的范式-根据我们想要的数据形状以及对我们的客户而言最简单的感觉构造数据图-而不是被我们直接从API获取的数据格式所困扰。
- We can change the way data is displayed — for example, we can take the epoch time for sunrise and sunset and convert them to time strings. 我们可以更改数据的显示方式-例如,我们可以将日出和日落的时期时间转换为时间字符串。
- We don’t need to use every piece of data from the third-party API — we can be selective about what is needed for our app. 我们不需要使用第三方API中的所有数据,我们可以选择应用程序所需的内容。
解析器 (Resolvers)
Finally, our resolvers. These help GraphQL know what to do based on the type of request we are making, or the root of our operation. For our weather app we will only be writing a query, but GraphQL also supports mutations (modifying the data in a GraphQL API) and subscriptions (only needed if your client needs realtime updates from your server as data changes).
最后,我们的解析器。 这些帮助GraphQL根据我们发出的请求类型或操作的根源知道要做什么。 对于我们的天气应用程序,我们将只编写查询,但是GraphQL还支持突变(修改GraphQL API中的数据)和订阅(仅当客户端需要随着数据更改从服务器实时更新时才需要)。
We’re going to export our query resolver with the callback for the “weather” query. The callback has four possible arguments:
我们将导出带有“天气”查询回调的查询解析器。 回调有四个可能的参数:
- Parent. This is only needed if your query requires the value of the resolver’s parent. This is not needed in our case so we use an _ to omit it. 父母仅当您的查询需要解析器的父级的值时才需要此属性。 在我们的情况下不需要这样做,因此我们使用_来省略它。
- Arguments. We want to get weather for a specific zip code, and the async function we wrote in datasource.js requires a zip parameter, so we will need a zip argument. 争论。 我们想要获取特定邮政编码的天气,并且我们在datasource.js中编写的async函数需要一个zip参数,因此我们将需要一个zip参数。
Context. This is where you pass anything the query might need in order to execute, in our case this is going to be the datasource we made in datasource.js and the query will be “resolved” using the WeatherAPI class and async function we made. Learn more about context on Apollo’s site.
上下文。 在这里,您可以传递查询执行所需的任何内容,在本例中,这将是我们在datasource.js中创建的数据源,并且将使用WeatherAPI类和我们创建的异步函数来“解析”查询。 在Apollo网站上了解有关上下文的更多信息。
- Info. This is where you would pass information about the operation’s execution state, but this is not a parameter we need for our resolver. 信息。 在这里您可以传递有关操作执行状态的信息,但这不是解析器所需的参数。
Our resolvers.js file should look like this. The datasources.weatherAPI call will come from the main server file that we will make next, and .getWeather is the async method we made in our datasource.js file.
我们的resolvers.js文件应如下所示。 datasources.weatherAPI调用将来自我们接下来要创建的主服务器文件,.getWeather是我们在datasource.js文件中创建的异步方法。
构造服务器 (Constructing the Server)
When working with Apollo, your server will be a new instance of the Apollo Server class. This class requires several parameters:
使用Apollo时,您的服务器将是Apollo Server类的新实例。 此类需要几个参数:
- Your schema (the typedefs we exported from schema.js) 您的架构(我们从schema.js导出的typedef)
- Your resolvers (exported from resolvers.js) 您的解析器(从resolvers.js导出)
- Your datasources (exported from datasource.js). Note this field needs to be a callback and can have multiple datasources when called. We will only be calling a new instance of the WeatherAPI we made in our datasource file for the query “weather”, but if we were using multiple datasources we could list them all in this callback. 您的数据源(从datasource.js导出)。 请注意,此字段必须是回调,并且在调用时可以具有多个数据源。 我们将只为查询“天气”调用在数据源文件中创建的WeatherAPI的新实例,但是如果使用多个数据源,则可以在此回调中将它们全部列出。
The engine field above is for tracking your schema with Apollo Studio. This is a very helpful tool, but not required for this exercise and beyond its scope so feel free to omit. If you want to use Apollo Studio for practice, you can learn more here.
上面的引擎字段用于跟踪Apollo Studio的架构。 这是一个非常有用的工具,但不是本练习所必需的,并且超出了本练习的范围,因此可以随时省略。 如果您想使用Apollo Studio进行练习,可以在此处了解更多信息。
启动服务器 (Launching the server)
We are ready to launch our server! We’ll have our server listen and then log the server url, which will come from the instance of the Apollo Server.
我们准备启动我们的服务器! 我们将让服务器监听,然后记录服务器URL,该URL将来自Apollo Server实例。
阿波罗游乐场 (Apollo Playground)
One of the best tools from Apollo is the playground developers can use to see their schema and query their data.
Apollo最好的工具之一是游乐场开发人员可以用来查看其架构和查询其数据。
Add the below to “scripts” in your package.json.
将以下内容添加到package.json中的“脚本”中。
"start-server": "node server"You can then run the below command from your root directory (your my-weather-app folder).
然后,您可以从根目录(您的my-weather-app文件夹)运行以下命令。
~ npm run start-serverYou can now head to http://localhost:4000/ and should see the below interface:
您现在可以转到http:// localhost:4000 /,并且应该看到以下界面:
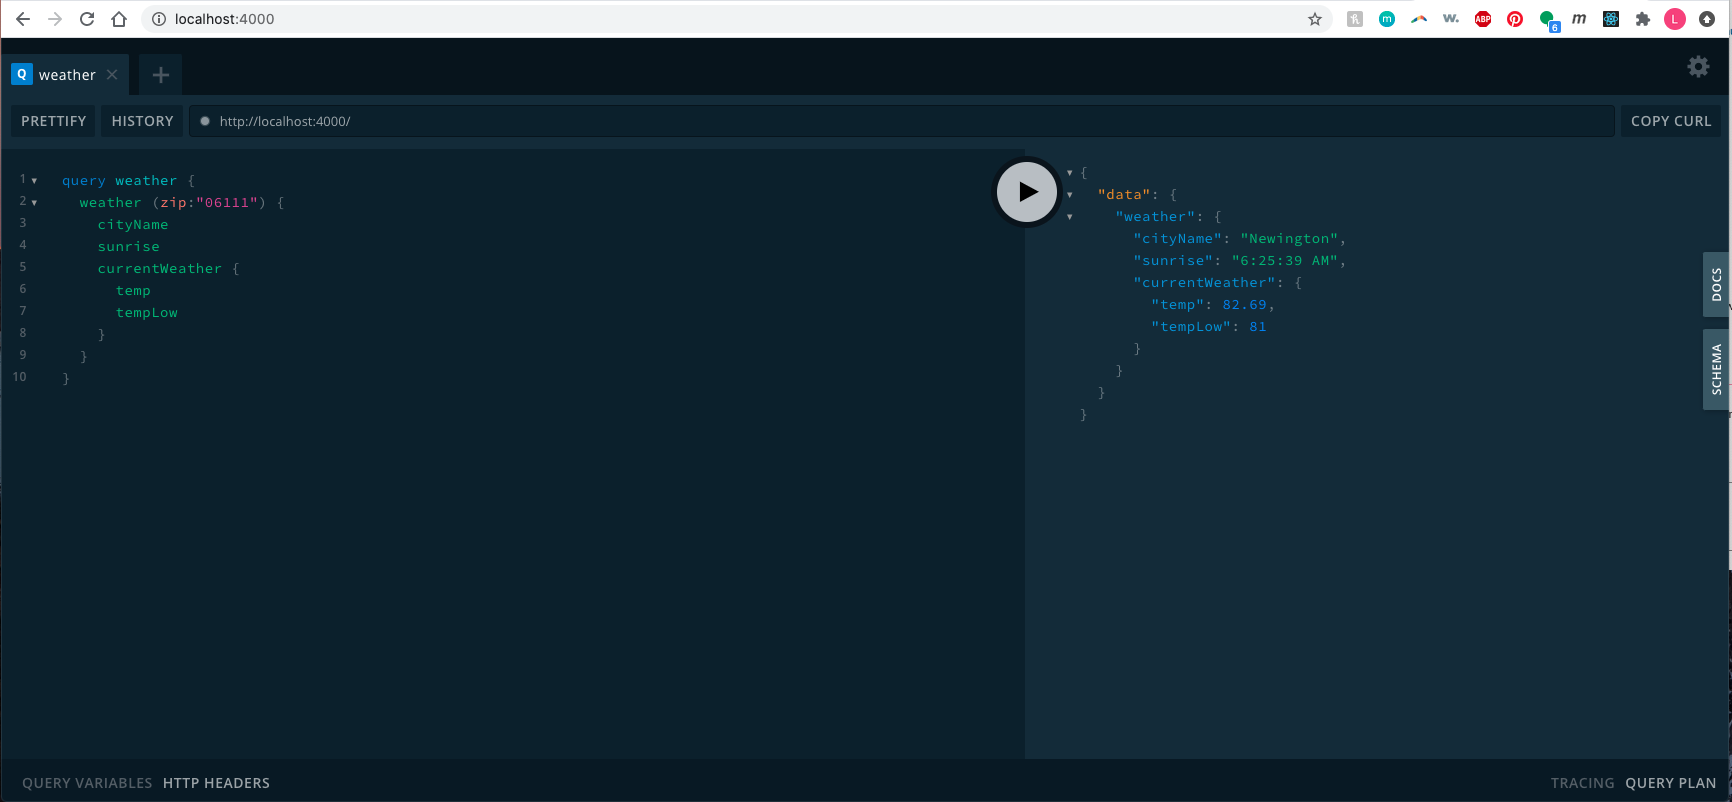
On the left hand side you can run a query for the “weather” root we made. You will need to pass in a zip code since we required it in our schema.
您可以在左侧查询我们创建的“天气”根目录。 由于我们在架构中需要邮政编码,因此您需要传递邮政编码。
query weather {
    weather (zip:"06111") {
      cityName
      sunrise
      currentWeather {
        temp
        tempLow
      }
    }
  }
Hit the play button and you will see the result of your query on the right! You can also open the schema and docs tabs on the far right if you want to see the schema we made in our schema.js file. Practice adding and removing fields from the above query and changing the zip code to see different data.
点击播放按钮,您将在右侧看到查询结果! 如果要查看我们在schema.js文件中创建的架构,也可以打开最右侧的schema和docs标签。 练习从上述查询中添加和删除字段,并更改邮政编码以查看其他数据。
入门-前端 (Getting Started — Front-end)
Now that we have our server working we can build a client application to query it and display our weather data.
现在我们的服务器可以工作了,我们可以构建一个客户端应用程序来查询它并显示我们的天气数据。
I used create-react-app to make the initial set up a bit faster. You can run the below command in the root directory of this app (in your my-weather-app folder) to create a new client folder. Omit the typescript tag at the end if you prefer to use Javascript.
我使用create-react-app加快了初始设置的速度。 您可以在此应用程序的根目录(在my-weather-app文件夹中)中运行以下命令,以创建新的客户端文件夹。 如果您更喜欢使用Javascript,请在最后省略typescript标签。
~ npx create-react-app client --typescriptThe new react client app has its own package.json file. You will want to install the Apollo Client library while in the client directory so it is added to the dependency list for this package.json.
新的react client应用程序具有自己的package.json文件。 您将需要在客户端目录中安装Apollo客户端库,以便将其添加到此package.json的依赖项列表中。
Your current file structure should look like the below.
您当前的文件结构应如下所示。
my-weather-app/
  client/
      src/
         App.tsx
         index.tsx
         (...more files from create-react-app)
      package.json
  server/
      datasource.js
      index.js
      resolvers.js
      schema.js
   package.json
   secrets.js
   .gitignore
To install the Apollo Client library, run the following in your terminal.
要安装Apollo客户端库,请在终端中运行以下命令。
~ cd client
~ npm i --save @apollo/client
阿波罗客户 (Apollo Client)
First we need to create an instance of the Apollo Client. Create a file client.tsx (or client.js) in your new client folder and paste the below (remove the ApolloClient<NormalizedCacheObject> type if using Javascript).
首先,我们需要创建一个Apollo Client实例。 在新的客户端文件夹中创建文件client.tsx(或client.js),然后粘贴以下内容(如果使用Javascript,请删除ApolloClient <NormalizedCacheObject>类型)。
The above code creates a new cache for our client queries, meaning subsequent requests for the same data will be much faster. The client instance also instructs our new client application to query http://localhost:4000/, the url for our server data, when making requests.
上面的代码为我们的客户端查询创建了一个新的缓存,这意味着后续对相同数据的请求将更快。 客户实例还指示我们的新客户应用程序在发出请求时查询我们服务器数据的URL http:// localhost:4000 / 。
We then we need to pass that client to Apollo’s provider to ensure our entire app can access it. Modify the index.tsx / index.js file that came with create-react-app to the below.
然后,我们需要将该客户端传递给Apollo的提供商,以确保我们的整个应用程序都可以访问它。 将create-react-app随附的index.tsx / index.js文件修改为以下内容。
客户查询 (Client Query)
We’re now going to make the frontend of our weather app. Open the App.tsx file and paste in the below to start (this will look the same for Typescript and Javascript).
现在,我们将成为天气应用程序的前端。 打开App.tsx文件并粘贴在下面以开始操作(对于Typescript和Javascript,外观相同)。
A little about the above code:
关于上面的代码:
- This probably looks familiar — it’s pretty close to the same query format we used in the Apollo Playground. Feel free to go back and use the playground and make sure you are getting the data you want for your client application. Modify the query above so you can display what you’d like to see in your app. 这看起来很熟悉-与我们在Apollo Playground中使用的查询格式非常接近。 随时返回并使用操场,并确保您正在获取客户端应用程序所需的数据。 修改上面的查询,以便您可以显示想要在应用程序中看到的内容。
We again are using the gql template literal tag from Apollo for our query (though now imported from ‘@apollo/client’).
我们再次使用来自Apollo的gql模板文字标签进行查询(尽管现在是从'@ apollo / client'导入的)。
- We’re calling this query “GET_WEATHER,” but it could be called whatever makes sense for you. 我们将此查询称为“ GET_WEATHER”,但可以根据您的需要进行调用。
useQuery挂钩 (useQuery Hook)
We’re going to now use that string in our main app file and the useQuery hook that Apollo Client provides to call it. We will have two variables on state — zip and nextZip — so that we can create a simple form to change zip codes and see the weather for different cities.
现在,我们将在主应用程序文件中使用该字符串,并使用Apollo Client提供的useQuery挂钩来调用它。 我们将在状态上有两个变量zip和nextZip,以便我们可以创建一个简单的表单来更改邮政编码并查看不同城市的天气。
The useQuery hook will first take in our GET_WEATHER query and then an object with the variables we will be passing to it, in this case a default zip code.
useQuery挂钩将首先接受我们的GET_WEATHER查询,然后是一个包含我们将传递给它的变量的对象,在这种情况下,该对象是默认的邮政编码。
The useQuery hook returns either a loading state, an error or the data for our query. Having access to all three is helpful when later creating a loading and error message in our app.
useQuery挂钩返回加载状态,错误或查询的数据。 稍后在我们的应用程序中创建加载和错误消息时,访问这三个控件将很有帮助。
The frame of your App.js / App.tsx file should look like this.
App.js / App.tsx文件的框架应如下所示。
邮政编码输入表格 (Zip Code Input Form)
We can first make a small form with an input field for a user to change the zip code. We’ll also want to make two event handlers that will reset nextZip when the input field is changed and reset the zip variable when the form is submitted. That form will look something like the below.
首先,我们可以使用输入字段来制作一个小的表格,以供用户更改邮政编码。 我们还将要创建两个事件处理程序,这些事件处理程序将在更改输入字段时重置nextZip,并在提交表单时重置zip变量。 该表格如下所示。
显示天气数据 (Display Weather Data)
Now we will add in our data! You can definitely choose different fields than I did below and order it differently. Each of our fields will be preceded by “data.weather.” I do recommend making the rendering for your data conditional on data and adding in loading and error messages based on what is returned from the useQuery hook.
现在,我们将添加数据! 您绝对可以选择与下面不同的字段,并以不同的顺序进行排序。 我们每个字段的前面都有“ data.weather”。 我建议您以数据为条件来呈现数据,并根据useQuery挂钩返回的内容添加加载和错误消息。
We’re now ready to look at our app! You will need to have two terminal windows open, one for the server from the root directory and one from our client folder. In the root directory, you should run the start-server command we wrote above. In the client folder, the “start” command will run the react-scripts start command and launch our client app at http://localhost:3000/.
现在我们准备看一下我们的应用程序! 您将需要打开两个终端窗口,一个来自根目录的服务器,另一个来自我们的客户端文件夹。 在根目录中,您应该运行上面编写的start-server命令。 在客户端文件夹中,“开始”命令将运行react-scripts start命令并在http:// localhost:3000 /处启动我们的客户端应用程序。
So from your my-weather-app folder:
因此,从您的my-weather-app文件夹中:
~ npm run start-serverAnd from your client folder within my-weather-app:
从my-weather-app中的客户文件夹中:
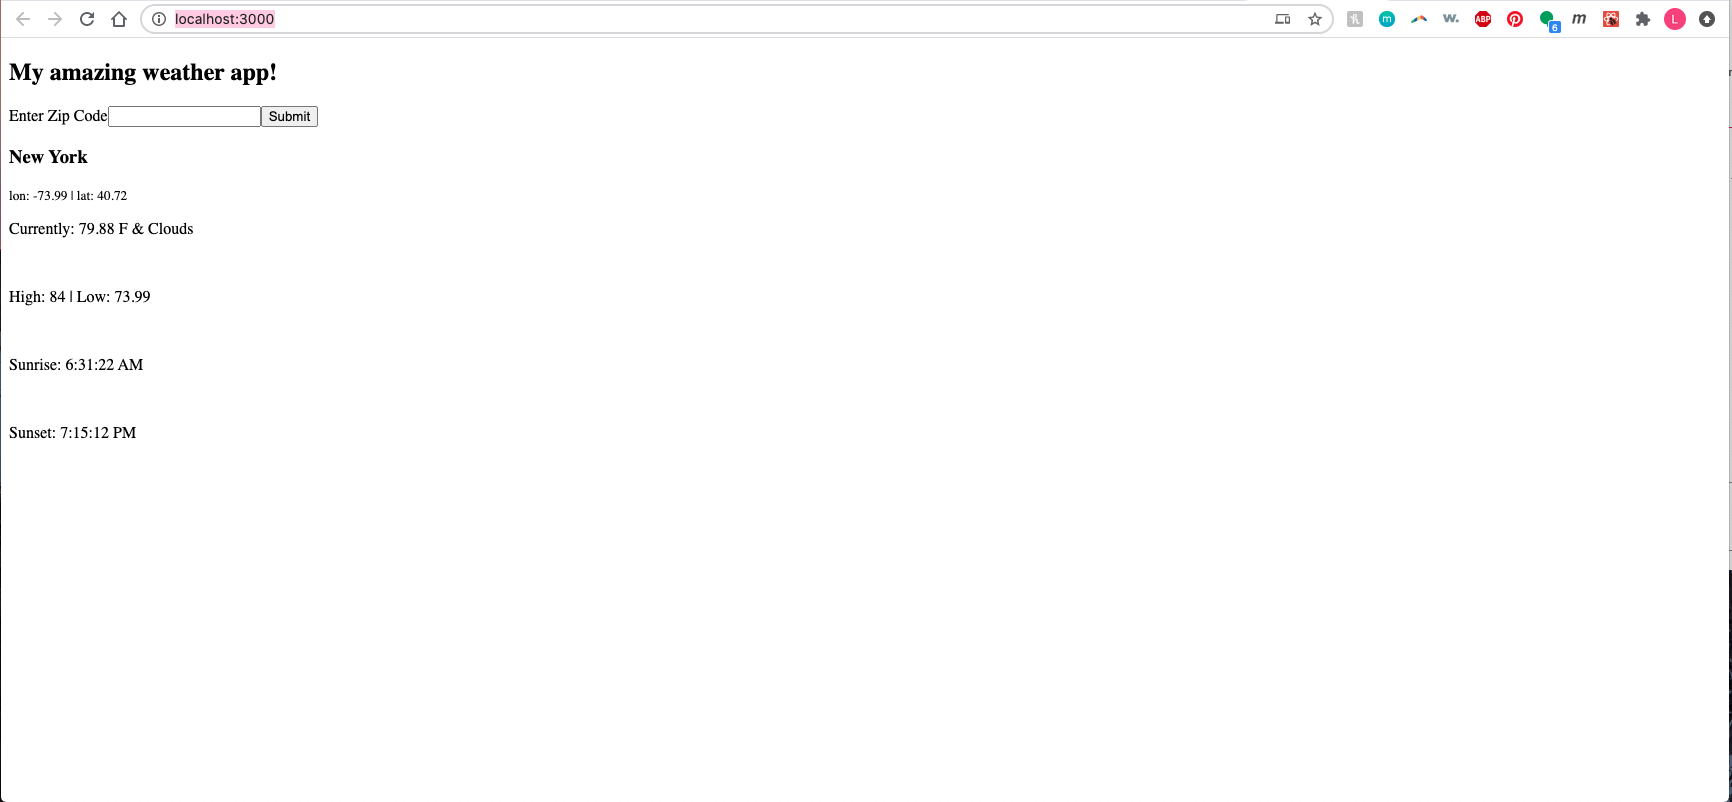
~ npm run startYou should see something like the below in your browser at http://localhost:3000/. You should be able to input different zip codes and see data for your hometown, current city, Beverley Hills 90210, and everywhere in between! You also can try putting in a random number to see your error message pop up.
您应该在浏览器的http:// localhost:3000 /上看到类似以下的内容。 您应该能够输入不同的邮政编码,并查看您的家乡,当前城市,贝弗利山庄90210以及之间的所有地方的数据! 您也可以尝试输入随机数以查看弹出的错误消息。
最后的润色 (Final Touches)
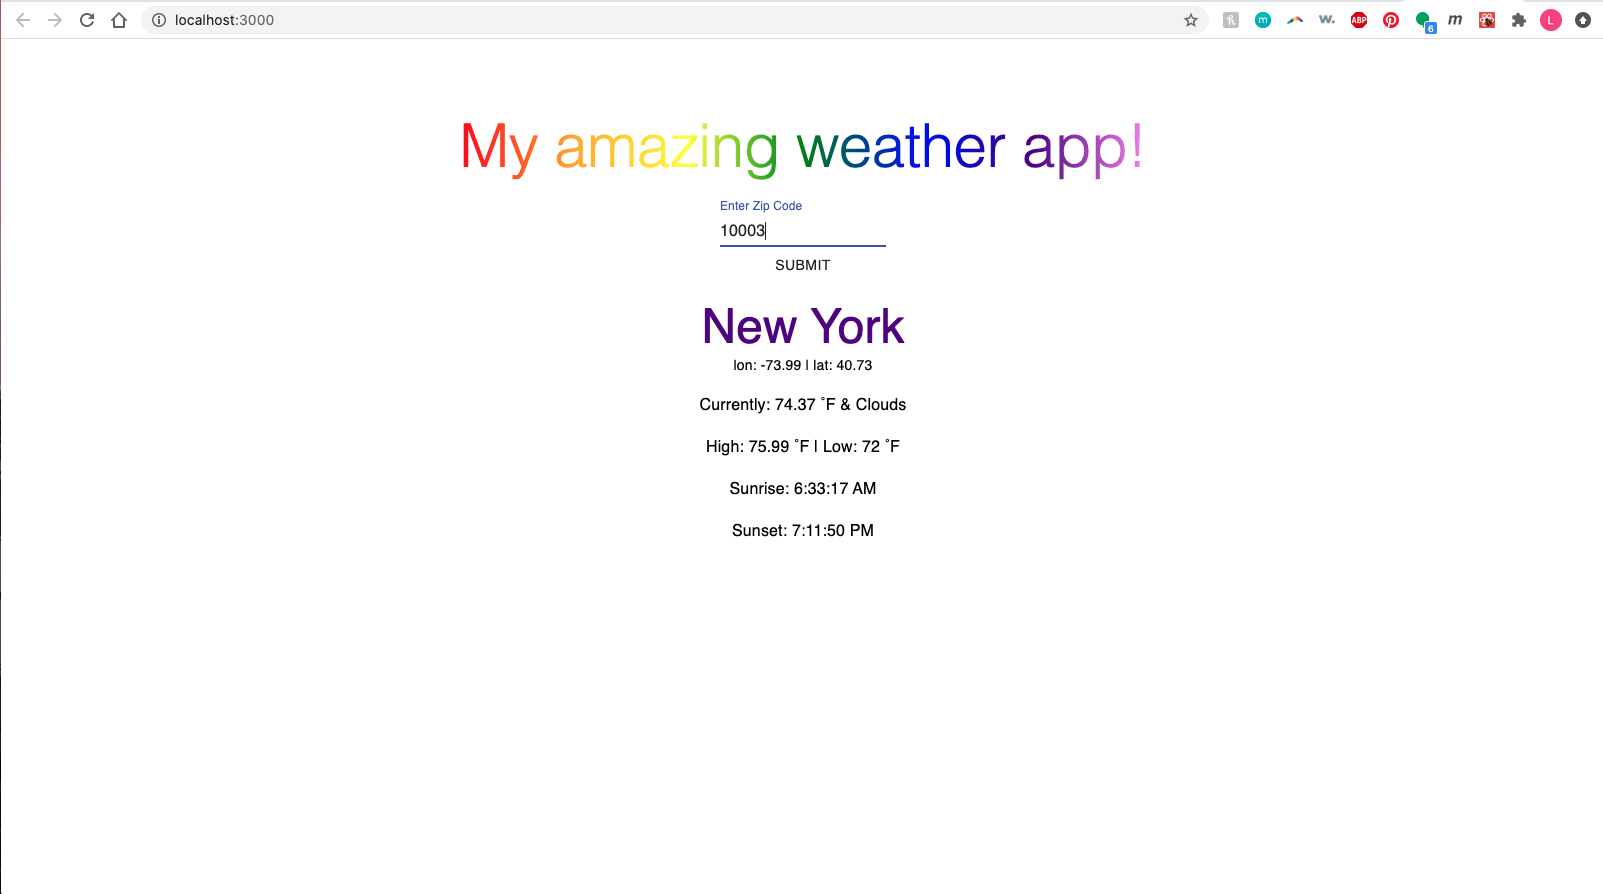
Now we just need to give it a facelift! I added Material-UI components and JSS, but feel free to style to your heart’s content. Here’s my final App.tsx.
现在我们只需要改头换面即可! 我添加了Material-UI组件和JSS,但可以随意调整样式。 这是我最后的App.tsx。
And the final view!
最后的看法!
结论 (Conclusion)
GraphQL is an amazing query language and runtime and the Apollo platform makes developing with GraphQL a relatively seamless experience. There is a bit of a learning curve to pick up syntax and organization, but building a wrapper around a third party API can be a fun way to practice using GraphQL for your server and client applications.
GraphQL是一种了不起的查询语言和运行时,而Apollo平台使使用GraphQL进行开发成为一种相对无缝的体验。 学习语法和组织方式有一些学习弯路,但是围绕第三方API构建包装器可能是将GraphQL用于服务器和客户端应用程序的一种有趣的练习方法。
You can find the full repo for this app here. Happy coding!
您可以在此处找到此应用的完整存储库。 祝您编码愉快!
翻译自: https://medium.com/swlh/no-idea-how-to-get-started-with-graphql-make-a-wrapper-of-a-rest-api-7159080dc318
graphql和rest
相关文章:
这篇关于graphql和rest_不知道如何开始使用graphql做rest api的包装的文章就介绍到这儿,希望我们推荐的文章对编程师们有所帮助!


