本文主要是介绍基于虹软人脸识别API和Qt5的人脸识别,希望对大家解决编程问题提供一定的参考价值,需要的开发者们随着小编来一起学习吧!
测试和使用了虹软的人脸API在QT5环境下设计了一个简单的人脸识别软件,实现了对人脸的跟踪和人脸识别。摄像头的控制以及图像格式的转换使用了Opencv,图像显示使用的是QT5的Qimage控件。下面是详细介绍
1基本流程
(1)加载存储的参考图像数据和图像标签,这里简单的使用图像的名字作为标签(2)使用虹软人脸识别API计算参考图像的人脸位置数据并存储(3)使用opencv VideoCapture 类采集摄像头图像数据(2)采集的图像数据送入虹软人脸识别API 计算人脸位置,并和参考人脸数据计算相似距离,返回最相似的人脸标签
2 Visual Studio 下构建Qt工程
(1)工程目录如下图所示:
其中QtGuiApplication1.ui是界面文件,Header File文件夹中的amcomdef.h

ammem.h arcsoft_fsdk_face_detection.h arcsoft_fsdk_face_recognition.h
asvloffscreen.h merror.h 是从虹软库中拷贝的头文件未做任何修改
FaceDiscern.h 和FaceDiscern.cpp是自定义的一个人脸识别类
(2)工程属性配置
点击工程属性->连接器->输入中出了QT5的库文件,添加opencv_world340d.lib
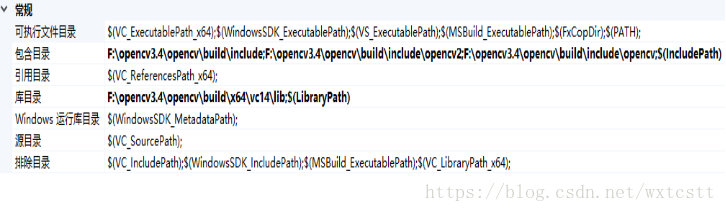
点击工程属性-》VC++目录添加OpenCV的头文件和库文件的路径,其中包含目录添加opencv的头文件路径,库目录添加opencv的dll路径,如下图
2工程类文件详解

(1)QtGuiApplication1 ui类的源文件如下所示,其中Mat2QImage函数将opencv采集的图像数据转化为QImage支 持 的数据格式, VideoCapture 是Opencv用来操作摄像头的类,QImage用来显示采集的图像数据
#pragma once
#include <QtWidgets/QMainWindow>
#include "ui_QtGuiApplication1.h"
#include "qmessagebox.h"
#include "opencv2/core/core.hpp"
#include "opencv2/highgui/highgui.hpp"
#include "opencv2/imgproc/imgproc.hpp"
#include <iostream>
#include "qtimer.h"
#include "FaceDiscern.h"
#include "qrect.h"
#include "qpainter.h"
using namespace cv;
using namespace std;
class QtGuiApplication1 : public QMainWindow
{Q_OBJECT
public:QtGuiApplication1(QWidget *parent = Q_NULLPTR);~QtGuiApplication1();QImage  Mat2QImage(cv::Mat cvImg); //图像格式转换QTimer  *timer;Mat     frame;            //摄像头直接获得的数据FaceDiscern *facediscern; //人脸识别类
private:Ui::QtGuiApplication1Class ui;VideoCapture capture; //采集摄像头的数据QImage qImg;          //展示图像的控件//---槽函数 用作事件触发
public slots :void openVideo();void stopVideo();void nextFrame();};
(2)QtGuiApplication1.cpp
#include "QtGuiApplication1.h"QtGuiApplication1::QtGuiApplication1(QWidget *parent): QMainWindow(parent)
{ui.setupUi(this);ui.image->setScaledContents(true);  //fit video to label areafacediscern = new FaceDiscern("F:\\trainimages");//加载参考图像数据和标签facediscern->Train();//计算参考数据图像数据的人脸位置等}QtGuiApplication1::~QtGuiApplication1()
{if (capture.isOpened())capture.release();delete(timer);
}void QtGuiApplication1::openVideo()
{if (capture.isOpened())capture.release();     //decide if capture is already opened; if so,close itcapture.open(0);           //open the default cameraif (capture.isOpened()){double  rate = capture.get(CV_CAP_PROP_FPS);capture >> frame;  //获得摄像头图像数据if (!frame.empty()){QImage  image = Mat2QImage(frame); //将摄像头的图像数据转换为QImage支持的格式this->ui.image->setPixmap(QPixmap::fromImage(image));timer = new QTimer(this); //循环获得摄像头数据connect(timer, SIGNAL(timeout()), this, SLOT(nextFrame()));timer->start(40);}}
}
void QtGuiApplication1::stopVideo()
{if (capture.isOpened()){capture.release();}
}
//循环获得摄像头数据
void QtGuiApplication1::nextFrame()
{capture >> frame;double  rate = capture.get(CV_CAP_PROP_FPS);if (!frame.empty()){QImage  image = Mat2QImage(frame);//通过人脸检测API获得人脸的位置并在Qimage上显示人脸框QRect rect;//RecognizeFace识别人脸的位置并计算人脸所属的标签string result = facediscern->RecognizeFace(&frame, rect);static QTextCodec *codecForCStrings;QString strQ = QString::fromLocal8Bit(result.c_str());QString s1 = strQ;//这是在qlabel中显示中文的办法this->ui.result->setText(s1); //在控件上显示人脸所属的标签QPainter painter(&image);// 设置画笔颜色painter.setPen(QColor(255, 0, 0));painter.drawRect(rect);//绘制人脸的框this->ui.image->setPixmap(QPixmap::fromImage(image));}}//将opencv 的cv::Mat 格式图像转换为QImage图像
QImage  QtGuiApplication1::Mat2QImage(cv::Mat cvImg)
{if (cvImg.channels() == 3)                             //3 channels color image{cv::cvtColor(cvImg, cvImg, CV_BGR2RGB); //BGR 转为 RGBqImg = QImage((const unsigned char*)(cvImg.data),cvImg.cols, cvImg.rows,cvImg.cols*cvImg.channels(),QImage::Format_RGB888);}else if (cvImg.channels() == 1)                    //grayscale image{qImg = QImage((const unsigned char*)(cvImg.data),cvImg.cols, cvImg.rows,cvImg.cols*cvImg.channels(),QImage::Format_Indexed8);}else{qImg = QImage((const unsigned char*)(cvImg.data),cvImg.cols, cvImg.rows,cvImg.cols*cvImg.channels(),QImage::Format_RGB888);}return qImg;}
(3) FaceDiscern.h
FaceDiscern 是人脸识别的主类 执行了人脸位置检测和人脸相似度计算等功能
#pragma once
#include <stdio.h>
#include <stdlib.h>
#include <stdint.h>
#include <Windows.h>
#include <iostream>
#include <vector>
#include <string>
#include <io.h>
#include <map>
#include "arcsoft_fsdk_face_recognition.h"
#include "merror.h"
#include "arcsoft_fsdk_face_detection.h"
#include "opencv2/core/core.hpp"
#include "opencv2/highgui/highgui.hpp"
#include "opencv2/imgproc/imgproc.hpp"
#include "qrect.h"
//动态载入人脸识别的API库 libarcsoft_fsdk_face_detection是人脸检测库
//libarcsoft_fsdk_face_recognition.lib是人脸识别库
#pragma comment(lib,"libarcsoft_fsdk_face_detection.lib")
#pragma comment(lib,"./libarcsoft_fsdk_face_recognition.lib")
using namespace cv;
#define WORKBUF_SIZE        (40*1024*1024)class FaceDiscern
{
public:FaceDiscern(std::string _trainpath);~FaceDiscern();//将cv::Mat格式的图像转换为Bitmapvoid ConvertMatToBitmap(cv::Mat *img, uint8_t **imageData, int *pWidth, int *pHeight);void  getFiles(std::string path, std::vector<std::string>& files, std::vector<std::string> &ownname);void  Train();bool  readBmp24(const char* path, uint8_t **imageData, int *pWidth, int *pHeight);std::string  RecognizeFace(cv::Mat *img, QRect &rect);//APPID是从网站上注册的免费使用id char APPID[45]  = "9aEAsHDYzzzWapX9rH9BZHhdBz8CPTfws4WuF5xdmgnf";char SDKKey[45] = "61MrwdsfKaMT8cm41uKPQBdCm4rKMLSELtJqs12p7WoV";	//SDKKeychar DETECTIONKKey[45] = "61MrwdsfKaMT8cm41uKPQBci7TocqKmAASGS7infomre";std::string trainpath = "F:\\trainimages";MRESULT nRet ;MHandle hEngine ;MInt32  nScale ;MInt32  nMaxFace ;MByte  *pWorkMem;std::vector<std::string>  trainfullfiles;//完整路径名std::vector<std::string>  trainnamefiles;std::string   *labels;std::map<std::string, std::string> dicfilenametoname;/* 初始化引擎和变量 */MRESULT detectionnRet;MHandle hdetectionEngine;MInt32  ndetetionScale;MInt32  ndetectionMaxFace ;MByte   *pdetectionWorkMem;int trainCount = 0;LPAFR_FSDK_FACEMODEL  *trainfaceModels;AFR_FSDK_FACEMODEL dectfaceModels;};
(4)FaceDiscern.cpp
#include "FaceDiscern.h"
FaceDiscern::FaceDiscern(std::string _trainpath)
{nRet = MERR_UNKNOWN;hEngine = nullptr;nScale = 16;nMaxFace = 10;pWorkMem = (MByte *)malloc(WORKBUF_SIZE);/* 初始化引擎和变量 */detectionnRet = MERR_UNKNOWN;hdetectionEngine = nullptr;ndetetionScale = 16;ndetectionMaxFace = 10;pdetectionWorkMem = (MByte *)malloc(WORKBUF_SIZE);dicfilenametoname.insert(std::pair<std::string, std::string>("bingbing.bmp", "冰冰女神"));dicfilenametoname.insert(std::pair<std::string, std::string>("fangfang.bmp", "村里有个姑娘叫小芳"));dicfilenametoname.insert(std::pair<std::string, std::string>("feifei.bmp", "刘亦菲"));dicfilenametoname.insert(std::pair<std::string, std::string>("huihui.bmp", "冷工"));dicfilenametoname.insert(std::pair<std::string, std::string>("shishi.bmp", "诗诗妹妹"));dicfilenametoname.insert(std::pair<std::string, std::string>("xiaxia.bmp", "天上掉下个林妹妹"));dicfilenametoname.insert(std::pair<std::string, std::string>("xudasong.bmp", "松哥"));dicfilenametoname.insert(std::pair<std::string, std::string>("likunpeng.bmp", "李工"));dicfilenametoname.insert(std::pair<std::string, std::string>("gaojianjun.bmp", "高建军"));dicfilenametoname.insert(std::pair<std::string, std::string>("liuzhen.bmp", "小鲜肉振哥"));dicfilenametoname.insert(std::pair<std::string, std::string>("liting.bmp", "女王婷姐"));dicfilenametoname.insert(std::pair<std::string, std::string>("wangxuetao.bmp", "雪涛"));dicfilenametoname.insert(std::pair<std::string, std::string>("guowei.bmp", "郭大侠")); dicfilenametoname.insert(std::pair<std::string, std::string>("mingxin.bmp", "宝宝鸣新"));this->trainpath = _trainpath;
}FaceDiscern::~FaceDiscern()
{/* 释放引擎和内存 */detectionnRet = AFD_FSDK_UninitialFaceEngine(hdetectionEngine);if (detectionnRet != MOK){fprintf(stderr, "UninitialFaceEngine failed , errorcode is %d \n", detectionnRet);}free(pdetectionWorkMem);for (int i = 0; i < trainCount; i++){if (trainfaceModels[i]->pbFeature != NULL)free(trainfaceModels[i]->pbFeature);}nRet = AFR_FSDK_UninitialEngine(hEngine);if (nRet != MOK){fprintf(stderr, "UninitialFaceEngine failed , errorcode is %d \n", nRet);}
}//加载所有的参考图像和图像名字作为参考库
void  FaceDiscern::getFiles(std::string path, std::vector<std::string>& files, std::vector<std::string> &ownname)
{/*files存储文件的路径及名称(eg.   C:\Users\WUQP\Desktop\test_devided\data1.txt)4      ownname只存储文件的名称(eg.     data1.txt)*///文件句柄  long long  hFile = 0;//文件信息  struct _finddata_t fileinfo;std::string p;if ((hFile = _findfirst(p.assign(path).append("\\*").c_str(), &fileinfo)) != -1){do{//如果是目录,迭代之  //如果不是,加入列表  if ((fileinfo.attrib &  _A_SUBDIR)){  /*if(strcmp(fileinfo.name,".") != 0  &&  strcmp(fileinfo.name,"..") != 0)getFiles( p.assign(path).append("\\").append(fileinfo.name), files, ownname ); */}else{files.push_back(p.assign(path).append("\\").append(fileinfo.name));ownname.push_back(fileinfo.name);}} while (_findnext(hFile, &fileinfo) == 0);_findclose(hFile);}}
//将cv::Mat转换为Bitmap
void  FaceDiscern::ConvertMatToBitmap(cv::Mat *img, uint8_t **imageData, int *pWidth, int *pHeight)
{//======建立位图信息 ===========int width, height, depth, channel;width = img->cols;height = img->rows;depth = img->depth();channel = img->channels();*pWidth = width; //图像宽。高*pHeight = height;int linebyte = width * channel;*imageData = (uint8_t *)malloc(linebyte * (*pHeight));for (int i = 0; i<height; i++) {for (int j = 0; j<width; j++) {*((*imageData) + i * width*channel + j * channel) = (*img).at<Vec3b>(i, j)[2];// (uint8_t)(*(img + i * width*channel + j * width + 2));*((*imageData) + i * width*channel + j * channel + 1) = (*img).at<Vec3b>(i, j)[1];*((*imageData) + i * width*channel + j * channel + 2) = (*img).at<Vec3b>(i, j)[0];} // end of line                     }
}
//从文件中读取图像并转化为bitmap
bool FaceDiscern::readBmp24(const char* path, uint8_t **imageData, int *pWidth, int *pHeight)
{if (path == NULL || imageData == NULL || pWidth == NULL || pHeight == NULL){return false;}FILE *fp = fopen(path, "rb");if (fp == NULL){return false;}fseek(fp, sizeof(BITMAPFILEHEADER), 0);BITMAPINFOHEADER head;fread(&head, sizeof(BITMAPINFOHEADER), 1, fp);*pWidth = head.biWidth;*pHeight = head.biHeight;int biBitCount = head.biBitCount;if (24 == biBitCount){int lineByte = ((*pWidth) * biBitCount / 8 + 3) / 4 * 4;*imageData = (uint8_t *)malloc(lineByte * (*pHeight));uint8_t * data = (uint8_t *)malloc(lineByte * (*pHeight));fseek(fp, 54, SEEK_SET);fread(data, 1, lineByte * (*pHeight), fp);for (int i = 0; i < *pHeight; i++){for (int j = 0; j < *pWidth; j++){memcpy((*imageData) + i * (*pWidth) * 3 + j * 3, data + (((*pHeight) - 1) - i) * lineByte + j * 3, 3);}}free(data);}else{fclose(fp);return false;}fclose(fp);return true;
}//加载所有的参考数据
void FaceDiscern::Train()
{if (pWorkMem == nullptr){return;}nRet = AFR_FSDK_InitialEngine(APPID, SDKKey, pWorkMem, WORKBUF_SIZE, &hEngine); //初始化引擎if (nRet != MOK){return;}getFiles(trainpath, trainfullfiles, trainnamefiles);//生成训练数据 特征集合if (trainfullfiles.size() > 0){//参考图像数据的人脸特征和标签的存储trainfaceModels = new LPAFR_FSDK_FACEMODEL[trainfullfiles.size()];labels = new  std::string[trainfullfiles.size()];}else{return ;}for (int i = 0; i < trainfullfiles.size(); i++){std::string filename = trainfullfiles[i];/* 读取第一张静态图片信息,并保存到ASVLOFFSCREEN结构体 (以ASVL_PAF_RGB24_B8G8R8格式为例) */ASVLOFFSCREEN offInput = { 0 };offInput.u32PixelArrayFormat = ASVL_PAF_RGB24_B8G8R8;offInput.ppu8Plane[0] = nullptr;const char * path = filename.c_str();readBmp24(path, (uint8_t**)&offInput.ppu8Plane[0], &offInput.i32Width, &offInput.i32Height);if (!offInput.ppu8Plane[0]){fprintf(stderr, "fail to ReadBmp(%s)\n", path);AFR_FSDK_UninitialEngine(hEngine);free(pWorkMem);continue ;}offInput.pi32Pitch[0] = offInput.i32Width * 3;AFR_FSDK_FACEMODEL *faceModels = new AFR_FSDK_FACEMODEL();{AFR_FSDK_FACEINPUT faceInput;//第一张人脸信息通过face detection\face tracking获得faceInput.lOrient = AFR_FSDK_FOC_0;//人脸方向//人脸框位置faceInput.rcFace.left = 0;faceInput.rcFace.top = 0;faceInput.rcFace.right = offInput.i32Width - 2;;faceInput.rcFace.bottom = offInput.i32Height - 2;;//提取第一张人脸特征AFR_FSDK_FACEMODEL LocalFaceModels = { 0 };nRet = AFR_FSDK_ExtractFRFeature(hEngine, &offInput, &faceInput, &LocalFaceModels);if (nRet != MOK){fprintf(stderr, "fail to Extract 1st FR Feature, error code: %d\n", nRet);}/* 拷贝人脸特征结果 */faceModels->lFeatureSize = LocalFaceModels.lFeatureSize;faceModels->pbFeature = (MByte*)malloc(faceModels->lFeatureSize);memcpy(faceModels->pbFeature, LocalFaceModels.pbFeature, faceModels->lFeatureSize);}trainfaceModels[i] = faceModels;labels[i] = trainnamefiles[i];trainCount++;}if (pdetectionWorkMem == nullptr){return;}//人脸检测enginedetectionnRet = AFD_FSDK_InitialFaceEngine(APPID, DETECTIONKKey, pdetectionWorkMem, WORKBUF_SIZE, &hdetectionEngine, AFD_FSDK_OPF_0_HIGHER_EXT, ndetetionScale, ndetectionMaxFace);if (detectionnRet != MOK){return;}}
//简单的通过距离相似计算出最相似的参考图像
std::string FaceDiscern::RecognizeFace(cv::Mat *img, QRect &rect)
{/* 读取静态图片信息,并保存到ASVLOFFSCREEN结构体 (以ASVL_PAF_RGB24_B8G8R8格式为例) *//* 人脸检测 */ASVLOFFSCREEN offInput = { 0 };offInput.u32PixelArrayFormat = ASVL_PAF_RGB24_B8G8R8;offInput.ppu8Plane[0] = nullptr;ConvertMatToBitmap(img, (uint8_t**)&offInput.ppu8Plane[0], &offInput.i32Width, &offInput.i32Height);if (!offInput.ppu8Plane[0]){return "";}offInput.pi32Pitch[0] = offInput.i32Width * 3;LPAFD_FSDK_FACERES	FaceRes = nullptr;detectionnRet = AFD_FSDK_StillImageFaceDetection(hdetectionEngine, &offInput, &FaceRes);void *imgptr = offInput.ppu8Plane[0];识别人脸信息AFR_FSDK_FACEINPUT faceInput;faceInput.lOrient = AFR_FSDK_FOC_0;//人脸方向							   //人脸框位置faceInput.rcFace.left =FaceRes->rcFace[0].left;faceInput.rcFace.top = FaceRes->rcFace[0].top;faceInput.rcFace.right = FaceRes->rcFace[0].right;faceInput.rcFace.bottom = FaceRes->rcFace[0].bottom;rect.setLeft(FaceRes->rcFace[0].left);rect.setTop(FaceRes->rcFace[0].top);rect.setRight(FaceRes->rcFace[0].right);rect.setBottom(FaceRes->rcFace[0].bottom);//提取人脸特征nRet = AFR_FSDK_ExtractFRFeature(hEngine, &offInput, &faceInput, &dectfaceModels);free(imgptr);if (nRet != MOK){return "";}float maxscore = -1.0;int index = -1;for (int i = 0; i < trainCount; i++){MFloat  fSimilScore = 0.0f;nRet = AFR_FSDK_FacePairMatching(hEngine, &dectfaceModels, trainfaceModels[i], &fSimilScore);if (fSimilScore > maxscore){maxscore = fSimilScore;index = i;}}if (index != -1){double num = maxscore * 100.0;std::string str;char ctr[10];_gcvt(num, 6, ctr);str = ctr;std::string nameresult = labels[index];if (dicfilenametoname.find(nameresult) != dicfilenametoname.end()){nameresult = dicfilenametoname[nameresult];}return nameresult + "," + str;}//释放if(dectfaceModels.lFeatureSize>0)free(dectfaceModels.pbFeature);return "";
}
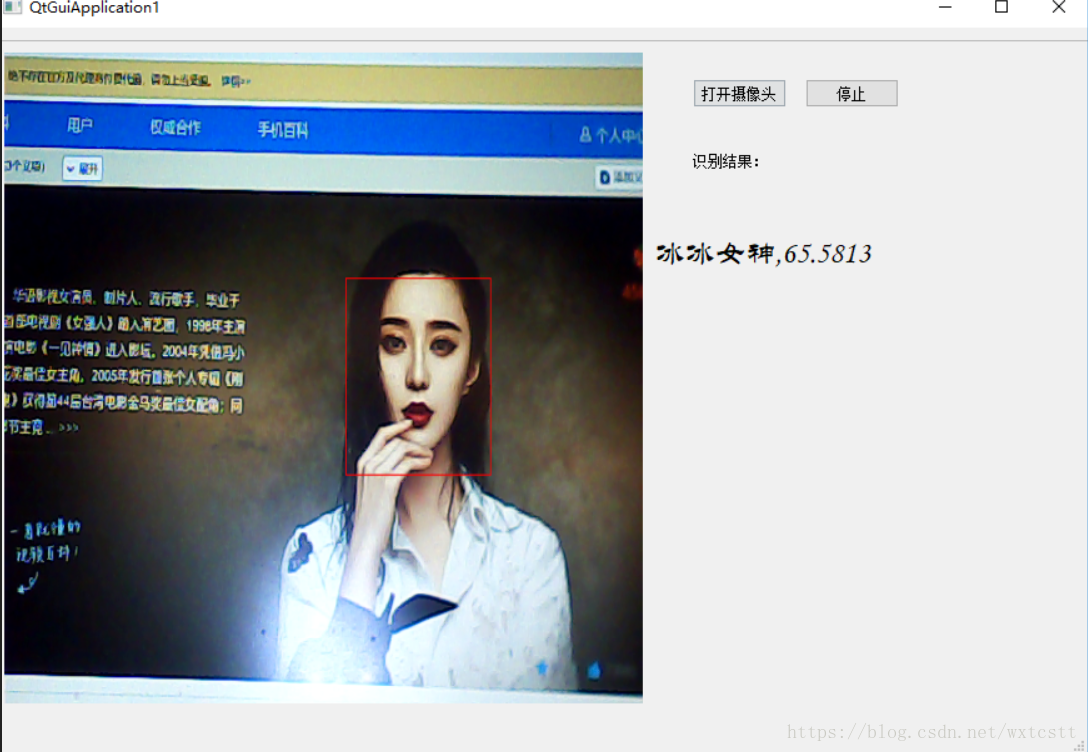
(3) 界面展示
最后是SDK下载地址 https://ai.arcsoft.com.cn/ucenter/user/reg?utm_source=csdn1&utm_medium=referral
这篇关于基于虹软人脸识别API和Qt5的人脸识别的文章就介绍到这儿,希望我们推荐的文章对编程师们有所帮助!


