本文主要是介绍Linux安装mysql-5.7.26(一条龙服务),希望对大家解决编程问题提供一定的参考价值,需要的开发者们随着小编来一起学习吧!
前期准备:
准备安装包,从官网下载:传送门
选择如下图:
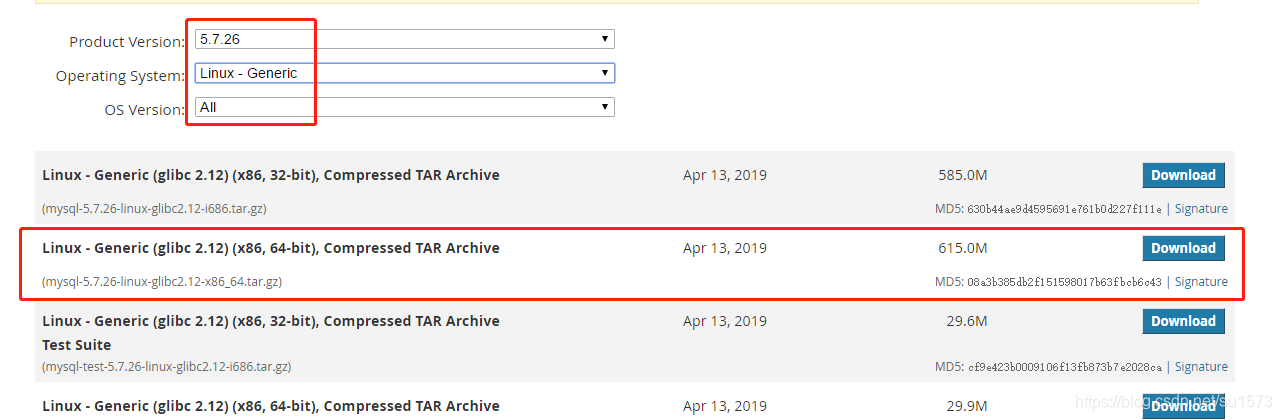
下载的安装包,通过Xftp上传到linux服务器/usr/local

开始安装
1、卸载系统自带的Mariadb
[root@VM-0-17-centos local]# rpm -qa|grep mariadb
mariadb-libs-5.5.65-1.el7.x86_64
[root@VM-0-17-centos local]# rpm -e --nodeps mariadb-libs-5.5.65-1.el7.x86_64
2、删除etc目录下的my.cnf文件,若存在
[root@VM-0-17-centos local]# rm /etc/my.cnf
rm: cannot remove ‘/etc/my.cnf’: No such file or directory
3、检查mysql是否存在,若存在则删除
[root@VM-0-17-centos local]# rpm -qa | grep mysql#存在根据安装版本执行删除命令,不存在不用执行
[root@VM-0-17-centos local]# rpm -e --nodeps mysql-libs-5.1.73-5.el6_6.x86_64
4、检查mysql用户组和用户是否存在,如无则创建
[root@VM-0-17-centos local]# cat /etc/group | grep mysql
[root@VM-0-17-centos local]# cat /etc/passwd | grep mysql#若上面两条命令查询为空,则执行一下语句创建用户组和用户
#1.创建mysql用户组
[root@VM-0-17-centos local]# groupadd mysql
#2.创建一个用户名为mysql的用户并加入mysql用户组
[root@VM-0-17-centos local]# useradd -g mysql mysql
5、解压安装安装包到/usr/local
[root@VM-0-17-centos local]# tar -zxvf mysql-5.7.26-linux-glibc2.12-x86_64.tar.gz
mysql-5.7.26-linux-glibc2.12-x86_64/bin/myisam_ftdump
mysql-5.7.26-linux-glibc2.12-x86_64/bin/myisamchk
mysql-5.7.26-linux-glibc2.12-x86_64/bin/myisamlog
mysql-5.7.26-linux-glibc2.12-x86_64/bin/myisampack
mysql-5.7.26-linux-glibc2.12-x86_64/bin/mysql
mysql-5.7.26-linux-glibc2.12-x86_64/bin/mysql_client_test_embedded
mysql-5.7.26-linux-glibc2.12-x86_64/bin/mysql_config_editor
...#将解压后的文件夹移到 /usr/local/mysql
[root@VM-0-17-centos local]# mv mysql-5.7.26-linux-glibc2.12-x86_64/ mysql
6、更改 /usr/local/mysql 所属组和用户
[root@VM-0-17-centos local]# chown -R mysql mysql/
[root@VM-0-17-centos local]# chgrp -R mysql mysql/
[root@VM-0-17-centos local]# cd mysql/
7、在etc下新建配置文件my.cnf,并在该文件内添加以下配置
[root@VM-0-17-centos mysql]# vim /etc/my.cnf[mysqld]
port=3306
datadir=/usr/local/mysql/data
socket=/usr/local/mysql/mysql.sock
user=mysql
max_connections=100
# Disabling symbolic-links is recommended to prevent assorted security risks
symbolic-links=0#防止出现err-1118 - Row size too large
sql_mode=STRICT_TRANS_TABLES,NO_ZERO_IN_DATE,NO_ZERO_DATE,ERROR_FOR_DIVISION_BY_ZERO,NO_AUTO_CREATE_USER,NO_ENGINE_SUBSTITUTION
innodb_strict_mode=0
max_allowed_packet=16M#忽略大小写
lower_case_table_names=1#设置编码
character-set-server=utf8
collation-server=utf8_general_ci#IP绑定
#bind-address=192.168.8.100[mysqld_safe]
log-error=/var/log/mysqld.log
pid-file=/var/run/mysqld/mysqld.pid#客户端连接设置
[client]
# 和上面要相同才行
socket=/usr/local/mysql/mysql.sockdefault-character-set=utf8
8、安装和初始化
记好
root@localhost:后的字符串,此字符串为mysql管理员临时登录密码
[root@VM-0-17-centos mysql]# ./bin/mysqld --user=mysql --basedir=/usr/local/mysql --datadir=/usr/local/mysql/data --initialize
2021-04-02T16:41:38.871015Z 0 [Warning] TIMESTAMP with implicit DEFAULT value is deprecated. Please use --explicit_defaults_for_timestamp server option (see documentation for more details).
2021-04-02T16:41:39.187869Z 0 [Warning] InnoDB: New log files created, LSN=45790
2021-04-02T16:41:39.231305Z 0 [Warning] InnoDB: Creating foreign key constraint system tables.
2021-04-02T16:41:39.287797Z 0 [Warning] No existing UUID has been found, so we assume that this is the first time that this server has been started. Generating a new UUID: 4c070c30-93d2-11eb-971a-005056adeb2f.
2021-04-02T16:41:39.289089Z 0 [Warning] Gtid table is not ready to be used. Table 'mysql.gtid_executed' cannot be opened.
2021-04-02T16:41:39.291529Z 1 [Note] A temporary password is generated for root@localhost: TlJYLaBsE8,x若是上一步出错,提示缺少依赖包libnuma.so.1,则要手动安装依赖包
yum安装的libnuma.so.1,安装时默认安装的是32的,但mysql需要的是64位的,如果已经安装了libnuma.so.1,先删除原有的yum remove libnuma.so.1,再安装64位的yum -y install numactl.x86_64
[root@VM-0-17-centos mysql]# yum remove libnuma.so.1
[root@VM-0-17-centos mysql]# yum -y install numactl.x86_64
9、拷贝启动文件,配置服务
[root@VM-0-17-centos mysql]# cp ./support-files/mysql.server /etc/init.d/mysqld
[root@VM-0-17-centos mysql]# chown 777 /etc/my.cnf
[root@VM-0-17-centos mysql]# chmod +x /etc/init.d/mysqld
10、重启
[root@VM-0-17-centos mysql]# /etc/init.d/mysqld restartERROR! MySQL server PID file could not be found!
Starting MySQL... ERROR! The server quit without updating PID file (/usr/local/mysql/data/VM-0-17-centos.pid)出现这种情况,可能是存在mysqld的进程,VM-0-17-centos.pid 没有读写权限;
使用chmod 777VM-0-17-centos.pid授权;
使用ps -ef|grep mysqld查看是否存在,并kill pid杀死进程
[root@VM-0-17-centos mysql]# cd /usr/local/mysql/data
[root@VM-0-17-centos data]# chmod 777 VM-0-17-centos.pid[root@VM-0-17-centos data]# ps -ef|grep mysqld
root      2632     1  0 00:43 pts/0    00:00:00 /bin/sh /usr/local/mysql/bin/mysqld_safe --datadir=/usr/local/mysql/data --pid-file=/usr/local/mysql/data/kfcs.pid
mysql     2861  2632  1 00:43 pts/0    00:00:00 /usr/local/mysql/bin/mysqld --basedir=/usr/local/mysql --datadir=/usr/local/mysql/data --plugin-dir=/usr/local/mysql/lib/plugin --user=mysql --log-error=/var/log/mysqld.log --pid-file=/usr/local/mysql/data/kfcs.pid --socket=/usr/local/mysql/mysql.sock --port=3306
root      2891  2350  0 00:43 pts/0    00:00:00 grep --color=auto mysqld[root@VM-0-17-centos data]# kill 2861[root@kfcs mysql]# ps -ef|grep mysqld
root      2902  2350  0 00:45 pts/0    00:00:00 grep --color=auto mysqld
11、再次重启,ERROR先不用管,后面会解决,此时mysql已启动,往下继续
[root@kfcs mysql]# /etc/init.d/mysqld restartERROR! MySQL server PID file could not be found!
Starting MySQL. SUCCESS!
12、设置开机启动
[root@VM-0-17-centos data]# chkconfig --level 35 mysqld on[root@VM-0-17-centos data]# chkconfig --list mysqld
Note: This output shows SysV services only and does not include nativesystemd services. SysV configuration data might be overridden by nativesystemd configuration.If you want to list systemd services use 'systemctl list-unit-files'.To see services enabled on particular target use'systemctl list-dependencies [target]'.mysqld         	0:off	1:off	2:on	3:on	4:on	5:on	6:off[root@VM-0-17-centos data]# chmod +x /etc/rc.d/init.d/mysqld[root@VM-0-17-centos data]# chkconfig --add mysqld[root@VM-0-17-centos data]# chkconfig --list mysqldNote: This output shows SysV services only and does not include nativesystemd services. SysV configuration data might be overridden by nativesystemd configuration.If you want to list systemd services use 'systemctl list-unit-files'.To see services enabled on particular target use'systemctl list-dependencies [target]'.mysqld         	0:off	1:off	2:on	3:on	4:on	5:on	6:off[root@VM-0-17-centos data]# service mysqld statusSUCCESS! MySQL running (21262)[root@VM-0-17-centos data]#
13、设置MySQL环境变量
[root@VM-0-17-centos data]# vim /etc/profile
#文件最下面添加:
export PATH=$PATH:/usr/local/mysql/bin#生效配置文件
[root@VM-0-17-centos data]# source /etc/profile
14、登录mysql(密码为初始化时的临时密码)
更改mysql密码为
666666
[root@VM-0-17-centos data]# mysql -uroot -p
Enter password:
Welcome to the MySQL monitor.  Commands end with ; or \g.
Your MySQL connection id is 5
Server version: 5.7.26Copyright (c) 2000, 2019, Oracle and/or its affiliates. All rights reserved.Oracle is a registered trademark of Oracle Corporation and/or its
affiliates. Other names may be trademarks of their respective
owners.Type 'help;' or '\h' for help. Type '\c' to clear the current input statement.mysql> set PASSWORD = PASSWORD('666666');
Query OK, 0 rows affected, 1 warning (0.00 sec)mysql> flush privileges;
Query OK, 0 rows affected (0.00 sec)mysql> exit
Bye
15、添加远程访问权限,使用新密码666666登录
[root@VM-0-17-centos data]# mysql -uroot -p
Enter password:
Welcome to the MySQL monitor.  Commands end with ; or \g.
Your MySQL connection id is 6
Server version: 5.7.26 MySQL Community Server (GPL)Copyright (c) 2000, 2019, Oracle and/or its affiliates. All rights reserved.Oracle is a registered trademark of Oracle Corporation and/or its
affiliates. Other names may be trademarks of their respective
owners.Type 'help;' or '\h' for help. Type '\c' to clear the current input statement.mysql> GRANT ALL PRIVILEGES ON *.* TO 'root'@'%' IDENTIFIED BY '666666' WITH GRANT OPTION;
Query OK, 0 rows affected, 1 warning (0.00 sec)mysql> flush privileges;
Query OK, 0 rows affected (0.00 sec)mysql> exit
Bye
16、重启生效,此时正常,没有ERROR,^_^
[root@VM-0-17-centos data]# service mysqld restart
Shutting down MySQL.. SUCCESS!
Starting MySQL. SUCCESS!
17、为了在任何目录下可以登录mysql
[root@VM-0-17-centos data]# ln -s /usr/local/mysql/bin/mysql /usr/bin/mysql
18、开启外部访问数据库
#查看现在防火墙
[root@VM-0-17-centos data]# firewall-cmd --list-all #开放3306端口
[root@VM-0-17-centos data]# firewall-cmd --permanent --add-port=3306/tcp#查看3306端口是否开放
[root@VM-0-17-centos data]# firewall-cmd --query-port=3306/tcp[root@VM-0-17-centos data]# firewall-cmd --list-all
19、如果开放不好使,那就把防火墙关掉
[root@VM-0-17-centos data]# service iptables stop
Redirecting to /bin/systemctl stop  iptables.service
Failed to stop iptables.service: Unit iptables.service not loaded.[root@VM-0-17-centos data]# /bin/systemctl stop  iptables.service
Failed to stop iptables.service: Unit iptables.service not loaded.[root@VM-0-17-centos data]# yum install iptables-services[root@VM-0-17-centos data]# /bin/systemctl stop  iptables.service[root@VM-0-17-centos data]# systemctl stop firewalld
[root@VM-0-17-centos data]#
20、连接测试
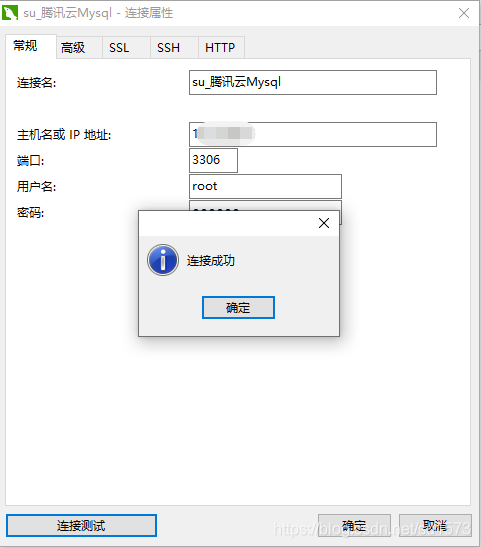
author:su1573
鄙人记录生活点滴,学习并分享,请多指教!!!
如需交流,请联系 sph1573@163.com,鄙人看到会及时回复
这篇关于Linux安装mysql-5.7.26(一条龙服务)的文章就介绍到这儿,希望我们推荐的文章对编程师们有所帮助!


