本文主要是介绍SKNet(2019),希望对大家解决编程问题提供一定的参考价值,需要的开发者们随着小编来一起学习吧!
在神经科学界,视皮层神经元的感受野大小受到刺激的调节,即对不同刺激,感受野的大小应该不同。目前很多卷积神经网络的相关工作都只是通过改进网络的空间结构来优化模型,如Inception模型通过引入不同大小的卷积核来获得不同感受野上的信息。但在构建传统CNN时一般在同一层只采用一种卷积核,即对于特定任务特定模型,卷积核大小是确定的,很少考虑多个卷积核的作用。
我们在看不同尺寸不同远近的物体时,视觉皮层神经元接受域大小是会根据刺激来进行调节的。作者提出了一种在CNN中对卷积核的动态选择机制,该机制允许每个神经元根据输入信息的多尺度自适应的调整其感受野(卷积核)的而大小。具体的,设计了一个称为选择内核单元(SK)的构建块,其中多个具有不同内核打下的分支在这些分支的信息引导下,使用Softmax进行融合。由多个SK单元组成SKNet,SKNet中的神经元能够捕获不同尺度的目标物体。
SKNet的全称是“Selective Kernel Network”,和SENet是一个团队提出来的,SENet对通道执行注意力机制,而SKNet则是对卷积核执行注意力机制,即让网络自己选择合适的卷积核。
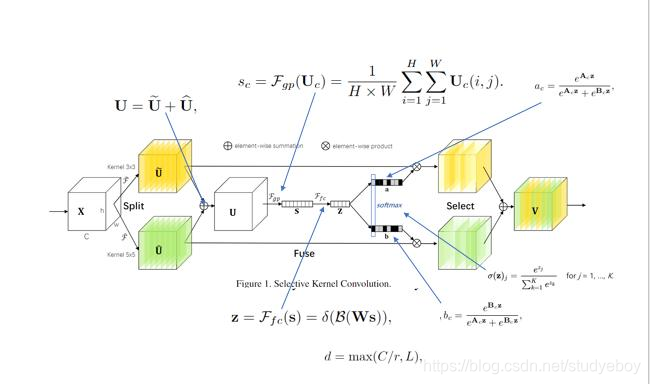
SKNet的核心模块如下图所示,在该模块中,作者使用了多分支卷积网络、组卷积、空洞卷积以及注意力机制。

多分支卷积网络
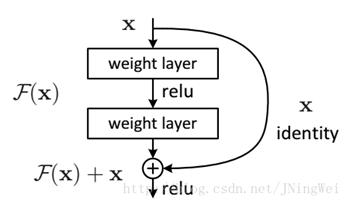
多分支卷积网络,即含有多于一个分支的卷积网络,例如经典的残差网络模块和Inception模块都属于多分支卷积网络。残差网络模块,使用了双分支结构,跨层连接的那条分支是一条单纯的恒等映射分支。Inception模块与残差网络的多支不同的是,该模块的每个分支都进行了卷积处理,并不是一个恒等映射。


组卷积
组卷积相比标准卷积,减少了一些参数量。假设feature map的尺寸大小为 W × H × C 1 W \times H \times C_1 W×H×C1,卷积核的尺寸为 w × h × C 1 w \times h \times C_1 w×h×C1,生成的feature map的尺寸大小为 W × H × C 2 W \times H \times C_2 W×H×C2,那么标准卷积的参数量为 w × h × C 1 × C 2 w \times h \times C_1 \times C_2 w×h×C1×C2;如果换为分组卷积,假设分为 g g g组,原feature map和生成的feature map 尺寸同上,那么每组卷积的参数量为 w × h × ( C 1 / g ) × ( C 2 / g ) w \times h \times (C_1 / g) \times (C_2 / g) w×h×(C1/g)×(C2/g),共有 g g g组,那么总参数量为 w × h × C 1 × C 2 / g w \times h \times C_1 \times C2/g w×h×C1×C2/g,参数量与标准卷积相比,减少为原来的 1 / g 1/g 1/g。
空洞卷积
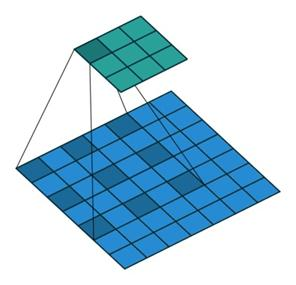
空洞卷积与标准卷积相比,增大了感受野。一般情况下,卷积之后的池化操作缩小feature map的尺寸也能达到增加感受野的效果,但是池化过程会导致信息丢失,所以引入了空洞卷积操作。下图为Dilation=2时的卷积效果,当Dilation=2时,3x3的卷积核的感受野变为5x5。空洞卷积与标准卷积相比,在不增加参数量的同时增大了感受野。

注意力机制
下图为SENet中的注意力机制模块,该通道注意力模块很好理解,图中Ftr函数表示标准卷积,Fsq函数表示一个全局平均池化,通过该函数,生成1x1xC的feature map。然后将该feature map 送人Fex函数(该函数由两个全连接层组成),输出1x1xC的feature map。将该feature map通过sigmoid函数将值控制到(0, 1)之间,然后与最开始的HxWxC的feature map对应相乘,即实现了对各个通道的权重控制,实现了注意力机制。

SKNet
SKNet如下图所示,其本质就是在网络中使用多尺寸的卷积核,与Inception网络中的多尺度不同,SKNet是让网络自己选择合适的尺度。

Split操作是将原feature map分别通过一个 3 × 3 3\times3 3×3的分组/深度卷积和 3 × 3 3\times3 3×3的空洞卷积(感受野为 5 × 5 5\times5 5×5)生成两个feature map: U 1 U_1 U1(图中黄色)和 U 2 U_2 U2(图中绿色)。然后将这两个feature map进行相加,生成 U U U。生成的 U U U通过 F q p F_{qp} Fqp函数(全局平均池化)生成 1 × 1 × C 1\times1\times C 1×1×C的feature map(图中的 s s s),该feature map通过 F f c F_{fc} Ffc函数(全连接层)生成 d × 1 d\times1 d×1的向量(图中的 z z z),公式如图中所示( δ \delta δ表示ReLU的激活函数, B B B表示BatchNormlization, W W W是一个 d × C d\times C d×C维的)。 d d d的取值是由公式 d = m a x ( C / r , L ) d=max(C/r, L) d=max(C/r,L)确定, r r r是一个缩小的比率(与SENet中相似), L L L表示 d d d的最小值,实验中 L L L的值为32。生成的 z z z通过 a c a_c ac和 b c b_c bc两个函数,并将生成的函数值与原先的 U 1 U_1 U1和 U 2 U_2 U2相乘。由于 a c a_c ac和 b c b_c bc的函数值相加等于1,因此能够实现对分支中的feature map设置权重,因为不同的分支卷积核尺寸不同,因此实现了让网络自己选择合适的卷积核( a c a_c ac和 b c b_c bc中的 A 、 B A、B A、B矩阵均是需要在训练之前初始化的,其尺寸均为 C × d C\times d C×d)
import torch
from torch import nnclass SKConv(nn.Module):def __init__(self, features, WH, M, G, r, stride=1, L=32):"""ConstructorArgs:features:input channel dimensionality.WH: input spatial dimensionality, used for GAP kernel size.M: the number of branches.G: number of convlution groups.r: the ratio for compute d, the length of z.stride: stride, default 1.L: the minimum dim of the vector z in paper, default 32."""super(SKConv, self).__init__()d = max(int(features/r), L)self.M = Mself.features = featuresself.convs = nn.ModuleList([])for i in range(M):self.convs.append(nn.Sequential(nn.Conv2d(features, features, kernel_size=3+i*2, stride=stride, padding=1+i, groups=G),nn.BatchNorm2d(features),nn.ReLU(inplace=False)))self.gap = nn.AvgPool2d(int(WH/stride))self.fc = nn.Linear(features, d)self.fcs = nn.ModuleList([])for i in range(M):self.fcs.append(nn.Linear(d, features))self.softmax = nn.Softmax(dim=1)def forward(self, x):for i, conv in enumerate(self.convs):fea = conv(x).unsqueeze_(dim=1)if i == 0:feas = feaelse:feas = torch.cat([feas, fea], dim=1)fea_U = torch.sum(feas, dim=1)fea_s = self.gap(fea_U).squeeze_()fea_z = self.fc(fea_s)for i, fc in enumerate(self.fcs):vector = fc(fea_z).unsqueeze_(dim=1)if i == 0:attention_vectors = vectorelse:attention_vectors = torch.cat([attention_vectors, vector], dim=1)attention_vectors = self.softmax(attention_vectors)attention_vectors = attention_vectors.unsqueeze(-1).unsqueeze(-1)fea_v = (feas * attenstion_vectors).sum(dim=1)return fea_vclass SKUnit(nn.Module):def __init__(self, in_features, out_features, WH, M, G, r, mid_features=None, stride=1, L=32):"""ConstructorArgs:in_features: input channel dimensionalityout_feauters: output channel dimensionality.WH: input spatial dimensionality, used for GAP kernel size.M: the number of branchs.G: number of convolution groups.r: the ratio for compute d, the length of z.mid_features: the channel dim of the middle conv with stride not 1, default out_features/2.stride: stride.L: the minimum dim of the vector z in paper."""super(SKUnit, self).__init__()if mid_features is None:mid_features = int(out_features/2)self.feas = nn.Sequential(nn.Conv2d(in_features, mid_features, 1, stride=1),nn.BatchNorm2d(mid_features),SKConv(mide_features, WH, M, G, r, stride=stride, L=L),nn.BatchNorm2d(mid_features),nn.Conv2d(mid_features, out_features, 1, stride=1),nn.BatchNorm2d(out_features))if in_features == out_features: #when dim not change, in could be added directly to out self.shortcut = nn.Sequential()else: # when dim not change, in should also change dim to be added to outself.shortcut = nn.Sequential(nn.Conv2d(in_features, out_features, 1, stride=stride),nn.BatchNorm2d(out_features))def forward(self, x):fea = self.feas(x)return fea + self.shortcut(x)class SKNet(nn.Module):def __init__(self, class_num):super(SKNet, self).__init__()self.basic_conv = nn.Sequential(nn.Conv2d(3, 64, 3, padding=1),nn.BatchNorm2d(64))# 32x32self.stage_1 = nn.Sequential(SKUnit(64, 256, 32, 2, 8, 2, stride=2),nn.ReLU(),SKUnit(256, 256, 32, 2, 8, 2),nn.ReLU(),SKUnit(256, 256, 32, 2, 8, 2),nn.ReLU()) # 32x32self.stage_2 = nn.Sequential(SKUnit(256, 512, 32, 2, 8, 2, stride=2),nn.ReLU(),SKUnit(512, 512, 32, 2, 8, 2),nn.ReLU()SKUnit(512, 512, 32, 2, 8, 2),nn.ReLU()) # 16 x 16self.stage_3 = nn.Sequential(SKUnit(512, 1024, 32, 2, 8, 2, stride=2),nn.ReLU(),SKUnit(1024, 1024, 32, 2, 8, 2),nn.ReLU(),SKUnit(1024, 1024, 32, 2, 8, 2),nn.ReLU(),)# 8x8self.pool = nn.AvgPool2d(8)self.classifier = nn.Sequential(nn.Linear(1024, class_num))def forward(self, x):fea = self.basic_conv(x)fea = self.stage_1(fea)fea = self.stage_2(fea)fea = self.stage_3(fea)fea = self.pool(fea)fea = torch.squeeze(fea)fea = self.classifier(fea)return fea
if __name__ == '__main__':x = torch.rand(8, 64, 32, 32)conv = SKConv(64, 32, 3, 8, 2)out = conv(x)criterion = nn.L1Loss()loss = criterion(out, x)loss.backward()print('out shape: {}'.format(out.shape))print('loss value: {}'.format(loss))
参考资料
SKNet解读
Selective Kernel Networks(2019)
implus/SKNet
人工智能 SKNet
这篇关于SKNet(2019)的文章就介绍到这儿,希望我们推荐的文章对编程师们有所帮助!
![BUUCTF靶场[web][极客大挑战 2019]Http、[HCTF 2018]admin](https://i-blog.csdnimg.cn/direct/ed45c0efd0ac40c68b2c1bc7b6d90ebc.png)

![最简单的使用JDBC[连接数据库] mysql 2019年3月18日](https://i-blog.csdnimg.cn/blog_migrate/d10b0c37d5115bce2197b87d8034b833.png)
![(php伪随机数生成)[GWCTF 2019]枯燥的抽奖](https://i-blog.csdnimg.cn/direct/4cedb561c99944399713d7d7d7a37c7c.png)


