本文主要是介绍小姜的ATPG学习笔记_TetraMax,希望对大家解决编程问题提供一定的参考价值,需要的开发者们随着小编来一起学习吧!
软件:Synopsys Tetramax
关于使用的参考资料:
- Tips For TetraMax
- link 使用中需注意2010后的版本生成测试激励不支持生成verilog版本
- 2006版本培训教程
- 知乎上的屁屁踢解读
软件探索:
- 打开图形界面的位置:tx/amd64/syn/bin/tmaxgui
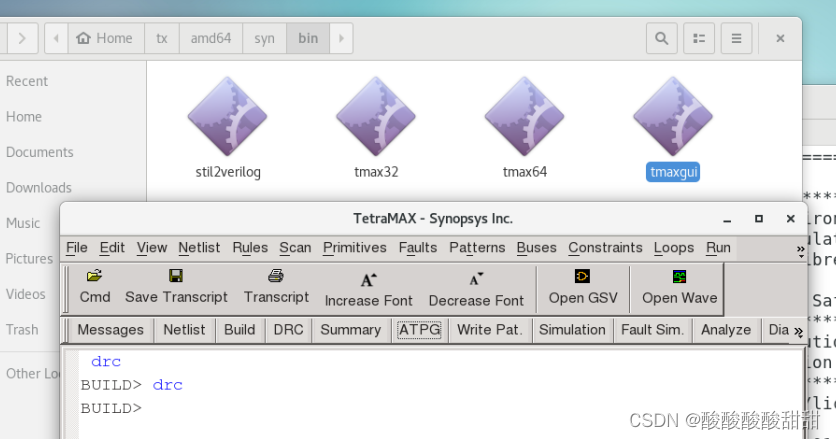
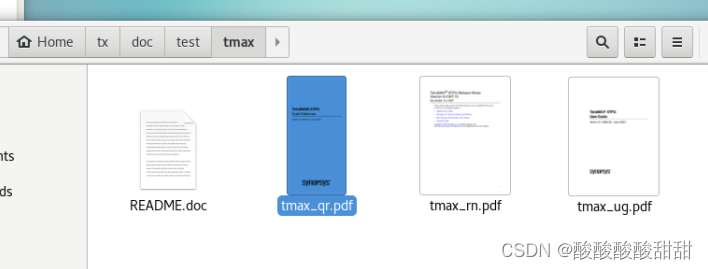
- 命令手册:tmax_qr.pdf
- 图形界面使用好像有问题,先用命令行
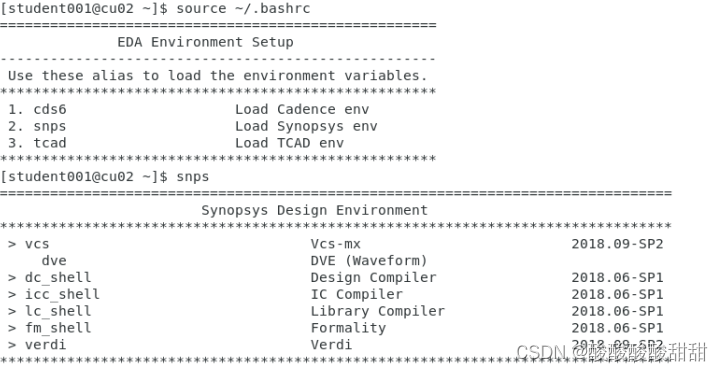
需要在snps的环境下打开软件

Flow:
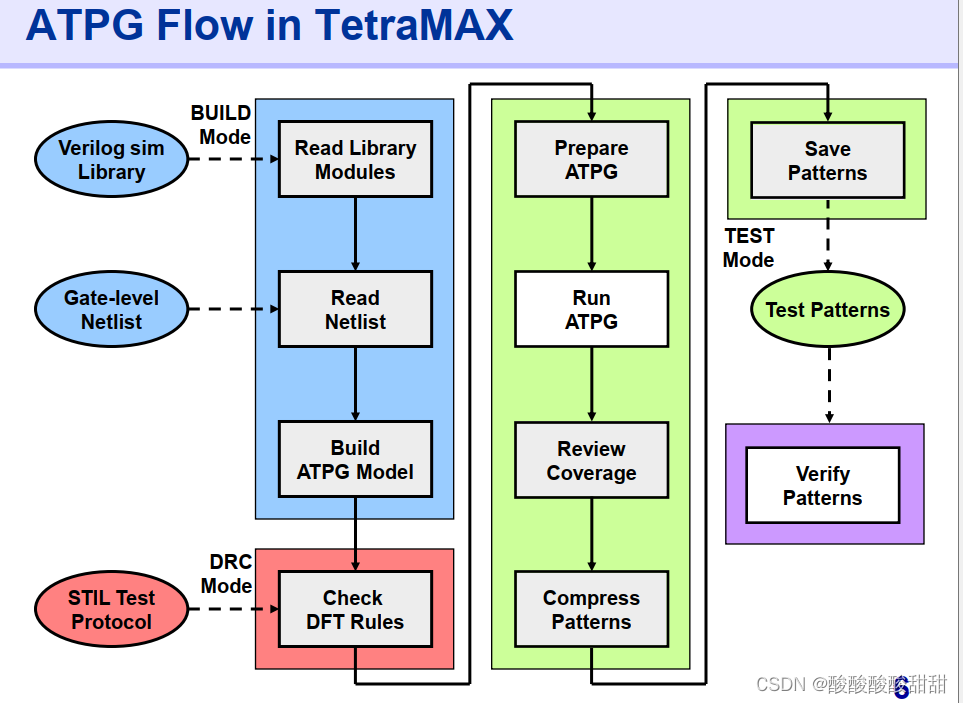
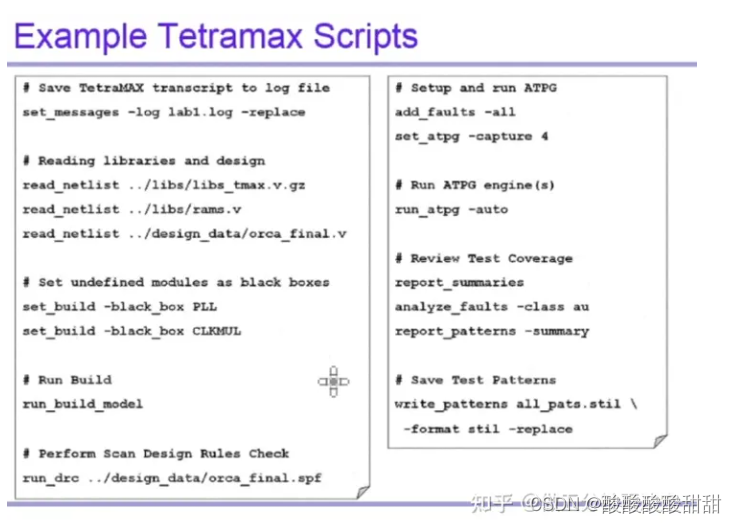
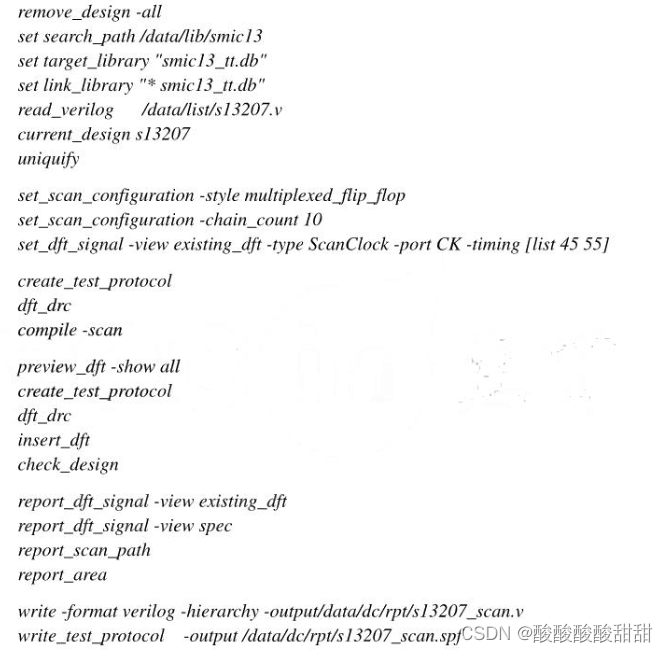
脚本实例: link
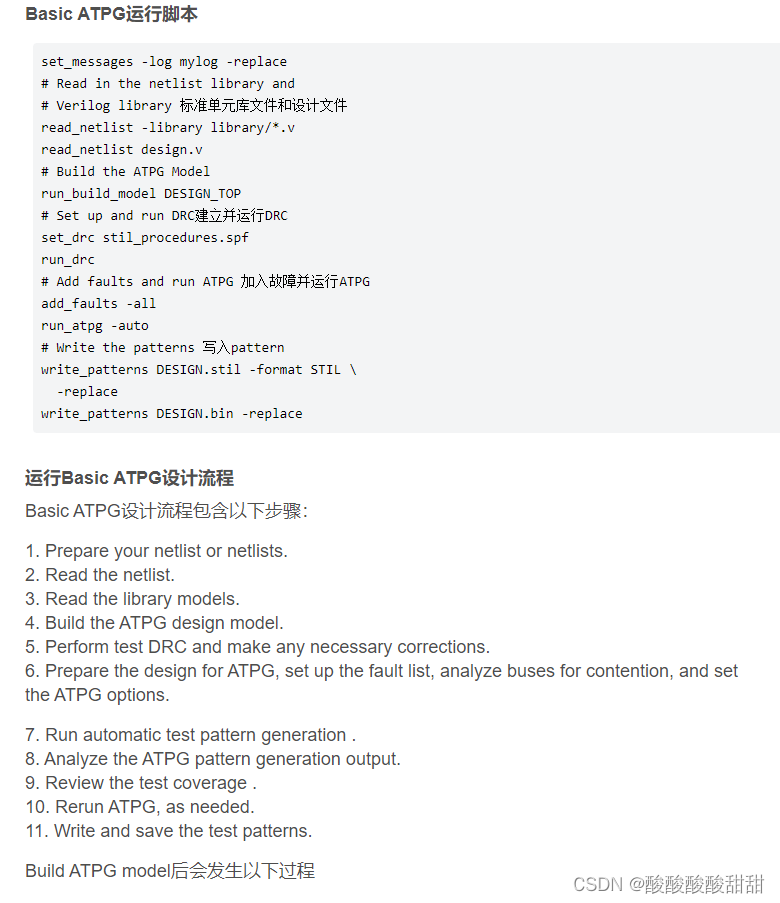
1. read lib modules
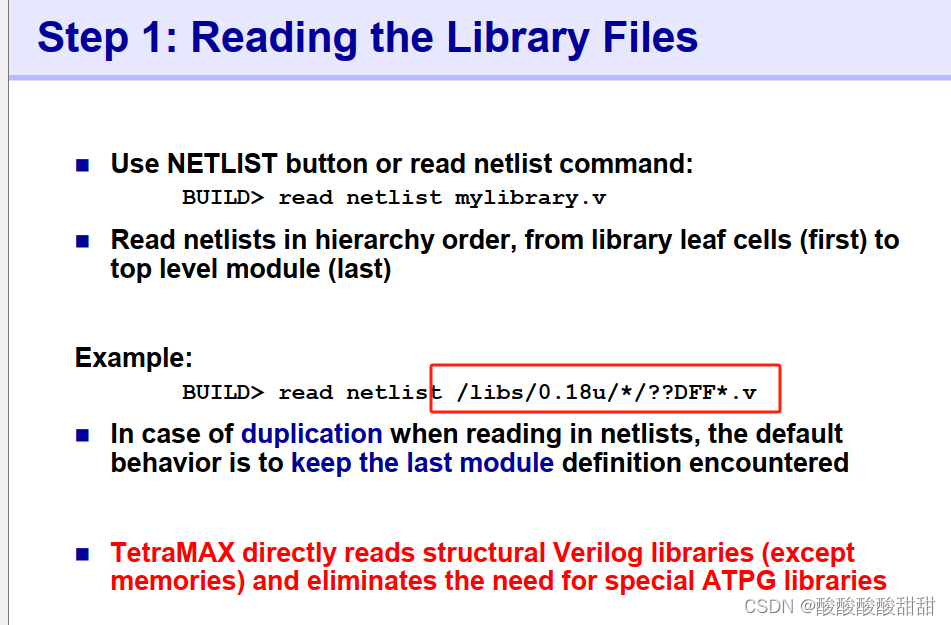
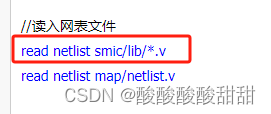
根据示例,这里应该是读取一个工艺库文件
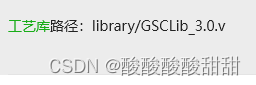
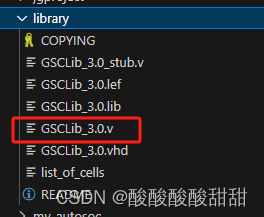
opencores的工艺库路径:
2. read netlist
读取设计的文件,根据ppt所述应该是门级网表,不确定rtl级是否可以
read_netlist /home/student00/student001/Functional_Safety/opencores/netlist/ac97_ctrl.v
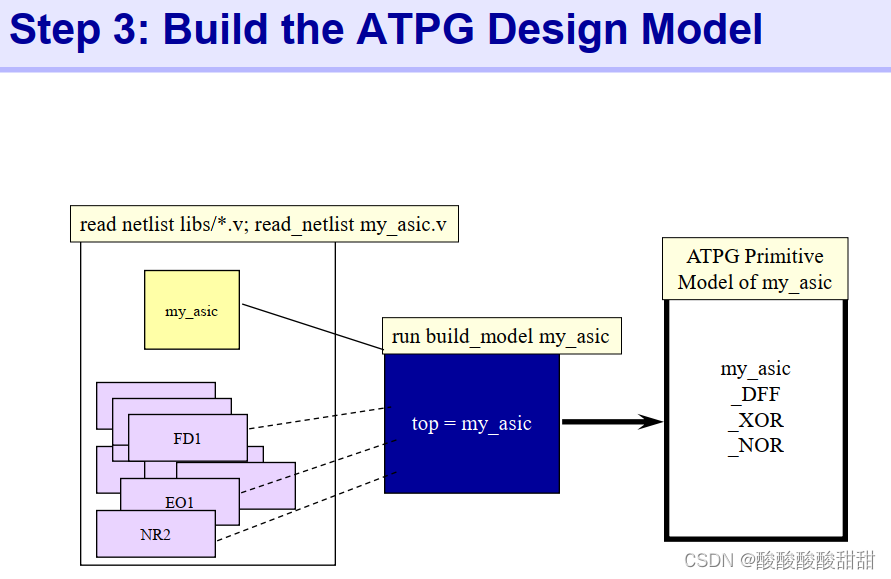
3. build ATPG model

3.1 set build
设计中可能存在不希望执行ATPG的模块,如锁相环模块、模拟模块、测试期间被旁路的模块或单独测试的模块,如RAM模块。
一些ATPG工具要求您构建一个黑盒模型来表示设计中的这种功能。但是,通过使用以下命令之一,可以将设计中的任何块声明为黑盒或空盒,黑盒输出为X,空盒输出为Z
set_build -black_box module_name
set_build -empty_box module_name
3.2 run build model

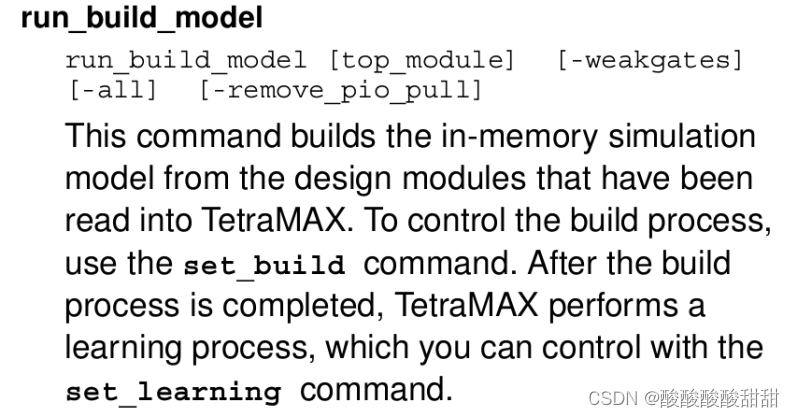
该命令从已读入TetraMAX的设计模块中构建内存仿真模型。若要控制构建过程,请使用set build命令。构建过程完成后,TetraMAX会执行一个学习过程,您可以使用set learning命令来控制该过程
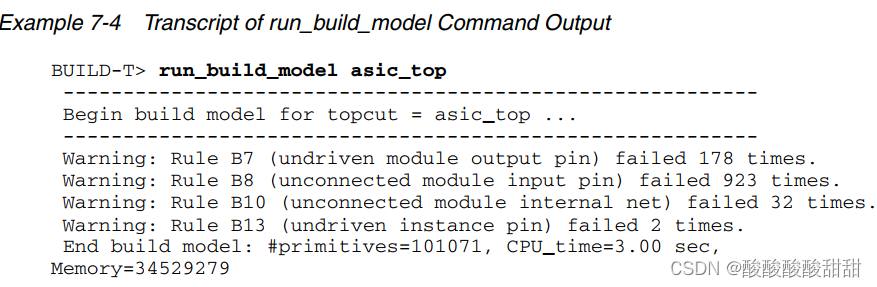
示例:
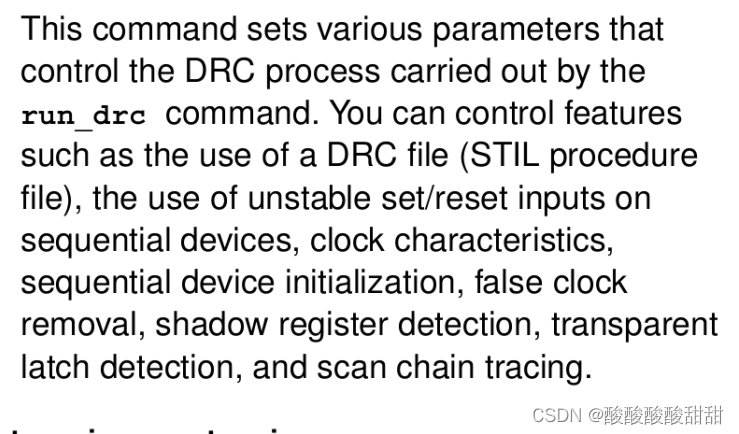
4. Perform DRC
4.1 准备
4.1.1 相关理论
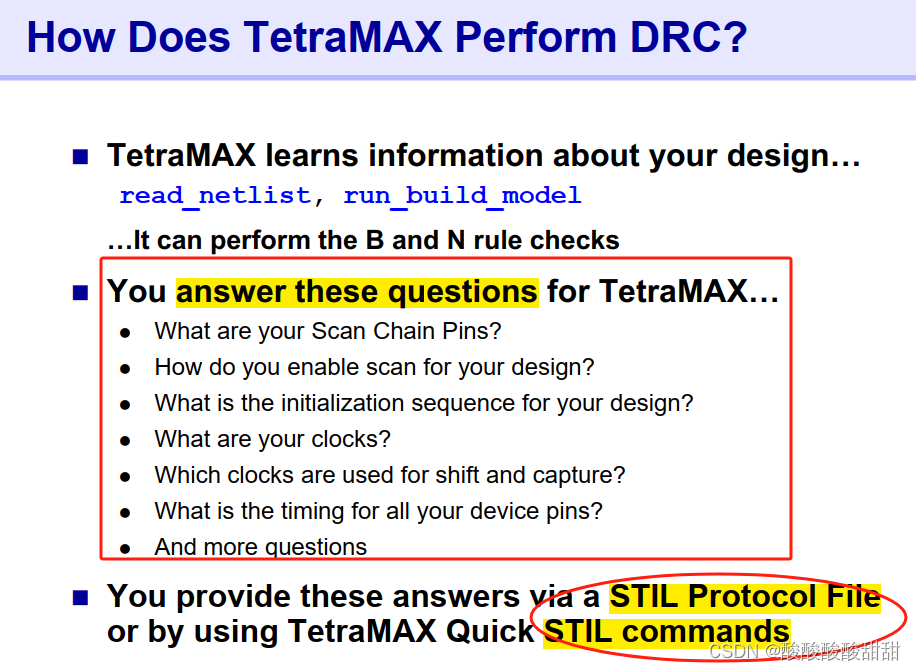
该软件的DRC可通过撰写STIL Protocol File或者用STIL快捷命令来实现
其中,STIL conmmand包括以下基础命令等等:

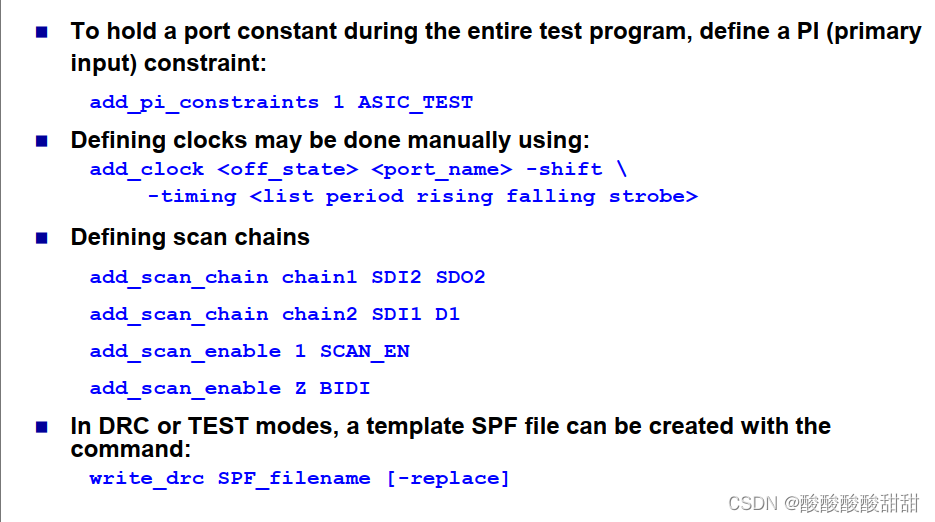
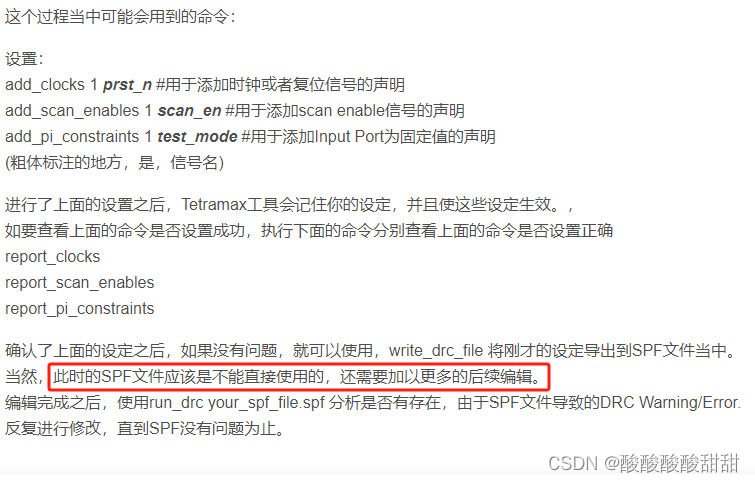
- add_pi_constraints

- set_DRC
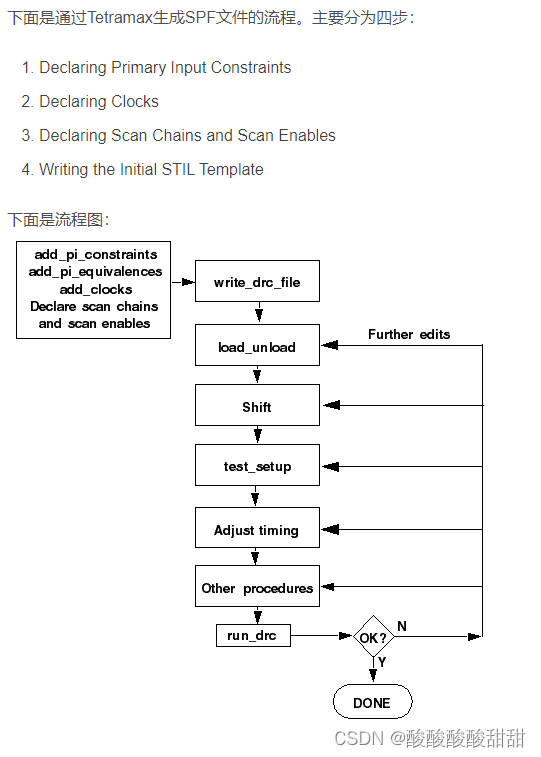
4.1.2 SPF文件相关工作
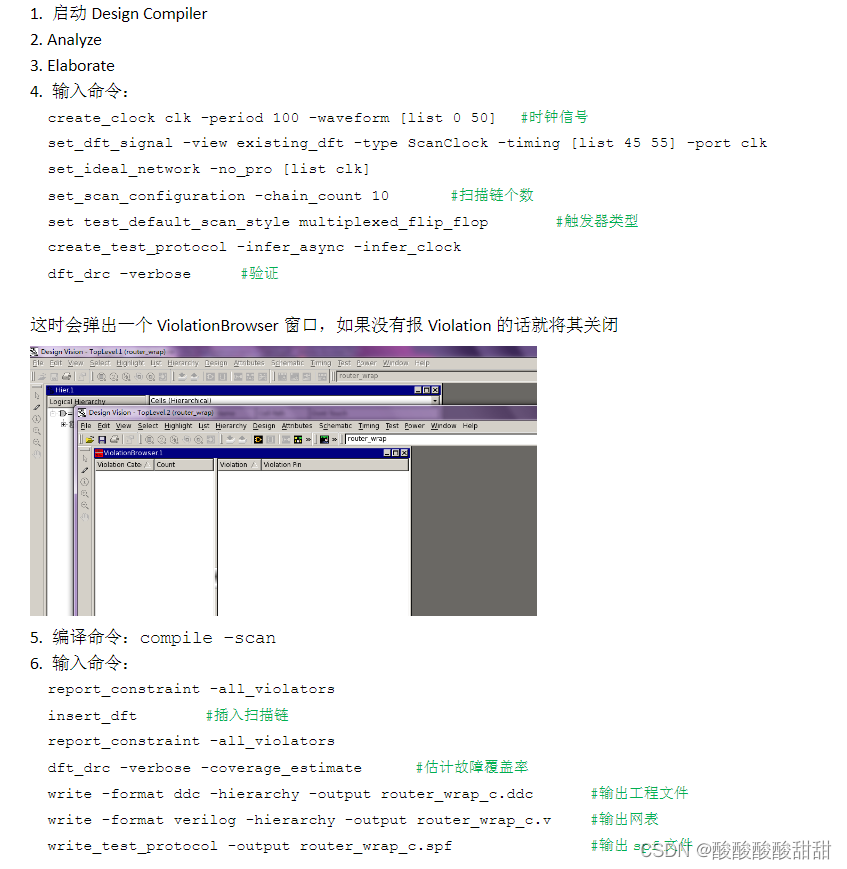
上图的关键是要有一个SPF文件,该文件可以由DC自动生成,也可以用命令行手写。
- 手写
示例链接
- DC自动生成 (首选方法)
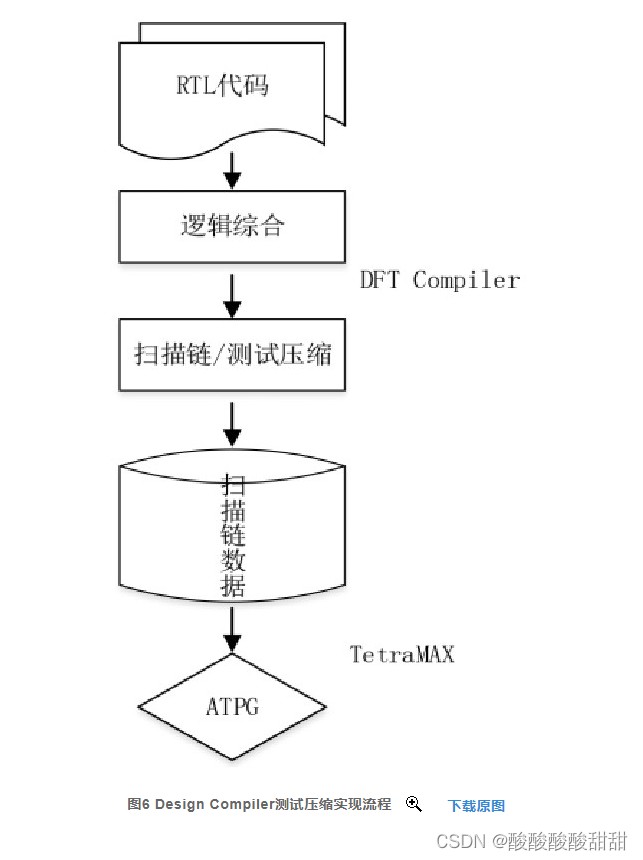
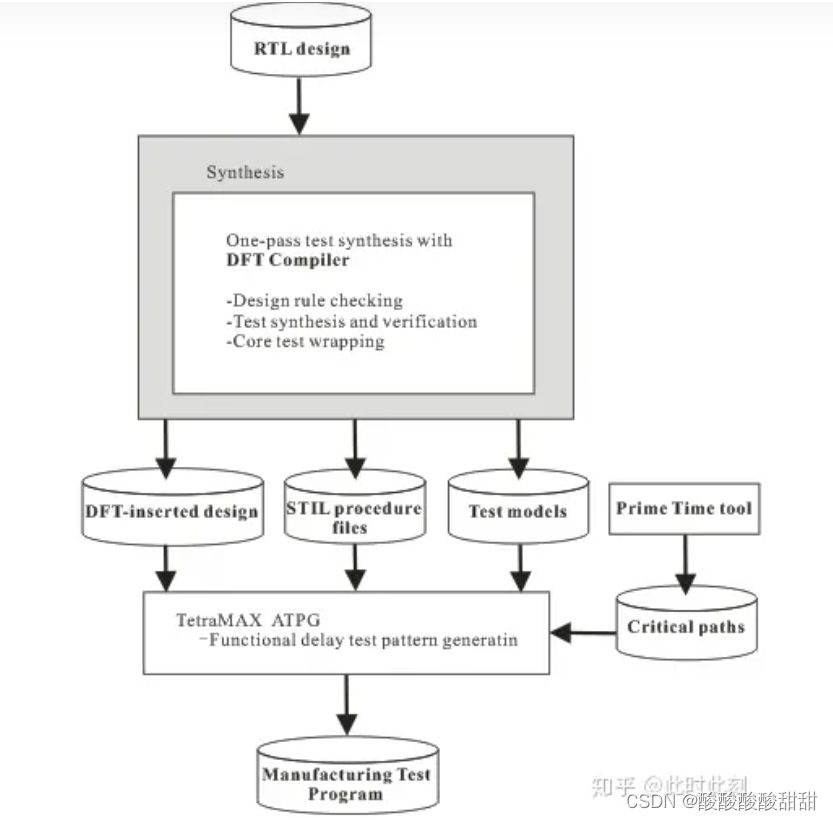
上图所示为测试自动化生成方法,首先读入RTL代码进行综合,在综合的过程中利用DFT Compiler进行扫描单元替换,然后完成一步到位的综合,包括设计规则检查,测试综合验证,内核测试包装。综合完毕后得到插入DFT电路的设计、STIL格式的程序文件、测试模型。同时由PT(Prime Time)工具分析电路给出关键路径。TetraMAX的ATPG工具会吃进这四个文件并生成对应的测试向量。
来源
脚本示例 :来源于PDF(百度文库),已存
参考脚本2(主要参考了这个)
我的工作:
- design_vision 启动图形界面
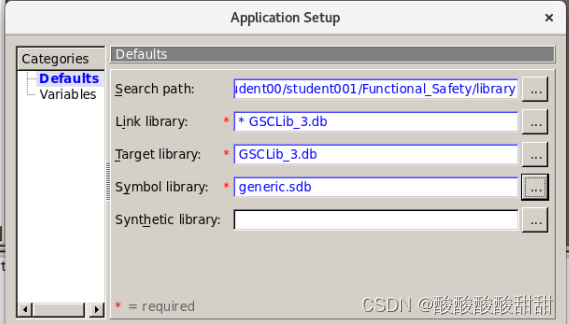
- setup 设置配置文件,包括源代码文件路径、工艺库文件路径等
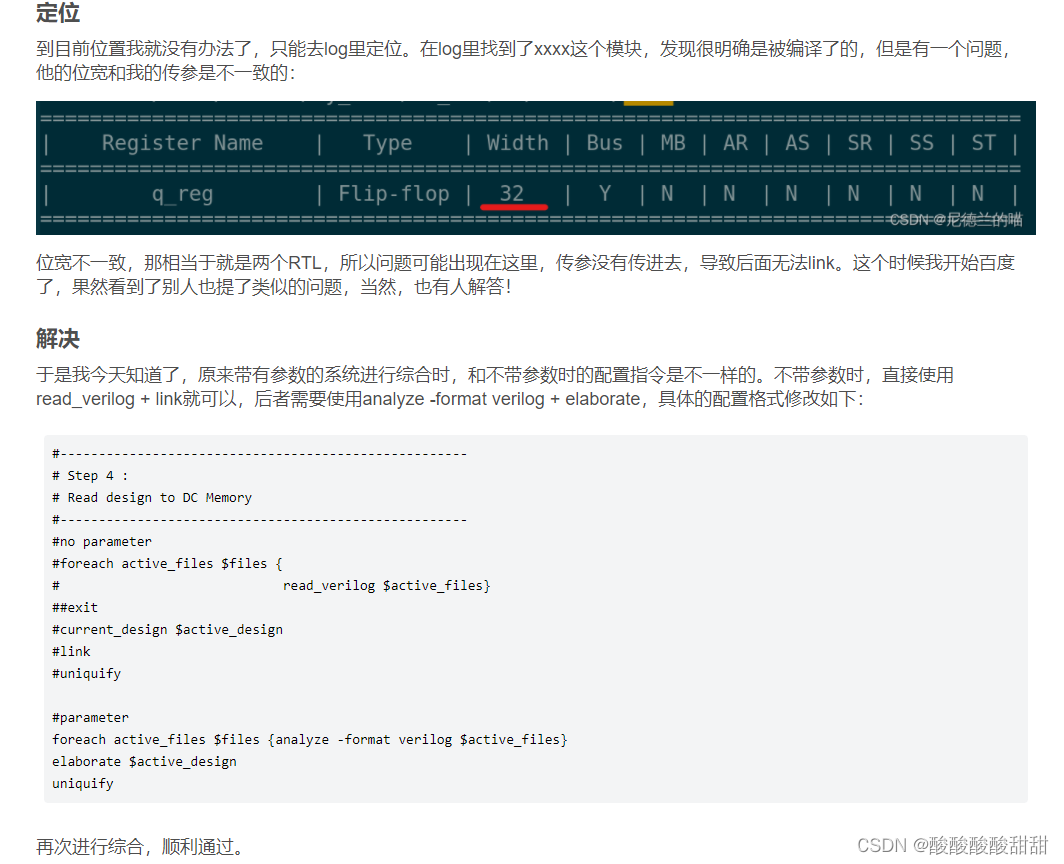
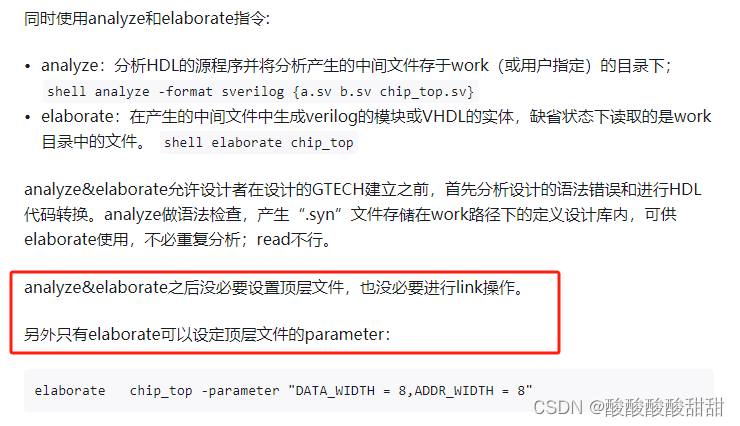
- 读取设计(这里需要改用analyze+elaborate来读取)
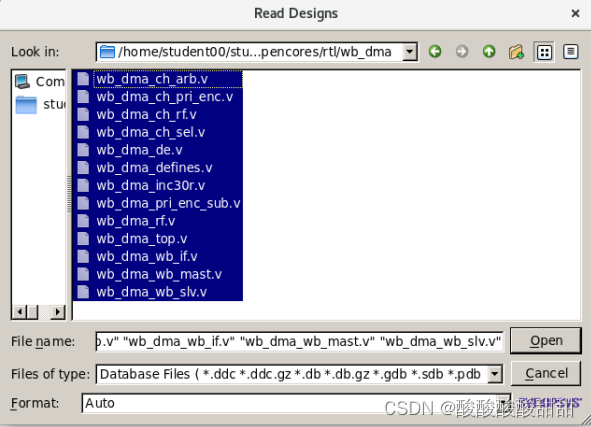
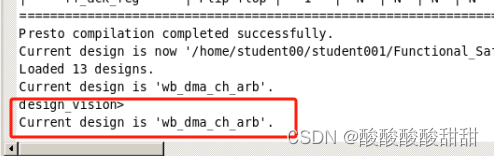
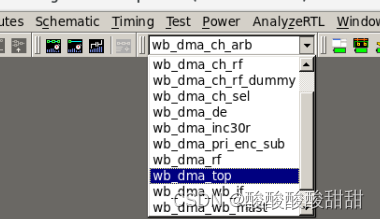
此时显示的设计会是按顺序读入的最后一个文件,需要修改顶层设计为当前设计:
上面的好像不行,没有反应,直接用命令输入修改
set current_design wb_dma_top
- link源代码和工艺库(如果是analyze的方式则不需要link这一步)
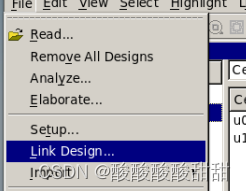
这里出现了link失败的问题,不会报error,只是warning
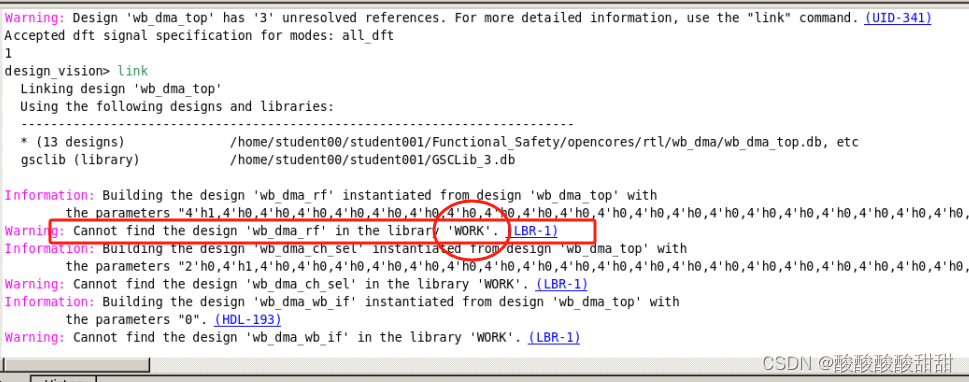
感觉是setup的环节中出现了问题,还是得自己写一个setup才行

这里的当前目录指的是?
使用report命令查看当前的design和lib
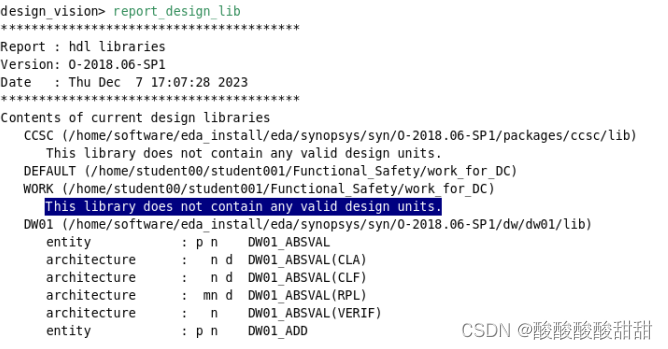
WORK对应之前warning中出现的WORK
网上查的同样的问题的解决办法
按照上述方法进行尝试后,warning不再是WORK相关,变成了新的,之前没有报过这个warning
去掉link操作后再次尝试
PRE-DFT中出现的违例为D2/D3

执行完所有脚本后,仍存在违例TEST-120/TEST-224
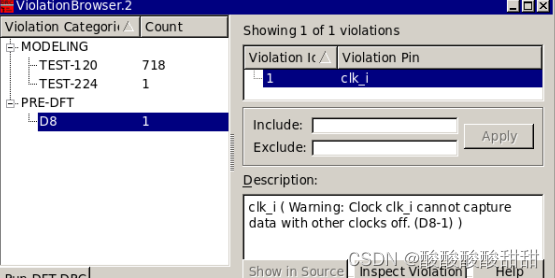
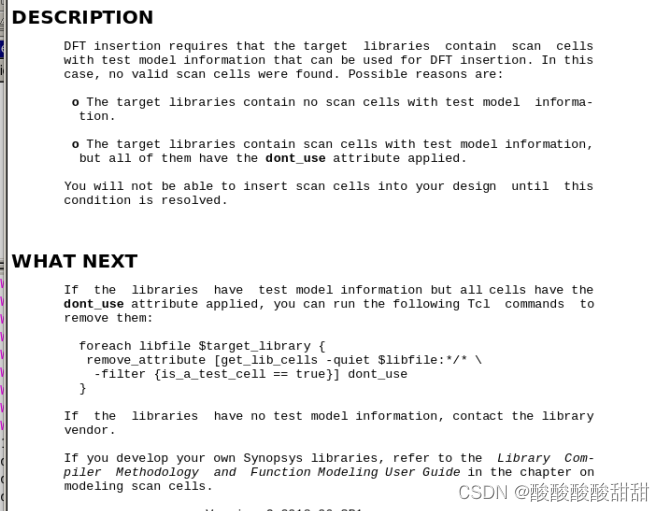
TEST-120:no scan
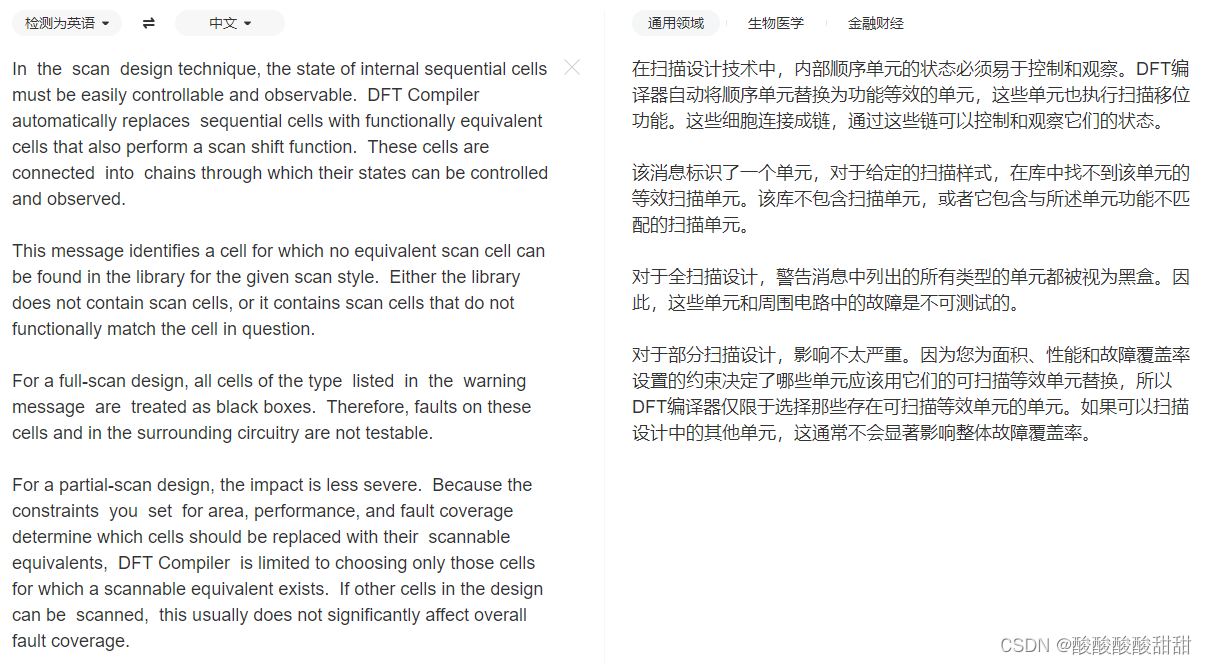
TEST-224:Target library for design contains no scan-cell models
D8:clk_i ( Warning: Clock clk_i cannot capture data with other clocks off. (D8-1) )
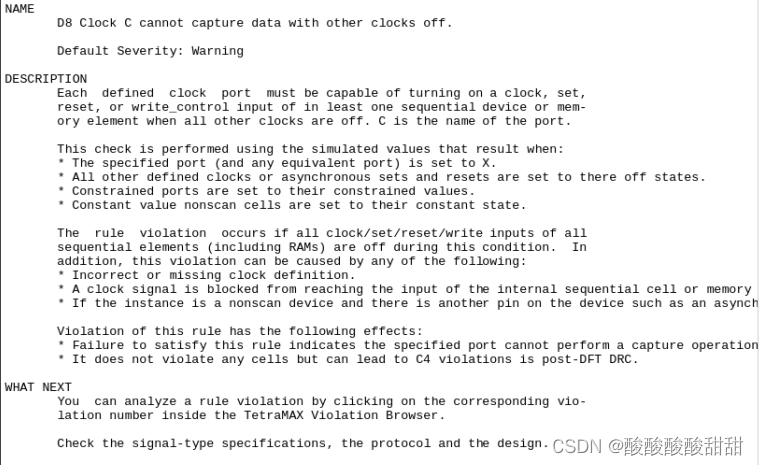
–>DRC修复解决办法:
(1)D2、D3:之前没有加入时钟信号的create以及复位信号rst的设置
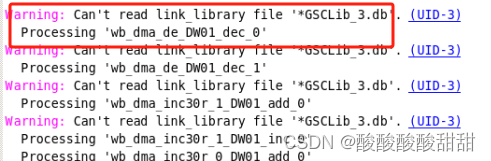
(2)TEST-120:scan model主要是来源于工艺库的问题,换一个工艺库就好了
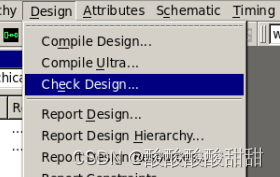
- *检查设计
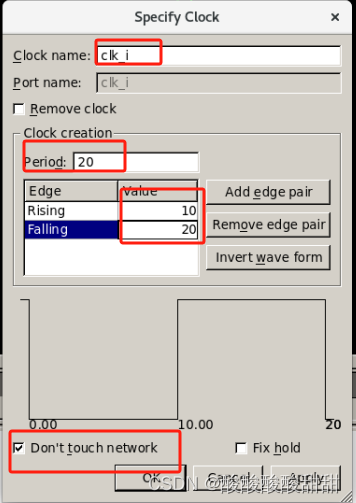
- *时钟设置,先打开schematic然后点击clk的端口进行设置
保存生成的文件,包括网表文件、spf文件等
write_test_protocol -output /home/student00/student001/Functional_Safety/work_for_DMA_DC/DMA.spfwrite -hierarchy -format ddc -output /home/student00/student001/Functional_Safety/work_for_DMA_DC/DC_result_wb_dma.ddc
write -hierarchy -format verilog -output /home/student00/student001/Functional_Safety/work_for_DMA_DC/DC_result_wb_dma.v
完整DC脚本
gui_startanalyze -library WORK -format verilog {/home/student00/student001/Functional_Safety/DC_works/DMA/wb_dma_wb_slv.v /home/student00/student001/Functional_Safety/DC_works/DMA/wb_dma_wb_mast.v /home/student00/student001/Functional_Safety/DC_works/DMA/wb_dma_wb_if.v /home/student00/student001/Functional_Safety/DC_works/DMA/wb_dma_top.v /home/student00/student001/Functional_Safety/DC_works/DMA/wb_dma_rf.v /home/student00/student001/Functional_Safety/DC_works/DMA/wb_dma_pri_enc_sub.v /home/student00/student001/Functional_Safety/DC_works/DMA/wb_dma_inc30r.v /home/student00/student001/Functional_Safety/DC_works/DMA/wb_dma_defines.v /home/student00/student001/Functional_Safety/DC_works/DMA/wb_dma_de.v /home/student00/student001/Functional_Safety/DC_works/DMA/wb_dma_ch_sel.v /home/student00/student001/Functional_Safety/DC_works/DMA/wb_dma_ch_rf.v /home/student00/student001/Functional_Safety/DC_works/DMA/wb_dma_ch_pri_enc.v /home/student00/student001/Functional_Safety/DC_works/DMA/wb_dma_ch_arb.v}
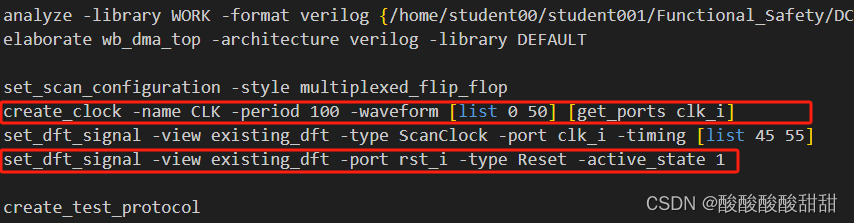
elaborate wb_dma_top -architecture verilog -library DEFAULTset_scan_configuration -style multiplexed_flip_flop
set_dft_signal -view existing_dft -type ScanClock -port clk_i -timing [list 45 55]#时钟默认10%的占空比(在45%时上升沿,在55%时下降沿)
create_clock -name CLK -period 100 -waveform [list 0 50] [get_ports clk_i]
set_dft_signal -view existing_dft -port rst_i -type Reset -active_state 1create_test_protocol
dft_drc
compile -scanpreview_dft -show all
create_test_protocol
dft_drc
insert_dft
check_designwrite_test_protocol -output /home/student00/student001/Functional_Safety/DC_works/DMA/DMA.spf
write -hierarchy -format ddc -output /home/student00/student001/Functional_Safety/DC_works/DMA/DC_result_wb_dma.ddc
write -hierarchy -format verilog -output /home/student00/student001/Functional_Safety/DC_works/DMA/DC_result_wb_dma.v
4.2 run DRC
运行DRC,有两种方式
run_DRC xxx.spf
或者
set_DRC xxx.spf
run_DRC
运行后出现违例

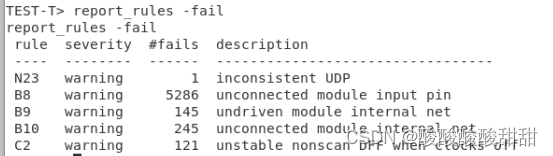
report DRC结果
report_rules -fail
5 加入故障并运行ATPG
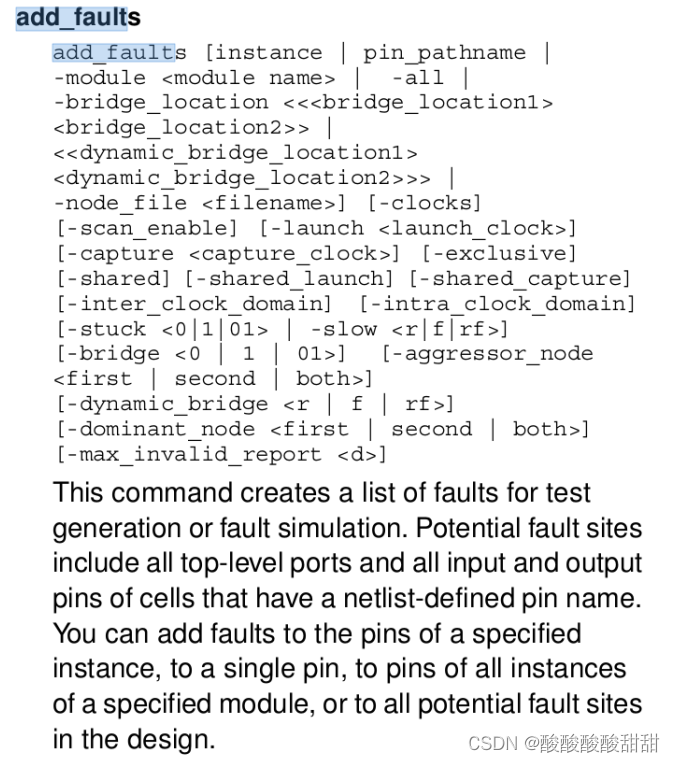
add_faults -all
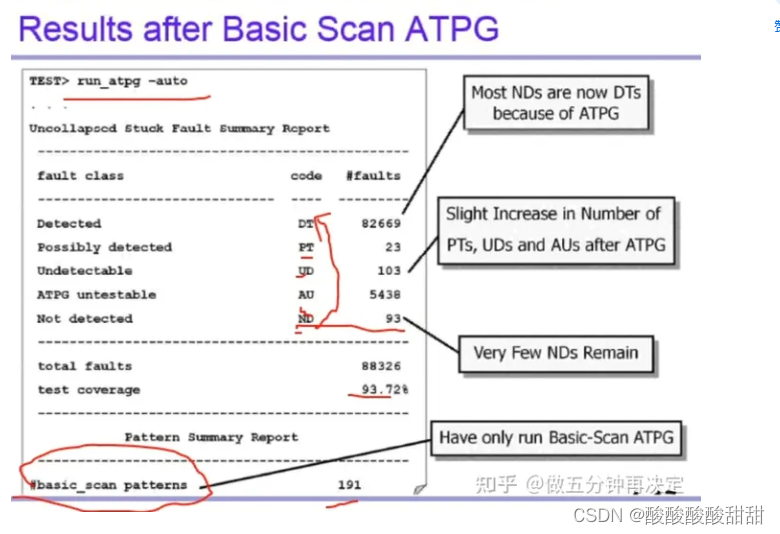
run_atpg -auto
在添加了故障后且run atpg之前,可用以下代码获得详细的fault report内容
set faults -summary verbose
report_summaries
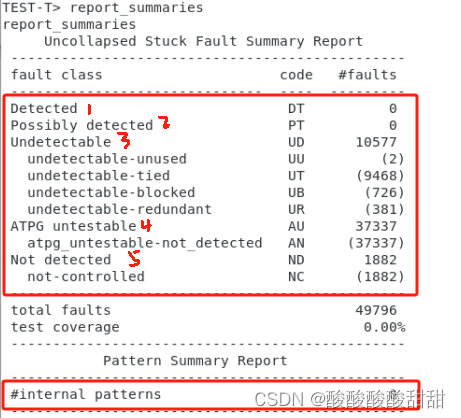
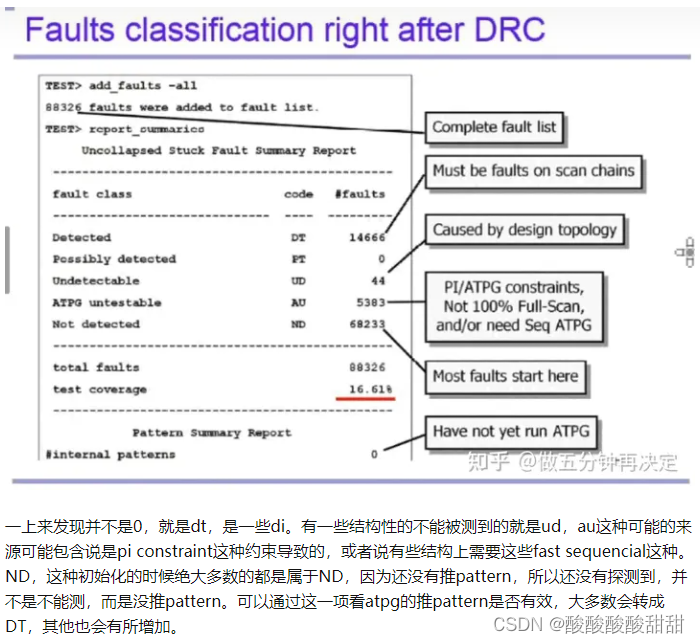
run atpg后,上述的故障数量会发生改变

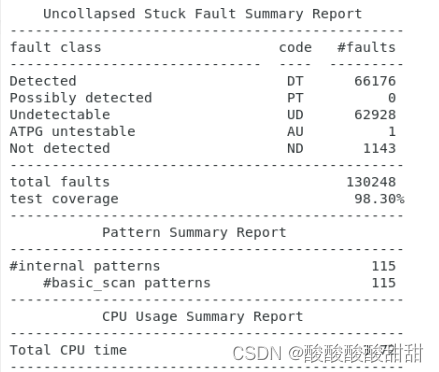
6 保存测试激励
write_patterns /home/student00/student001/Functional_Safety/ATPG_works/TEST.v -format verilog_single_file -serial -replace
完整tetramax脚本
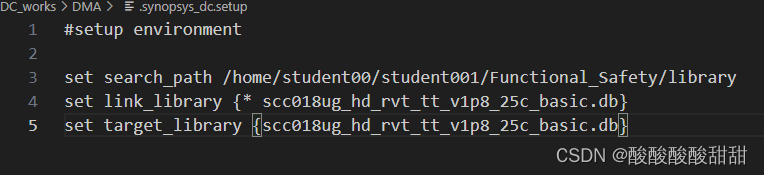
- setup文件
#setup environmentset search_path /home/student00/student001/Functional_Safety/library
set link_library {* scc018ug_hd_rvt_tt_v1p8_25c_basic.db}
set target_library {scc018ug_hd_rvt_tt_v1p8_25c_basic.db}
- tcl文件
#source ~/Functional_Safety/ATPG_works/DMA/Tmax_DMA.tcl# 打开Tetramax
#./tx/amd64/syn/bin/tmax64# 读取工艺库文件
read_netlist /home/student00/student001/Functional_Safety/library/scc018ug_hd_rvt_neg_pg.v
read_netlist /home/student00/student001/Functional_Safety/library/scc018ug_hd_rvt_neg.v
read_netlist /home/student00/student001/Functional_Safety/library/scc018ug_hd_rvt_pg.v
read_netlist /home/student00/student001/Functional_Safety/library/scc018ug_hd_rvt.v# 读取设计门级网表
read_netlist /home/student00/student001/Functional_Safety/DC_works/DMA/DC_result_wb_dma.v#Build the ATPG model
run_build_model wb_dma_top#建立并运行DRC
set_drc /home/student00/student001/Functional_Safety/DC_works/DMA/DMA.spf
run_drc#加入故障并运行ATPG
add_faults -all
run_atpg -auto#保存测试激励
write_patterns /home/student00/student001/Functional_Safety/ATPG_works/DMA/tb_DMA.v -format verilog_single_file -serial -replace
这篇关于小姜的ATPG学习笔记_TetraMax的文章就介绍到这儿,希望我们推荐的文章对编程师们有所帮助!