本文主要是介绍SpringBoot集成Swagger2的增强版Knife4j,希望对大家解决编程问题提供一定的参考价值,需要的开发者们随着小编来一起学习吧!
1. 背景
作为SpringBoot集成中间件其中的一篇文章吧,既然打算出这么一个系列了,争取做到虽小却全,又精又美的一个系列吧。
Swagger应该都有接触吧,knife4j是Swagger2的增强版,更加友好的操作页面,更多强大的功能,基于Swagger2和 OpenAPI,提供了一个更好的接口文档界面,本文主要演示了如何使用SpringBoot集成Knife4j。
本文拆分自笑小枫-SpringBoot系列 , 更为精简的介绍了SpringBoot如何集成中间件。如果想系统的使用SpringBoot,可以参考笑小枫-SpringBoot系列
- Spring Boot版本: 2.7.12
- Knife4j版本: 4.4.0
2. 配置后端接口
2.1 什么是knife4j😴
先贴官网Knife4j
Knife4j是一个集Swagger2 和 OpenAPI3 为一体的增强解决方案。
增强扩展
- 基础ui组件(自定义文档、动态参数调试、I18n、接口排序、导出等)
- 基于Springfox框架+Swagger2规范的自动注入starter
- 基于Springdoc-openapi+OAS3规范的自动注入starter
- 提供对主流网关组件的统一聚合OpenAPI接口文档的解决方案
2.2 怎么使用knife4j🎨
版本选择
关于版本,可以前往官网查看 Knife4j版本参考
Spring Boot 3
- Spring Boot 3 只支持OpenAPI3规范
- Knife4j提供的starter已经引用springdoc-openapi的jar,开发者需注意避免jar包冲突
- JDK版本必须 >= 17
Spring Boot 2
- Spring Boot 版本建议 2.4.0~3.0.0之间
- Spring Boot 版本 < 2.4 版本则建议选择Knife4j 4.0之前的版本
👉第一步:在maven项目的pom.xml中引入Knife4j的依赖包,代码如下:👇
<!-- 引入knife4j依赖 --><dependency><groupId>com.github.xiaoymin</groupId><artifactId>knife4j-openapi2-spring-boot-starter</artifactId><version>4.4.0</version></dependency>
👉第二步:创建Swagger配置依赖,代码如下:👇
package com.maple.knife4j.config;import org.springframework.context.annotation.Bean;
import org.springframework.context.annotation.Configuration;
import springfox.documentation.builders.ApiInfoBuilder;
import springfox.documentation.builders.PathSelectors;
import springfox.documentation.builders.RequestHandlerSelectors;
import springfox.documentation.service.Contact;
import springfox.documentation.spi.DocumentationType;
import springfox.documentation.spring.web.plugins.Docket;
import springfox.documentation.swagger2.annotations.EnableSwagger2WebMvc;/*** @author 笑小枫 <https://www.xiaoxiaofeng.com/>* @date 2023/12/21*/
@Configuration
@EnableSwagger2WebMvc
public class Knife4jConfiguration {/*** 接口分类:配置模块一的接口* 如果只有一个模块,删掉模块二即可* 如果有多个,可以继续配置*/@Bean(value = "exampleOne")public Docket exampleOne() {return new Docket(DocumentationType.SWAGGER_2).apiInfo(new ApiInfoBuilder().title("笑小枫演示接口1").description("笑小枫演示接口1").termsOfServiceUrl("http://127.0.0.1:8080").contact(new Contact("笑小枫", "https://www.xiaoxiaofeng.com", "zfzjava@163.com")).version("1.0").build())//分组名称.groupName("笑小枫演示接口1").select()//这里指定Controller扫描包路径.apis(RequestHandlerSelectors.basePackage("com.maple.knife4j.controller.one")).paths(PathSelectors.any()).build();}/*** 接口分类:配置模块二的接口*/@Bean(value = "exampleTwo")public Docket exampleTwo() {return new Docket(DocumentationType.SWAGGER_2).apiInfo(new ApiInfoBuilder().title("笑小枫演示接口2").description("笑小枫演示接口2").termsOfServiceUrl("http://127.0.0.1:8080").contact(new Contact("笑小枫", "https://www.xiaoxiaofeng.com", "zfzjava@163.com")).version("1.0").build())//分组名称.groupName("笑小枫演示接口2").select()//这里指定Controller扫描包路径.apis(RequestHandlerSelectors.basePackage("com.maple.rest.controller.two")).paths(PathSelectors.any()).build();}
}
👉第三步:创建两个不同目录的Controller,模拟上面的两个模块👇
com.maple.knife4j.controller.one.TestKnife4jOneController
package com.maple.knife4j.controller.one;import io.swagger.annotations.Api;
import io.swagger.annotations.ApiModel;
import io.swagger.annotations.ApiModelProperty;
import io.swagger.annotations.ApiOperation;
import lombok.Data;
import org.springframework.web.bind.annotation.GetMapping;
import org.springframework.web.bind.annotation.RequestMapping;
import org.springframework.web.bind.annotation.RestController;/*** @author 笑小枫 <https://www.xiaoxiaofeng.com/>* @date 2023/12/21*/
@Api(tags = "实例演示1-Knife4j接口文档")
@RestController
@RequestMapping("/one")
public class TestKnife4jOneController {@ApiOperation(value = "Knife4j接口文档演示")@GetMapping("/testKnife4j")public User testKnife4j(User param) {User user = new User();user.setName("笑小枫");user.setAge(18);user.setRemark("大家好,我是笑小枫,喜欢我的小伙伴点个赞呗,欢迎访问我的个人博客:https://www.xiaoxiaofeng.com");return user;}@Data@ApiModel("用户对象")static class User {@ApiModelProperty(value = "姓名")private String name;@ApiModelProperty(value = "年龄")private Integer age;@ApiModelProperty(value = "描述")private String remark;}
}
com.maple.knife4j.controller.one.TestKnife4jTwoController
package com.maple.knife4j.controller.two;import io.swagger.annotations.Api;
import io.swagger.annotations.ApiModel;
import io.swagger.annotations.ApiModelProperty;
import io.swagger.annotations.ApiOperation;
import lombok.Data;
import org.springframework.web.bind.annotation.GetMapping;
import org.springframework.web.bind.annotation.RequestMapping;
import org.springframework.web.bind.annotation.RestController;/*** @author 笑小枫 <https://www.xiaoxiaofeng.com/>* @date 2023/12/21*/
@Api(tags = "实例演示2-Knife4j接口文档")
@RestController
@RequestMapping("/two")
public class TestKnife4jTwoController {@ApiOperation(value = "Knife4j接口文档演示")@GetMapping("/testKnife4j")public User testKnife4j(User param) {User user = new User();user.setName("笑小枫");user.setAge(18);user.setRemark("大家好,我是笑小枫,喜欢我的小伙伴点个赞呗,欢迎访问我的个人博客:https://www.xiaoxiaofeng.com");return user;}@Data@ApiModel("用户对象")static class User {@ApiModelProperty(value = "姓名")private String name;@ApiModelProperty(value = "年龄")private Integer age;@ApiModelProperty(value = "描述")private String remark;}
}
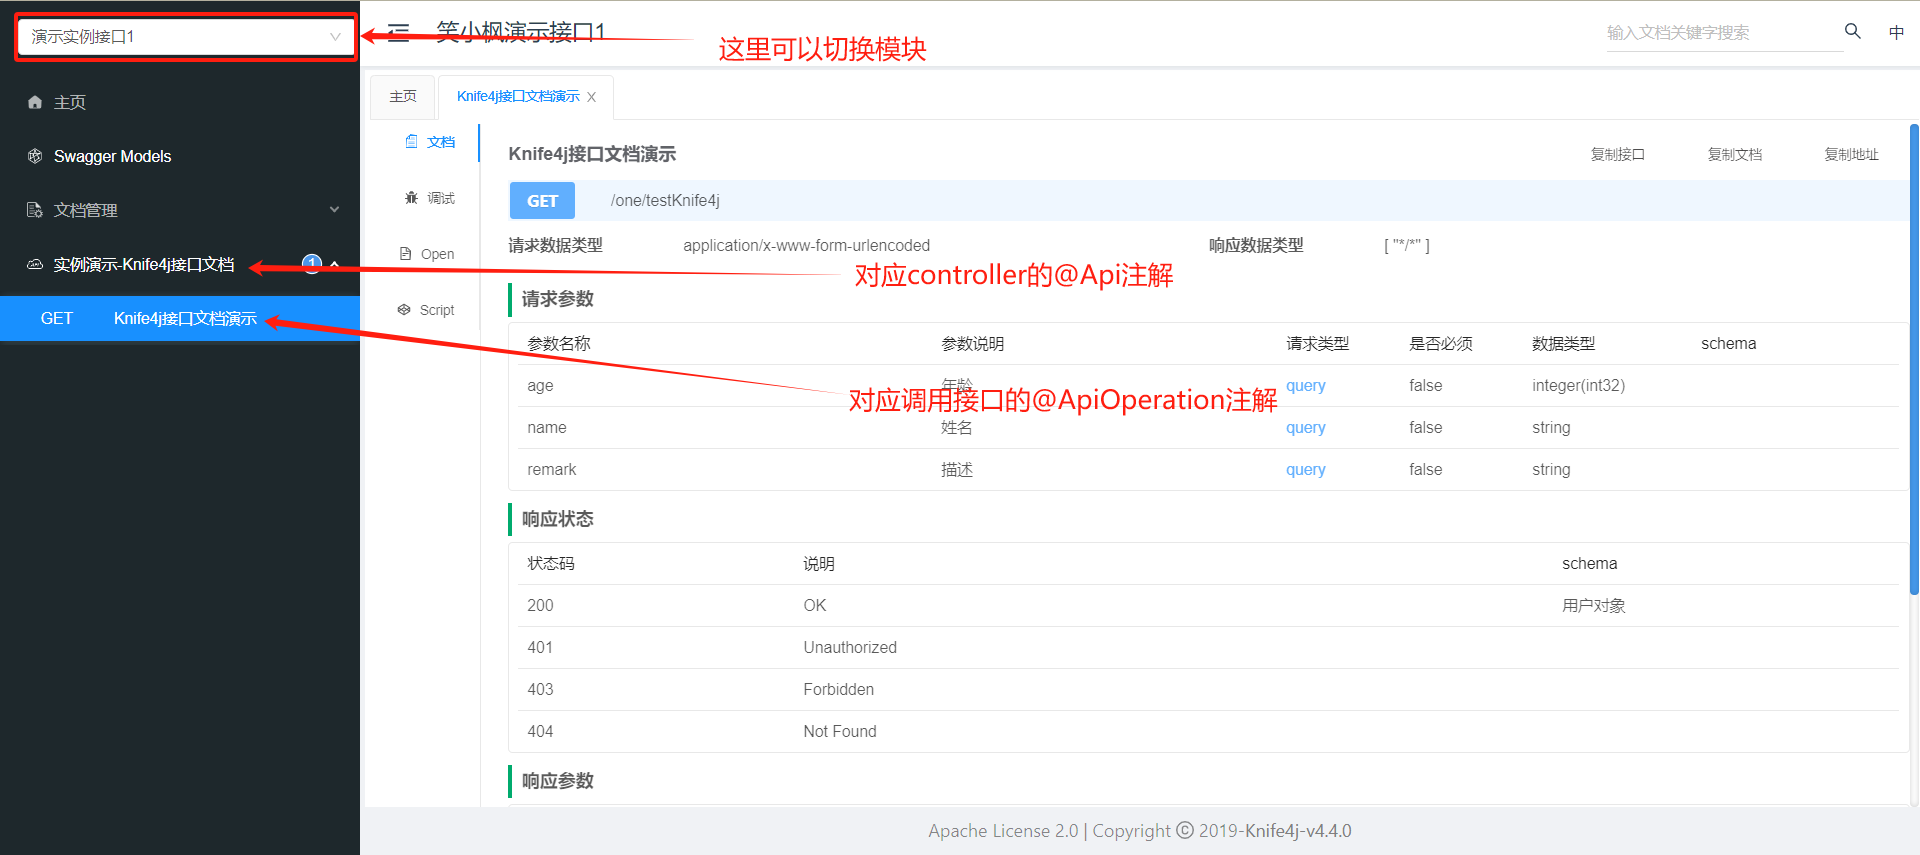
2.3 看下页面效果👌
项目启动后,在浏览器输入http://127.0.0.1:6666/doc.html访问
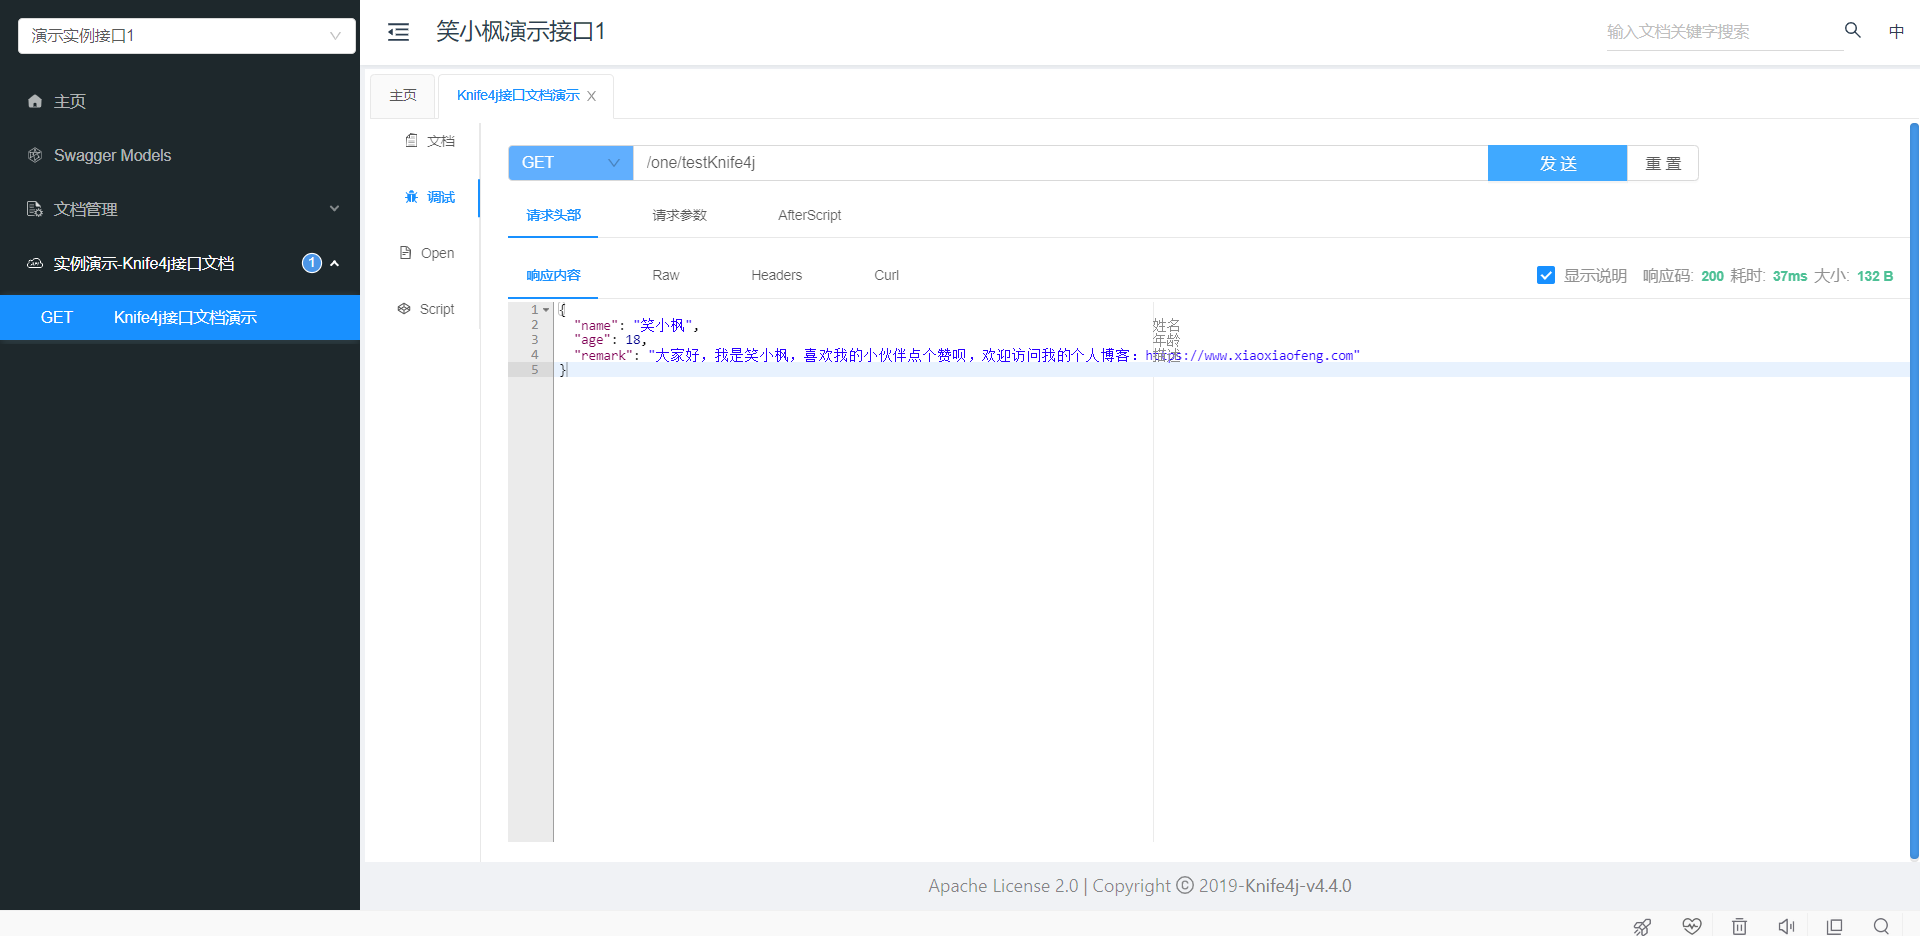
接口调试:
2.4 增强模式😦
更多的增强模式使用可以参考官方文档增强模式
Knife4j自2.0.6版本开始,将目前在Ui界面中一些个性化配置剥离,开发者可以在后端进行配置,并且提供的knife4j-spring-boot-strater组件自动装载
spring.factories配置如下:
# Auto Configure
org.springframework.boot.autoconfigure.EnableAutoConfiguration=\
com.github.xiaoymin.knife4j.spring.configuration.Knife4jAutoConfiguration
在Spring Boot配置文件中,完整的配置如下:
knife4j:enable: truedocuments:-group: 2.X版本name: 接口签名locations: classpath:sign/*setting:language: zh-CNenableSwaggerModels: trueenableDocumentManage: trueswaggerModelName: 实体类列表enableVersion: falseenableReloadCacheParameter: falseenableAfterScript: trueenableFilterMultipartApiMethodType: POSTenableFilterMultipartApis: falseenableRequestCache: trueenableHost: falseenableHostText: 192.168.0.193:8000enableHomeCustom: truehomeCustomLocation: classpath:markdown/home.mdenableSearch: falseenableFooter: falseenableFooterCustom: truefooterCustomContent: Copyright 2022-[笑小枫](https://www.xiaoxiaofeng.com)enableDynamicParameter: falseenableDebug: trueenableOpenApi: falseenableGroup: truecors: falseproduction: falsebasic:enable: falseusername: testpassword: 123123
在以前的版本中,开发者需要在配置文件中手动使用@EnableKnife4j来使用增强,自2.0.6版本后,只需要在配置文件中配置knife4j.enable=true即可不在使用注解
注意:要使用Knife4j提供的增强,knife4j.enable=true必须开启
各个配置属性说明如下:
| 属性 | 默认值 | 说明值 |
|---|---|---|
| knife4j.enable | false | 是否开启Knife4j增强模式 |
| knife4j.cors | false | 是否开启一个默认的跨域配置,该功能配合自定义Host使用 |
| knife4j.production | false | 是否开启生产环境保护策略,详情参考文档 |
| knife4j.basic | 对Knife4j提供的资源提供BasicHttp校验,保护文档 | |
| knife4j.basic.enable | false | 关闭BasicHttp功能 |
| knife4j.basic.username | basic用户名 | |
| knife4j.basic.password | basic密码 | |
| knife4j.documents | 自定义文档集合,该属性是数组 | |
| knife4j.documents.group | 所属分组 | |
| knife4j.documents.name | 类似于接口中的tag,对于自定义文档的分组 | |
| knife4j.documents.locations | markdown文件路径,可以是一个文件夹(classpath:markdowns/*),也可以是单个文件(classpath:md/sign.md) | |
| knife4j.setting | 前端Ui的个性化配置属性 | |
| knife4j.setting.enableAfterScript | true | 调试Tab是否显示AfterScript功能,默认开启 |
| knife4j.setting.language | zh-CN | Ui默认显示语言,目前主要有两种:中文(zh-CN)、英文(en-US) |
| knife4j.setting.enableSwaggerModels | true | 是否显示界面中SwaggerModel功能 |
| knife4j.setting.swaggerModelName | Swagger Models | 重命名SwaggerModel名称,默认 |
| knife4j.setting.enableDocumentManage | true | 是否显示界面中"文档管理"功能 |
| knife4j.setting.enableReloadCacheParameter | false | 是否在每个Debug调试栏后显示刷新变量按钮,默认不显示 |
| knife4j.setting.enableVersion | false | 是否开启界面中对某接口的版本控制,如果开启,后端变化后Ui界面会存在小蓝点 |
| knife4j.setting.enableRequestCache | true | 是否开启请求参数缓存 |
| knife4j.setting.enableFilterMultipartApis | false | 针对RequestMapping的接口请求类型,在不指定参数类型的情况下,如果不过滤,默认会显示7个类型的接口地址参数,如果开启此配置,默认展示一个Post类型的接口地址 |
| knife4j.setting.enableFilterMultipartApiMethodType | POST | 具体接口的过滤类型 |
| knife4j.setting.enableHost | false | 是否启用Host |
| knife4j.setting.enableHomeCustom | false | 是否开启自定义主页内容 |
| knife4j.setting.homeCustomLocation | 主页内容Markdown文件路径 | |
| knife4j.setting.enableSearch | false | 是否禁用Ui界面中的搜索框 |
| knife4j.setting.enableFooter | true | 是否显示Footer |
| knife4j.setting.enableFooterCustom | false | 是否开启自定义Footer |
| knife4j.setting.footerCustomContent | false | 自定义Footer内容 |
| knife4j.setting.enableDynamicParameter | false | 是否开启动态参数调试功能 |
| knife4j.setting.enableDebug | true | 启用调试 |
| knife4j.setting.enableOpenApi | true | 显示OpenAPI规范 |
| knife4j.setting.enableGroup | true | 显示服务分组 |
关于个性化文档(knife4j.documents)以及个性化设置(knife4j.setting),有一些细微的区别,开发者在配置文件中进行配合好后,还需要在创建Docket对象时调用Knife4j提供的扩展Extesions进行赋值
示例代码如下:
package com.maple.knife4j.config;import com.github.xiaoymin.knife4j.spring.extension.OpenApiExtensionResolver;
import lombok.AllArgsConstructor;
import org.springframework.context.annotation.Bean;
import org.springframework.context.annotation.Configuration;
import springfox.documentation.builders.ApiInfoBuilder;
import springfox.documentation.builders.PathSelectors;
import springfox.documentation.builders.RequestHandlerSelectors;
import springfox.documentation.service.Contact;
import springfox.documentation.spi.DocumentationType;
import springfox.documentation.spring.web.plugins.Docket;
import springfox.documentation.swagger2.annotations.EnableSwagger2WebMvc;/*** @author 笑小枫 <https://www.xiaoxiaofeng.com/>* @date 2023/12/21*/
@Configuration
@EnableSwagger2WebMvc
@AllArgsConstructor
public class Knife4jConfiguration {/*** 引入Knife4j提供的扩展类*/private final OpenApiExtensionResolver openApiExtensionResolver;/*** 接口分类:配置模块一的接口* 如果只有一个模块,删掉模块二即可* 如果有多个,可以继续配置*/@Bean(value = "exampleOne")public Docket exampleOne() {return new Docket(DocumentationType.SWAGGER_2).apiInfo(new ApiInfoBuilder().title("笑小枫演示接口1").description("笑小枫演示接口1").termsOfServiceUrl("http://127.0.0.1:8080").contact(new Contact("笑小枫", "https://www.xiaoxiaofeng.com", "zfzjava@163.com")).version("1.0")//赋予插件体系.build())//分组名称.groupName("笑小枫演示接口1").select()//这里指定Controller扫描包路径.apis(RequestHandlerSelectors.basePackage("com.maple.knife4j.controller.one")).paths(PathSelectors.any()).build()//赋予插件体系.extensions(openApiExtensionResolver.buildExtensions("笑小枫演示接口1"));}/*** 接口分类:配置模块二的接口*/@Bean(value = "exampleTwo")public Docket exampleTwo() {return new Docket(DocumentationType.SWAGGER_2).apiInfo(new ApiInfoBuilder().title("笑小枫演示接口2").description("笑小枫演示接口2").termsOfServiceUrl("http://127.0.0.1:8080").contact(new Contact("笑小枫", "https://www.xiaoxiaofeng.com", "zfzjava@163.com")).version("1.0").build())//分组名称.groupName("笑小枫演示接口2").select()//这里指定Controller扫描包路径.apis(RequestHandlerSelectors.basePackage("com.maple.rest.controller.two")).paths(PathSelectors.any()).build();}
}buildExtensions方法需要传入分组名称,该分组名称主要是为了区分开发者在构建自定义文档时,在不同的Docket逻辑分组下进行区别显示。
OpenApiExtensionResolver辅助类需要配置knife4j.enable=true才能自动@Autowired
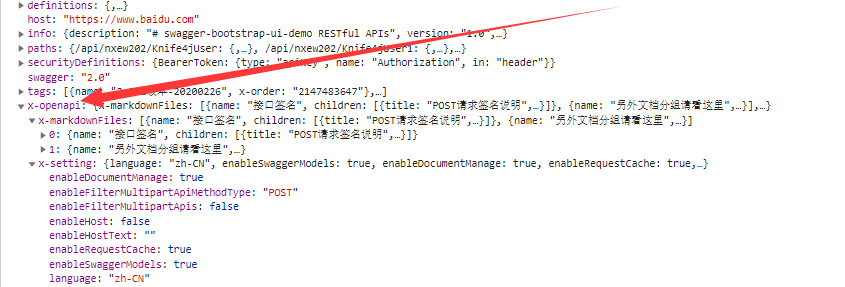
增强效果开启后,在最终调用接口时,Knife4j会添加扩展属性x-openapi,如下图:
更多功能,请参考官方文档:https://doc.xiaominfo.com/knife4j/
3. 项目源码💕
本文到此就结束了,如果帮助到你了,帮忙点个赞👍
本文源码:https://github.com/hack-feng/maple-product/tree/main/maple-knife4j
🐾我是笑小枫,全网皆可搜的【笑小枫】
这篇关于SpringBoot集成Swagger2的增强版Knife4j的文章就介绍到这儿,希望我们推荐的文章对编程师们有所帮助!


