本文主要是介绍LINUX网络工具,希望对大家解决编程问题提供一定的参考价值,需要的开发者们随着小编来一起学习吧!
转载自:http://blog.csdn.net/evenness/article/details/7530937
一、ifconfig
用于基本接口与IP配置的ifconfig
ifconfig工具(interface configurator,接口配置器)提供了一些非常基本但是非常重要的功能。它可以打开和关闭网络适配器,分配IP地址与netmask信息。一些常用指令如下:
查看网络接口当前配置与接口命名:
ifconfig
打开(up)或关闭(down)适配器
ifconfig <网络名> <up|down>
为适配器分配IP地址:
ifconfig <网络名> <ip地址>
为适配器分配第二个IP地址:
ifconfig <网络名:实例数> <ip地址>
范例:ifconfig eth0:0 192.168.1.101
二、ethtool
用于管理以太网卡的ethtool工具
Ethtool可以查看和修改以太适配器的各种设置(不包括Wi-Fi网卡),包括tx/rx,checksumming和wake-on-LAN设置。下面是一些有用的命令:
显示某个网络适配器的驱动信息,适用于查询软件兼容性的情况:
ethtool -i <接口名>
显示网络数据:
ethtool -S
设置适配器连接速度(Mbps)
ethtool speed <10|100|1000>
ethtool 工具有一个-E 指令, 可以通过此指令修改网卡的eeprom. 前提是此网卡驱动编写了ethtool驱动接口,并具有eeprom.
以intel e1000系列网卡为例
首先取得e000设备的VenID:DevID, 这个VenID:DevID就是ethtool -E 指令中magic 的参数.
可以分别通过2种方式取得
1> lspci 查看
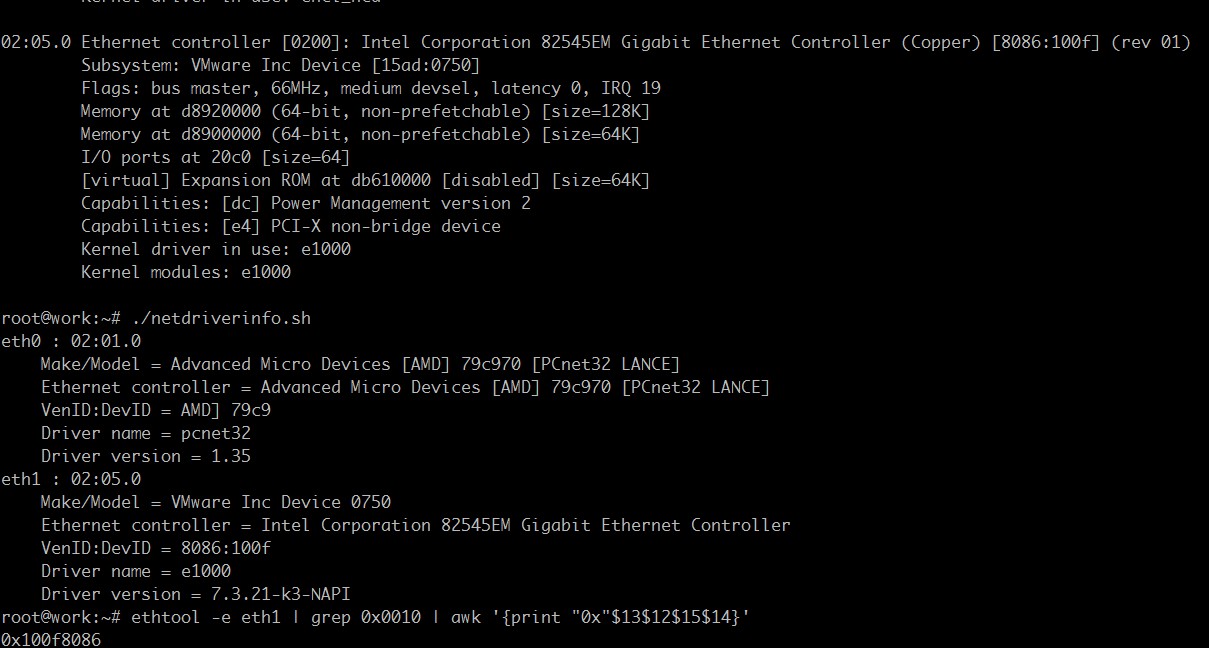
~# lspci -nn -v |grep "Ethernet Controller"
02:05.0 Ethernet controller [0200]: Intel Corporation 82545EM Gigabit Ethernet Controller (Copper) [8086:100f] (rev 01)
2> Intel 网卡eeprom已经包含了VenID:DevID, 具体可以查看每个网卡的芯片及开发手册
~# ethtool -e eth1 | grep 0x0010 | awk '{print "0x"$13$12$15$14}'
0x100f8086
也可在以下链接查阅到.
Intel® PRO/100, PRO/1000 & 10GbE Network Adapter ID and driver guide
获取到VenID:DevID后, 就可以直接修改了.
#!/bin/bash
if [ -z "$1" ]; then
echo "Usage: $0 /<interface/>"
echo " i.e. $0 eth0"
exit 1
fi
if ! ifconfig $1 > /dev/null; then
exit 1
fi
dev=$(ethtool -e $1 | grep 0x0010 | awk '{print "0x"$13$12$15$14}')
ethtool -E $1 magic $dev offset 0xAA value 0xBB
0xAA 就是eeprom位置
0xBB 就是新值
命令:
ethtool -E eth0 magic 0x3A8EBEEF offset 0x10 value 0x1A
The Stargate 2 daughter card has a serial EEPROM (AT93C45A) that can store 128 bytes. The MAC address is stored at word offset 0x20 (byte offset 0x40). Ethtool displays the contents of EEPROM. For example:
[root@SG2-21 /root]#ethtool -e eth0
Offset          Values
------          ------
0x0000          ff ff ff ff ff ff ff ff ff ff ff ff ff ff ff ff
0x0010          ff ff ff ff ff ff ff ff ff ff ff ff ff ff ff ff
0x0020          ff ff ff ff ff ff ff ff ff ff ff ff ff ff ff ff
0x0030          ff ff ff ff ff ff ff ff ff ff ff ff ff ff ff ff
0x0040          00 50 c2 2f 30 13 ff ff ff ff ff ff ff ff ff ff
0x0050          ff ff ff ff ff ff ff ff ff ff ff ff ff ff ff ff
0x0060          ff ff ff ff ff ff ff ff ff ff ff ff ff ff ff ff
0x0070          ff ff ff ff ff ff ff ff ff ff ff ff ff ff ff ff
Ethtool also modifies the EEPROM
[root@SG2-21 /root]#ethtool -E eth0 magic 0x3A8EBEEF offset 0x10 value 0x1A[root@SG2-21 /root]#ethtool -e eth0
Offset          Values
------          ------
0x0000          ff ff ff ff ff ff ff ff ff ff ff ff ff ff ff ff
0x0010          1a ff ff ff ff ff ff ff ff ff ff ff ff ff ff ff
0x0020          ff ff ff ff ff ff ff ff ff ff ff ff ff ff ff ff
0x0030          ff ff ff ff ff ff ff ff ff ff ff ff ff ff ff ff
0x0040          00 50 c2 2f 30 13 ff ff ff ff ff ff ff ff ff ff
0x0050          ff ff ff ff ff ff ff ff ff ff ff ff ff ff ff ff
0x0060          ff ff ff ff ff ff ff ff ff ff ff ff ff ff ff ff
0x0070          ff ff ff ff ff ff ff ff ff ff ff ff ff ff ff ff
[ edit]
Setting the MAC Address
The MAC address is set with the script /sbin/setMAC. For example,
[root@SG2-21 /root]#setMAC 00:50:C2:2F:30:13setmac to 00:50:C2:2F:30:13
The script is:
#!/bin/bashecho "setmac to $1"numbers=(`echo $1 | tr ':' ' '`)# echo ${numbers[1]}ethtool -E eth0 magic 0x3A8EBEEF offset 0x40 value 0x${numbers[0]}ethtool -E eth0 magic 0x3A8EBEEF offset 0x41 value 0x${numbers[1]}ethtool -E eth0 magic 0x3A8EBEEF offset 0x42 value 0x${numbers[2]}ethtool -E eth0 magic 0x3A8EBEEF offset 0x43 value 0x${numbers[3]}ethtool -E eth0 magic 0x3A8EBEEF offset 0x44 value 0x${numbers[4]}ethtool -E eth0 magic 0x3A8EBEEF offset 0x45 value 0x${numbers[5]}
The setMAC script is called by px2init during Initial File System Configuration.
三、iwconfig
iwconfig配置无线网络
iwconfig工具可以算是无线网卡的ifconfig和ethtool。你可以检查基本的Wi-Fi网络设置,如SSID、channel和加密等细节。此外还可以修改一些高级设置,包括接收敏感度,RTS/CTS,碎片,以及重试数。下面介绍几个有用的命令:
显示当前无线设置,包括接口名称:
iwconfig
设置ESSID(扩展服务设置识别器)或网络名:
iwconfig <接口名> essid <网络名>
范例:iwconfig <接口名> "my network"
范例:Example: iwconfig <接口名> any
设置radio的无线channel(1-11):
iwconfig <接口名> <channel>
输入WEP加密密钥(WPA和WPA1尚不支持,需要wpa_supplicant的支持):
iwconfig eth0 key <HEX格式的密钥>
限制适配器仅能在指定MAC地址下连接到AP:
iwconfig <接口名> ap <mac地址>
范例:iwconfig eth0 ap 00:60:1D:01:23:45
设置radio的发射强度,仅在无线网卡支持的情况下有效。默认单位为dBm,可设置为mW:
iwconfig <接口名> txpower <强度>
范例:iwconfig eth0 txpower 15
范例:iwconfig eth0 txpower 30mW
四,tcpdump
用于嗅探网络包的tcpdump
这不是一个简单的工具。这是一个嗅探器/分析器。它可以捕捉你的接口中和网络上传输的包。这个工具常常通过其他GUI程序进行调用,不过在terminal下也同样有用。可以从以下几个指令开始了解:
-i:设置需要捕捉的接口,如eth0或ath0。
-n:停止用主机名称替换IP地址。
-nn:停止解析主机名或端口名。
-s:每个packet显示的最大byte数。默认值为68,设置为0则显示整个packet。
v,-vv和-vvv:显示随packet输出的详细信息,如IP packet的全长度和选项,完全解码的SMB packet,以及telnet细节。
-x:以HEX格式显示packet内容。
-X:以ASCII格式输出packet内容。
五,ping
Ping,你的网络声纳
Ping工具与微软在Windows中提供的差不多,不过选项类型和名称不同。另外,Linux中的Ping在默认情况下会无休止的ping,而不是Windows中的四次。
开始ping一个IP地址或主机名/域名:
ping <ip地址>
要停止ping,使用Ctrl+C。
一些有用的选项包括:
-c:为发送的packet计数
-i:packet间等待的时间长度,单位为秒
-s:packet大小,默认为56
-w:执行ping的时间长度,单位为秒
六,netstat
检测网络数据的netstat
netstat工具可以显示网络连接、接口数据、路由表、masquerade连接和multicast成员的详细信息。常用指令如下:
查看打开的socket列表:
netstat
显示所有网络接口:
netstat -i
显示每个协议的概括情况:
netstat -s
七,hostname
用于查看和修改主机名的hostname
所有管理员都知道主机名(hostname)是什么东西。主机名是一个相比IP地址而言更加友好的网络设备显示方式。Linux当中提供了一个hostname工具,可以让你暂时修改你的主机名。
查看当前主机名:
hostname
暂时更改主机名(可以维持到重启之前):
hostname <新的主机名>
若想要永久的更改主机名,则需要编辑/etc/hostname文件或/etc/sysconfig/network文件。
Linux/Unix命令之Ethtool
描述:
Ethtool是用于查询及设置网卡参数的命令。
概要:
ethtool ethX //查询ethX网口基本设置
ethtool –h //显示ethtool的命令帮助(help)
ethtool –i ethX //查询ethX网口的相关信息
ethtool –d ethX //查询ethX网口注册性信息
ethtool –r ethX //重置ethX网口到自适应模式
ethtool –S ethX //查询ethX网口收发包统计
ethtool –s ethX [speed 10|100|1000]\ //设置网口速率10/100/1000M
[duplex half|full]\ //设置网口半/全双工
[autoneg on|off]\ //设置网口是否自协商
[port tp|aui|bnc|mii]\ //设置网口类型
[phyad N]\
[xcvr internal|exteral]\
[wol p|u|m|b|a|g|s|d...]\
[sopass xx:yy:zz:aa:bb:cc]\
[msglvl N]
举例:
1)[root@linux /]# ethtool eth1
Settings for eth0:
Supported ports: [ TP ]
Supported link modes: 10baseT/Half 10baseT/Full
100baseT/Half 100baseT/Full
1000baseT/Full
Supports auto-negotiation: Yes
Advertised link modes: 10baseT/Half 10baseT/Full
100baseT/Half 100baseT/Full
1000baseT/Full
Advertised auto-negotiation: Yes
Speed: 1000Mb/s
Duplex: Full
Port: Twisted Pair
PHYAD: 1
Transceiver: internal
Auto-negotiation: on
Supports Wake-on: g
Wake-on: d
Link detected: yes
2)[root@linux /]#
ethtool -i eth1
driver: bnx2
version: 2.0.8-rh
firmware-version: 6.2.12 bc 5.2.3 NCSI 2.0.11
bus-info: 0000:01:00.0
3)[root@linux /]#
ethtool -S eth1
NIC statistics:
rx_bytes: 216494818
rx_error_bytes: 0
tx_bytes: 27084170553
tx_error_bytes: 0
rx_ucast_packets: 2933822
rx_mcast_packets: 33
rx_bcast_packets: 956
tx_ucast_packets: 18464909
tx_mcast_packets: 6
tx_bcast_packets: 179
tx_mac_errors: 0
tx_carrier_errors: 0
rx_crc_errors: 0
rx_align_errors: 0
tx_single_collisions: 0
tx_multi_collisions: 0
tx_deferred: 0
tx_excess_collisions: 0
tx_late_collisions: 0
tx_total_collisions: 0
rx_fragments: 0
rx_jabbers: 0
rx_undersize_packets: 0
rx_oversize_packets: 0
rx_64_byte_packets: 959
rx_65_to_127_byte_packets: 2930241
rx_128_to_255_byte_packets: 2634
rx_256_to_511_byte_packets: 752
rx_512_to_1023_byte_packets: 169
rx_1024_to_1522_byte_packets: 56
rx_1523_to_9022_byte_packets: 0
tx_64_byte_packets: 183
tx_65_to_127_byte_packets: 357
tx_128_to_255_byte_packets: 750
tx_256_to_511_byte_packets: 224
tx_512_to_1023_byte_packets: 991032
tx_1024_to_1522_byte_packets: 17472548
tx_1523_to_9022_byte_packets: 0
rx_xon_frames: 0
rx_xoff_frames: 0
tx_xon_frames: 0
tx_xoff_frames: 0
rx_mac_ctrl_frames: 0
rx_filtered_packets: 0
rx_ftq_discards: 0
rx_discards: 0
rx_fw_discards: 0
4)[root@linux /]# ethtool -s eth1 autoneg off speed 100 duplex full
相关:
1)[root@linux /]# which ethtool
/sbin/ethtool
2)[root@linux /]# rpm -qf /sbin/ethtool
ethtool-1.6-5
3)怎样使ethtool设置永久保存在网络设备中?
解决方法一:
ethtool设置可通过/etc/sysconfig/network-scripts/ifcfg-ethX文件保存,从而在设备下次启动时激活选项。
例如:ethtool -s eth0 speed 100 duplex full autoneg off
此指令将eth0设备设置为全双工自适应,速度为100Mbs。若要eth0启动时设置这些参数, 修改文件/etc/sysconfig/network-scripts/ifcfg-eth0 ,添加如下一行:
ETHTOOL_OPTS="speed 100 duplex full autoneg off"
解决方法二:
将ethtool设置写入/etc/rc.d/rc.local之中。
二
解决方法:
对Intel千兆网卡禁用自适应时必须指定链路速度和全双工模式。当使用ethtool来禁用使用e1000网卡驱动模块的网卡自适应特性时,必须同时指定链路速度和全双工工作模式。例如: ethtool -s eth0 autoneg off
会边比自适应,但是只是临时禁用,如果在命令中没有指定链路速度和全双工工作模式,驱动会自动重新打开自适应。
为了使用ethtool工具来禁用e1000网卡驱动模块的网卡自适应特性,使用以下步骤
1. 进入终端模式。 2. 以root身份执行 ethtool -s ethx autoneg off speed 1000 duplex full
这里ethX是网卡的名字(例如eth0或者eth1等等),这个命令将关闭该网卡的自适应特性,并且强制设置网卡速度为1Gb,全双公模式。
另外ethtool比mii-tool要高级,mii-tool只支持 Port: MII的网卡.
ethtool with a single argument specifying the device name prints current setting of the specified device.
- -h
- shows a short help message. -a
- queries the specified ethernet device for pause parameter information. -A
- change the pause parameters of the specified ethernet device. autoneg on| off
- Specify if pause autonegotiation is enabled. rx on| off
- Specify if RX pause is enabled. tx on| off
- Specify if TX pause is enabled. -c
- queries the specified ethernet device for coalescing information. -C
- change the coalescing settings of the specified ethernet device. -g
- queries the specified ethernet device for rx/tx ring parameter information. -G
- change the rx/tx ring parameters of the specified ethernet device. rx N
- Change number of ring entries for the Rx ring. rx-mini N
- Change number of ring entries for the Rx Mini ring. rx-jumbo N
- Change number of ring entries for the Rx Jumbo ring. tx N
- Change number of ring entries for the Tx ring. -i
- queries the specified ethernet device for associated driver information. -d
- retrieves and prints a register dump for the specified ethernet device. -e
- retrieves and prints an EEPROM dump for the specified ethernet device. -k
- queries the specified ethernet device for checksumming information. -K
- change the checksumming parameters of the specified ethernet device. rx on| off
- Specify if RX checksumming is enabled. tx on| off
- Specify if TX checksumming is enabled. sg on| off
- Specify if scatter-gather is enabled. -p
- initiates adapter-specific action intended to enable an operator to easily identify the adapter by sight. typically this involves blinking one or more LEDs on the specific ethernet port. N
- Length of time to perform phys-id, in seconds. -r
- restarts auto-negotiation on the specified ethernet device, if auto-negotiation is enabled. -S
- queries the specified ethernet device for NIC- and driver-specific statistics. -t
- executes adapter selftest on the specified ethernet device. Possible test modes are: offline| online
- defines test type: offline (default) means to perform full set of tests possibly causing normal operation interruption during the tests, online means to perform limited set of tests do not interrupting normal adapter operation. -s
- option allows changing some or all settings of the specified ethernet device. All following options only apply if -s was specified. speed 10| 100| 1000
- Set speed in Mb/s. ethtool with single argument will show you the supported device speeds. duplex half| full
- Set full or half duplex mode. port tp| aui| bnc| mii
- Select device port. autoneg on| off
- Specify if autonegotiation is enabled. In the usual case it is, but might cause some problems with some network devices, so you can turn it off. phyad N
- PHY address. xcvr internal| external
- Select transceiver type. Currently only internal and external can be specified, in the future further types might be added. wol p| u| m| b| a| g| s| d...
- Set Wake-on-LAN options. Not all devices support this. The argument to this option is a string of characters specifying which options to enable.
-
- p
- Wake on phy activity u
- Wake on unicast messages m
- Wake on multicast messages b
- Wake on broadcast messages a
- Wake on ARP g
- Wake on MagicPacket(tm) s
- Enable SecureOn(tm) password for MagicPacket(tm) d
- Disable (wake on nothing). This option clears all previous options.
sopass xx:yy:zz:aa:bb:cc -
- Set the SecureOn(tm) password. The argument to this option must be 6 bytes in ethernet MAC hex format ( xx : yy : zz : aa : bb : cc). msglvl N
- Set the driver message level. Meanings differ per driver
改变网络接口的速度和协商方式的工具miitool 和ethtool
通过mii-tool和ethtool工具来调整网卡的速度、双工等,这样能提高网卡的效率;
mii-tool 配置网络设备协商方式的工具
mii-tool 介绍
mii-tool - view, manipulate media-independent interface status (mii-tool 是查看,管理介质的网络接口的状态)
有时网卡需要 配置协商方式 ,比如10/100/1000M的网卡半双工、全双工、自动协商的配置 。但大多数的网络设备是不用我们来修改协商,因为大多数网络设置接入的时候,都采用自动协商来解决相互通信的问题。但在有的情况下,需要我们手动来设置网卡的协商方式;
mii-tool 就是能指定网卡的协商方式。
注明:我在使用 mii-tool 工具修改协商模式时,提示是错误的,因为是在虚拟机中做的,不过虚拟机中的网卡我查看是支持全双工模式的,可是提示错误 SIOCGMIIPHY on 'eth0' failed: Operation not supported ,问题出在那里也不清楚,用 google 查了下,发现不少人都是这样的错误,也没说明原因;不过多数人提示可以使用 ethtool 工具去修改,我测试了下,还行!还有一种方法是修改 /etc/modules.conf 配置文件;
# ethtool -s eth0 autoneg off
# ethtool -s eth0 duplex full
# ethtool -s eth0 duplex full
在 /etc/modules.conf 添加内容
alias eth0 bcm5700 line_speed=100 full_duplex=1
options bcm5700 line_speed=100 full_duplex=1
重起!
alias eth0 bcm5700 line_speed=100 full_duplex=1
options bcm5700 line_speed=100 full_duplex=1
重起!
mii-tool 更改网络接口协商的方法;
[root@localhost]# mii-tool --help
usage: mii-tool [-VvRrwl] [-A media,... | -F media] [interface ...]
-V, --version display version information
-v, --verbose more verbose output 注:显示网络接口的信息;
-R, --reset reset MII to poweron state 注:重设MII到开启状态;
-r, --restart restart autonegotiation 注:重启自动协商模式;
-w, --watch monitor for link status changes 注:查看网络接口连接的状态变化;
-l, --log with -w, write events to syslog 注:写入事件到系统日志;
-A, --advertise=media,... advertise only specified media 注:指令特定的网络接口;
-F, --force=media force specified media technology 注:更改网络接口协商方式;
media: 100baseT4, 100baseTx-FD, 100baseTx-HD, 10baseT-FD, 10baseT-HD,
(to advertise both HD and FD) 100baseTx, 10baseT
查看网络接口的协商状态
[root@localhost]# mii-tool -v eth0
eth0: negotiated 100baseTx-FD, link ok
product info: vendor 00:00:00, model 0 rev 0
basic mode: autonegotiation enabled
basic status: autonegotiation complete, link ok
capabilities: 100baseTx-FD 100baseTx-HD 10baseT-FD 10baseT-HD
advertising: 100baseTx-FD 100baseTx-HD 10baseT-FD 10baseT-HD
link partner: 100baseTx-FD 100baseTx-HD 10baseT-FD 10baseT-HD flow-control
注:上面的例子,我们可以看得到是自动协商。注意红字的部份;
更改网络接口协商方式;
更改网络接口的协商方式,我们要用到-F选项,后面可以接 100baseT4, 100baseTx-FD, 100baseTx-HD, 10baseT-FD, 10baseT-HD等参数;
把网络接口eth0改为 1000Mb/s全双工的模式
[root@localhost]# mii-tool -F 100baseTx-FD
[root@localhost]#mii-tool -v eth0
eth0: 100 Mbit, full duplex, link ok
product info: vendor 00:00:00, model 0 rev 0
basic mode: 100 Mbit, full duplex
basic status: link ok
capabilities: 100baseTx-FD 100baseTx-HD 10baseT-FD 10baseT-HD
advertising: 100baseTx-FD 100baseTx-HD 10baseT-FD 10baseT-HD
也可以使用ethtool工具修改:
[root@localhost]# ethtool -s eth0 speed 100 duplex full
ethtool 工具关于网络协商功能介绍
ethtool - Display or change ethernet card settings(ethtool 是用来显示和更改网卡设置的工具);这个工具比较复杂,功能也特别多;
ethtool 显示网络端口设置功能
[root@localhost]# ethtool eth0
Settings for eth0:
Supported ports: [ TP MII ]
Supported link modes: 10baseT/Half 10baseT/Full
100baseT/Half 100baseT/Full
Supports auto-negotiation: Yes
Advertised link modes: 10baseT/Half 10baseT/Full
100baseT/Half 100baseT/Full
Advertised auto-negotiation: No 注:自动协商关闭
Speed: 100Mb/s 注:速度 100Mb
Duplex: Full 注:全双工
Port: MII
PHYAD: 32
Transceiver: internal
Auto-negotiation: off
Supports Wake-on: pumbg
Wake-on: d
Current message level: 0x00000007 (7)
Link detected: yes 注:eth0已经激活;
ethtool 设置网卡的协商模式;
ethtool -s DEVNAME \
[ speed 10|100|1000 ] \
[ duplex half|full ] \
[ port tp|aui|bnc|mii|fibre ] \
[ autoneg on|off ] \
[ speed 10|100|1000 ] \
[ duplex half|full ] \
[ port tp|aui|bnc|mii|fibre ] \
[ autoneg on|off ] \
把网卡eth0 速度改为10Mb/s,采用半双工;
[root@localhost]# ethtool -s eth1 speed 10 duplex half
[root@localhost]# ethtool eth1
Settings for eth1:
Supported ports: [ TP MII ]
Supported link modes: 10baseT/Half 10baseT/Full
100baseT/Half 100baseT/Full
Supports auto-negotiation: Yes
Advertised link modes: 10baseT/Half 10baseT/Full
100baseT/Half 100baseT/Full
Advertised auto-negotiation: No
Speed: 10Mb/s 注:速度 10M/s
Duplex: Half 注:半双工
Port: MII
PHYAD: 32
Transceiver: internal
Auto-negotiation: off
Supports Wake-on: pumbg
Wake-on: d
Current message level: 0x00000007 (7)
Link detected: no 注:eth1没有激活;
把网卡eth0 速度改为100Mb/s,采用全双工;
[root@localhost]# ethtool -s eth1 speed 100 duplex full
[root@localhost]# ethtool eth1
Settings for eth1:
Supported ports: [ TP MII ]
Supported link modes: 10baseT/Half 10baseT/Full
100baseT/Half 100baseT/Full
Supports auto-negotiation: Yes
Advertised link modes: 10baseT/Half 10baseT/Full
100baseT/Half 100baseT/Full
Advertised auto-negotiation: No
Speed: 100Mb/s 注:速度 100M/s
Duplex: Full 注:全双工
Port: MII
PHYAD: 32
Transceiver: internal
Auto-negotiation: off
Supports Wake-on: pumbg
Wake-on: d
Current message level: 0x00000007 (7)
Link detected: no
注:eth1网卡没有激活;
这篇关于LINUX网络工具的文章就介绍到这儿,希望我们推荐的文章对编程师们有所帮助!


