本文主要是介绍在VagrantBox中安装TmesTen Classic,希望对大家解决编程问题提供一定的参考价值,需要的开发者们随着小编来一起学习吧!
概述
Windows 10作为Host,其上安装VirtualBox VM作为timesten主机。
然后在Host上安装SQL Developer管理timesten
准备一台Linux虚机
使用oracle官方的vagrantbox,操作系统为OL7,在Windows下执行以下操作:
git clone https://github.com/oracle/vagrant-boxes.git
vagrant up
vagrant putty
创建用户与目录
创建用户,instance Administrator为timesten,timesten user group为oinstall:
sudo groupadd oinstall
sudo useradd timesten -g oinstall
sudo passwd timesten
创建数据库目录:
sudo mkdir -p /u01/database/data
sudo mkdir -p /u01/database/log
sudo chown -R timesten:oinstall /u01/database
创建注册表目录:
sudo mkdir /etc/TimesTen
sudo chown timesten:oinstall /etc/TimesTen
验证主机名解析正确:
$ ping $(hostname)
PING ol7-vagrant-timesten (127.0.0.1) 56(84) bytes of data.
64 bytes from ol7-vagrant-timesten (127.0.0.1): icmp_seq=1 ttl=64 time=0.031 ms
64 bytes from ol7-vagrant-timesten (127.0.0.1): icmp_seq=2 ttl=64 time=0.041 ms
^C
--- ol7-vagrant-timesten ping statistics ---
2 packets transmitted, 2 received, 0% packet loss, time 1064ms
rtt min/avg/max/mdev = 0.031/0.036/0.041/0.005 ms
安装数据库软件
切换到instance Administrator用户timesten:
su - timesten
id
解压安装文件:
mkdir /tmp/timesten
unzip -d /tmp/timesten /vagrant/p27679963_1122_Linux-x86-64.zip
开始安装。除了TNS_ADMIN设置选择s跳过及安装示例程序选择Y,其余均回车选择默认:
$ cd /tmp/timesten/linux8664/
$ ./setup.shNOTE: Each TimesTen installation is identified by a unique instance name.The instance name must be a non-null alphanumeric string, not longerthan 255 characters.Please choose an instance name for this installation? [ tt1122 ]
Instance name will be 'tt1122'.
Is this correct? [ yes ]Of the three components:[1] Client/Server and Data Manager[2] Data Manager Only[3] Client OnlyWhich would you like to install? [ 1 ]Of the following options :[1] /home/timesten[2] /tmp/timesten[3] Specify a location[q] Quit the installationWhere would you like to install the tt1122 instance of TimesTen? [ 1 ]
Where would you like to create the daemon home directory? [ /home/timesten/TimesTen/tt1122/info ]The daemon logs will be located in /home/timesten/TimesTen/tt1122/info
Would you like to specify a different location for the daemon logs? [ no ]
Installing into /home/timesten/TimesTen/tt1122 ...
Uncompressing ...NOTE: If you are configuring TimesTen for use with Oracle Clusterware, thedaemon port number must be the same across all TimesTen installationsmanaged within the same Oracle Clusterware cluster.NOTE: All installations that replicate to each other must use the same daemonport number that is set at installation time. The daemon port number canbe verified by running 'ttVersion'.The default port number is 53396.Do you want to use the default port number for the TimesTen daemon? [ yes ]
The daemon will run on the default port number (53396).NOTE: For security, we recommend that you restrict access to theTimesTen installation to members of a single OS group. Only members ofthat OS group will be allowed to perform direct mode connections toTimesTen, and only members of that OS group will be allowed to performoperations that access TimesTen data stores, TimesTen files and sharedmemory. The OS group defaults to the primary group of the instanceadministrator. You can default to this group, choose another OS groupor you can make this instance world-accessible. If you choose to makethis instance world-accessible, all database files and shared memoryare readable and writable by all users.Restrict access to the the TimesTen installation to the group 'oinstall'? [ yes ]NOTE: Enabling PL/SQL will increase the size of some TimesTen libraries.Would you like to enable PL/SQL for this instance? [ yes ]In order to use the 'Oracle TimesTen Application-Tier Database Cache' feature in any databases
created within this installation, you must set a value for the TNS_ADMIN
environment variable. It can be left blank, and a value can be supplied later
using <install_dir>/bin/ttModInstall.Please enter a value for TNS_ADMIN (s=skip)? [  ] sNOTE: It appears that you are running version 4 or higher of the g++compiler. TimesTen ships with multiple sets of client libraries and serverbinaries : one built for compatibility with g++ 3.4.6 and one withg++ 4.1.0. The installer has created links to the 4.1.0 library in the<install_dir>/lib directory and to the 4.1.0 server binary in the<install_dir>/bin directory. If you want to use a different compiler,please modify the links to point to the desired library and server binary.Installing server components ...
What is the TCP/IP port number that you want the TimesTen Server to listen on? [ 53397 ]
Do you want to install the Quick Start Sample Programs and the TimesTen Documentation? [ no ] yes
Where would you like to install the Quick Start and doc directories (s=skip)? [ /home/timesten/TimesTen/tt1122 ]
The TimesTen documentation has been installed in /home/timesten/TimesTen/tt1122.The TimesTen Quick Start applications can take up to 64 Mbytes of disk space.
Depending on how your system is configured, you may not want to create the
Quick Start DemoDataStore directory in the default location,
/home/timesten/TimesTen/tt1122/info/DemoDataStoreWhere would you like to create the DemoDataStore directory? [ /home/timesten/TimesTen/tt1122/info ]
Creating /home/timesten/TimesTen/tt1122/info/DemoDataStore ...Installing client components ...Would you like to use TimesTen Replication with Oracle Clusterware? [ no ]NOTE: The TimesTen daemon startup/shutdown scripts have not been installed.Run the 'setuproot' script :cd /home/timesten/TimesTen/tt1122/bin./setuproot -install
This will move the TimesTen startup script into its appropriate location.The startup script is currently located here :'/home/timesten/TimesTen/tt1122/startup/tt_tt1122'.The Quickstart home page can be accessed here :'/home/timesten/TimesTen/tt1122/quickstart/index.html'The 11.2.2.8 Release Notes are located here :'/home/timesten/TimesTen/tt1122/README.html'Starting the daemon ...
TimesTen Daemon startup OK.
End of TimesTen installation.
清理安装文件:
rm -fr /tmp/timesten
设置环境变量
echo 'export TIMESTEN_HOME=~/TimesTen/tt1122' >> ~/.bash_profile
echo '. $TIMESTEN_HOME/bin/ttenv.sh' >> ~/.bash_profile
source ~/.bash_profile
验证环境变量设置成功:
$ ttversion
TimesTen Release 11.2.2.8.29 (64 bit Linux/x86_64) (tt1122:53396) 2018-03-11T19:11:30ZInstance admin: timestenInstance home directory: /home/timesten/TimesTen/tt1122Group owner: oinstallDaemon home directory: /home/timesten/TimesTen/tt1122/infoPL/SQL enabled.
$ ttstatus
TimesTen status report as of Mon Apr 29 10:21:36 2019Daemon pid 9852 port 53396 instance tt1122
TimesTen server pid 9861 started on port 53397
------------------------------------------------------------------------
Accessible by group oinstall
End of report
设置日志文件日期格式
echo '-showdate' >> $TIMESTEN_HOME/info/ttendaemon.options
ttdaemonadmin -restart
验证日志记录日期格式已生效:
$ tail $TIMESTEN_HOME/info/ttmesg.log
10:25:54.80 Info:    :  9857: Listener terminating
10:25:54.80 Info:    :  9857: Listener exited, termination finishing
10:25:54.80 Info:    :  9857: Process termination complete
10:25:54.80 Info:    :  9858: Listener terminating
10:25:54.80 Info:    :  9858: Listener exited, termination finishing
10:25:54.80 Info:    :  9858: Process termination complete
10:25:54.80 Info:    :  9859: Listener terminating
10:25:54.80 Info:    :  9859: Listener exited, termination finishing
10:25:54.80 Info:    :  9859: Process termination complete
2019-04-29 10:26:04.36 Info:    :  9930: << Date : Mon Apr 29 10:26:04 2019, daemon port 53396 >>
创建数据库
编辑DSN文件:
$ vi $TIMESTEN_HOME/info/sys.odbc.ini
创建示例DSN如下:
[ODBC Data Sources]
...
TTDB=TimesTen 11.2.2 Driver[TTDB]
Driver=/home/timesten/TimesTen/tt1122/lib/libtten.so
DataStore=/u01/database/data/ttdb
LogDir=/u01/database/log
PermSize=128
TempSize=64
LogBufMB=64
LogBufParallelism=4
DatabaseCharacterSet=ZHS16GBK
ConnectionCharacterSet=ZHS16GBK
OracleNetServiceName=orcl
创建数据库:
$ ttisql ttdbCopyright (c) 1996, 2018, Oracle and/or its affiliates. All rights reserved.
Type ? or "help" for help, type "exit" to quit ttIsql.connect "DSN=ttdb";
Connection successful: DSN=TTDB;UID=timesten;DataStore=/u01/database/data/ttdb;DatabaseCharacterSet=ZHS16GBK;ConnectionCharacterSet=ZHS16GBK;DRIVER=/home/timesten/TimesTen/tt1122/lib/libtten.so;LogDir=/u01/database/log;PermSize=128;TempSize=64;TypeMode=0;OracleNetServiceName=orcl;LogBufMB=64;LogBufParallelism=4;
(Default setting AutoCommit=1)
Command> dssize
The following values are in KB:PERM_ALLOCATED_SIZE:      131072PERM_IN_USE_SIZE:         9473PERM_IN_USE_HIGH_WATER:   9494TEMP_ALLOCATED_SIZE:      65536TEMP_IN_USE_SIZE:         12048TEMP_IN_USE_HIGH_WATER:   13883Command> exit
Disconnecting...
Done.
创建schema user
假设用户为appuser,此用户后续用于测试客户端连接。
$ ttisql ttdbCopyright (c) 1996, 2018, Oracle and/or its affiliates. All rights reserved.
Type ? or "help" for help, type "exit" to quit ttIsql.connect "DSN=ttdb";
Connection successful: DSN=TTDB;UID=timesten;DataStore=/u01/database/data/ttdb;DatabaseCharacterSet=ZHS16GBK;ConnectionCharacterSet=ZHS16GBK;DRIVER=/home/timesten/TimesTen/tt1122/lib/libtten.so;LogDir=/u01/database/log;PermSize=128;TempSize=64;TypeMode=0;OracleNetServiceName=orcl;LogBufMB=64;LogBufParallelism=4;
(Default setting AutoCommit=1)
Command> create user appuser identified by timesten;User created.Command> grant create session, create table to appuser;
Command> exit
Disconnecting...
Done.
设置数据库内存加载策略
设置策略为manual并加载数据库:
ttadmin -rampolicy manual ttdb
ttadmin -ramload ttdb
查看数据库状态:
$ ttstatus
TimesTen status report as of Mon Apr 29 10:33:08 2019Daemon pid 9930 port 53396 instance tt1122
TimesTen server pid 9939 started on port 53397
------------------------------------------------------------------------
Data store /u01/database/data/ttdb
There are 11 connections to the data store
Shared Memory KEY 0x060099e1 ID 131073
PL/SQL Memory KEY 0x070099e1 ID 163842 Address 0x7fa0000000
Type            PID     Context             Connection Name              ConnID
Subdaemon       9937    0x0000000001ffff60  Manager                        2047
Subdaemon       9937    0x0000000002057670  Rollback                       2046
Subdaemon       9937    0x00007f24040008c0  Flusher                        2037
Subdaemon       9937    0x00007f24080008c0  Checkpoint                     2042
Subdaemon       9937    0x00007f240c0008c0  Log Marker                     2043
Subdaemon       9937    0x00007f24100008c0  HistGC                         2044
Subdaemon       9937    0x00007f24140008c0  IndexGC                        2040
Subdaemon       9937    0x00007f24180008c0  Monitor                        2041
Subdaemon       9937    0x00007f241c0008c0  AsyncMV                        2039
Subdaemon       9937    0x00007f24200008c0  Deadlock Detector              2038
Subdaemon       9937    0x00007f24240008c0  Aging                          2045
RAM residence policy: Manual
Data store is manually loaded into RAM
Replication policy  : Manual
Cache Agent policy  : Manual
PL/SQL enabled.
------------------------------------------------------------------------
Accessible by group oinstall
End of report
设置TNS_ADMIN
设为$TIMESTEN_HOME/network/admin,本例为/home/timesten/TimesTen/tt1122/network/admin:
$ ttmodinstall -tnsadmin $TIMESTEN_HOME/network/admin
TNS_ADMIN for the instance 'tt1122' is currently not set.
Would you like to change TNS_ADMIN for this instance? [ yes ]
Please enter a value for TNS_ADMIN (q=quit)? [ /home/timesten/TimesTen/tt1122/network/admin ]Do you want to restart the daemon using the new configuration? [ yes ] yes
Restarting the daemon ...
TimesTen Daemon stopped.
TimesTen Daemon startup OK.
Instance tt1122 is now configured with TNS_ADMIN=/home/timesten/TimesTen/tt1122/network/admin
退出重新登录,验证其生效:
$ su - timesten
...
TNS_ADMIN set to /home/timesten/TimesTen/tt1122/network/admin
$ echo $TNS_ADMIN
/home/timesten/TimesTen/tt1122/network/admin
验证与Oracle数据库的连接
Oracle数据库也是通过vagrantbox安装的,版本12.2.0.1。
Oracle数据库的服务和tnsnames.ora如下:
$ lsnrctl statusLSNRCTL for Linux: Version 12.2.0.1.0 - Production on 29-APR-2019 22:34:55Copyright (c) 1991, 2016, Oracle.  All rights reserved.Connecting to (DESCRIPTION=(ADDRESS=(PROTOCOL=IPC)(KEY=EXTPROC1)))
STATUS of the LISTENER
------------------------
Alias                     LISTENER
Version                   TNSLSNR for Linux: Version 12.2.0.1.0 - Production
Start Date                29-APR-2019 20:43:34
Uptime                    0 days 1 hr. 51 min. 21 sec
Trace Level               off
Security                  ON: Local OS Authentication
SNMP                      OFF
Listener Parameter File   /opt/oracle/product/12.2.0.1/dbhome_1/network/admin/listener.ora
Listener Log File         /opt/oracle/diag/tnslsnr/oracle-12201-vagrant/listener/alert/log.xml
Listening Endpoints Summary...(DESCRIPTION=(ADDRESS=(PROTOCOL=ipc)(KEY=EXTPROC1)))(DESCRIPTION=(ADDRESS=(PROTOCOL=tcp)(HOST=0.0.0.0)(PORT=1521)))(DESCRIPTION=(ADDRESS=(PROTOCOL=tcps)(HOST=oracle-12201-vagrant)(PORT=5500))(Security=(my_wallet_directory=/opt/oracle/product/12.2.0.1/dbhome_1/admin/ORCLCDB/xdb_wallet))(Presentation=HTTP)(Session=RAW))
Services Summary...
Service "85ed2a1b333e762be0530100007f0333" has 1 instance(s).Instance "ORCLCDB", status READY, has 1 handler(s) for this service...
Service "ORCLCDB" has 1 instance(s).Instance "ORCLCDB", status READY, has 1 handler(s) for this service...
Service "ORCLCDBXDB" has 1 instance(s).Instance "ORCLCDB", status READY, has 1 handler(s) for this service...
Service "orclpdb1" has 1 instance(s).Instance "ORCLCDB", status READY, has 1 handler(s) for this service...
The command completed successfully$ cat $ORACLE_HOME/network/admin/tnsnames.ora
ORCLCDB=localhost:1521/ORCLCDB
ORCLPDB1=
(DESCRIPTION =(ADDRESS = (PROTOCOL = TCP)(HOST = 0.0.0.0)(PORT = 1521))(CONNECT_DATA =(SERVER = DEDICATED)(SERVICE_NAME = ORCLPDB1))
)
由于timesten端的sqlplus版本较低,仅为11g,而Oracle数据库为12c。因此在服务器端的sqlnet.ora中要加入认证兼容设置,否则报错:
ORA-28040: No matching authentication protocol
Oracle数据库端的sqlnet.ora定义如下:
$ cat $ORACLE_HOME/network/admin/sqlnet.ora
NAME.DIRECTORY_PATH= (TNSNAMES, EZCONNECT, HOSTNAME)
SQLNET.ALLOWED_LOGON_VERSION_SERVER=11
好了,现在先可以试一下用easy connect连接,都成功了:
sqlplus appuser/oracle@orclpdb1
sqlplus sys/Abcdef_123456@localhost/orclcdb as sysdba
补充一点,有好几次在Oracle端可以正常登入,而在TimesTen端登入时报错:
ORA-01017: invalid username/password; logon denied
原因都是在Oracle端创建用户时,口令没有加双引号:
create user ttuser identified by oracle
修改以后就可以了:
alter user ttuser identified by "oracle";
然后可以设置tnsnames.ora:
如果通过,可以在tnsnames.ora中添加条目,最好的方式就是从Oracle数据库端拷贝:
ORCLCDB=localhost:1521/ORCLCDB
ORCLPDB1=
(DESCRIPTION =(ADDRESS = (PROTOCOL = TCP)(HOST = 0.0.0.0)(PORT = 1521))(CONNECT_DATA =(SERVER = DEDICATED)(SERVICE_NAME = ORCLPDB1))
)
然后验证登录:
sqlplus sys/Abcdef_123456@orclcdb as sysdba
sqlplus sys/Abcdef_123456@orclpdb1 as sysdba
sqlplus appuser/oracle@orclpdb1
设置实例开机自动启动(可选)
以root用户执行命令:
sudo -s TIMESTEN_HOME=$TIMESTEN_HOME
cd $TIMESTEN_HOME/bin
./setuproot -install
输出如下:
$ sudo -s TIMESTEN_HOME=$TIMESTEN_HOME
$ echo $TIMESTEN_HOME
/home/timesten/TimesTen/tt1122
$ cd $TIMESTEN_HOME/bin$ ./setuproot -install
Would you like to install the TimesTen daemon startup scripts into /etc/init.d? [ yes ]
Copying /home/timesten/TimesTen/tt1122/startup/tt_tt1122 to /etc/init.dSuccessfully installed the following scripts :
/etc/init.d/tt_tt1122
/etc/rc.d/rc0.d/K45tt_tt1122
/etc/rc.d/rc1.d/K45tt_tt1122
/etc/rc.d/rc2.d/S90tt_tt1122
/etc/rc.d/rc3.d/S90tt_tt1122
/etc/rc.d/rc5.d/S90tt_tt1122
/etc/rc.d/rc6.d/K45tt_tt1122
安装Windows客户端
安装在Host VM上,也即Windows 10主机中。步骤如下:
- 解压安装包,点击setup.exe开始安装。
- 在选择特性时,选择TimesTen Client(64 bit)
- 其余选择默认
安装完成后,受影响的环境变量为:
CLASSPATH=C:\TimesTen\TT1122~1\lib\ttjdbc5.jar;
Include=C:\TimesTen\TT1122~1\include;
Lib=C:\TimesTen\TT1122~1\lib;
Path=C:\TimesTen\TT1122~1\bin;C:\TimesTen\TT1122~1\ttoracle_home\instantclient_11_2;...
设置Vagrant port forwarding
如果不是vagrant box,请忽略此步骤。
由于vagrant box中的端口不能被直接访问到,因此需要做port forwarding。
timesten 客户端连接的服务为timesten server, 以下命令可确认其端口为53397:
$ ttstatus|grep "TimesTen server"
TimesTen server pid 17258 started on port 53397
在virtualbox中,为此虚机的网络设置port forwarding:

客户端创建client DSN
在windows中,运行“设置ODBC数据源(64位)”
创建“系统DSN”,如下:
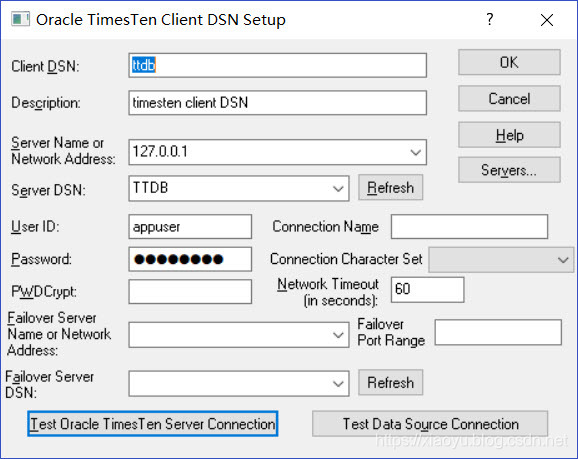
运行底部两个测试连接程序,保证其成功:
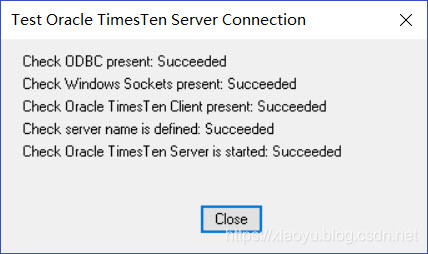
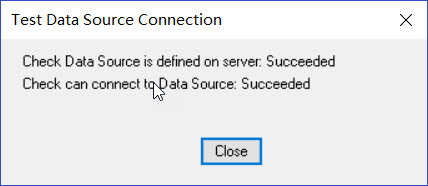
最后保存。
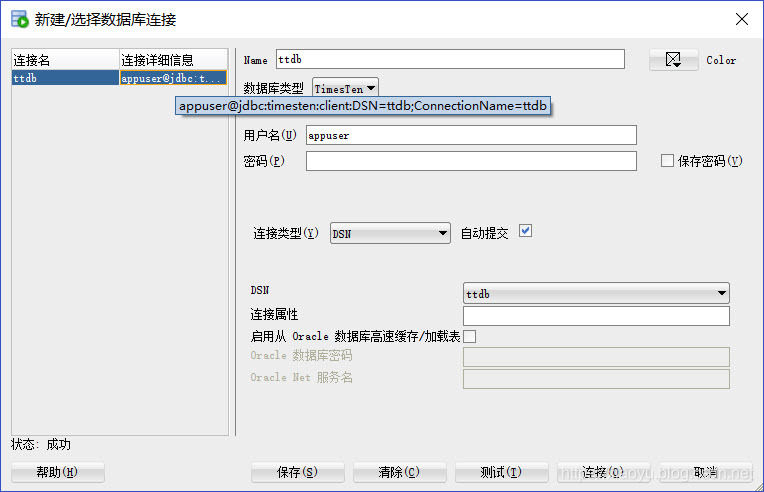
使用SQL Developer管理TimesTen
下载并安装SQL Developer,此步骤略过。我安装的是SQL Developer 19.1。
启动SQL Developer,如果前面timesten client安装正确,就可以在数据库类型中选择timesten。
创建连接,并保证测试成功,然后保存:
设置缓存组
场景为timesten缓存Oracle数据库中的数据(orclpdb1)。
启动服务和数据库:
ttdaemonadmin -start
ttadmin -ramload ttdb
假设在oracle和timesten中都已建立schema用户为appuser。
Oracle数据库端的初始化工作:
$ cd $TIMESTEN_HOME/oraclescripts/$ sqlplus sys/Abcdef_123456@orclpdb1 as sysdbaSQL*Plus: Release 11.2.0.2.0 Production on Tue Apr 30 10:28:20 2019Copyright (c) 1982, 2010, Oracle.  All rights reserved.Connected to:
Oracle Database 12c Enterprise Edition Release 12.2.0.1.0 - 64bit ProductionSQL> CREATE TABLESPACE cachetblsp DATAFILE 'cachetblsp.dbf' SIZE 100M;Tablespace created.SQL> @initCacheGlobalSchema "cachetblsp"Please enter the tablespace where TIMESTEN user is to be created
The value chosen for tablespace is cachetblsp******* Creation of TIMESTEN schema and TT_CACHE_ADMIN_ROLE starts *******
1. Creating TIMESTEN schema
2. Creating TIMESTEN.TT_GRIDID table
3. Creating TIMESTEN.TT_GRIDINFO table
4. Creating TT_CACHE_ADMIN_ROLE role
5. Granting privileges to TT_CACHE_ADMIN_ROLE
** Creation of TIMESTEN schema and TT_CACHE_ADMIN_ROLE done successfully **PL/SQL procedure successfully completed.SQL> exit
Disconnected from Oracle Database 12c Enterprise Edition Release 12.2.0.1.0 - 64bit Production
最后创建Oracle数据库中的缓存管理用户cacheadm并赋权:
$ cd $TIMESTEN_HOME/oraclescripts/
$ sqlplus sys/Abcdef_123456@orclpdb1 as sysdbaSQL*Plus: Release 11.2.0.2.0 Production on Tue Apr 30 10:33:16 2019Copyright (c) 1982, 2010, Oracle.  All rights reserved.Connected to:
Oracle Database 12c Enterprise Edition Release 12.2.0.1.0 - 64bit ProductionSQL> create user cacheadm identified by oracle
default tablespace cachetblsp quota unlimited on cachetblsp;2
User created.SQL> @grantCacheAdminPrivileges "cacheadm"Please enter the administrator user id
The value chosen for administrator user id is cacheadm***************** Initialization for cache admin begins ******************
0. Granting the CREATE SESSION privilege to CACHEADM
1. Granting the TT_CACHE_ADMIN_ROLE to CACHEADM
2. Granting the DBMS_LOCK package privilege to CACHEADM
3. Granting the DBMS_DDL package privilege to CACHEADM
4. Granting the CREATE SEQUENCE privilege to CACHEADM
5. Granting the CREATE CLUSTER privilege to CACHEADM
6. Granting the CREATE OPERATOR privilege to CACHEADM
7. Granting the CREATE INDEXTYPE privilege to CACHEADM
8. Granting the CREATE TABLE privilege to CACHEADM
9. Granting the CREATE PROCEDURE  privilege to CACHEADM
10. Granting the CREATE ANY TRIGGER  privilege to CACHEADM
11. Granting the GRANT UNLIMITED TABLESPACE privilege to CACHEADM
12. Granting the DBMS_LOB package privilege to CACHEADM
13. Granting the SELECT on SYS.ALL_OBJECTS privilege to CACHEADM
14. Granting the SELECT on SYS.ALL_SYNONYMS privilege to CACHEADM
15. Checking if the cache administrator user has permissions on the default
tablespacePermission exists
17. Granting the CREATE TYPE privilege to CACHEADM
18. Granting the SELECT on SYS.GV$LOCK privilege to CACHEADM (optional)
19. Granting the SELECT on SYS.GV$SESSION privilege  to CACHEADM (optional)
20. Granting the SELECT on SYS.DBA_DATA_FILES privilege  to CACHEADM (optional)
21. Granting the SELECT on SYS.USER_USERS privilege  to CACHEADM (optional)
22. Granting the SELECT on SYS.USER_FREE_SPACE privilege  to CACHEADM (optional)
23. Granting the SELECT on SYS.USER_TS_QUOTAS privilege  to CACHEADM (optional)
24. Granting the SELECT on SYS.USER_SYS_PRIVS privilege  to CACHEADM (optional)
********* Initialization for cache admin user done successfully *********
SQL> exit
Disconnected from Oracle Database 12c Enterprise Edition Release 12.2.0.1.0 - 64bit Production
确保timesten DSN中定义的字符集与Oracle数据库一致。
timesten数据库端的初始化,执行前请确保DSN中定义了OracleNetService并正确:
$ ttisql ttdbCopyright (c) 1996, 2018, Oracle and/or its affiliates. All rights reserved.
Type ? or "help" for help, type "exit" to quit ttIsql.connect "DSN=ttdb";
Connection successful: DSN=TTDB;UID=timesten;DataStore=/u01/database/data/ttdb;DatabaseCharacterSet=AL32UTF8;ConnectionCharacterSet=AL32UTF8;DRIVER=/home/timesten/TimesTen/tt1122/lib/libtten.so;LogDir=/u01/database/log;PermSize=128;TempSize=64;TypeMode=0;OracleNetServiceName=orcl;LogBufMB=64;LogBufParallelism=4;
(Default setting AutoCommit=1)
Command> create user cacheadm identified by timesten;User created.Command> grant create session, cache_manager, create any table, drop any table to cacheadm;
Command> exit
Disconnecting...
Done.
在timesten数据库中存储缓存管理员的口令:
$ ttisql "DSN=ttdb;UID=cacheadm;PWD=timesten"Copyright (c) 1996, 2018, Oracle and/or its affiliates. All rights reserved.
Type ? or "help" for help, type "exit" to quit ttIsql.connect "DSN=ttdb;UID=cacheadm;PWD=********";
Connection successful: DSN=TTDB;UID=cacheadm;DataStore=/u01/database/data/ttdb;DatabaseCharacterSet=AL32UTF8;ConnectionCharacterSet=AL32UTF8;DRIVER=/home/timesten/TimesTen/tt1122/lib/libtten.so;LogDir=/u01/database/log;PermSize=128;TempSize=64;TypeMode=0;OracleNetServiceName=orclpdb1;LogBufMB=64;LogBufParallelism=4;
(Default setting AutoCommit=1)
Command> call ttCacheUidPwdSet('cacheadm','oracle');
Command> call ttCacheUidGet();
< CACHEADM >
1 row found.
Command> exit
Disconnecting...
Done.
初始化缓存框架(这一步骤在18c中已不需要了):
$ ttisql "dsn=ttdb;uid=cacheadm;pwd=timesten;oraclepwd=oracle"Copyright (c) 1996, 2018, Oracle and/or its affiliates. All rights reserved.
Type ? or "help" for help, type "exit" to quit ttIsql.connect "dsn=ttdb;uid=cacheadm;pwd=********;oraclepwd=********";
Connection successful: DSN=TTDB;UID=cacheadm;DataStore=/u01/database/data/ttdb;DatabaseCharacterSet=AL32UTF8;ConnectionCharacterSet=AL32UTF8;DRIVER=/home/timesten/TimesTen/tt1122/lib/libtten.so;LogDir=/u01/database/log;PermSize=128;TempSize=64;TypeMode=0;OracleNetServiceName=orclpdb1;LogBufMB=64;LogBufParallelism=4;
(Default setting AutoCommit=1)
Command> call ttGridCreate ('ttgrid');
Command> call ttGridNameSet ('ttgrid');
Command> exit
Disconnecting...
Done.
测试只读缓存组
在oracle中建立基础表:
$ rlwrap sqlplus appuser/oracle@orclpdb1SQL*Plus: Release 11.2.0.2.0 Production on Tue Apr 30 10:46:33 2019Copyright (c) 1982, 2010, Oracle.  All rights reserved.Connected to:
Oracle Database 12c Enterprise Edition Release 12.2.0.1.0 - 64bit ProductionSQL> create table rotab(a int, primary key(a));Table created.
SQL> insert into rotab values(1);1 row created.SQL> grant select on rotab to cacheadm;Grant succeeded.
启动缓存代理:
$ ttadmin -cachestart ttdb
RAM Residence Policy            : manual
Manually Loaded In RAM          : True
Replication Agent Policy        : manual
Replication Manually Started    : False
Cache Agent Policy              : manual
Cache Agent Manually Started    : True
定义只读缓存组:
$ ttisql "dsn=ttdb;uid=cacheadm;pwd=timesten;oraclepwd=oracle"Copyright (c) 1996, 2018, Oracle and/or its affiliates. All rights reserved.
Type ? or "help" for help, type "exit" to quit ttIsql.connect "dsn=ttdb;uid=cacheadm;pwd=********;oraclepwd=********";
Connection successful: DSN=TTDB;UID=cacheadm;DataStore=/u01/database/data/ttdb;DatabaseCharacterSet=AL32UTF8;ConnectionCharacterSet=AL32UTF8;DRIVER=/home/timesten/TimesTen/tt1122/lib/libtten.so;LogDir=/u01/database/log;PermSize=128;TempSize=64;TypeMode=0;OracleNetServiceName=orclpdb1;LogBufMB=64;LogBufParallelism=4;
(Default setting AutoCommit=1)
Command> CREATE READONLY CACHE GROUP "RO">  AUTOREFRESH MODE INCREMENTAL INTERVAL 5 SECONDS>  STATE ON>  FROM>   "APPUSER"."ROTAB" (>     "A" NUMBER(4) NOT NULL,>     PRIMARY KEY("A")>   );
Command> cachegroups;Cache Group CACHEADM.RO:Cache Group Type: Read OnlyAutorefresh: YesAutorefresh Mode: IncrementalAutorefresh State: OnAutorefresh Interval: 5 SecondsAutorefresh Status: okAging: No aging definedRoot Table: APPUSER.ROTABTable Type: Read Only1 cache group found.
Command> exit
Disconnecting...
Done.
验证数据已刷新:
$ ttisql "uid=appuser;pwd=timesten;dsn=ttdb"Copyright (c) 1996, 2018, Oracle and/or its affiliates. All rights reserved.
Type ? or "help" for help, type "exit" to quit ttIsql.connect "uid=appuser;pwd=********;dsn=ttdb";
Connection successful: DSN=TTDB;UID=appuser;DataStore=/u01/database/data/ttdb;DatabaseCharacterSet=AL32UTF8;ConnectionCharacterSet=AL32UTF8;DRIVER=/home/timesten/TimesTen/tt1122/lib/libtten.so;LogDir=/u01/database/log;PermSize=128;TempSize=64;TypeMode=0;OracleNetServiceName=orclpdb1;LogBufMB=64;LogBufParallelism=4;
(Default setting AutoCommit=1)Command> select * from rotab;
< 1 >
1 row found.
Command> exit
Disconnecting...
Done.
清理:
$ ttisql "dsn=ttdb;uid=cacheadm;pwd=timesten;oraclepwd=oracle"Copyright (c) 1996, 2018, Oracle and/or its affiliates. All rights reserved.
Type ? or "help" for help, type "exit" to quit ttIsql.connect "dsn=ttdb;uid=cacheadm;pwd=********;oraclepwd=********";
Connection successful: DSN=TTDB;UID=cacheadm;DataStore=/u01/database/data/ttdb;DatabaseCharacterSet=AL32UTF8;ConnectionCharacterSet=AL32UTF8;DRIVER=/home/timesten/TimesTen/tt1122/lib/libtten.so;LogDir=/u01/database/log;PermSize=128;TempSize=64;TypeMode=0;OracleNetServiceName=orclpdb1;LogBufMB=64;LogBufParallelism=4;
(Default setting AutoCommit=1)Command> drop cache group CACHEADM.RO;
Command> exit
Disconnecting...
Done.
停止缓存代理:
$ ttadmin -cachestop ttdb
RAM Residence Policy            : manual
Manually Loaded In RAM          : True
Replication Agent Policy        : manual
Replication Manually Started    : False
Cache Agent Policy              : manual
Cache Agent Manually Started    : False
测试读写(AWT)缓存组
启动缓存代理:
$ ttadmin -cachestart ttdb
复制代理还起不来,因为需要先定义复制schema
定义基础表,还是使用以上的测试表,但这次需要补齐修改权限:
$ rlwrap sqlplus appuser/oracle@orclpdb1SQL*Plus: Release 11.2.0.2.0 Production on Tue Apr 30 11:16:49 2019Copyright (c) 1982, 2010, Oracle.  All rights reserved.Connected to:
Oracle Database 12c Enterprise Edition Release 12.2.0.1.0 - 64bit ProductionSQL> grant insert, delete, update on rotab to cacheadm;Grant succeeded.SQL> exit
Disconnected from Oracle Database 12c Enterprise Edition Release 12.2.0.1.0 - 64bit Production
定义缓存组:
$ ttisql "dsn=ttdb;uid=cacheadm;pwd=timesten;oraclepwd=oracle"Copyright (c) 1996, 2018, Oracle and/or its affiliates. All rights reserved.
Type ? or "help" for help, type "exit" to quit ttIsql.connect "dsn=ttdb;uid=cacheadm;pwd=********;oraclepwd=********";
Connection successful: DSN=TTDB;UID=cacheadm;DataStore=/u01/database/data/ttdb;DatabaseCharacterSet=AL32UTF8;ConnectionCharacterSet=AL32UTF8;DRIVER=/home/timesten/TimesTen/tt1122/lib/libtten.so;LogDir=/u01/database/log;PermSize=128;TempSize=64;TypeMode=0;OracleNetServiceName=orclpdb1;LogBufMB=64;LogBufParallelism=4;
(Default setting AutoCommit=1)
Command> CREATE ASYNCHRONOUS WRITETHROUGH CACHE GROUP "RW">  FROM>   "APPUSER"."ROTAB" (>     "A" NUMBER(38) NOT NULL,>     PRIMARY KEY("A")>   );
Command> cachegroups;Cache Group CACHEADM.RW:Cache Group Type: Asynchronous WritethroughAutorefresh: NoAging: No aging definedRoot Table: APPUSER.ROTABTable Type: Propagate1 cache group found.
Command> exit
Disconnecting...
Done.
启动复制代理:
$ ttadmin -repstart ttdb
RAM Residence Policy            : manual
Manually Loaded In RAM          : True
Replication Agent Policy        : manual
Replication Manually Started    : True
Cache Agent Policy              : manual
Cache Agent Manually Started    : True
先把基础表中已有的数据同步上来:
$ ttisql "dsn=ttdb;uid=cacheadm;pwd=timesten;oraclepwd=oracle"Copyright (c) 1996, 2018, Oracle and/or its affiliates. All rights reserved.
Type ? or "help" for help, type "exit" to quit ttIsql.connect "dsn=ttdb;uid=cacheadm;pwd=********;oraclepwd=********";
Connection successful: DSN=TTDB;UID=cacheadm;DataStore=/u01/database/data/ttdb;DatabaseCharacterSet=AL32UTF8;ConnectionCharacterSet=AL32UTF8;DRIVER=/home/timesten/TimesTen/tt1122/lib/libtten.so;LogDir=/u01/database/log;PermSize=128;TempSize=64;TypeMode=0;OracleNetServiceName=orclpdb1;LogBufMB=64;LogBufParallelism=4;
(Default setting AutoCommit=1)
Command> load cache group rw;8290: Manual LOAD/REFRESH must have the COMMIT EVERY N ROWS clause
The command failed.
Command> load cache group rw commit every 256 rows;
1 cache instance affected.
插入数据:
$ ttisql "uid=appuser;pwd=timesten;dsn=ttdb"Copyright (c) 1996, 2018, Oracle and/or its affiliates. All rights reserved.
Type ? or "help" for help, type "exit" to quit ttIsql.connect "uid=appuser;pwd=********;dsn=ttdb";
Connection successful: DSN=TTDB;UID=appuser;DataStore=/u01/database/data/ttdb;DatabaseCharacterSet=AL32UTF8;ConnectionCharacterSet=AL32UTF8;DRIVER=/home/timesten/TimesTen/tt1122/lib/libtten.so;LogDir=/u01/database/log;PermSize=128;TempSize=64;TypeMode=0;OracleNetServiceName=orclpdb1;LogBufMB=64;LogBufParallelism=4;
(Default setting AutoCommit=1)
Command> select * from rotab;
< 1 >
1 row found.
Command> insert into rotab values(2);
1 row inserted.
Command> exit
Disconnecting...
Done.
验证:
$ rlwrap sqlplus appuser/oracle@orclpdb1SQL*Plus: Release 11.2.0.2.0 Production on Tue Apr 30 11:25:28 2019Copyright (c) 1982, 2010, Oracle.  All rights reserved.Connected to:
Oracle Database 12c Enterprise Edition Release 12.2.0.1.0 - 64bit ProductionSQL> select * from rotab;A
----------12
清理:
$ ttadmin -repstop ttdb
RAM Residence Policy            : manual
Manually Loaded In RAM          : True
Replication Agent Policy        : manual
Replication Manually Started    : False
Cache Agent Policy              : manual
Cache Agent Manually Started    : True$ ttisql "dsn=ttdb;uid=cacheadm;pwd=timesten;oraclepwd=oracle"Copyright (c) 1996, 2018, Oracle and/or its affiliates. All rights reserved.
Type ? or "help" for help, type "exit" to quit ttIsql.connect "dsn=ttdb;uid=cacheadm;pwd=********;oraclepwd=********";
Connection successful: DSN=TTDB;UID=cacheadm;DataStore=/u01/database/data/ttdb;DatabaseCharacterSet=AL32UTF8;ConnectionCharacterSet=AL32UTF8;DRIVER=/home/timesten/TimesTen/tt1122/lib/libtten.so;LogDir=/u01/database/log;PermSize=128;TempSize=64;TypeMode=0;OracleNetServiceName=orclpdb1;LogBufMB=64;LogBufParallelism=4;
(Default setting AutoCommit=1)
Command> drop cache group cacheadm.rw;
Command> exit
Disconnecting...
Done.
关于增加唯一索引
基础表都在Oracle端,都需要主键或唯一索引。
如果没有,可以在Oracle数据库端定义序列和UUID。
到底在哪端来生成这个唯一ID呢?
这篇关于在VagrantBox中安装TmesTen Classic的文章就介绍到这儿,希望我们推荐的文章对编程师们有所帮助!


