本文主要是介绍芯旺微chipon KF32A156系列 IIC(I2C)模块的基本使用,希望对大家解决编程问题提供一定的参考价值,需要的开发者们随着小编来一起学习吧!
本文免费开放,也请尊重原创,转载需注明源出处!!!
芯旺微chipon KF32A156系列 IIC(I2C)模块的基本使用
我们在实际的使用过程中,IIC也是较为常用的通讯方式,像eepron,传感器等会使用到这种通讯方式。
当然啦,很多工程师也会喜欢使用IO口模拟IIC来做通讯,毕竟很多片子的IIC真的很不好用,而且这个IO口模拟的方式可移植性也是比较强,开源的代码也比较多,本文章主要是说说芯旺微CHIPON156型号的硬件IIC外设,以供参考。
**本次主要讲解IIC外设的使用,文章使用中断收发的方式来对芯旺微32位机的KF32A156系列配置为主机、从机进行讲解。**本篇幅较长,需要耐心看完。
如有需要工程代码,还请私聊留下联系方式邮箱等。本文主要是接口函数代码
主机配置(以7位地址配置讲解)
这里强烈建议,做为主机使用时,尽量使用主循环发送接收的方式,同步通讯,可以不用太担心被其他中断打断导致数据不正确。本次主要在讲解这种方式。
**配置步骤:**老生常谈三步骤
1、配置IO口:将对应的IO口进行重映射模式,并重映射为IIC(iic_sck,iic_sda).本文以PG0和PF15为例,由于demo板没有外部上拉,注意下引脚要配置为开漏模式,并启用内部上拉,程序如下:
void I2c_IO_Init()
{GPIO_InitTypeDef GpioConfigPtr;/* Configure GPIO remapping function */GpioConfigPtr.m_Mode = GPIO_MODE_RMP;/* Configyre GPIO open drain output */GpioConfigPtr.m_OpenDrain = GPIO_POD_OD;/* PG0,SCL */GpioConfigPtr.m_Pin = GPIO_PIN_MASK_0;/* Configure pull up */GpioConfigPtr.m_PullUp = GPIO_PULLUP;/* Configure drop down */GpioConfigPtr.m_PullDown = GPIO_NOPULL;/* Configure PG0 as I2C0 SCL */GPIO_Pin_RMP_Config(GPIOG_SFR, GPIO_Pin_Num_0, GPIO_RMP_AF5);GPIO_Configuration(GPIOG_SFR, &GpioConfigPtr);/* PF15,SDA */GpioConfigPtr.m_Pin = GPIO_PIN_MASK_15;/* Configure PF15 as I2C0 SDA */GPIO_Pin_RMP_Config(GPIOF_SFR, GPIO_Pin_Num_15, GPIO_RMP_AF5);GPIO_Configuration(GPIOF_SFR, &GpioConfigPtr);
}
2、配置IIC外设,其实这里可以直接调用官方提供的历程里面的库即可。这里我也并未做修改,直接拿过来使用,配置为主机,波特率接近400k,程序如下:
void I2c_Init(I2C_SFRmap *I2cx)
{I2C_InitTypeDef I2cConfigPtr;/* I2c mode */I2cConfigPtr.m_Mode = I2C_MODE_I2C;/* I2c clock */I2cConfigPtr.m_ClockSource = I2C_CLK_SCLK;
/* Configure slave address width */I2cConfigPtr.m_BADR10 = I2C_BUFRADDRESS_7BIT;/* SMBus type */I2cConfigPtr.m_MasterSlave = I2C_MODE_SMBUSHOST;/* I2c baud rate low level time */I2cConfigPtr.m_BaudRateL = 115;/* I2c baud rate high level time */I2cConfigPtr.m_BaudRateH = 115;/* Enable ACK */I2cConfigPtr.m_AckEn = TRUE;/* Select the response signal as ACK */I2cConfigPtr.m_AckData = I2C_ACKDATA_ACK;I2C_Reset(I2cx);/* Configue I2C */I2C_Configuration(I2cx, &I2cConfigPtr);//    /* Enable I2C HW module */I2C_Cmd(I2cx, TRUE);/* Clear Interrupt flag */I2C_Clear_INTERRUPT_Flag(I2cx);/* Enable I2C address match */I2C_MATCH_ADDRESS_Config(I2cx, TRUE);/* Enable I2C HW module */I2C_Cmd(I2cx, TRUE);
}
3、配置中断。由于主机这里推荐使用循环里面跑接收发送,所以中断暂无配置。
主机发送函数:就是主机对从机写
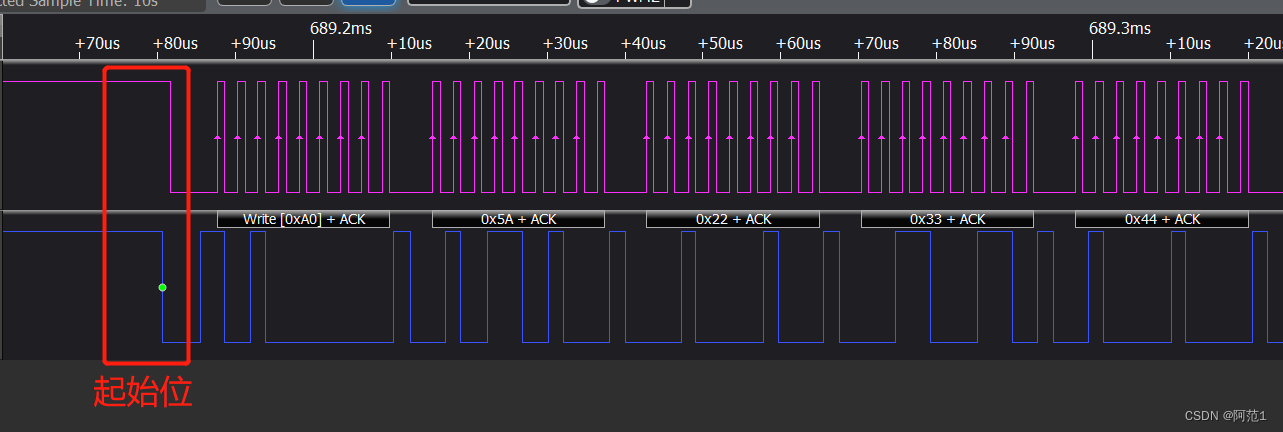
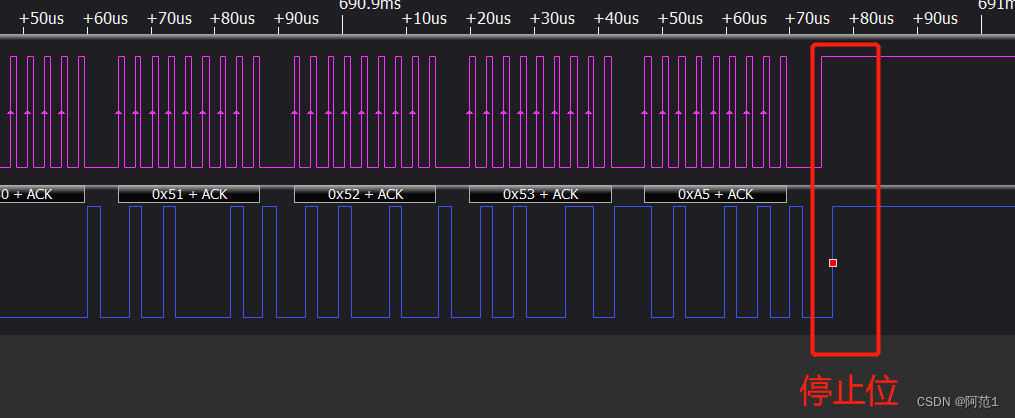
写的流程就是 :发送起始位 – 地址(最后一位为0) – 数据 – 停止位
这里面注意的是,有时候等待ISIF会卡死,这里可能是因为未释放总线或者有干扰之类,导致数据或者起始停止位发送失败了。所以,本次提供的东西也是进行了超时处理,同时数据手册说是会硬件清除起始位和停止位,但是为了安全起见,我依然是进行了软件清除,这样也许更加保险。
代码如下:
IIC_SEND_TypeDef I2C_Buffer_write(uint16_t Write_i2c_Addr,uint8_t *p_buffer,uint16_t number_of_byte)
{
//	volatile uint32_t j;volatile uint16_t   u16TickCount = 0;I2C_Choose=I2C0_SFR;//选择I2C0_SFR I2C1_SFRI2C_Cmd(I2C_Choose,TRUE);               //使能I2C模块/*起始位*///使能后延迟一会asm("NOP");asm("NOP");asm("NOP");asm("NOP");asm("NOP");asm("NOP");asm("NOP");asm("NOP");I2C_Clear_INTERRUPT_Flag(I2C_Choose);   //清I2C中断标志位ISIF位I2C_Generate_START(I2C_Choose,TRUE);    //使能起始信号Iic_Test_Flag=1;//等待isif标志位wait_cnt = 0;while(!I2C_Get_INTERRUPT_Flag(I2C_Choose)) //等待起始信号稳定{if(wait_cnt++ > IIC_TIMOUT){Iic_error_Flag = 1 ;break;}}//清掉起始信号I2C_Generate_START(I2C_Choose,FALSE);    //使能起始信号I2C_Clear_Start_Flag (I2C_Choose);Iic_Test_Flag=2;#if IIC_10BIT_Addressstatic uint8_t I2C_SLAVE_ADDRESS10BH=0;static uint8_t I2C_SLAVE_ADDRESS10BL=0;I2C_SLAVE_ADDRESS10BL=Write_i2c_Addr& 0xff;       //低8位I2C地址I2C_SLAVE_ADDRESS10BH=(Write_i2c_Addr>>8)& 0xff;  //高8位I2C地址/*发送从机10位高位地址*/I2C_SendData(I2C_Choose,I2C_SLAVE_ADDRESS10BH); //发送从机地址  I2C_SLAVE_ADDRESS10BH_WI2C_Clear_INTERRUPT_Flag(I2C_Choose);        //清I2C中断标志位ISIF位while(!I2C_Get_INTERRUPT_Flag(I2C_Choose));  //等待发送完成/*发送从机10位低位地址*/I2C_SendData(I2C_Choose,I2C_SLAVE_ADDRESS10BL); //发送从机地址  I2C_SLAVE_ADDRESS10BH_WI2C_Clear_INTERRUPT_Flag(I2C_Choose);        //清I2C中断标志位ISIF位while(!I2C_Get_INTERRUPT_Flag(I2C_Choose));  //等待发送完成while(I2C_Get_Ack_Fail_Flag(I2C_Choose));    //判断是否有ACK应答,如没有则停止,如果有则继续发#else/*发送7位从机地址*/I2C_SendData8(I2C_Choose,Write_i2c_Addr); //发送从机地址  I2C_SLAVE_ADDRESS10BH_WI2C_Clear_INTERRUPT_Flag(I2C_Choose);        //清I2C中断标志位ISIF位//等待isif标志位wait_cnt = 0;while(!I2C_Get_INTERRUPT_Flag(I2C_Choose)) //等待起始信号稳定{if(wait_cnt++ > IIC_TIMOUT){Iic_error_Flag = 1 ;break;}}
//nACK处理wait_cnt = 0;while(I2C_Get_Ack_Fail_Flag(I2C_Choose))   //判断是否有ACK应答,如没有则停止,如果有则继续发{if(wait_cnt++ > IIC_TIMOUT){Iic_ack_error_Flag = 1 ;break;}}
//应答错误或者ISIF超时处理if((Iic_ack_error_Flag==1) || (Iic_error_Flag == 1)){I2C_Clear_Ack_Fail_Flag (I2C_Choose);Iic_ack_error_Flag = 0 ;Iic_error_Flag = 0;I2C_Generate_STOP(I2C_Choose,TRUE);         //使能停止信号I2C_Clear_INTERRUPT_Flag(I2C_Choose);       //清I2C中断标志位ISIF位wait_cnt = 0;while(!I2C_Get_INTERRUPT_Flag(I2C_Choose)) //等待起始信号稳定{if(wait_cnt++ > IIC_TIMOUT){
//					Iic_error_Flag = 1 ;break;}}I2C_Generate_STOP(I2C_Choose,FALSE);         //使能停止信号I2C_Clear_INTERRUPT_Flag(I2C_Choose);       //清I2C中断标志位ISIF位I2C_Clear_Stop_Flag(I2C_Choose);            //清I2C停止标志位PIF位I2C_Cmd(I2C_Choose,FALSE);                  //关闭I2C模组return IIC_SEND_ERROR;}
//	以上为nack,isif不置位处理#endif/*循环写数据 */while(number_of_byte--){I2C_SendData8(I2C_Choose, *p_buffer);    //发送数据I2C_Clear_INTERRUPT_Flag(I2C_Choose);     	//清I2C中断标志位ISIF位/* 指向下一个要写的字节*/p_buffer++;
//        j=0xFFFFFF;    //测试使用
//        GPIOD_SFR->POR |= (uint32_t)GPIO_PIN_MASK_5 ;    //测试使用Iic_Test_Flag=3;wait_cnt = 0;while(!I2C_Get_INTERRUPT_Flag(I2C_Choose)) //等待释放总线{if(wait_cnt++ > IIC_TIMOUT){Iic_error_Flag = 1 ;break;}}//nACK处理wait_cnt = 0;while(I2C_Get_Ack_Fail_Flag(I2C_Choose))   //判断是否有ACK应答,如没有则停止,如果有则继续发{if(wait_cnt++ > IIC_TIMOUT){Iic_ack_error_Flag = 1 ;break;}}if((Iic_ack_error_Flag==1) || (Iic_error_Flag == 1)){I2C_Clear_Ack_Fail_Flag (I2C_Choose);Iic_ack_error_Flag = 0 ;Iic_error_Flag = 0;I2C_Generate_STOP(I2C_Choose,TRUE);         //使能停止信号I2C_Clear_INTERRUPT_Flag(I2C_Choose);       //清I2C中断标志位ISIF位wait_cnt = 0;while(!I2C_Get_INTERRUPT_Flag(I2C_Choose)) //等待起始信号稳定{if(wait_cnt++ > IIC_TIMOUT){
//						Iic_error_Flag = 1 ;break;}}I2C_Generate_STOP(I2C_Choose,FALSE);         //使能停止信号I2C_Clear_INTERRUPT_Flag(I2C_Choose);       //清I2C中断标志位ISIF位I2C_Clear_Stop_Flag(I2C_Choose);            //清I2C停止标志位PIF位I2C_Cmd(I2C_Choose,FALSE);                  //关闭I2C模组return IIC_SEND_ERROR;}//	以上为nack,isif不置位处理Iic_Test_Flag=4;}/*停止位*/asm("NOP");asm("NOP");asm("NOP");asm("NOP");asm("NOP");asm("NOP");asm("NOP");asm("NOP");I2C_Generate_STOP(I2C_Choose,TRUE);         //使能停止信号Iic_Test_Flag=5;I2C_Clear_INTERRUPT_Flag(I2C_Choose);       //清I2C中断标志位ISIF位Iic_Test_Flag=6;wait_cnt = 0;while(!I2C_Get_INTERRUPT_Flag(I2C_Choose)) //等待起始信号稳定{if(wait_cnt++ > IIC_TIMOUT){Iic_error_Flag = 1 ;break;}}if(Iic_error_Flag == 1){Iic_error_Flag = 0;return IIC_SEND_ERROR ;}Iic_Test_Flag=7;I2C_Generate_STOP(I2C_Choose,FALSE);         //使能停止信号I2C_Clear_INTERRUPT_Flag(I2C_Choose);       //清I2C中断标志位ISIF位Iic_Test_Flag=8;I2C_Clear_Stop_Flag(I2C_Choose);            //清I2C停止标志位PIF位Iic_Test_Flag=9;I2C_Cmd(I2C_Choose,FALSE);                  //关闭I2C模组return IIC_SEND_OK;
}
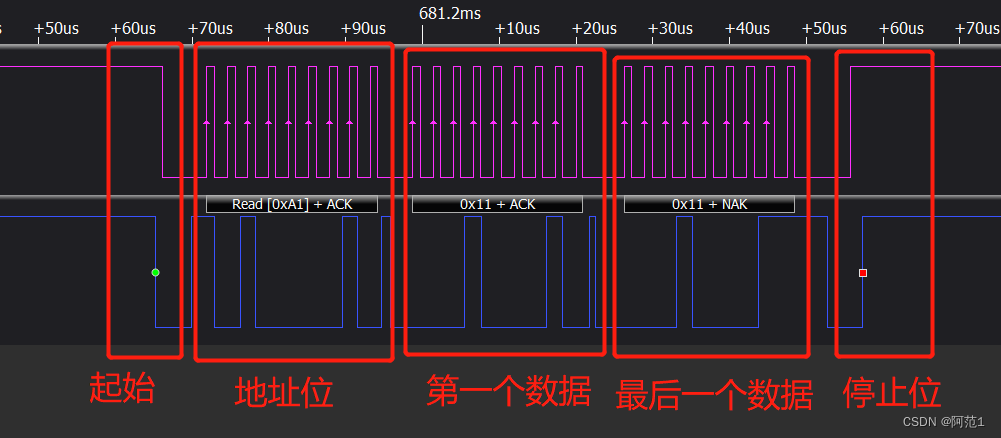
主机接收函数:就是主机对从机读
写的流程就是 :发送起始位 – 地址(最后一位为1) – 数据(最后一个字节回NACK) – 停止位
同样的函数里面也是做了超时处理,以及对最后一个字节的数据进行NACK的回复操作。
程序如下:
IIC_SEND_TypeDef I2C_Buffer_read(uint16_t Read_I2C_Addr, uint8_t *p_buffer, uint16_t number_of_byte)
{if(number_of_byte == 1){I2C_Ack_DATA_Config(I2C_Choose, I2C_ACKDATA_NO_ACK);}I2C_Choose = I2C0_SFR;static uint8_t I2C_SLAVE_ADDRESS10BH = 0;static uint8_t I2C_SLAVE_ADDRESS10BL = 0;/* Enable I2C HW module*/I2C_Cmd(I2C_Choose, TRUE);asm("NOP");asm("NOP");asm("NOP");asm("NOP");asm("NOP");asm("NOP");asm("NOP");asm("NOP");/* Clear interrupt flag ISIF */I2C_Clear_INTERRUPT_Flag(I2C_Choose);/* Start bit */I2C_Generate_START(I2C_Choose, TRUE);/* Wait for the start signal to stabilize */read_wait_cnt = 0;while(!I2C_Get_INTERRUPT_Flag(I2C_Choose)) //获取isif标志位{if(read_wait_cnt++ > IIC_TIMOUT){read_Iic_error_Flag = 1 ;break;}}I2C_Generate_START(I2C_Choose,FALSE);    //失能起始位I2C_Clear_Start_Flag (I2C_Choose);#if (I2C_ADDRESS_WIDTH == I2C_10BIT)/* Low 8 bit register address */I2C_SLAVE_ADDRESS10BL = Read_I2C_Addr& 0xff;/* High bit address */I2C_SLAVE_ADDRESS10BH = (Read_I2C_Addr>> 8) & 0xff;/* Send slave address */I2C_SendData(I2C_Choose, I2C_SLAVE_ADDRESS10BH | 0x01);/* Clear the ISIF bit of the I2C interrupt flag */I2C_Clear_INTERRUPT_Flag(I2C_Choose);/* Wait for sending to complete */while (!I2C_Get_INTERRUPT_Flag(I2C_Choose));/* Send slave 10-bit low address */I2C_SendData(I2C_Choose, I2C_SLAVE_ADDRESS10BL);/* Clear the ISIF bit of the I2C interrupt flag */I2C_Clear_INTERRUPT_Flag(I2C_Choose);/* Wait for sending to complete */while (!I2C_Get_INTERRUPT_Flag(I2C_Choose));/* Determine whether there is an ACK response, if not, stop, if there is, continue to send */while (I2C_Get_Ack_Fail_Flag(I2C_Choose));#else/* Send 7-bit slave address */I2C_SendData8(I2C_Choose, Read_I2C_Addr | 0x01);/* Clear the ISIF bit of the I2C interrupt flag */I2C_Clear_INTERRUPT_Flag(I2C_Choose);/* Wait for sending to complete */read_wait_cnt = 0;while(!I2C_Get_INTERRUPT_Flag(I2C_Choose)) //获取isif标志位{if(read_wait_cnt++ > IIC_TIMOUT){read_Iic_error_Flag = 1 ;break;}}/* Determine whether there is an ACK response, if not, stop, if there is, continue to send *///nACK处理read_wait_cnt = 0;while(I2C_Get_Ack_Fail_Flag(I2C_Choose))   //获取ack失败标志位{if(read_wait_cnt++ > IIC_TIMOUT){read_Iic_ack_error_Flag = 1 ;break;}}
//ISIF和ack有任意失败的情况下if((read_Iic_ack_error_Flag==1) || (read_Iic_error_Flag == 1)){I2C_Clear_Ack_Fail_Flag (I2C_Choose);read_Iic_ack_error_Flag = 0 ;read_Iic_error_Flag = 0;I2C_Generate_STOP(I2C_Choose,TRUE);         //启动停止位I2C_Clear_INTERRUPT_Flag(I2C_Choose);       //清除isif标志位read_wait_cnt = 0;while(!I2C_Get_INTERRUPT_Flag(I2C_Choose)) //获取isif标志位{if(read_wait_cnt++ > IIC_TIMOUT){
//					read_Iic_error_Flag = 1 ;break;}}I2C_Generate_STOP(I2C_Choose,FALSE);         //失能停止位I2C_Clear_INTERRUPT_Flag(I2C_Choose);       //获取isif标志位I2C_Clear_Stop_Flag(I2C_Choose);            //清除stop标志位I2C_Cmd(I2C_Choose,FALSE);                  //失能iic模块return IIC_SEND_ERROR;}
#endif/* Send read command *//* Send slave address and read operation *///I2C_SendData8(I2C_Choose, Read_I2C_Addr);/* Clear the ISIF bit of the I2C interrupt flag */// I2C_Clear_INTERRUPT_Flag(I2C_Choose);/* Wait for sending to complete *///while (!I2C_Get_INTERRUPT_Flag(I2C_Choose));/* Clear the ISIF bit of the I2C interrupt flag */I2C_Clear_INTERRUPT_Flag(I2C_Choose);while (number_of_byte){/* Wait for sending to complete */read_wait_cnt = 0;while(!I2C_Get_INTERRUPT_Flag(I2C_Choose)) //获取isif标志位{if(read_wait_cnt++ > IIC_TIMOUT){read_Iic_error_Flag = 1 ;break;}}if((read_Iic_error_Flag == 1)){
//    			I2C_Clear_Ack_Fail_Flag (I2C_Choose);
//    			read_Iic_ack_error_Flag = 0 ;read_Iic_error_Flag = 0;I2C_Generate_STOP(I2C_Choose,TRUE);         //启动停止位I2C_Clear_INTERRUPT_Flag(I2C_Choose);       //清除isif标志位read_wait_cnt = 0;while(!I2C_Get_INTERRUPT_Flag(I2C_Choose)) //获取isif标志位{if(read_wait_cnt++ > IIC_TIMOUT){//					read_Iic_error_Flag = 1 ;break;}}I2C_Generate_STOP(I2C_Choose,FALSE);         //失能停止位I2C_Clear_INTERRUPT_Flag(I2C_Choose);       //获取isif标志位I2C_Clear_Stop_Flag(I2C_Choose);            //清除stop标志位I2C_Cmd(I2C_Choose,FALSE);                  //失能iic模块return IIC_SEND_ERROR;}/* Determine whether the Buff is full */if (I2C_Get_Receive_Buff_Flag(I2C_Choose)){if(number_of_byte <= 1){I2C_Ack_DATA_Config(I2C_Choose, I2C_ACKDATA_ACK);*p_buffer = I2C_ReceiveData(I2C_Choose);}else{I2C_Ack_DATA_Config(I2C_Choose, I2C_ACKDATA_ACK);*p_buffer = I2C_ReceiveData(I2C_Choose);/* Clear the ISIF bit of the I2C interrupt flag */I2C_Clear_INTERRUPT_Flag(I2C_Choose);if(number_of_byte <= 2){I2C_Ack_DATA_Config(I2C_Choose, I2C_ACKDATA_ACK);I2C_Ack_DATA_Config(I2C_Choose, I2C_ACKDATA_NO_ACK);*p_buffer = I2C_ReceiveData(I2C_Choose);}/* Point to the location where the next read byte will be saved */p_buffer++;}/* Reply ACK */}/* Decrement read byte counter */number_of_byte--;}/* Stop bit */asm("NOP");asm("NOP");asm("NOP");asm("NOP");asm("NOP");asm("NOP");asm("NOP");asm("NOP");I2C_Generate_STOP(I2C_Choose, TRUE);asm("NOP");asm("NOP");asm("NOP");asm("NOP");asm("NOP");asm("NOP");asm("NOP");asm("NOP");/* Clear the ISIF bit of the I2C interrupt flag */I2C_Clear_INTERRUPT_Flag(I2C_Choose);/* Wait for the stop to complete */read_wait_cnt = 0;while(!I2C_Get_INTERRUPT_Flag(I2C_Choose)) //获取isif标志位{if(read_wait_cnt++ > IIC_TIMOUT){read_Iic_error_Flag = 1 ;break;}}if(read_Iic_error_Flag == 1){I2C_Generate_STOP(I2C_Choose,FALSE);         //失能停止位I2C_Clear_INTERRUPT_Flag(I2C_Choose);       //获取isif标志位I2C_Clear_Stop_Flag(I2C_Choose);            //清除stop标志位I2C_Cmd(I2C_Choose,FALSE);read_Iic_error_Flag = 0;return IIC_SEND_ERROR ;}I2C_Generate_STOP(I2C_Choose, FALSE);/* Clear the ISIF bit of the I2C interrupt flag */I2C_Clear_INTERRUPT_Flag(I2C_Choose);/* Clear the I2C stop flag PIF bit */I2C_Clear_Stop_Flag(I2C_Choose);/* Turn off the I2C module */I2C_Cmd(I2C_Choose, FALSE);return IIC_SEND_OK ;
}
从机配置(以7位地址配置讲解)
做为从机使用时,由于没有控制权,接收数据的时候为了更加及时,这里建议从机用中断来进行收发。
1、从机配置IO口配置和IIC外设配置不再赘述,基本和主机相同,建议是直接调用例程里面IIC从机的配置接口函数
示意程序如下:
I2c_IO_Init();   //io口初始化
I2c_Init(I2C0_SFR, I2C_SLAVE_ADDR);  //从机iIC外设初始化,第二个参数为从机地址
2、开启中断,建议看起从机的ISIF中断,因为无论哪种位置,都会产生ISIF。再去中段里面判断标志位再处理。
void I2c_Interrupt_Init()
{/* Enable I2c receive interrupt */INT_Interrupt_Enable(INT_I2C0, TRUE);/* Enable I2c interrupt */I2C_ISIE_INT_Enable(I2C0_SFR, TRUE);INT_All_Enable(TRUE);
}
3、这里主要说一下从机的中断里面的操作
当ISIF置位以后去判断 I2C读/ 写信息状态位状态,如果是写,那直接将数据读出,再进行判断当前是否为数据位,如果是数据位则接收放置数据到软件buff里面。地址读了可直接丢弃 ; 如果是读,那就将数据放置到硬件发送buff里面,清空isif释放总线等待发送成功即可。
程序如下:
void __attribute__((interrupt)) _I2C0_exception(void)
{volatile uint32_t I2C0_DATA = 0x11;volatile uint8_t I2C0_REDATA = 0;volatile uint32_t I2C0_ADD = 0;i2c_data_temp = 0;/* Clear the I2C0 interrupt flag bit */
//    I2C_Clear_INTERRUPT_Flag(I2C0_SFR);/* Reply ACK */#if (I2C_ADDRESS_WIDTH == I2C_10BIT)if (I2C_Get_Write_Read_Flag(I2C0_SFR)){I2C_SendData(I2C0_SFR, I2C0_DATA);}else{if (I2C_Get_HighAddress_Flag(I2C0_SFR)){ /* High address, skip */;}else{ /* Not high address, perform other actions */i2c_data_temp = I2C_ReceiveData(I2C0_SFR);if (I2C_Get_Data_Flag(I2C0_SFR)){/* Read data */I2C_receive_input(i2c_data_temp);I2C0_DATA = i2c_data_temp;}else{I2C0_ADD = i2c_data_temp;I2C_RecNum = 0;}}}
#elseif (I2C_Get_Write_Read_Flag(I2C0_SFR)){ /* The host reads the status bit, and sends from the slave */I2C_SendData(I2C0_SFR, I2C0_DATA);I2C_Clear_INTERRUPT_Flag(I2C0_SFR);}else{I2C_Clear_INTERRUPT_Flag(I2C0_SFR);/* Host write status bit, slave receive */I2C_Ack_DATA_Config(I2C0_SFR, I2C_ACKDATA_ACK);i2c_data_temp = I2C_ReceiveData(I2C0_SFR);if (I2C_Get_Data_Flag(I2C0_SFR)){I2C0_REDATA = i2c_data_temp & 0xff;I2C_receive_input(I2C0_REDATA);}else{I2C0_ADD = i2c_data_temp;I2C_RecNum = 0;}}
#endif
}
这里再粘贴一下用户手册上的配置步骤
主机发送接收:
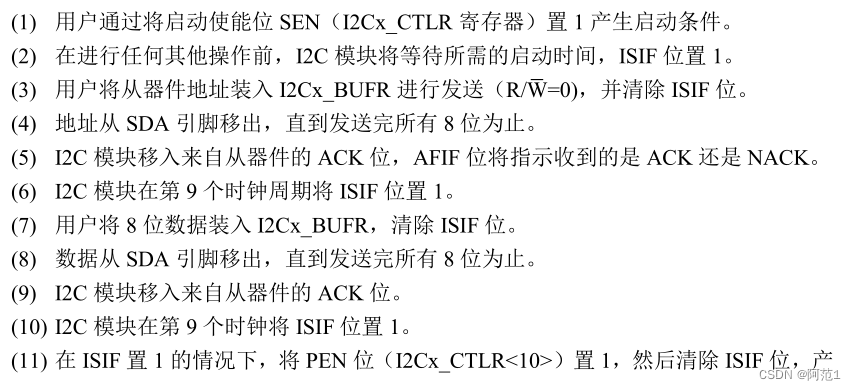

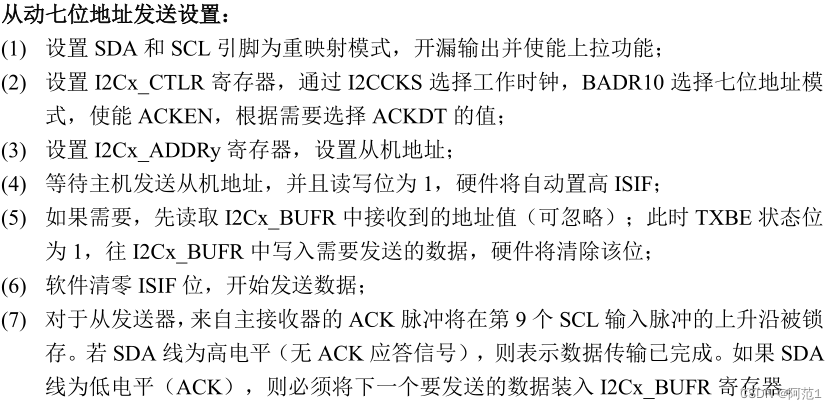
从机发送:
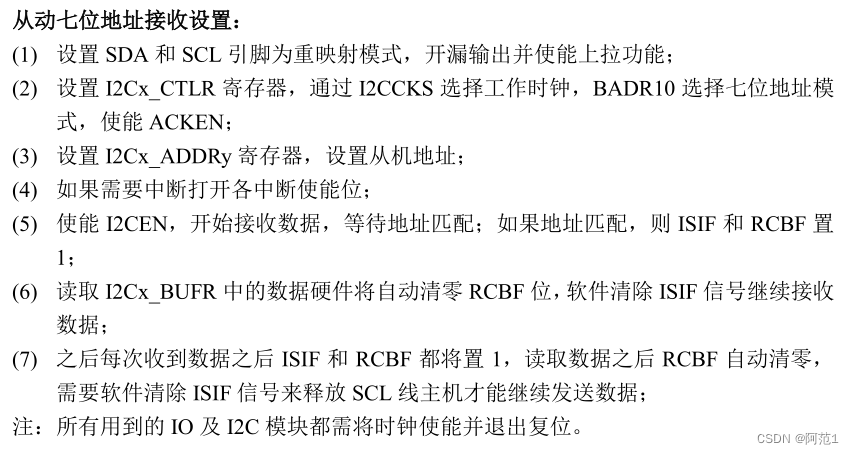
从机接收:
以上基本已经将IIC的主从机配置和发送接收等流程配置完毕,用户可再根据自身需求进行优化。
这里
本次更新时间20230507
这篇关于芯旺微chipon KF32A156系列 IIC(I2C)模块的基本使用的文章就介绍到这儿,希望我们推荐的文章对编程师们有所帮助!


