本文主要是介绍【从零开始的rust web开发之路 三】orm框架sea-orm入门使用教程,希望对大家解决编程问题提供一定的参考价值,需要的开发者们随着小编来一起学习吧!
【从零开始的rust web开发之路 三】orm框架sea-orm入门使用教程
文章目录
- 前言
- 一、引入依赖
- 二、创建数据库连接
- 简单链接
- 连接选项
- 开启日志调试
- 三、生成实体
- 安装sea-orm-cli
- 创建数据库表
- 使用sea-orm-cli命令生成实体文件代码
- 四、增删改查实现
- 新增数据
- 主键查找
- 条件查找
- 查找用户名是admin的一条用户
- 查找地址是郑州的所有用户
- 查找地址是郑州并且用户名包含admin的所有用户
- 分页查找
- 修改数据
- 删除数据
- 数据库事务操作
- 总结
前言
前两篇文件主要降了axum相关使用,这篇文章来讲讲orm相关框架。目前rust orm相关框架不多,比较主流的是sqlx,本文介绍的框架实在此基础上封装的一层,sql-orm同样也支持rust异步。
一、引入依赖
sea-orm = { version = "0.12", features = [ <DATABASE_DRIVER>, <ASYNC_RUNTIME>, "macros" ] } #DATABASE_DRIVER和ASYNC_RUNTIME参数需要替换
DATABASE_DRIVER参数
- sqlx-mysql-SQLx的MySQL
- sqlx-postgres-SQLx
- PostgreSQL的 sqlx-sqlite
ASYNC_RUNTIME参数
- runtime-async-std-native-tls
- runtime-tokio-native-tls
- runtime-async-std-rustls
- runtime-tokio-rustls
这里我们选择引入tokio异步支持的,还要引入tokio
[dependencies]
sea-orm = { version = "0.12", features = [ "sqlx-mysql", "runtime-tokio-native-tls", "macros" ] }
tokio = { version = "1.35.1", features = ["full"] }
二、创建数据库连接
简单链接
let db: DatabaseConnection = Database::connect("protocol://username:password@host/database").await?;
举例子mysql数据库连接
let db: DatabaseConnection = Database::connect("mysql://root:root@127.0.0.1:3307/test").await.unwrap();
后续查询选相关操作每次调用DatabaseConnection ,都会从池中获取和释放连接。
连接别的数据库可以看官方文档https://www.sea-ql.org/SeaORM/docs/next/install-and-config/connection/
连接选项
若要配置连接,请使用 ConnectOptions 接口
let mut opt = ConnectOptions::new("mysql://root:root@127.0.0.1:3307/test");
opt.max_connections(100).min_connections(5).connect_timeout(Duration::from_secs(8)).acquire_timeout(Duration::from_secs(8)).idle_timeout(Duration::from_secs(8)).max_lifetime(Duration::from_secs(8)).sqlx_logging(true).sqlx_logging_level(log::LevelFilter::Info).set_schema_search_path("my_schema"); // Setting default PostgreSQL schemalet db = Database::connect(opt).await?;
可以看ConnectOptions接口文档https://docs.rs/sea-orm/0.12.12/sea_orm/struct.ConnectOptions.html
开启日志调试
开发阶段需要打印相关日志,可以开启调试模式
features当中多一个[“debug-print”]
[dependencies]
sea-orm = { version = "0.12", features = [ "sqlx-mysql", "runtime-tokio-native-tls", "macros" ,"debug-print","with-chrono"] }
tokio = { version = "1.35.1", features = ["full"] }
chrono = "0.4.33"
tracing = "0.1.40"
tracing-subscriber = { version = "0.3.18",features = ["env-filter","time","local-time", ]}
然后需要执行一段初始化tracing-subscriber代码
// 设置全局日志级别为 infolet env_filter = EnvFilter::try_from_default_env().unwrap_or_else(|_| EnvFilter::new("info"))//单独设置sea_orm.add_directive("sea_orm::driver=debug".parse().unwrap())//关闭sqlx自带的日志.add_directive("sqlx::query=off".parse().unwrap());
三、生成实体
安装sea-orm-cli
运行命令
cargo install sea-orm-cli
创建数据库表
CREATE TABLE `user` (`id` int NOT NULL AUTO_INCREMENT,`username` varchar(32) NOT NULL COMMENT '用户名称',`birthday` datetime DEFAULT NULL COMMENT '生日',`sex` char(1) DEFAULT NULL COMMENT '性别',`address` varchar(256) DEFAULT NULL COMMENT '地址',PRIMARY KEY (`id`)
) ENGINE=InnoDB AUTO_INCREMENT=49 DEFAULT CHARSET=utf8mb3
使用sea-orm-cli命令生成实体文件代码
在项目文件夹下运行命令,-o 是输出文件目录。相关参数配置可看文档https://www.sea-ql.org/SeaORM/docs/next/generate-entity/sea-orm-cli/
sea-orm-cli generate entity -u mysql://root:root@127.0.0.1:3307/test -o src/entity

在main文件加入entity模块即可。
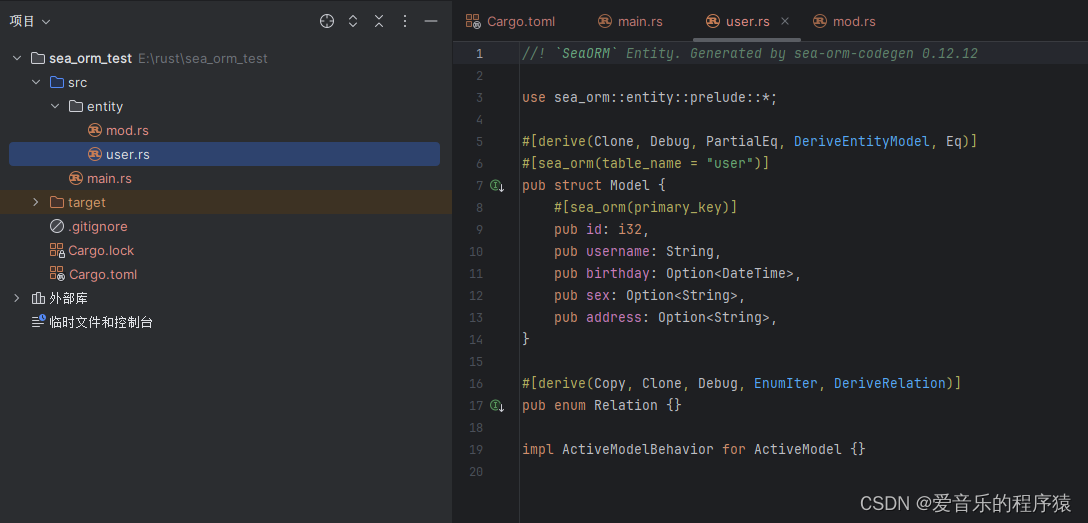
生成的文件内容
在这里插入图片描述
指定表名
#[sea_orm(table_name = "cake", schema_name = "public")]
pub struct Model { ... }
指定列名
#[sea_orm(column_name = "name")]
pub name: String
四、增删改查实现
新增数据
先了解ActiveValue和ActiveModel
use entity::user::ActiveModel as UserModel;
let user: UserModel =  UserModel{id: ActiveValue::NotSet,username: ActiveValue::Set("你好".to_owned()),birthday: ActiveValue::Set(Some(Local::now().naive_local())),sex: ActiveValue::Set(Some("1".to_owned())),address: ActiveValue::Set(Some("address".to_owned())),};
这里我们创建UserModel的ActiveModel模型,里面的值是ActiveValue类型,NotSet是不设置值。
创建ActiveModel方法还有别的,比如通过JSON字符,具体的可以看文档https://www.sea-ql.org/SeaORM/docs/next/basic-crud/insert/#convert-activemodel-back-to-model
然后执行插入方法,具体代码如下
use chrono::{ Local};
use sea_orm::{ActiveModelTrait, ActiveValue, Database, DatabaseConnection, IntoActiveModel};pub mod entity;
use entity::user::Entity as UserDao;
use entity::user::ActiveModel as UserModel;
use entity::user::Model as Model;
#[tokio::main]
async fn main(){let db: DatabaseConnection = Database::connect("mysql://root:root@127.0.0.1:3307/test").await.unwrap();let user: UserModel =  UserModel{id: ActiveValue::NotSet,username: ActiveValue::Set("你好".to_owned()),birthday: ActiveValue::Set(Some(Local::now().naive_local())),sex: ActiveValue::Set(Some("1".to_owned())),address: ActiveValue::Set(Some("address".to_owned())),};
/*    let user: Model = Model{id: 1,username: "admin".to_string(),birthday: Some(Local::now().naive_local()),sex: Some("1".to_owned()),address: Some("address".to_owned()),};let active_model = user.into_active_model();*/let result = user.insert(&db).await.unwrap();println!("插入成功!:{:?}",result);
}
多个插入可以调用上述代码UserDao中的insert_many方法,传入ActiveModel数组
主键查找
use entity::user::Entity as UserDao;let option = UserDao::find_by_id(1).one(&db).await.unwrap();match option {None => {}Some(user) => println!("查询成功!:{:?}",user)}
条件查找
查找用户名是admin的一条用户
use crate::entity::user;use entity::user::Entity as UserDao;let result = UserDao::find().filter(user::Column::Username.eq("admin")).one(&db).await.unwrap();match result {None => {}Some(user) => println!("查询成功!:{:?}",user)}
查找地址是郑州的所有用户
use crate::entity::user;use entity::user::Entity as UserDao;let result = UserDao::find().filter(user::Column::Address.eq("郑州")).all(&db).await.unwrap();println!("查询成功!:{:?}",result)
查找地址是郑州并且用户名包含admin的所有用户
use crate::entity::user;use entity::user::Entity as UserDao;let result = UserDao::find().filter(Condition::all().add(user::Column::Address.eq("郑州")).add(user::Column::Username.like("%admin%"))).all(&db).await.unwrap();println!("查询成功!:{:?}",result)
分页查找
use crate::entity::user;use entity::user::Entity as UserDao;let mut paginator = UserDao::find().filter(Condition::all().add(user::Column::Address.eq("郑州")).add(user::Column::Username.like("%admin%"))).paginate(&db,50);//paginate(&db,50)此处第二个参数表示设置单页数量,此方法会返回Paginator对象。while let Some(user) = paginator.fetch_and_next().await.unwrap() {//循环从paginate取数据,每次取50条,页数加一,直到没有数据println!("查询成功!:{:?}",user)}
如果直接获取第几页数据怎么做,下面有方法
use crate::entity::user;use entity::user::Entity as UserDao;let mut paginator = UserDao::find().filter(Condition::all().add(user::Column::Address.eq("郑州")).add(user::Column::Username.like("%admin%"))).paginate(&db,50);//此方法可直接取具体页数,注意是从零开始,需要前端页数加一let result = paginator.fetch_page(0).await;match result{Ok(vec_user) => {println!("{:?}", vec_user)}Err(_) => {}}
修改数据
修改主键为1的用用户名
use entity::user::Entity as UserDao;let user = UserDao::find_by_id(1).one(&db).await.unwrap().unwrap();let mut active_model = user.into_active_model();active_model.username = ActiveValue::Set("修改后的用户名".to_owned());active_model.update(&db).await.unwrap();
如果想强制更新某个字段可以调用。
active_model.reset(user::Column::Address); //这样更新时字段就会强制带上,可以实现把字段置空
删除数据
很简单
use entity::user::Entity as UserDao;let res = UserDao::delete_by_id(1).exec(&db).await.unwrap();
或者还有一种方法
use entity::user::Entity as UserDao;let res = UserDao::find_by_id(1).one(&db).await.unwrap().unwrap();let active_model = res.into_active_model();active_model.delete(&db).await.unwrap();
数据库事务操作
可以手动调用db的begin和commit方法,以下是官方例子
let txn = db.begin().await?;bakery::ActiveModel {name: Set("SeaSide Bakery".to_owned()),profit_margin: Set(10.4),..Default::default()
}
.save(&txn)
.await?;bakery::ActiveModel {name: Set("Top Bakery".to_owned()),profit_margin: Set(15.0),..Default::default()
}
.save(&txn)
.await?;txn.commit().await?;
总结
以上就是sea-orm入门使用教程,更具体的可以查看sea-orm官方文档https://www.sea-ql.org/SeaORM/docs/index/。后续我可能会再出一篇sea-orm的高级使用教程
这篇关于【从零开始的rust web开发之路 三】orm框架sea-orm入门使用教程的文章就介绍到这儿,希望我们推荐的文章对编程师们有所帮助!


