本文主要是介绍openssl3.2 - 测试程序的学习,希望对大家解决编程问题提供一定的参考价值,需要的开发者们随着小编来一起学习吧!
文章目录
- openssl3.2 - 测试程序的学习
- 概述
- 笔记
- openssl3.2 - 测试程序的学习 - 准备openssl测试专用工程的模板
- openssl3.2 - 测试程序的学习 - test\aborttest.c
- openssl3.2 - 测试程序的学习 - test\sanitytest.c
- openssl3.2 - 测试程序的学习 - test\acvp_test.c
- openssl3.2 - 测试程序的学习 - test\aesgcmtest.c
- openssl3.2 - 测试程序的学习 - error LNK2019: 无法解析的外部符号 evp_pkey_export_to_provider, evp_keymgmt_get_params
- 可以用一个工程模板, 来学习所有的case
- 测试文件.c 的有效范围
- asn1_string_table_test.c
- asynctest.c
- bad_dtls_test.c
- bftest.c
- bio_addr_test.c
- bio_callback_test.c
- bio_comp_test.c
- bio_core_test.c
- bio_dgram_test.c
- bio_enc_test.c
- bio_memleak_test.c
- bio_prefix_text.c
- bio_readbuffer_test.c
- bio_tfo_test.c
- bioprinttest
- bn_internal_test.c
- bntest.c
- build_wincrypt_test.c
- buildtest_*.c
- casttest.c
- cipherlist_test.c
- ciphername_test.c
- clienthellotest.c
- cmactest.c
- 没用的内部测试
- END
openssl3.2 - 测试程序的学习
概述
namke test时, 记录日志.
nmake test > nmake_test_log.txt
可以看到生成了很多测试程序.
	"link" /nologo /debug setargv.obj /subsystem:console /opt:ref  /nologo /debug @C:\Users\chenx\AppData\Local\Temp\nmCACF.tmpIF EXIST test\x509_test.exe.manifest  "mt" -nologo -manifest test\x509_test.exe.manifest -outputresource:test\x509_test.exeIF EXIST test\x509_time_test.exe.manifest DEL /F /Q test\x509_time_test.exe.manifest"link" /nologo /debug setargv.obj /subsystem:console /opt:ref  /nologo /debug @C:\Users\chenx\AppData\Local\Temp\nmCC66.tmpIF EXIST test\x509_time_test.exe.manifest  "mt" -nologo -manifest test\x509_time_test.exe.manifest -outputresource:test\x509_time_test.exeIF EXIST test\x509aux.exe.manifest DEL /F /Q test\x509aux.exe.manifest"link" /nologo /debug setargv.obj /subsystem:console /opt:ref  /nologo /debug @C:\Users\chenx\AppData\Local\Temp\nmCD90.tmpIF EXIST test\x509aux.exe.manifest  "mt" -nologo -manifest test\x509aux.exe.manifest -outputresource:test\x509aux.exeIF EXIST engines\capi.dll.manifest DEL /F /Q engines\capi.dll.manifestcmd /C ""link" /nologo /debug /dll  /nologo /debug @C:\Users\chenx\AppData\Local\Temp\nmCEAB.tmp || (DEL /Q capi.* engines\capi.* & EXIT 1)"IF EXIST engines\capi.dll.manifest  "mt" -nologo -manifest engines\capi.dll.manifest -outputresource:engines\capi.dllIF EXIST engines\dasync.dll.manifest DEL /F /Q engines\dasync.dll.manifestcmd /C ""link" /nologo /debug /dll  /nologo /debug @C:\Users\chenx\AppData\Local\Temp\nmD003.tmp || (DEL /Q dasync.* engines\dasync.* & EXIT 1)"IF EXIST engines\dasync.dll.manifest  "mt" -nologo -manifest engines\dasync.dll.manifest -outputresource:engines\dasync.dllIF EXIST engines\loader_attic.dll.manifest DEL /F /Q engines\loader_attic.dll.manifestcmd /C ""link" /nologo /debug /dll  /nologo /debug @C:\Users\chenx\AppData\Local\Temp\nmD7D4.tmp || (DEL /Q loader_attic.* engines\loader_attic.* & EXIT 1)"IF EXIST engines\loader_attic.dll.manifest  "mt" -nologo -manifest engines\loader_attic.dll.manifest -outputresource:engines\loader_attic.dllIF EXIST engines\ossltest.dll.manifest DEL /F /Q engines\ossltest.dll.manifestcmd /C ""link" /nologo /debug /dll  /nologo /debug @C:\Users\chenx\AppData\Local\Temp\nmD9AA.tmp || (DEL /Q ossltest.* engines\ossltest.* & EXIT 1)"IF EXIST engines\ossltest.dll.manifest  "mt" -nologo -manifest engines\ossltest.dll.manifest -outputresource:engines\ossltest.dllIF EXIST engines\padlock.dll.manifest DEL /F /Q engines\padlock.dll.manifestcmd /C ""link" /nologo /debug /dll  /nologo /debug @C:\Users\chenx\AppData\Local\Temp\nmDAF3.tmp || (DEL /Q padlock.* engines\padlock.* & EXIT 1)"IF EXIST engines\padlock.dll.manifest  "mt" -nologo -manifest engines\padlock.dll.manifest -outputresource:engines\padlock.dllIF EXIST providers\legacy.dll.manifest DEL /F /Q providers\legacy.dll.manifestcmd /C ""link" /nologo /debug /dll  /nologo /debug @C:\Users\chenx\AppData\Local\Temp\nmE18C.tmp || (DEL /Q legacy.* providers\legacy.* & EXIT 1)"IF EXIST providers\legacy.dll.manifest  "mt" -nologo -manifest providers\legacy.dll.manifest -outputresource:providers\legacy.dllcmd /C "set "SRCTOP=." & set "BLDTOP=." & set "PERL=C:\Perl\bin\perl.exe" & set "FIPSKEY=f4556650ac31d35461610bac4ed81b1a181b2d8a43ea2854cbae22ca74560813" & "C:\Perl\bin\perl.exe" ".\test\run_tests.pl" "
00-prep_fipsmodule_cnf.t .. skipped: FIPS module config file only supported in a fips build
Files=1, Tests=0,  0 wallclock secs ( 0.02 usr +  0.00 sys =  0.02 CPU)
Result: NOTESTS
01-test_abort.t ......................... ok
01-test_fipsmodule_cnf.t ................ skipped: Test only supported in a fips build
测试脚本是用perl写的, 挺复杂的. 但是大概齐能看懂意思.
cmd /C "set "SRCTOP=." & set "BLDTOP=." & set "PERL=C:\Perl\bin\perl.exe" & set "FIPSKEY=f4556650ac31d35461610bac4ed81b1a181b2d8a43ea2854cbae22ca74560813" & "C:\Perl\bin\perl.exe" ".\test\run_tests.pl"
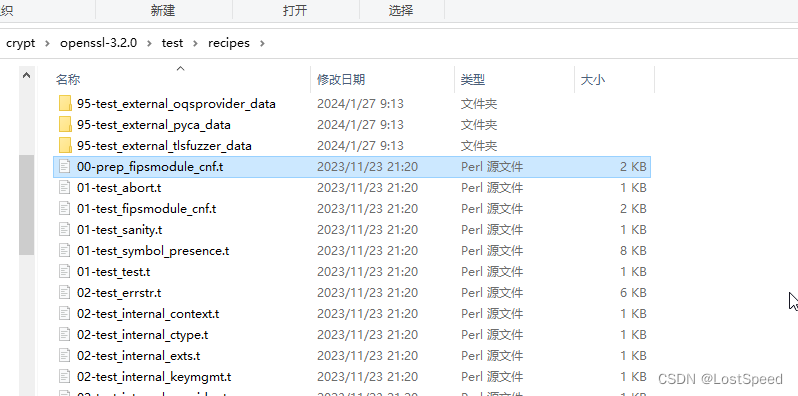
run_tests.pl 中找测试配置文件*.t
# prep recipes are mandatory and need to be always run first
my @preps = glob(catfile($recipesdir,"00-prep_*.t"));
foreach my $test (@preps) {delete $tests{$test};
}sub find_matching_tests {my ($glob) = @_;if ($glob =~ m|^[\d\[\]\?\-]+$|) {return glob(catfile($recipesdir,"$glob-*.t"));}return glob(catfile($recipesdir,"*-$glob.t"));
}openssl-3.2.0\test\recipes/.t

查看具体的.t
use OpenSSL::Test;setup("test_abort");plan tests => 1;is(run(test(["aborttest"])), 0, "Testing that abort is caught correctly");
最终都是调用了生成好的测试程序.
run(test(["用C写的测试程序"]))
结合make test的日志和makefile, 就可以知道具体测试程序(e.g. aborttest.exe ) 编译时, 需要哪些工程文件.
这些测试程序, 是用来对编译好的openssl组件(主要是DLL)来测试. 是真正对openssl外部接口的测试.
这些测试程序是在调用openssl的DLL的接口, 和我们正常使用openssl DLL的场景是一样的, 不同的时, 官方提供的测试程序, 是在测试各种细节场景, 保证编译出的openssl DLL是正常可用的. 如果通不过测试, 那就说明从源码编译出的openssl的可执行文件(exe, DLL)是有问题的.
我想将openssl的这些测试exe的工程实现过一遍. 等过完后, openssl DLL接口细节的使用, 就没啥不知道的了.
等于是, 我们自己工程中如何用openssl, 在这些官方内部使用的nmake test相关工程中, 已经全部演示了.
看完这些测试程序, 在openssl.exe工程中找代码参考, 也容易和清晰多了.
笔记
这个笔记作为一个索引贴.
如果测试程序很短, 就写在这个笔记中
如果测试程序很长, 就另外开一个笔记, 将具体笔记的索引放在这个索引贴中.
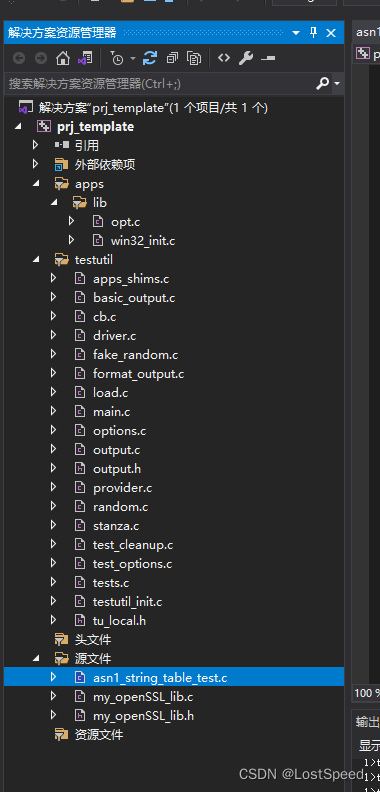
openssl源码目录下的\test下, 用everything搜索全部的*.c, 拷贝到自己工程的备用目录下, 这些.c就是要学习的官方测试程序的C实现.
全部过一遍. 过一个工程, 就删掉一个实现, 等实现都没了, 就搞定了.
openssl3.2 - 测试程序的学习 - 准备openssl测试专用工程的模板
openssl的测试实现.c, 写的不是很标准, 不是测试必须的实现都写了.
这就导致, 向测试工程中加了新实现(删掉旧实现)时, 不是每次都能一次编译过.
有时还要向工程中添加或删减文件, 很麻烦.
整了几个openssl官方的测试程序后, 就想做个专用的模板工程, 这样每个新实验都在模板工程上做, 工作量小多了. 稍作修改就能编译过, 然后做实验.
openssl3.2 - 测试程序的学习 - 准备openssl测试专用工程的模板
openssl3.2 - 测试程序的学习 - test\aborttest.c
#include "my_openSSL_lib.h"#include <openssl/crypto.h>int main(int argc, char **argv)
{// 打印错误原因, 报错点(file, line), 结束程序OPENSSL_die("Voluntary abort", __FILE__, __LINE__);return 0;
}
openssl3.2 - 测试程序的学习 - test\sanitytest.c
openssl3.2 - 测试程序的学习 - test\sanitytest.c
openssl3.2 - 测试程序的学习 - test\acvp_test.c
openssl3.2 - 测试程序的学习 - test\acvp_test.c
openssl3.2 - 测试程序的学习 - test\aesgcmtest.c
openssl3.2 - 测试程序的学习 - test\aesgcmtest.c
openssl3.2 - 测试程序的学习 - error LNK2019: 无法解析的外部符号 evp_pkey_export_to_provider, evp_keymgmt_get_params
openssl make test 不只是测试已经导出的API, 也进行内部函数测试.
我们搭建的环境, 是基于已经编译安装的openssl3.2的DLL对外导出接口.
如果是openssl内部函数在测试程序中, 是会编译报错的.
如果看到openssl/test/*.c中有测试内部函数(小写字母开头), 就跳过, 不玩了.
openssl3.2 - 测试程序的学习 - error LNK2019: 无法解析的外部符号 evp_pkey_export_to_provider, evp_keymgmt_get_params
可以用一个工程模板, 来学习所有的case

已经试验过10+个官方的test*.c的测试用例, 为了节省空间, 不用对每个case都建立单独的工程.
现在已经解决了所有的编译问题, 也搭好了工程模板.
只需要在一个基于工程模板的工程中, 删掉旧case, 添加新case, 编译, 单步调试(如果值得花费时间).
剩下300+的case, 就用这种方法去code review.
现在过了100个test.c, 发现开始整理的openssl 测试专用工程模板不太合适, 又修正了一个好用的工程模板.
遇到每个openssl的testcase都好使, 等将300+case都过完, 再来更新.
测试文件.c 的有效范围
从openssl_src_dir/test/*.c 收集来的测试.c文件, 并不都是测试用例文件.
.c名称中必须包含test字样, 其他都是支持文件.
e.g. asn1_dsa_internal_test.c
asn1_string_table_test.c
ASN1_STRING_TABLE_x() 的测试, 没学到东西
asynctest.c
openssl中实现的异步(线程)任务, 有用, 但是用起来有点复杂.
ASYNC_x()
bad_dtls_test.c
对dtls的测试, 能看到作为客户端和远端的tlserver的通讯流程.
http://git.infradead.org/users/dwmw2/openconnect.git/blob/HEAD:/dtls.c
bftest.c
BF_x() 系列是低级API, 官方不推荐在库外部使用.
bio_addr_test.c
BIO_ADDR_x()
AF_INET6, AF_INET数据(sockaddr_in6, sockaddr_in)的操作.
bio_callback_test.c
BIO_set_callback_ex(), BIO操作的回调, 可以在回调中做一些统计.
bio_comp_test.c
BIO_push() 可以让BIO可以有多种附加操作.
bio_core_test.c
BIO_new_from_core_bio()的测试
bio_dgram_test.c
用BIO进行UDP通讯的例子
bio_enc_test.c
用BIO进行对称加解密的例子, 可以指定算法.
bio_memleak_test.c
没营养
bio_prefix_text.c
可以看到程序入参的处理和分析
bio_readbuffer_test.c
读文件
BIO_read_ex(), BIO_gets()
bio_tfo_test.c
在windows上没实现, 用于测试tfo(linux, mac, freebsd)
bioprinttest
BIO_snprintf()
bn_internal_test.c
bn_prime.h 中有前2048个质数的数组预定义
其余是内部API测试, 没用.
bntest.c
openssl里面还封装了字符串操作的接口 OPENSSL_strcasecmp()
BN_x()
测试程序居然有3K+行…
BN_check_prime(), openssl中封装的API真多啊, 居然连检查是否为质数的API都有.
build_wincrypt_test.c
演示win中加密的头文件包含.
#include <openssl/types.h>#ifdef _WIN32
# ifndef WIN32_LEAN_AND_MEAN
#  define WIN32_LEAN_AND_MEAN
# endif
# include <windows.h>
# include <wincrypt.h>
# ifndef X509_NAME
#  ifndef PEDANTIC
#    ifdef _MSC_VER
#      pragma message("wincrypt.h no longer defining X509_NAME before OpenSSL headers")
#    else
#      warning "wincrypt.h no longer defining X509_NAME before OpenSSL headers"
#    endif
#  endif
# endif
#endif#include <openssl/opensslconf.h>
#ifndef OPENSSL_NO_STDIO
# include <stdio.h>
#endif#include <openssl/evp.h>
#include <openssl/x509.h>
#include <openssl/x509v3.h>//int main(void)
//{
//    return 0;
//}
buildtest_*.c
都是演示进行具体编程时, 要包哪些头文件, 怎么用宏来判断要包哪些头文件.
#ifndef OPENSSL_NO_XX_YY
# include <openssl/XX_YY.h>
#endif
openssl中的配置宏都在 opensslconf.h中.
代码中包含头文件时,应先包opensslconf.h, 然后再根据编译宏开关来包含其他头文件, 如下:
#include <openssl/opensslconf.h>
#ifndef OPENSSL_NO_STDIO
# include <stdio.h>
#endif
#ifndef OPENSSL_NO_HMAC
# include <openssl/hmac.h>
#endifint main(void)
{return 0;
}
casttest.c
CAST API官方不推荐在库外使用.
CAST是对称加解密算法, 用起来好直白:)
CAST_set_key(&key_b, 16, out_b);CAST_ecb_encrypt(&(out_a[0]), &(out_a[0]), &key_b, CAST_ENCRYPT);CAST_ecb_encrypt(&(out_a[8]), &(out_a[8]), &key_b, CAST_ENCRYPT);
cipherlist_test.c
向SSL连接设置通讯支持的算法列表.
ciphername_test.c
从SLL连接得到支持的算法列表
clienthellotest.c
用session file 来做配置, 进行TLS客户端测试.
先放这.
cmactest.c
官方不推荐在库外使用CMAC低级API
没用的内部测试
文件名称不带test字样的.c
build_*_test.casn1_dsa_internal_test.c
bn_internal_test.c
asn1_encode_test.c
asn1_internal_test.c
asn1_time_test.c
asynciotest.c
ca_internals_test.c
cert_comp_test.c
chacha_internal_test.c
cipher_overhead_test.c
cipherbytes_test.c
cmp_*_test.c都是内部测试, 不用看.
END
这篇关于openssl3.2 - 测试程序的学习的文章就介绍到这儿,希望我们推荐的文章对编程师们有所帮助!


