本文主要是介绍java—AWT,希望对大家解决编程问题提供一定的参考价值,需要的开发者们随着小编来一起学习吧!
AWT
课程:1、GUI编程简介_哔哩哔哩_bilibili
一.介绍
- 包含了很多类和接口!GUI!
- 元素:窗口、按钮、文本框
- java.awt
二.窗口
1.构造
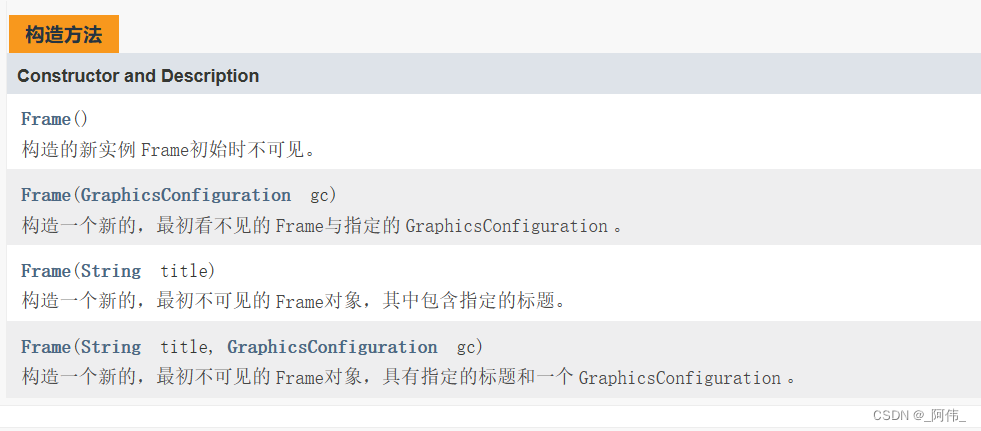
2.方法
// 实例化frame类Frame frame = new Frame("这个一个框");// 设置可见性frame.setVisible(true);// 设置窗口大小frame.setSize(500, 500);// 设置窗口背景颜色,实例化Color类frame.setBackground(new Color(50, 70, 300));// 设置窗口的弹出位置frame.setLocation(300, 300);// 设置窗口大小不可拖动改变frame.setResizable(false);
效果: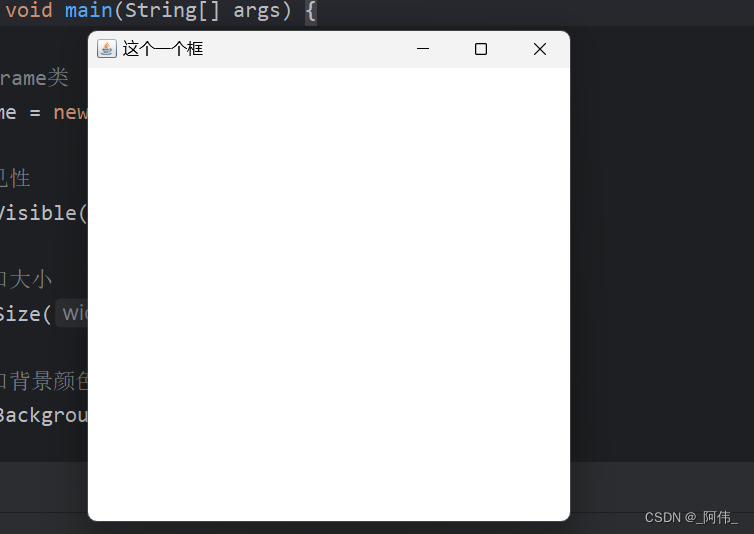
问题:无法关闭窗口,停止java程序
多个frame
我们先写一个frame的封装类:
import java.awt.*;public class MyFrame extends Frame {// 静态序号,计算窗口个数static int id = 0;// 使用构造函数初始化弹出属性// 初始化的属性有大小,弹出位置,背景颜色public MyFrame(int x, int y, int w, int h, Color color) {// 计算窗口个数super("myFrame"+(++id));// 设置窗口可视化setVisible(true);// 设置窗口大小与弹出位置,使用Bounds可以同时设置setBounds(x, y, w, h);// 设置窗口背景颜色setBackground(color);}
}
再写测试类:
public class Application {public static void main(String[] args) {MyFrame myFrame1 = new MyFrame(100, 100, 400, 400, Color.black);MyFrame myFrame2 = new MyFrame(500, 100, 400, 400, Color.red);MyFrame myFrame3 = new MyFrame(100, 500, 400, 400, Color.blue);MyFrame myFrame4 = new MyFrame(500, 500, 400, 400, Color.green);}
}
效果: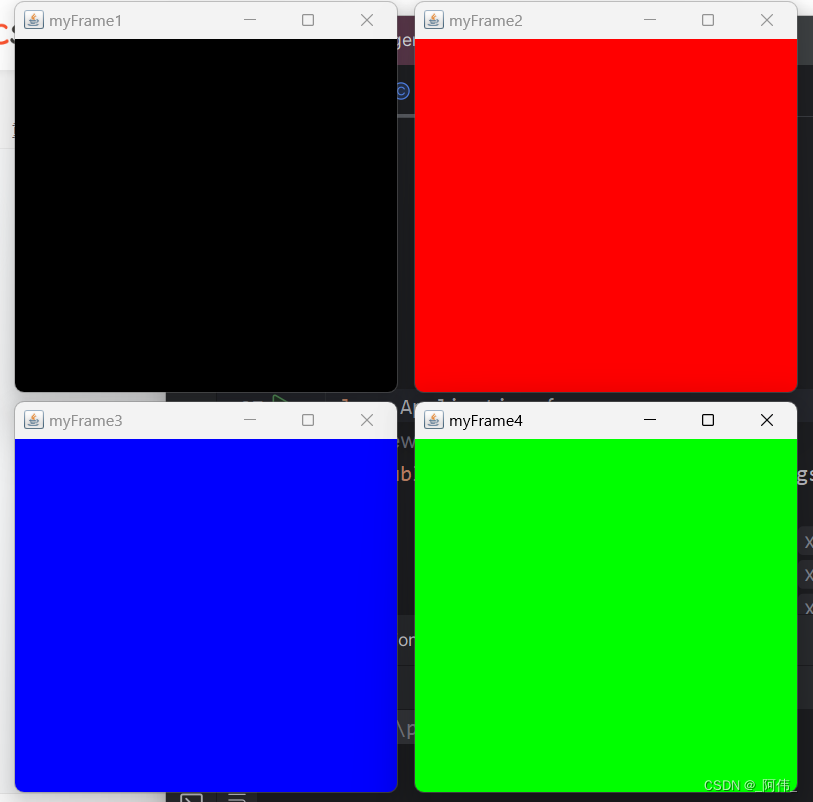
三.panel 面板
1.构造
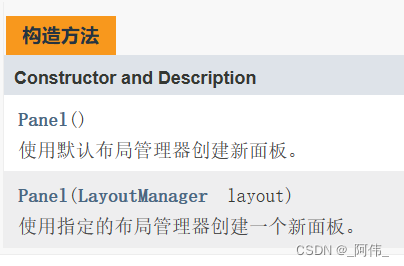
2.方法
- frame中放置一个固定面板
// 先完成窗口的设置Frame frame = new Frame();frame.setVisible(true);frame.setBounds(300, 300, 500, 500);frame.setBackground(new Color(128, 253, 190));// 将组件的布局设置为空布局,使你能够手动控制组件的位置和大小。frame.setLayout(null);// 面板的设置与窗口一样,但是面板在窗口里面要注意位置与大小// Panel是面板,可以放在窗口中,不能单独存在Panel panel = new Panel();frame.setVisible(true);panel.setBounds(50, 50, 400, 400);panel.setBackground(new Color(238, 47, 142));// 添加面板进窗口,frame.add(panel);效果:

解决无法关闭窗口停止java程序,可以使用下面的方法看不懂跳过后面还会再讲
package com.demo.panel;
import java.awt.*;
import java.awt.event.WindowAdapter;
import java.awt.event.WindowEvent;public class PanelTest {public static void main(String[] args) {panelTest();}public static void panelTest() {// 先完成窗口的设置Frame frame = new Frame();frame.setVisible(true);frame.setBounds(300, 300, 500, 500);frame.setBackground(new Color(128, 253, 190));// 将组件的布局设置为空布局,使你能够手动控制组件的位置和大小。frame.setLayout(null);// 面板的设置与窗口一样,但是面板在窗口里面要注意位置与大小// Panel是面板,可以放在窗口中,不能单独存在Panel panel = new Panel();frame.setVisible(true);panel.setBounds(50, 50, 400, 400);panel.setBackground(new Color(238, 47, 142));// 添加面板进窗口,frame.add(panel);// 设置窗口关闭,可以自己写一个窗口监听// 监听事件:监听窗口关闭事件 关闭:System.exit(0)// 适配器模式:用Adapter类重写方法    只有一个方法的监听接口没有适配器frame.addWindowListener(new WindowAdapter() {@Overridepublic void windowClosing(WindowEvent e) {// 窗口点击关闭的时候需要做的事,退出程序System.exit(0);}});}
}
四.四种布局管理器与按钮
按钮的构造器
| Constructor and Description |
|---|
Button() 构造一个带有标签的空字符串的按钮。 |
Button(String label) 构造具有指定标签的按钮。 |
方法
| Modifier and Type | Method and Description |
|---|---|
void | addActionListener(ActionListener l) 添加指定的动作侦听器以从此按钮接收动作事件。 |
void | addNotify() 创建按钮的对等体。 |
AccessibleContext | getAccessibleContext() 获取 |
String | getActionCommand() 返回此按钮触发的操作事件的命令名称。 |
ActionListener[] | getActionListeners() 返回在此按钮上注册的所有动作侦听器的数组。 |
String | getLabel() 获取此按钮的标签。 |
<T extends EventListener> | getListeners(类<T> listenerType) 返回当前注册为 |
protected String | paramString() 返回一个代表此 |
protected void | processActionEvent(ActionEvent e) 通过将此按钮分派到任何已注册的 |
protected void | processEvent(AWTEvent e) 处理此按钮上的事件。 |
void | removeActionListener(ActionListener l) 删除指定的动作侦听器,使其不再从此按钮接收到动作事件。 |
void | setActionCommand(String command) 设置此按钮触发的操作事件的命令名称。 |
void | setLabel(String label) 将按钮的标签设置为指定的字符串。 |
1.空布局(绝对布局)
前面我们使用的是空布局,如下
// 将组件的布局设置为空布局,使你能够手动控制组件的位置和大小。frame.setLayout(null);2.流式布局
从左到右从上到下
public static void main() {Frame frame = new Frame();// 按钮Button button1 = new Button("按钮1");Button button2 = new Button("按钮2");Button button3 = new Button("按钮3");// FlowLayout:流式布局 从左到右从上到下// frame.setLayout(new FlowLayout(FlowLayout.LEFT));// 向左// frame.setLayout(new FlowLayout()); // 中间frame.setLayout(new FlowLayout(FlowLayout.RIGHT));// 向右// 设置可见度与大小frame.setVisible(true);frame.setSize(200,200);// 添加按钮frame.add(button1);frame.add(button2);frame.add(button3);}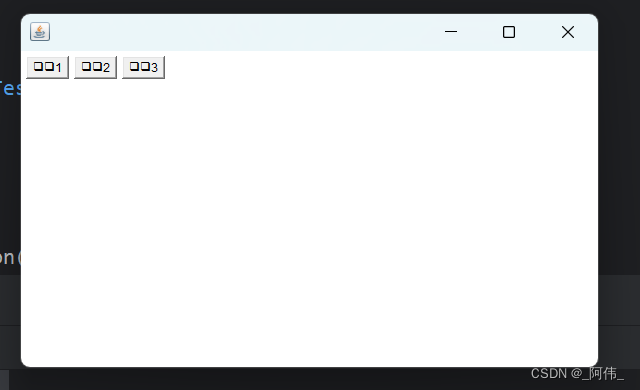


3.空间布局
东西南北中
public static void main() {Frame frame1 = new Frame("BorderLayout布局");// 组件--按钮Button east = new Button("East");Button west = new Button("West");Button south= new Button("South");Button north = new Button("North");Button center = new Button("Center");// 设置可见度与大小frame1.setVisible(true);frame1.setSize(200,200);// 添加按钮// BorderLayout:空间布局 东西南北中 南北是拉满的 有南北的情况下左右不一定拉满了frame1.add(east,BorderLayout.EAST);frame1.add(west,BorderLayout.WEST);frame1.add(south,BorderLayout.SOUTH);frame1.add(north,BorderLayout.NORTH);frame1.add(center,BorderLayout.CENTER);}
4.网格布局
几行几列 根据多少,列会产生变化
public static void main() {Frame frame2 = new Frame("GridLayout布局");//组件--按钮Button button1 = new Button("1");Button button2 = new Button("2");Button button3 = new Button("3");Button button4 = new Button("4");Button button5 = new Button("5");Button button6 = new Button("6");//设置布局GridLayout new GridLayout(行,列,行间隔,列间隔)frame2.setLayout(new GridLayout(3,2));// 设置可见度frame2.setVisible(true);// 添加按钮frame2.add(button1);frame2.add(button2);frame2.add(button3);frame2.add(button4);frame2.add(button5);frame2.add(button6);// 使用pack()方法可以自动调节大小和布局大小frame2.pack();}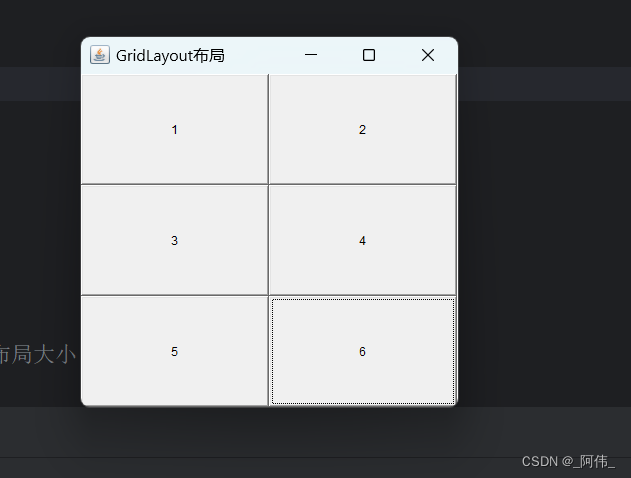
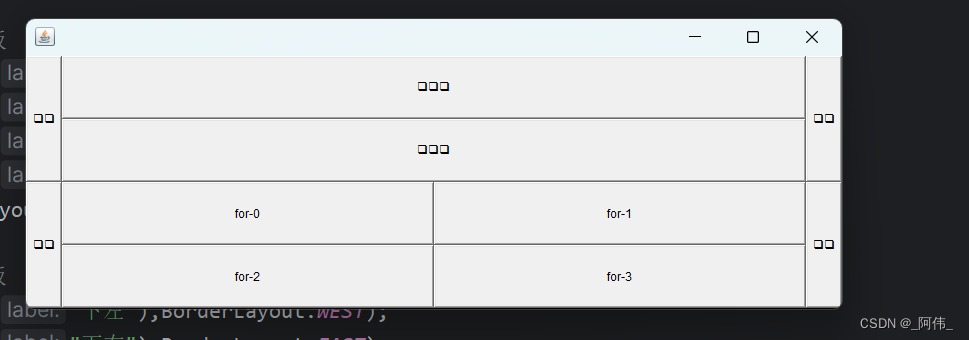
5.练习
请用30分钟做以下内容 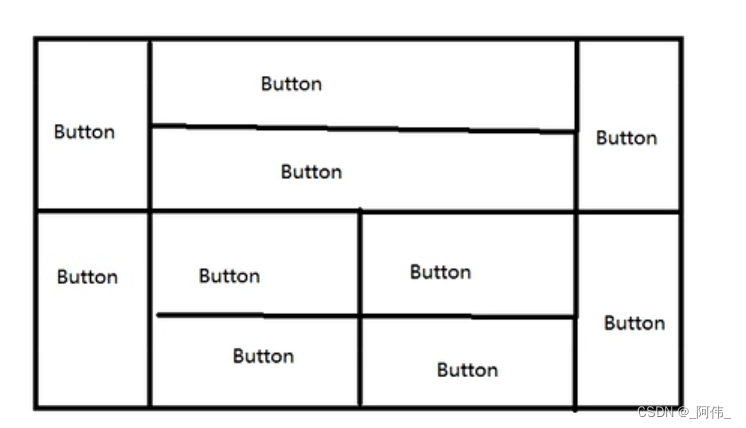
思路讲解:6、课堂练习讲解及总结_哔哩哔哩_bilibili
public static void main() {// 一.外层窗口Frame frame3 = new Frame();// 设置可见度,弹出位置,大小,颜色frame3.setVisible(true);frame3.setBounds(200,200,200,300);frame3.setBackground(Color.BLACK);// 设置布局frame3.setLayout(new GridLayout(2,1));// 二.设置四个面板// 上面的面板Panel p1 = new Panel(new BorderLayout());// 上面中间的面板Panel p2 = new Panel(new GridLayout(2,1));// 下面的面板Panel p3 = new Panel(new BorderLayout());// 下面中间的面板Panel p4 = new Panel(new GridLayout(2,2));// 三.设计上面的面板p1.add(new Button("上左"),BorderLayout.WEST);p1.add(new Button("上右"),BorderLayout.EAST);p2.add(new Button("上中一"));p2.add(new Button("上中二"));p1.add(p2,BorderLayout.CENTER);// 四.设计下面的面板p3.add(new Button("下左"),BorderLayout.WEST);p3.add(new Button("下右"),BorderLayout.EAST);for (int i = 0; i < 4; i++) {p4.add(new Button("for-"+i));}p3.add(p4,BorderLayout.CENTER);// 五.将上下拼凑起来frame3.add(p1);frame3.add(p3);frame3.addWindowListener(new WindowAdapter() {@Overridepublic void windowClosing(WindowEvent e) {// 窗口点击关闭的时候需要做的事,退出程序System.exit(0);}});}由于中文的字符编码问题,我的结果中的中文没有显示出来,全部变成了正方形
五.事件监听
| Modifier and Type | Method and Description |
|---|---|
void | actionPerformed(ActionEvent e) 发生动作时调用。 |
1.按钮监听
package com.demo.panel;import java.awt.*;
import java.awt.event.ActionEvent;
import java.awt.event.ActionListener;
import java.awt.event.WindowAdapter;
import java.awt.event.WindowEvent;
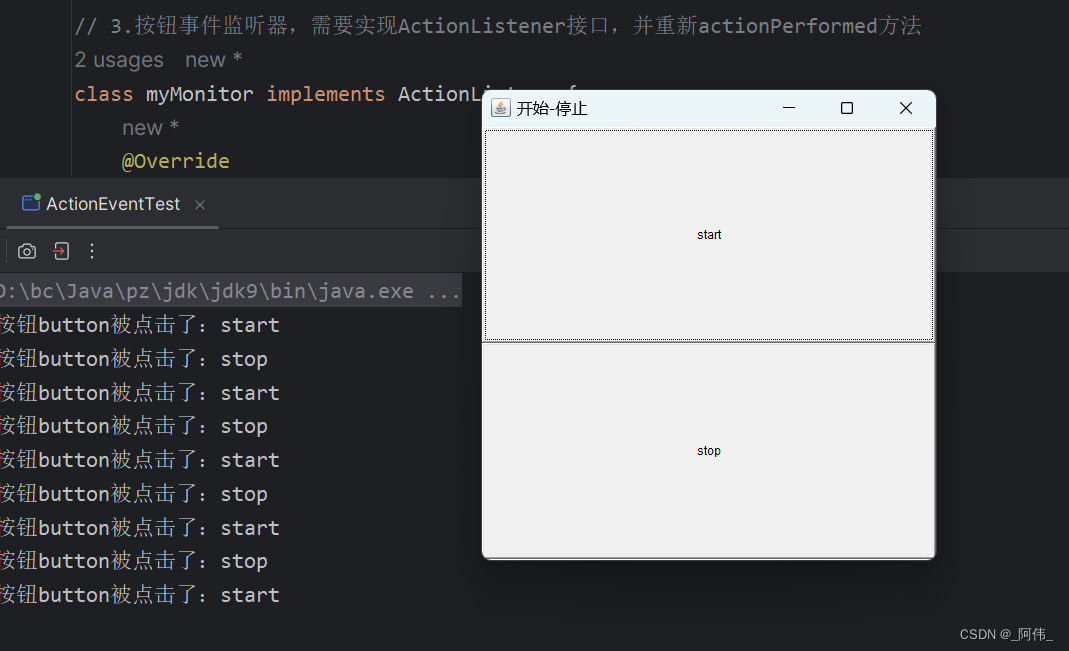
public class ActionEventTest {public static void main(String[] args) {actionEventTest();}// 事件监听 按下按钮 触发一些事件public static void actionEventTest() {// 1.窗口与布局Frame frame = new Frame("开始-停止");frame.setVisible(true);frame.setLayout(new GridLayout(2,1));// 2.按钮Button button1 = new Button("start");Button button2 = new Button("stop");// 4.设置按钮信息button1.setActionCommand("start");// 5.实例化myMonitor与,两个按钮同用一个事件myMonitor myMonitor = new myMonitor();button1.addActionListener(myMonitor);button2.addActionListener(myMonitor);// 6.按钮添加到窗口frame.add(button1);frame.add(button2);frame.pack();// 8.调用关闭窗口事件windowClose(frame);}// 7.关闭窗口的事件,单独写成一个方法private static void windowClose(Frame frame){frame.addWindowListener(new WindowAdapter() {@Overridepublic void windowClosing(WindowEvent e) {System.exit(0);}});}}// 3.按钮事件监听器,需要实现ActionListener接口,并重新actionPerformed方法
class myMonitor implements ActionListener{@Overridepublic void actionPerformed(ActionEvent e) {System.out.println("按钮button被点击了:"+e.getActionCommand());}
}
2.输入框事件监听与文本框
| Constructor and Description |
|---|
TextField() 构造一个新的文本字段。 |
TextField(int columns) 构造具有指定列数的新的空文本字段。 |
TextField(String text) 构造一个使用指定文本初始化的新文本字段。 |
TextField(String text, int columns) 构造一个新的文本字段,并使用指定的文本进行初始化,以便显示,并且足够宽以容纳指定的列数。 |
方法摘要
| Modifier and Type | Method and Description |
|---|---|
void | addActionListener(ActionListener l) 添加指定的动作侦听器以从此文本字段接收动作事件。 |
void | addNotify() 创建TextField的对等体。 |
boolean | echoCharIsSet() 指示此文本字段是否具有用于回显的字符集。 |
AccessibleContext | getAccessibleContext() 获取与此TextField关联的AccessibleContext。 |
ActionListener[] | getActionListeners() 返回在此文本域中注册的所有操作侦听器的数组。 |
int | getColumns() 获取此文本字段中的列数。 |
char | getEchoChar() 获取要用于回显的字符。 |
<T extends EventListener> | getListeners(类<T> listenerType) 返回当前注册的所有对象的数组 |
Dimension | getMinimumSize() 获取此文本字段的最小尺寸。 |
Dimension | getMinimumSize(int columns) 获取具有指定列数的文本字段的最小尺寸。 |
Dimension | getPreferredSize() 获取此文本字段的首选大小。 |
Dimension | getPreferredSize(int columns) 使用指定的列数获取此文本字段的首选大小。 |
Dimension | minimumSize()已弃用 从JDK 1.1版开始,替换为 |
Dimension | minimumSize(int columns)已弃用 截至JDK 1.1版,由 |
protected String | paramString() 返回表示此 |
Dimension | preferredSize()已弃用 从JDK 1.1版开始,由 |
Dimension | preferredSize(int columns)已弃用 截至JDK 1.1版,由 |
protected void | processActionEvent(ActionEvent e) 通过将这些事件发送到任何已注册的 |
protected void | processEvent(AWTEvent e) 处理此文本字段上的事件。 |
void | removeActionListener(ActionListener l) 删除指定的动作监听器,使其不再从此文本字段接收到动作事件。 |
void | setColumns(int columns) 设置此文本字段中的列数。 |
void | setEchoChar(char c) 设置此文本字段的回音字符。 |
void | setEchoCharacter(char c)已弃用 从JDK 1.1版开始,替换为 |
void | setText(String t) 将此文本组件呈现的文本设置为指定的文本。 |
package com.demo.panel;import java.awt.*;
import java.awt.event.ActionEvent;
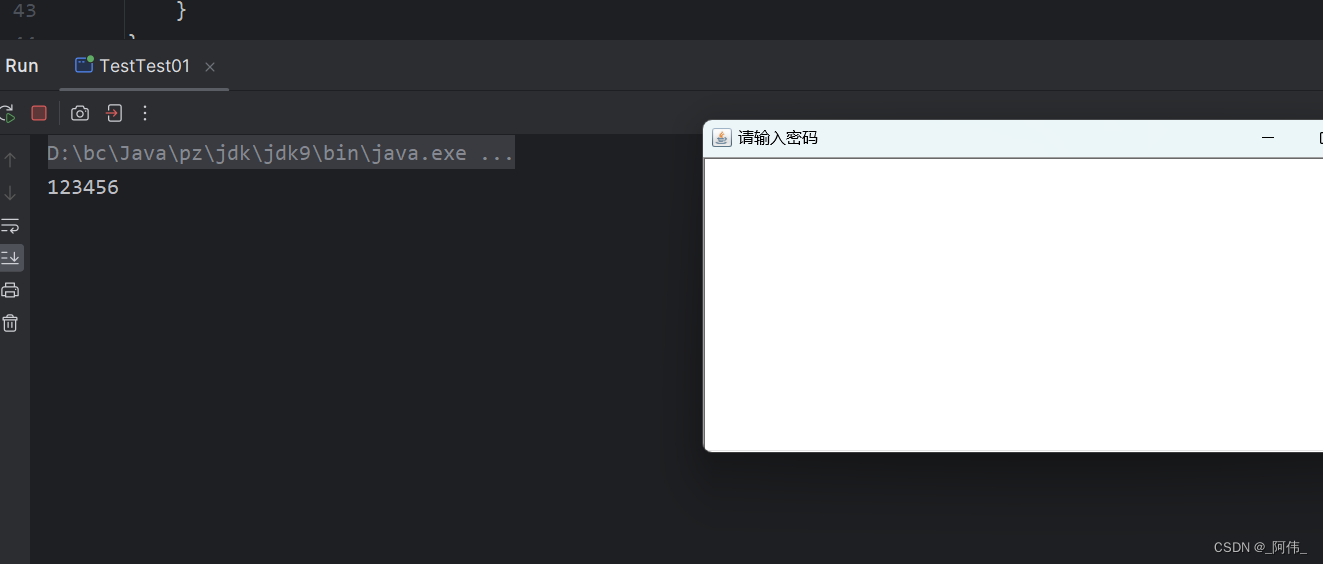
import java.awt.event.ActionListener;public class TestTest01 {public static void main(String[] args) {// 调用构造器new MyFrame();}
}class MyFrame extends Frame{// 构造器(无参)public MyFrame() {//设置窗口的标题//利用super访问父类构造方法super("请输入密码");TextField textField = new TextField();// 因为继承了Frame,使用方法可以直接调用add(textField);//监听这个文本框输入的文字textField.addActionListener(new MyActionListenerTextField());// 设置替换编码textField.setEchoChar('*');// 设置窗口setBounds(200,200,200,200);setVisible(true);}
}class MyActionListenerTextField implements ActionListener{@Overridepublic void actionPerformed(ActionEvent e) {//获得一些资源,返回一个对象 向下转型获取事件源e.getSource()的返回值是objectTextField textField = (TextField) e.getSource();// 获得输入框的文本System.out.println(textField.getText());// 换行清空与后台显示密码textField.setText("");}
}
3.练习简单加法计算器和标签
| Constructor and Description |
|---|
Label() 构造一个空标签。 |
Label(String text) 用指定的文本字符串构造一个新的标签,左对齐。 |
Label(String text, int alignment) 构造一个新的标签,以指定的对齐方式显示指定的文本字符串。 |
方法
void | addNotify() 创建此标签的对等体。 |
AccessibleContext | getAccessibleContext() 获取与此Label相关联的AccessibleContext。 |
int | getAlignment() 获取此标签的当前对齐方式。 |
String | getText() 获取此标签的文本。 |
protected String | paramString() 返回表示此 |
void | setAlignment(int alignment) 将此标签的对齐方式设置为指定的对齐方式。 |
void | setText(String text) 将此标签的文本设置为指定的文本。 |
package com.demo.panel;import java.awt.*;
import java.awt.event.ActionEvent;
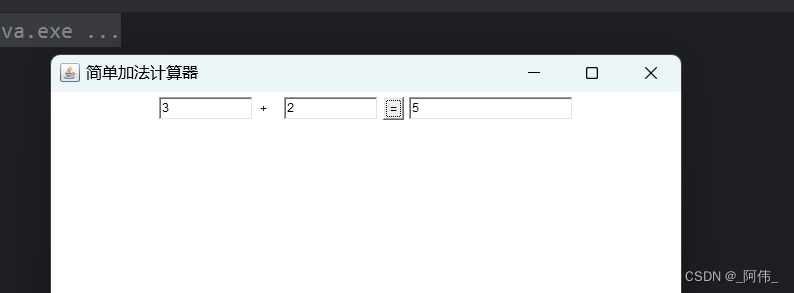
import java.awt.event.ActionListener;public class CalcTest {public static void main(String[] args) {new MyCalcTest().loadFrame();}
}class MyCalcTest extends Frame{// 调用父类构造设置标题public MyCalcTest() {super("简单加法计算器");}TextField num1,num2,num3;public void loadFrame() {// 设置小组件num1 = new TextField(10);num2 = new TextField(10);num3 = new TextField(20);Button button = new Button("=");Label label = new Label("+");// 布局setLayout(new FlowLayout());setVisible(true);pack();add(num1);add(label);add(num2);add(button);add(num3);// 监听按钮button.addActionListener(new MyCalcListener());}// 内部类实现监听public class MyCalcListener implements ActionListener{@Overridepublic void actionPerformed(ActionEvent e) {// 实现加法,使用包装类将String类型转换成intint n1 = Integer.parseInt(num1.getText());int n2 = Integer.parseInt(num2.getText());// 两数相加,回车输出结果num3.setText(""+(n1+n2));}}
}
4.画笔paint
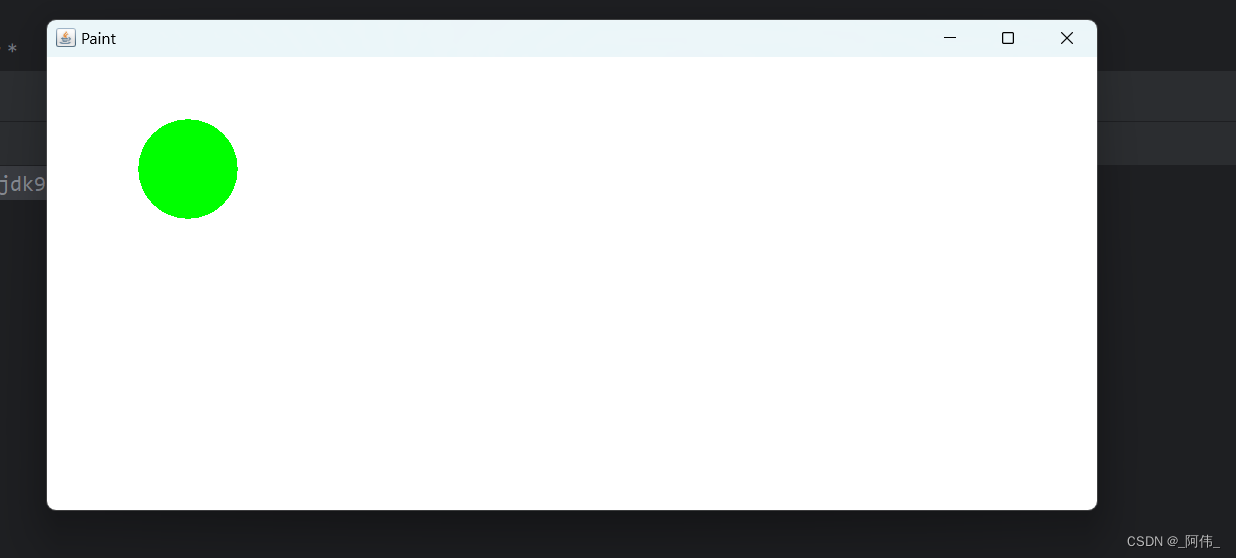
package com.demo.panel;import java.awt.*;public class PaintTest {public static void main(String[] args) {new MyPaintTest().loadPaint();}
}class MyPaintTest extends Frame{// 画板public void loadPaint() {setTitle("Paint");setBounds(200,200,600,500);setVisible(true);}// 画笔,重写paint()方法//画笔方法 paint创建窗口后,默认只执行一次@Overridepublic void paint(Graphics g) {// 选择颜色g.setColor(Color.GREEN);// 选择图像g.fillOval(100,100,100,100);// 养成习惯,画笔用完,将它还原成最初的颜色g.setColor(Color.black);}
}
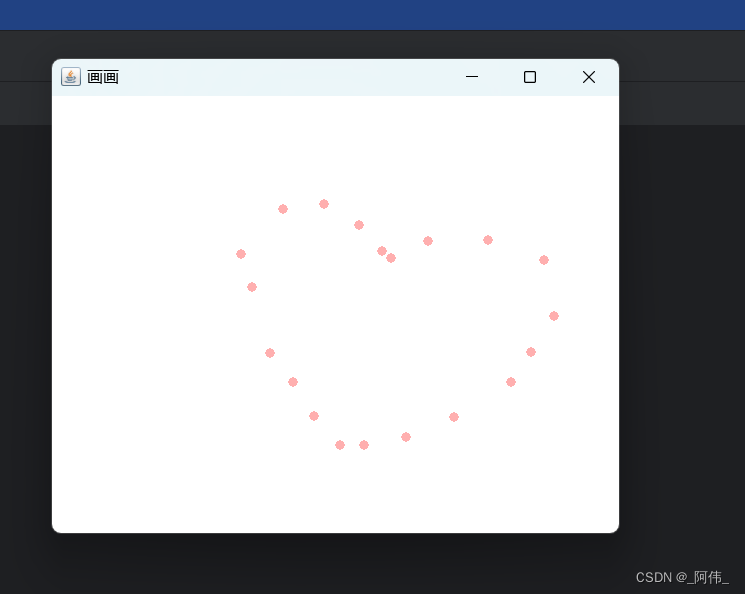
5.鼠标监听与Point
| Modifier and Type | Method and Description |
|---|---|
void | mouseClicked(MouseEvent e) 在组件上单击(按下并释放)鼠标按钮时调用。 |
void | mouseEntered(MouseEvent e) 当鼠标进入组件时调用。 |
void | mouseExited(MouseEvent e) 当鼠标退出组件时调用。 |
void | mousePressed(MouseEvent e) 在组件上按下鼠标按钮时调用。 |
void | mouseReleased(MouseEvent e) 在组件上释放鼠标按钮时调用。 |
| Constructor and Description |
|---|
Point() 构造并初始化坐标空间原点(0,0)的点。 |
Point(int x, int y) 构造并初始化坐标空间中指定的 |
Point(Point p) 构造和初始化与指定的 |
方法
double | getX() 返回这个 |
double | getY() 返回这个 |
package com.demo.panel;import java.awt.*;
import java.awt.event.MouseAdapter;
import java.awt.event.MouseEvent;
import java.util.ArrayList;
import java.util.Iterator;public class MouseListenerTest {public static void main(String[] args) {new MyFrame2("画画");}
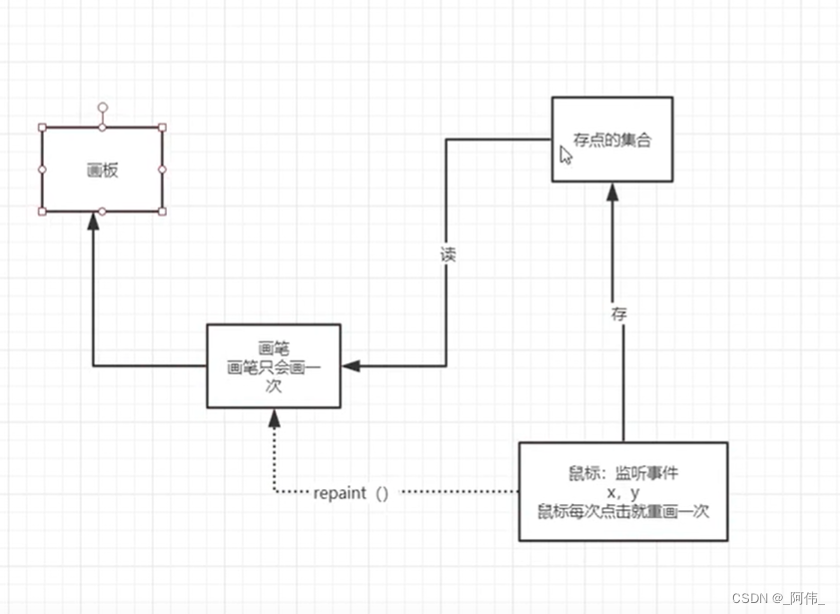
}class MyFrame2 extends Frame{// 需要一个集合来存储画笔画出点的(X,Y)坐标ArrayList<Point> points;// 设置画板(窗口)public MyFrame2(String s) {// 调用父类的构造器,参数为名字super(s);setBounds(200,200,400,300);setVisible(true);// 存储点的坐标points = new ArrayList<>();// 鼠标监听器,正对这个画板(窗口)addMouseListener(new MyMouseListener());}// 画笔@Overridepublic void paint(Graphics g) {// 利用迭代器遍历,读取点的坐标Iterator<Point> iterator = points.iterator();while (iterator.hasNext()){Point point=iterator.next();// 设置颜色与点的大小g.setColor(Color.PINK);g.fillOval(point.x,point.y,10,10);}}// 将点添加到画板上public void addPaint(Point point) {points.add(point);}// 适配器模式private class MyMouseListener extends MouseAdapter{// 鼠标监听事件:按下 弹起 按住不放@Overridepublic void mousePressed(MouseEvent e) {// 鼠标按下时,运行这个方法MyFrame2 myFrame2=(MyFrame2) e.getSource();// 添加画点坐标myFrame2.addPaint(new Point(e.getX(),e.getY()));//因为paint方法只会自动调用一次,所以通过repaint刷新后重新调用paint方法//每次点击鼠标都需要重新画一次repaint();}}
}
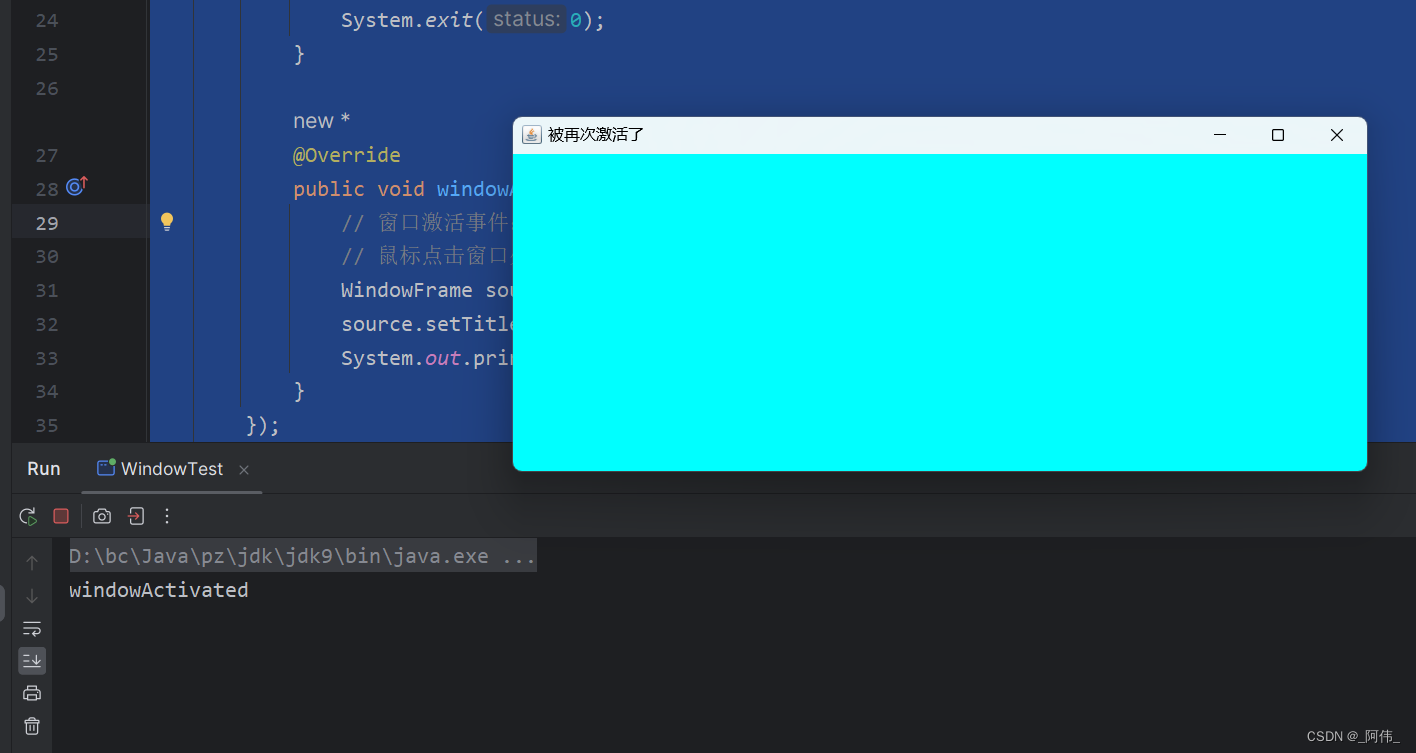
6.窗口监听
| Modifier and Type | Method and Description |
|---|---|
void | windowActivated(WindowEvent e) 当窗口设置为活动窗口时调用。 |
void | windowClosed(WindowEvent e) 当窗口关闭时调用窗口调用处理结果时调用。 |
void | windowClosing(WindowEvent e) 当用户尝试从窗口的系统菜单中关闭窗口时调用。 |
void | windowDeactivated(WindowEvent e) 当窗口不再是活动窗口时调用。 |
void | windowDeiconified(WindowEvent e) 当窗口从最小化更改为正常状态时调用。 |
void | windowIconified(WindowEvent e) 当窗口从正常状态更改为最小化状态时调用。 |
void | windowOpened(WindowEvent e) 第一次调用窗口可见。 |
package com.demo.panel;import java.awt.*;
import java.awt.event.WindowAdapter;
import java.awt.event.WindowEvent;public class WindowTest {public static void main(String[] args) {new WindowFrame();}
}class WindowFrame extends Frame {public WindowFrame() {setBackground(Color.cyan);setBounds(200, 200, 300, 200);setVisible(true);addWindowListener(new WindowAdapter() {@Overridepublic void windowClosing(WindowEvent e) {System.out.println("点击x关闭");System.exit(0);}@Overridepublic void windowActivated(WindowEvent e) {// 窗口激活事件:也就是当你点击到这个窗口内时,就是窗口激活了// 鼠标点击窗口外的地方(窗口变灰了),也就是离开了窗口WindowFrame source = (WindowFrame) e.getSource();source.setTitle("被再次激活了");System.out.println("windowActivated");}});}
}
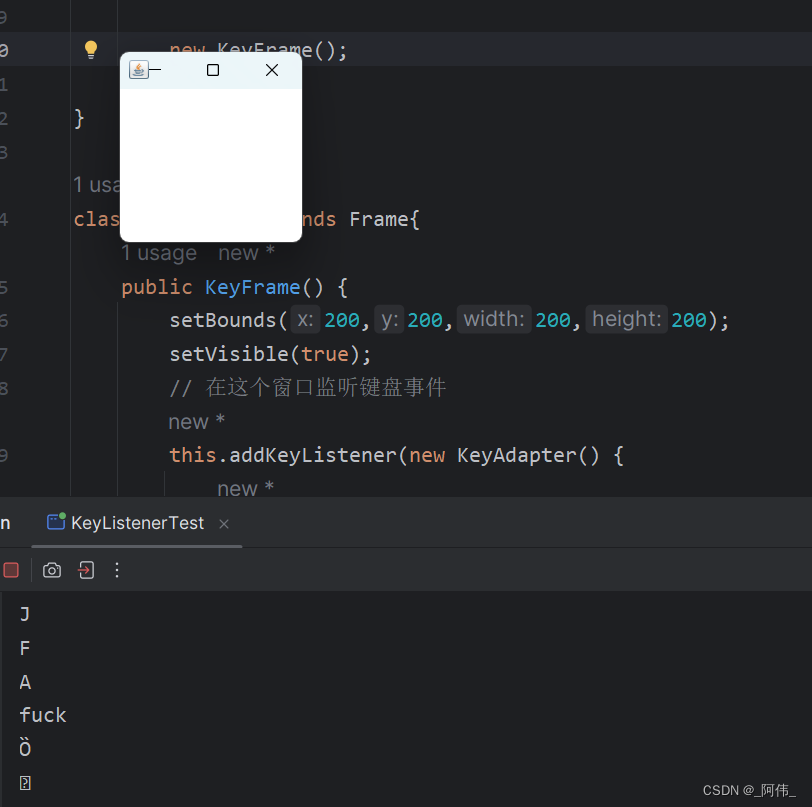
7.键盘监听
| Modifier and Type | Method and Description |
|---|---|
void | keyPressed(KeyEvent e) 按下键时调用。 |
void | keyReleased(KeyEvent e) 当键已被释放时调用。 |
void | keyTyped(KeyEvent e) 键入键时调用。 |
package com.demo.panel;import java.awt.*;
import java.awt.event.KeyAdapter;
import java.awt.event.KeyEvent;public class KeyListenerTest {public static void main(String[] args) {new KeyFrame();}
}class KeyFrame extends Frame{public KeyFrame() {setBounds(200,200,200,200);setVisible(true);// 在这个窗口监听键盘事件this.addKeyListener(new KeyAdapter() {@Overridepublic void keyPressed(KeyEvent e) {// 读取键盘int keyCode = e.getKeyCode();// 输出System.out.println((char) keyCode);// 如果按到a就fuckif (keyCode == KeyEvent.VK_A ) {System.out.println("fuck");}}});}
}
这篇关于java—AWT的文章就介绍到这儿,希望我们推荐的文章对编程师们有所帮助!


