本文主要是介绍C++大学教程(第九版)7.19 将7.10节vector对象的例子转换成array对象,希望对大家解决编程问题提供一定的参考价值,需要的开发者们随着小编来一起学习吧!
文章目录
- 题目
- 代码
- 运行截图
题目
(将7.10节vector 对象的例子转换成array 对象)将图7.26中 vector 对象的例子转换成使用array
对象。请消除任何 vector 对象仅有的特性。
分析:
vector对象独有的特性:
1.vector对象长度可变
2.长度不同的vector对象可以直接赋值,以及比较(!=) (==)可以直接使用
3.函数形参无需包括vector对象的长度
转换成array对象需要修改的地方:
1.array对象大小不可变,所以不同长度的array对象需要不同的输入输出函数
2.长度不同的array对象不可以直接赋值;长度相同可以直接赋值;
长度不同的array对象比较时首先比较array对象长度,
若array对象长度不同,则两个array对象一定不同;
若array对象长度相同,才可以比较array对象是否相同(比较方法: 遍历,逐个比较元素大小)
3.不同的输入输出函数面对不同的array对象的长度,自动调用相应大小的函数。
例如:定义了四个函数(两个输入,两个输出)
代码
#include <iostream>
#include <iomanip>
#include <array>
#include <stdexcept>using namespace std;const int arraySize1 = 7;
const int arraySize2 = 10;void outputVector(const array<int, arraySize1> &);
void outputVector(const array<int, arraySize2> &);
void inputVector(array<int, arraySize1> &);
void inputVector(array<int, arraySize2> &);int main()
{array<int, arraySize1> integers1 = {};array<int, arraySize2> integers2 = {};cout << "Size of array integers1 is " << integers1.size()<< "\narray after initialization:" << endl;outputVector(integers1);cout << "Size of array integers2 is " << integers2.size()<< "\narray after initialization:" << endl;outputVector(integers2);cout << "\nEnter 17 integers:" << endl;inputVector(integers1);inputVector(integers2);cout << "\nAfter input,the arrays contain:\n"<< "integers1:" << endl;outputVector(integers1);cout << "integers2:" << endl;outputVector(integers2);cout << "\nEvaluating:integers1 != integers2" << endl;// 比较integers1和integers2是否相同if (integers1.size() != integers2.size()) // 如果两个array对象大小不同,则一定不同{cout << "integers1 and integers2 are not equal" << endl;}else{bool isEqual = true;for (size_t i = 0; i < integers1.size(); i++){if (integers1[i] != integers2[i]){isEqual = false;break;}}if (isEqual){cout << "integers1 and integers2 are equal." << std::endl;}else{cout << "integers1 and integers2 are not equal." << std::endl;}}array<int, arraySize1> integers3 = integers1; // integers3进行初始化,用integers1赋值cout << "\nSize of array integers3 is " << integers3.size()<< "\narray after initialization:" << endl;outputVector(integers3);cout << "\nAssigning integers2 to integers1:" << endl;for (size_t i = 0; i < arraySize1; ++i){ // 将integers2的值赋给integers1integers1[i] = integers2[i];}cout << "integers1:" << endl;outputVector(integers1);cout << "integers2:" << endl;outputVector(integers2);cout << "\nEvaluating:integers1 == integers2" << endl;if (integers1.size() != integers2.size()) // 如果两个array对象大小不同,则一定不同{cout << "integers1 and integers2 are not equal" << endl;}else{bool isEqual = true;for (size_t i = 0; i < integers1.size(); i++){if (integers1[i] != integers2[i]){isEqual = false;break;}}if (isEqual){cout << "integers1 and integers2 are equal." << std::endl;}else{cout << "integers1 and integers2 are not equal." << std::endl;}}cout << "\nintegers1[5] is " << integers1[5] << endl;cout << "\n\nAssigning 1000 to integers1[5]" << endl;integers1[5] = 1000;cout << "integers1:" << endl;outputVector(integers1);try{cout << "\nAttempt to display integers1.at(15)" << endl;cout << integers1.at(15) << endl;}catch (out_of_range &ex){cerr << "An exception occurred: " << ex.what() << endl;}cout << "\nCurrent integers3 size is: " << integers3.size() << endl;// integers3.push_back(1000);//array对象无法添加新元素,所以此处代码直接注释掉// cout << "New integers3 size is:" << integers3.size() << endl;outputVector(integers3);return 0;
}void outputVector(const array<int, arraySize1> &items)
{ // integers1和integers3输出for (int item : items){cout << item << " ";}cout << endl;
}void outputVector(const array<int, arraySize2> &items)
{ // integers2输出for (int item : items){cout << item << " ";}cout << endl;
}void inputVector(array<int, arraySize1> &items)
{ // integers1和integers3输入for (int &item : items)cin >> item;
}void inputVector(array<int, arraySize2> &items)
{ // integers2输入for (int &item : items)cin >> item;
}
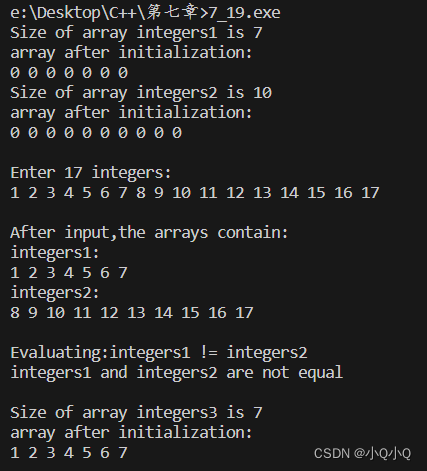
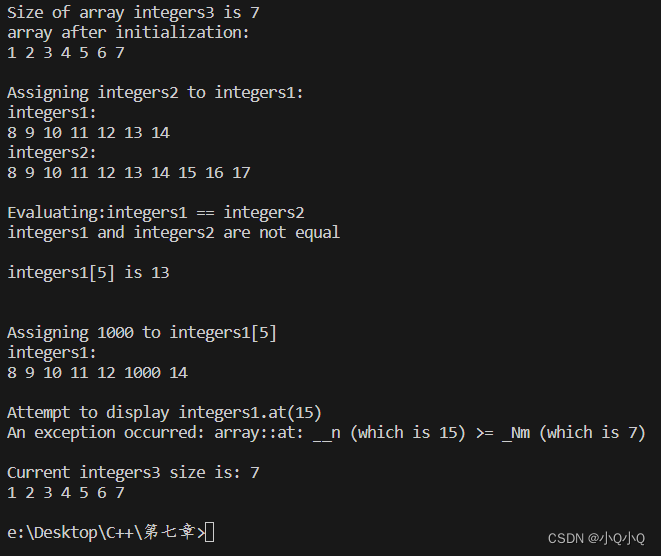
运行截图


如有问题,欢迎评论一起交流,正在努力学习中~~
这篇关于C++大学教程(第九版)7.19 将7.10节vector对象的例子转换成array对象的文章就介绍到这儿,希望我们推荐的文章对编程师们有所帮助!


