本文主要是介绍浅学JAVAFX布局,希望对大家解决编程问题提供一定的参考价值,需要的开发者们随着小编来一起学习吧!
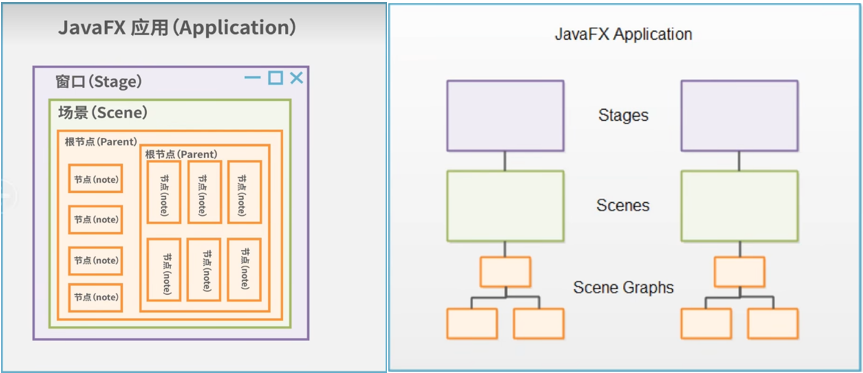
JAVAFX
FlowPane布局
Flowpane是一个容器。它在一行上排列连续的子组件,并且如果当前行填充满了以后,则自动将子组件向下推到一行
public class FlowPanedemo extends Application {@Overridepublic void start(Stage stage) throws Exception {stage.setTitle("FlowPanedemo");FlowPane flowPane = new FlowPane();//设置控件的垂直水平间距flowPane.setHgap(10);flowPane.setVgap(10);Button button1 = new Button("button1");Button button2 = new Button("button2");button2.setPrefSize(100,100);Text text = new Text();text.setText("hello world");text.setFill(Color.RED);//复选框CheckBox checkBox = new CheckBox();checkBox.setText("123");RadioButton radioButton = new RadioButton();radioButton.setText("radiobuttion");TextField textField = new TextField();textField.setText("111");flowPane.getChildren().addAll(button1,button2,text,checkBox,radioButton,textField);Scene scene = new Scene(flowPane,500,300);stage.setScene(scene);stage.show();}public static void main(String[] args) {launch();}}HBox水平布局

边框样式:
1. border-style边框样式(hidden隐藏、none无边框、dotted电线、dashed虚线、soild实线、double两个边框、groove3D沟槽边框、ridge3D脊边框、inset3D嵌入边框、outset3D突出边框)
缩写:
①border-style: 上 右 下 左;
②border-style: 上 左右 下;
③border-style: 上下 左右;
④border-style: 上下左右;
border-width边框宽度(5px、medium):可以单独设置一边的宽度。
border-top-width上边框、border-bottom-width下边框、border-right-width有边框、border-left-width左边框。
border-color边框颜色: 可以单独设置一边的颜色。
border-top-color、border-bottom-color、border-right-color、border-left-color
缩写:
①border: 5px solid red;
②border-top:5px solid red ;
③border-bottom:5px solid red ;
④border-right:5px solid red ;
⑤border-left:5px solid red ;
轮廓
轮廓样式:轮廓是在边框外面的一层,其用法同边框。
outline-style
outline-color
outline-width
缩写:outline:green dotted thick ;
边距
边距:(百分数、em、px)
margin-top
margin-bottom
margin-right
margin-left
缩写:margin: 上 右 下 左;
填充
填充:(百分数、em、px)
padding-top
padding-bottom
padding-left
padding-right
缩写:padding: 上 右 下 左;
尺寸
尺寸:(百分数、em、px)
包括height、width
height、max-height、min-height
width、max-width、min-width
//设置控件间的间距
hbox.setSpacing(10);
//设置内边距
Hbox.setPadding(new Insets(10));
//设置某个组件的边距
Hbos.setMargin(b1,new Insets(10))
//设置水平居中方式
Hbox.setAlignment(Pos.CENTER);
案例
public class HBoxDemo extends Application {@Overridepublic void start(Stage stage) throws Exception {stage.setTitle("HBoxDemo");Group group = new Group();//创建水平布局HBox hbox = new HBox();//配置背后颜色hbox.setStyle("-fx-background-color: #336699;");hbox.setMinWidth(300);hbox.setMinHeight(50);group.getChildren().add(hbox);//设置控件间的间距hbox.setSpacing(10);Button button = new Button();button.setText("确定");Text text = new Text();text.setText("hello");text.setFont(Font.font("宋体",30));//Insets:设置偏移量 上右下左hbox.setMargin(button,new Insets(10,0,0,0));hbox.setMargin(text,new Insets(10,0,0,0));hbox.getChildren().addAll(button,text);Scene scene = new Scene(group,500,400);stage.setScene(scene);stage.show();}public static void main(String[] args) {launch();}}VBox垂直布局
Rectangle矩形、Label标签、TextArea文本域(输入框)、Alignment对齐
public void start(Stage stage) throws Exception {stage.setTitle("VBoxdemo");Group group = new Group();TextArea mytestArea =new TextArea();HBox hbox = new HBox(50);hbox.setMinWidth(600);hbox.setMinHeight(100);hbox.setStyle("-fx-background-color: #336699;");VBox vbox = new VBox(50);vbox.setMinWidth(100);vbox.setMinHeight(400);vbox.setStyle("-fx-background-color: #330000;");Rectangle r1 = new Rectangle(200,200);r1.setY(300);r1.setX(300);Label lbl =new Label("VBox");group.getChildren().addAll(hbox,vbox,r1);Scene scene =new Scene(group,600,500, Color.rgb(0,0,0,0));stage.setScene(scene);stage.show();}public void start(Stage primaryStage) {TextArea myTextArea = new TextArea();VBox vbox = new VBox();vbox.getChildren().add(myTextArea);//设置以后跟随外边框增长VBox.setVgrow(myTextArea, Priority.ALWAYS);Scene scene = new Scene(hbox, 320, 112, Color.rgb(0, 0, 0, 0));primaryStage.setScene(scene);primaryStage.show();}Bordderpane边框窗格
JavaFX BorderPane布局、HyperLink超级链接、Hyper超级、Insets插入、
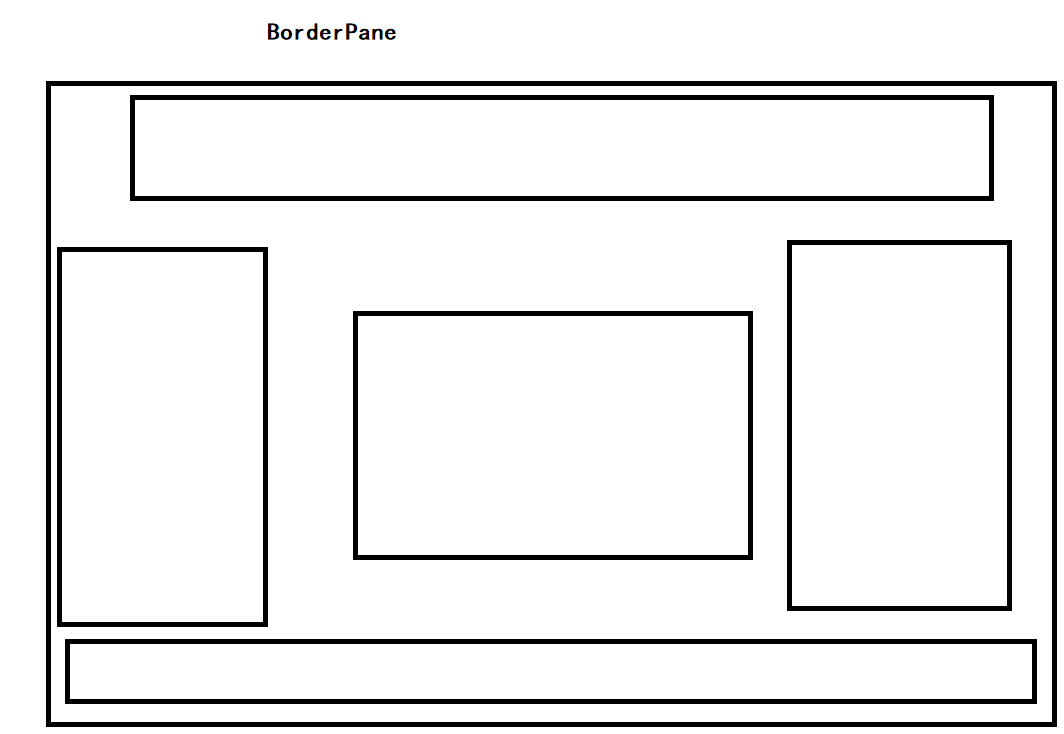
BorderPane布局顶部,底部,左,右或中心区域中的子节点。每个区域只能有一个节点。BorderPane的顶部和底部区域允许可调整大小的节点占用所有可用宽度。 左边界区域和右边界区域占据顶部和底部边界之间的可用垂直空间。默认情况下,所有边界区域尊重子节点的首选宽度和高度。放置在顶部,底部,左侧,右侧和中心区域中的节点的默认对齐方式如下:
顶部: Pos.TOP_LEFT
底部: Pos.BOTTOM_LEFT
左侧: Pos.TOP_LEFT
右侧: Pos.TOP_RIGHT
中心: Pos.CENTER
案例:
public void start(Stage stage) throws Exception {stage.setTitle("borderpane测试");Image image = new Image(new FileInputStream("F:\\IDEADemo\\hello\\Snipaste_2022-10-12_20-03-32.jpg"));BorderPane borderPane = new BorderPane();borderPane.setStyle("-fx-background-color: #330000;");HBox top = new HBox();top.setMinWidth(30);top.setMinHeight(30);Text text = new Text("Welcome");text.setFont(Font.font("宋体", FontWeight.BOLD,30));top.setStyle("-fx-background-color: #336699;");//设置top居中top.setAlignment(Pos.CENTER);top.getChildren().addAll(text);VBox letf = new VBox();letf.setMinWidth(50);letf.setStyle("-fx-background-color: #226699;");Button b1 =new Button("改色");Button b2 = new Button("改色");Button b3 = new Button("改色");Button b4 = new Button("改色");letf.getChildren().addAll(b1,b2,b3,b4);VBox right = new VBox();Button r1 =new Button("11");Button r2 = new Button("22");Button r3 = new Button("33");Button r4 = new Button("44");right.setStyle("-fx-background-color: #111199;");right.setMinWidth(50);right.getChildren().addAll(r1,r2,r3,r4);HBox Bottom= new HBox();Hyperlink hl = new Hyperlink("www.baidu.com");Bottom.setMinHeight(30);Bottom.setStyle("-fx-background-color: #113339;");Button close = new Button("关闭系统");close.setOnAction((e)->{Platform.exit();});Bottom.getChildren().addAll(close,hl);Bottom.setAlignment(Pos.CENTER);GridPane Center = new GridPane();Center.setMinWidth(350);borderPane.setTop(top);borderPane.setLeft(letf);// borderPane.setRight(right);borderPane.setBottom(Bottom);borderPane.setCenter(Center);b1.setOnAction((e)->{Center.setStyle("-fx-background-color: #113339;");});b2.setOnAction((e)->{Center.setStyle("-fx-background-color: #222239;");});b3.setOnAction((e)->{Center.setStyle("-fx-background-color: #333339;");});b4.setOnAction((e)->{Center.setStyle("-fx-background-color: #444439;");});//获取鼠标移动坐标Center.addEventFilter(MouseEvent.MOUSE_MOVED, e->{String xy="鼠标坐标为:"+e.getX()+","+e.getY();text.setText(xy);text.setLayoutX(e.getX()+70);text.setLayoutY(e.getY()+70);});Scene scene =new Scene(borderPane,400,300);stage.getIcons().add(image);stage.setScene(scene);stage.show();}GirdPane布局
Gird网格、pane窗格、Lines线、Visible可见的、ColumnConstraints列约束、priority优先事项、always总是、column列、
网格布局
GridPane通常用于布局:表单布局
GridPane可以在行,列或单元格级别指定约束。
例如,我们可以设置包含输入文本字段的第二列,以在窗口调整大小时调整大小。
使用Java FX创建表格的时候,这个布局非常方便。
包javafx.scene.layout名为GridPane这个类提供了 11 个属性,它们是 -
- alignment- 此属性可以设置位置,使用方式setAlignment()方法设置此属性的值。
放置在顶部,底部,左侧,右侧和中心区域中的节点的默认对齐方式如下:
-
-
- 顶部: Pos.TOP_LEFT
- 底部: Pos.BOTTOM_LEFT
- 左侧: Pos.TOP_LEFT
- 右侧: Pos.TOP_RIGHT
- 中心: Pos.CENTER
-
- hgap- 此属性的类型为double,表示列之间的水平差距。
- vgap- 属性的类型为double,它表示行之间的垂直间距。
- gridLinesVisible- 此属性是布尔类型,显示表格线
案例一:
public class GridPanedemo extends Application {@Overridepublic void start(Stage stage) throws Exception {stage.setTitle("gridpane测试");BorderPane borderpane = new BorderPane();GridPane gridPane = new GridPane();gridPane.setStyle("-fx-background-color: #C0C0C0;");//表格实线gridPane.setGridLinesVisible(true);gridPane.setPadding(new Insets(5));//水平间距gridPane.setHgap(5);//垂直间距gridPane.setVgap(50);//3列ColumnConstraints column1 = new ColumnConstraints(100);ColumnConstraints column2 = new ColumnConstraints(50, 150, 300);ColumnConstraints column3 = new ColumnConstraints(100);column2.setHgrow(Priority.ALWAYS);gridPane.getColumnConstraints().addAll(column1, column2,column3);Label userNameLabel = new Label("用户名");TextField userNameField = new TextField();Label passwordLabel = new Label("密码");PasswordField passwordField =new PasswordField();Text userNameWarn = new Text("用户名不能为空");Text passwordWarn = new Text("密码不能空");Button saveButt = new Button("保存");// userNameLabel 列 行GridPane.setHalignment(userNameLabel, HPos.RIGHT);gridPane.add(userNameLabel, 0, 0);gridPane.add(userNameWarn,3,0);gridPane.add(passwordWarn,3,1);// userNameFieldGridPane.setHalignment(userNameField, HPos.RIGHT);gridPane.add(userNameField, 1, 0);// passwordLabelGridPane.setHalignment(passwordLabel, HPos.LEFT);gridPane.add(passwordLabel, 0, 1);// passwordFieldGridPane.setHalignment(passwordField, HPos.LEFT);gridPane.add(passwordField, 1, 1);// Save buttonGridPane.setHalignment(saveButt, HPos.RIGHT);gridPane.add(saveButt, 1, 2);borderpane.setCenter(gridPane);Scene scene =new Scene(borderpane,600,500);stage.setScene(scene);stage.show();}public static void main(String[] args) {launch();}}案例二、
public void start(Stage stage) throws Exception {//舞台名称stage.setTitle("JavaFX Welcome");FileInputStream fileInputStream =new FileInputStream("F:\\IDEADemo\\hello\\Snipaste_2022-10-12_20-03-32.jpg");Image image =new Image(fileInputStream);stage.getIcons().add(image);GridPane grid = new GridPane();//grid.setBackground(new Background(new Image(fileinputStream)));//GridPane内容居中grid.setAlignment(Pos.CENTER);//水平间距grid.setHgap(10);//垂直间距grid.setVgap(10);//填充:距离上下左右外框grid.setPadding(new Insets(25, 25, 25, 25));// grid.setGridLinesVisible(true);Text scenetitle = new Text("欢迎");scenetitle.setFont(Font.font("宋体", FontWeight.NORMAL, 20));//、0列、0行、占用2列、占用1行grid.add(scenetitle, 0, 0, 2, 1);Label userName = new Label("账号:");grid.add(userName, 0, 1);TextField userTextField = new TextField();grid.add(userTextField, 1, 1);Label pw = new Label("密码:");grid.add(pw, 0, 2);PasswordField pwBox = new PasswordField();grid.add(pwBox, 1, 2);Button btn = new Button("登入");//登录按钮放到水平布局HBox中方便控制左右HBox hbBtn = new HBox(10);hbBtn.setAlignment(Pos.BOTTOM_RIGHT);hbBtn.getChildren().add(btn);grid.add(hbBtn, 1, 4);final Text actiontarget = new Text();grid.add(actiontarget, 1, 6);btn.setOnAction(new EventHandler<ActionEvent>() {@Overridepublic void handle(ActionEvent e) {actiontarget.setFill(Color.FIREBRICK);actiontarget.setText("按下登录按钮");}});Scene scene = new Scene(grid, 300, 275);stage.setScene(scene);stage.show();}FlowPane布局
public void start(Stage stage) throws Exception {stage.setTitle("FlowPaneDemo");Button button1 =new Button("button1");Button button2 =new Button("button1");Button button3 =new Button("button1");Button button4 =new Button("button1");Button button5 =new Button("button1");Button button6 =new Button("button1");FlowPane flow = new FlowPane();flow.setStyle("-fx-background-color:#f6d3ab");flow.setPadding(new Insets(10));//组件的水平间距flow.setHgap(10);flow.getChildren().addAll(button1,button2,button3,button4,button5,button6);Scene scene =new Scene(flow,300,400);stage.setScene(scene);stage.show();}Titlepane布局 可折叠组件
Content内容、

public void start(Stage stage) throws Exception {HBox h1 = new HBox();CheckBox c1 =new CheckBox("ok");CheckBox c2 = new CheckBox("on");h1.getChildren().addAll(c1,c2);TitledPane titledPane = new TitledPane("标题", h1);//titledPane.setAlignment(Pos.BASELINE_CENTER);//GridPane grid = new GridPane();grid.setVgap(4);grid.setPadding(new Insets(5,5,5,5));grid.add(new Button("按钮1"),0,0);grid.add(new Button("按钮2"),1,0);grid.add(new Button("按钮3"),0,1);grid.add(new Button("按钮4"),1,1);TitledPane titledPane1 =new TitledPane("按钮",grid);HBox hbox = new HBox(10);hbox.setPadding(new Insets(20, 0, 0, 20));hbox.getChildren().setAll(titledPane,titledPane1);hbox.setAlignment(Pos.BASELINE_CENTER);Scene scene = new Scene(hbox, 350, 250);stage.setScene(scene);stage.show();}titledPane1.setGraphic(new Button("text"));

Accordion布局 手风琴布局

可以使用手风琴(accordion)控件对标题窗格进行分组。
public void start(Stage stage) throws Exception {Group g = new Group();TitledPane t1 = new TitledPane("T1", new Button("B1"));TitledPane t2 = new TitledPane("T2", new Button("B2"));TitledPane t3 = new TitledPane("T3", new Button("B3"));t3.setText("T3");t3.setContent(new Button("B3"));Accordion accordion = new Accordion();accordion.getPanes().addAll(t1, t2, t3);g.getChildren().add(accordion);//accordion事件accordion.expandedPaneProperty().addListener((ObservableValue<? extends TitledPane> ov, TitledPane old_val, TitledPane new_val) -> {if (new_val != null) {System.out.println(accordion.getExpandedPane().getText());}});Scene scene = new Scene(g, 550, 250);stage.setScene(scene);stage.show();}AnchorPane布局(锚定)
锚定布局一般配合其他布局使用
public void start(Stage stage) throws Exception {stage.setTitle("hello AnchorPane");HBox hbox =new HBox();Button b1 =new Button("hello");Button b2 = new Button("World");hbox.getChildren().addAll(b1,b2);AnchorPane acpane = new AnchorPane();acpane.getChildren().addAll(hbox);//距离顶部50,距离左边10AnchorPane.setTopAnchor(hbox,50.0);AnchorPane.setLeftAnchor(hbox,10.0);// AnchorPane.setBottomAnchor();// AnchorPane.setRightAnchor();Scene scene = new Scene(acpane,500,400);stage.setScene(scene);stage.show();}stage.setTitle("AbchorDemo");Button b1 =new Button("b1");Button b2 =new Button("b2");//锚点布局AnchorPane anchorPane =new AnchorPane();anchorPane.setStyle("-fx-background-color:#e8f2fe");anchorPane.getChildren().addAll(b1,b2);//距离Top10.0--可以自动适配屏幕大小anchorPane.setTopAnchor(b1, 10.0);anchorPane.setLeftAnchor(b1, 10.0);anchorPane.setBottomAnchor(b2, 10.0);//设置内边距anchorPane.setPadding(new Insets(10));//false解除父类对b1的管理//b1.setManaged(false);//false不可见//b1.setVisible(false);//设置透明度b1.setOpacity(0.1);anchorPane.setOnMouseClicked(new EventHandler<MouseEvent>() {@Overridepublic void handle(MouseEvent event) {System.out.println("被点击了");}});Scene scene =new Scene(anchorPane,300,400);stage.setScene(scene);stage.show();TextFlow布局类
public void start(Stage stage) throws Exception {stage.setTitle("TextFlowDemo");Text t1 =new Text("t1");Text t2 =new Text("t2freagrthbagragargaefacw");Text t3 =new Text("t3");t1.setFont(Font.font(20));t1.setFill(Paint.valueOf("#f8f8f8"));TextFlow textFlow =new TextFlow();textFlow.setStyle("-fx-background-color:#e1e6f6");textFlow.getChildren().addAll(t1,t2,t3);//边距textFlow.setPadding(new Insets(10));Scene scene =new Scene(textFlow,300,400);stage.setScene(scene);stage.show();stage.widthProperty().addListener(new ChangeListener<Number>() {@Overridepublic void changed(ObservableValue<? extends Number> observable, Number oldValue, Number newValue) {System.out.println(textFlow.getWidth());}});}TilePane布局
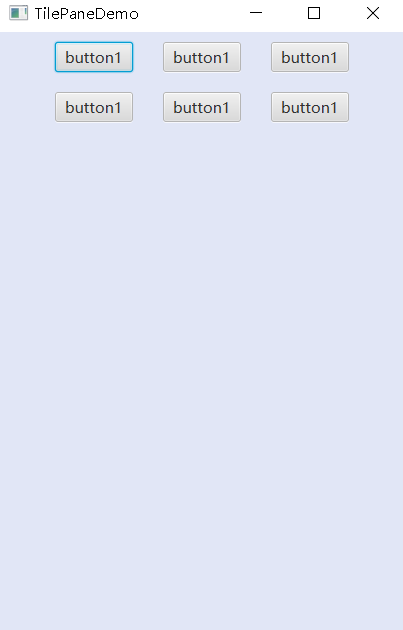
public void start(Stage stage) throws Exception {stage.setTitle("TilePaneDemo");Button button1 =new Button("button1");Button button2 =new Button("button1");Button button3 =new Button("button1");Button button4 =new Button("button1");Button button5 =new Button("button1");Button button6 =new Button("button1");TilePane tile =new TilePane();tile.setStyle("-fx-background-color:#e1e6f6");tile.setMargin(button1, new Insets(10));tile.setHgap(10);//tile.setPadding(new Insets(10));tile.setAlignment(Pos.BASELINE_CENTER);tile.getChildren().addAll(button1,button2,button3,button4,button5,button6);Scene scene =new Scene(tile,300,400);stage.setScene(scene);stage.show();}DialogPane布局

@Overridepublic void start(Stage stage) throws Exception {stage.setTitle("DialogPaneDemo");BorderPane bP =new BorderPane();TextArea textArea =new TextArea();Button button =new Button("帮助");bP.setCenter(textArea);bP.setTop(button);button.setOnAction((e)->{DialogPane daPe =new DialogPane();Stage s =new Stage();s.setTitle("帮助");daPe.setHeaderText("hello javafx");daPe.setContentText("the is text");daPe.getButtonTypes().add(ButtonType.APPLY);daPe.getButtonTypes().add(ButtonType.CANCEL);daPe.getButtonTypes().add(ButtonType.CLOSE);Button apply =(Button) daPe.lookupButton(ButtonType.APPLY);Button close =(Button) daPe.lookupButton(ButtonType.CLOSE);ImageView imgImageView =new ImageView("Img/Snipaste_2022-10-17_17-14-25.jpg");daPe.setGraphic(imgImageView);//设置扩展内容daPe.setExpandableContent(new Text("扩展内容"));daPe.setExpanded(true);//默认打开Scene sc =new Scene(daPe,400,200);s.setScene(sc);//模态化对话框s.initOwner(stage);s.initModality(Modality.WINDOW_MODAL);s.show();apply.setOnAction(new EventHandler<ActionEvent>() {@Overridepublic void handle(ActionEvent event) {System.out.println("apply");}});close.setOnAction(new EventHandler<ActionEvent>() {@Overridepublic void handle(ActionEvent event) {System.out.println("close");}});});Scene scene =new Scene(bP,300,400);stage.setScene(scene);stage.show();}TabPane和Tab切换面板组件

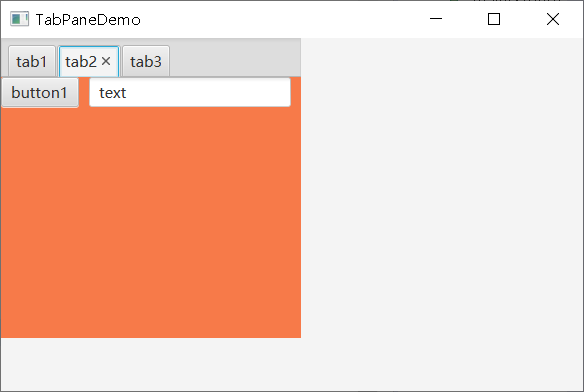


public void start(Stage stage) throws Exception {stage.setTitle("TabPaneDemo");AnchorPane an =new AnchorPane();TabPane tabPane =new TabPane();tabPane.setStyle("-fx-background-color: #336699");tabPane.setPrefWidth(300);tabPane.setPrefHeight(300);Tab tab1 =new Tab("tab1");Tab tab2 =new Tab("tab2");Tab tab3 =new Tab("tab3");VBox vBox =new VBox(10);vBox.setStyle("-fx-background-color: #f7f9ff");vBox.getChildren().addAll(new Button("button1"),new Button("button2"));tab1.setContent(vBox);HBox hBox =new HBox(10);hBox.setStyle("-fx-background-color: #f77a49");hBox.getChildren().addAll(new Button("button1"),new TextField("text"));tab2.setContent(hBox);tabPane.getTabs().addAll(tab1,tab2,tab3);an.getChildren().add(tabPane);Scene scene =new Scene(an);stage.setScene(scene);stage.setWidth(600);stage.setHeight(400);stage.show();}这篇关于浅学JAVAFX布局的文章就介绍到这儿,希望我们推荐的文章对编程师们有所帮助!


