本文主要是介绍物联网协议Coap之C#基于Mozi的CoapServer实现解析,希望对大家解决编程问题提供一定的参考价值,需要的开发者们随着小编来一起学习吧!
目录
前言
一、C#的Coap Server实现
1、CoapServer相关类
2、主要类解析
3、资源控制器定义
4、ResourceManager管理器
二、CoapServer生命周期
1、Server创建代码
2、服务端创建
3、绑定endpoint
4、准备接收请求
总结
前言
在之前的关于物联网协议的介绍中,我们详细介绍了如何基于Java进行Coap协议的开发,由于一些项目原因,在项目中采用的不是Java的技术栈,而是ASP.NET Core,因此需要基于C#进行Coap协议的开发与实现。Coap本身是与编程语言无关的,不仅可以用Java进行实现,当然也可以使用C#,还可以是Python、GO等多语言,感兴趣的朋友可以自行问度娘,其实每一种语言都有相应的Coap实现。以下是weixin_34026276博主分享的博客,大家可以自己熟悉的编程语言所进行的开源实现,Coap各编程语言实现传送门。非常感谢他的认真整理。
| 名称 | 开发语言 | CoAP版本 | 客户端/服务端 | 实现的CoAP特征 | 开源协议 | 项目链接地址 |
|---|---|---|---|---|---|---|
| Californium | Java | RFC 7252 | Client + Server | Observe, Blockwise Transfers, DTLS | EPL+EDL | Eclipse Californium™ |
| cantcoap | C++/C | RFC 7252 | Client + Server | BSD | https://github.com/staropram/cantcoap | |
| CoAP implementation for Go | Go | RFC 7252 | Client + Server | Core + Draft Subscribe | MIT | https://github.com/dustin/go-coap |
| CoAP.NET | C# | RFC 7252, coap-13, coap-08, coap-03 | Client + Server | Core, Observe, Blockwise Transfers | 3-clause BSD | https://github.com/smeshlink/CoAP.NET |
| CoAPSharp | C#, .NET | RFC 7252 | Client + Server | Core, Observe, Block, RD | LGPL | http://www.coapsharp.com |
| CoAPthon | Python | RFC 7252 | Client + Server + Forward Proxy + Reverse Proxy | Observe, Multicast server discovery, CoRE Link Format parsing, Block-wise | MIT | https://github.com/Tanganelli/CoAPthon |
| Copper | JavaScript (Browser Plugin) | RFC 7252 | Client | Observe, Blockwise Transfers | 3-clause BSD | https://github.com/mkovatsc/Copperhttps://addons.mozilla.org/de/firefox/addon/copper-270430/ |
| eCoAP | C | RFC 7252 | Client + Server | Core | MIT | josé bollo / ecoap · GitLab |
| Erbium for Contiki | C | RFC 7252 | Client + Server | Observe, Blockwise Transfers | 3-clause BSD | Contiki: The Open Source Operating System for the Internet of Things (er-rest-example) |
| ETRI CoAP | C | RFC 7252 | Client + Server | Core, Observe, Block | Commercial | http://coap.or.kr/index_en.html |
| iCoAP | Objective-C | RFC 7252 | Client | Core, Observe, Blockwise Transfers | MIT | https://github.com/stuffrabbit/iCoAP |
| jCoAP | Java | RFC 7252 | Client + Server | Observe, Blockwise Transfers | Apache License 2.0 | https://code.google.com/p/jcoap/ |
| libcoap | C | RFC 7252 | Client + Server | Observe, Blockwise Transfers | BSD/GPL | libcoap: C-Implementation of CoAP download | SourceForge.net |
| microcoap | C | RFC 7252 | Client + Server | MIT | https://github.com/1248/microcoap | |
| nCoap | Java | RFC 7252 | Client + Server | Observe | BSD | https://github.com/okleine/nCoAP |
| node-coap | Javascript | RFC 7252 | Client + Server | Core, Observe, Block | MIT | https://github.com/mcollina/node-coap |
| Ruby coap | Ruby | RFC 7252 | Client + Server (david) | Core, Observe, Block, RD | MIT, GPL | https://github.com/nning/coap https://github.com/nning/david |
| Sensinode C Device Library | C | RFC 7252 | Client + Server | Core, Observe, Block, RD | Commercial | Downloads - Arm Developer |
| Sensinode Java Device Library | Java SE | RFC 7252 | Client + Server | Core, Observe, Block, RD | Commercial | Downloads - Arm Developer |
| Sensinode NanoService Platform | Java SE | RFC 7252 | Cloud Server | Core, Observe, Block, RD | Commercial | Downloads - Arm Developer |
| SMCP | C | RFC 7252 | Client + Server | Core, Observe, Block | MIT | https://github.com/darconeous/smcp |
| SwiftCoAP | Swift | RFC 7252 | Client + Server | Core, Observe, Blockwise Transfers | MIT | https://github.com/stuffrabbit/SwiftCoAP |
| TinyOS CoapBlip | nesC/C | coap-13 | Client + Server | Observe, Blockwise Transfers | BSD | http://docs.tinyos.net/tinywiki/index.php/CoAP |
| txThings | Python (Twisted) | RFC 7252 | Client + Server | Blockwise Transfers, Observe (partial) | MIT | https://github.com/siskin/txThings/ |
由于对ASP.NET Core并不是很熟悉,在进行基础入门编程学习之后后,我们基于Mozi开源框架进行扩展扩展实现,这是gitee上mozi项目地址。原本的项目包含的内容比较多,我们可以在它的基础之上进行简化,改造成符合自己需求的项目。本文以CoapServer为主线,介绍CoapServer使用C#语言的定义以及后台资源管理类的定义和实现。
一、C#的Coap Server实现
本节将重点介绍CoapServer在C#中的设计与实现,由于Coap协议在Java的篇章中有所涉及,相信大家对Coap已经不再陌生,因此这里不再对Coap进行赘述。下面依然采用熟悉的OOA即面向对象分析,采用面向对象的方式进行源代码分析。
1、CoapServer相关类

在CoapServer中,在这个工程中,主要涉及的类如下:
| 序号 | 类名 | 说明 |
| 1 | CoAPServer | CoAP的服务端 |
| 2 | CoAPResource | 类似于Java的中controller |
| 3 | ResourceManager | 资源管理器,可以理解成IOC容器 |
2、主要类解析
CoapServer是服务端程序中最重要的类,其中主要定义了后端的服务,以及绑定了Coap协议,用于接收前端来自Client的请求。

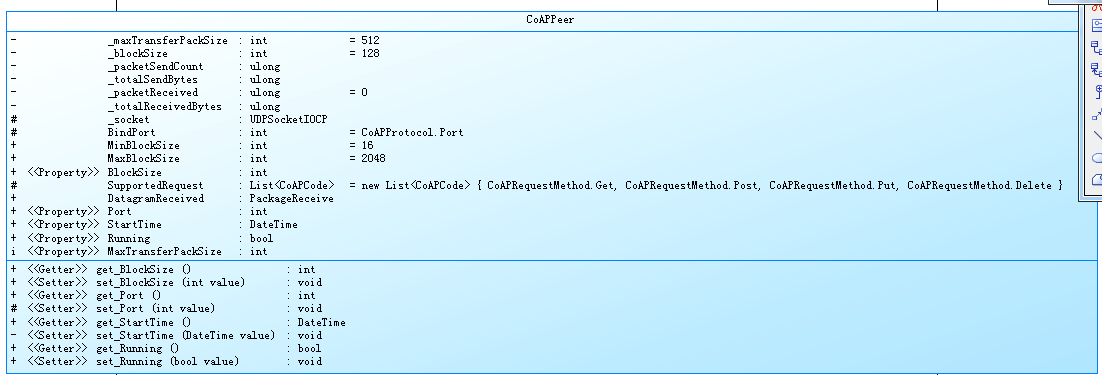
从类的继承体系来说,CoapServer是CoAPPeer的子类,有必要对CoAPPeer进行一个全面的说明。
using System;
using System.Collections.Generic;
namespace Mozi.IoT
{/// <summary>/// CoAP对等端/// </summary>public class CoAPPeer{/// <summary>/// 最大数据包尺寸 包含所有头信息和有效荷载 Byte/// </summary>private int _maxTransferPackSize = 512;private int _blockSize = 128;private ulong _packetSendCount, _totalSendBytes, _packetReceived = 0, _totalReceivedBytes;protected UDPSocketIOCP _socket;protected int BindPort = CoAPProtocol.Port;/// <summary>/// 最小分块大小,单位Byte/// </summary>public const int MinBlockSize = 16;/// <summary>/// 最大分块大小,单位Byte/// </summary>public const int MaxBlockSize = 2048;/// <summary>/// 当前端默认采用块大小,默认值为128bytes,单位Byte/// </summary>/// <remarks>在通讯两方没有进行协商的情况下,默认采用此值作为分块大小。取值区间为{<see cref="MinBlockSize"/>~<see cref="MaxBlockSize"/>}</remarks>public int BlockSize { get { return _blockSize; } set { _blockSize = value; } }/// <summary>s/// 受支持的请求方法/// </summary>protected List<CoAPCode> SupportedRequest = new List<CoAPCode> { CoAPRequestMethod.Get, CoAPRequestMethod.Post, CoAPRequestMethod.Put, CoAPRequestMethod.Delete };/// <summary>/// 数据包接收事件,字节流数据包/// </summary>public PackageReceive DatagramReceived;/// <summary>/// 服务端口/// </summary>public int Port { get { return BindPort; } protected set { BindPort = value; } }/// <summary>/// 启动时间/// </summary>public DateTime StartTime { get; private set; }/// <summary>/// 服务器运行状态/// </summary>public bool Running{get; set;}/// <summary>/// 最大数据包尺寸 包含所有头信息和有效荷载/// </summary>internal int MaxTransferPackSize { get => _maxTransferPackSize; set => _maxTransferPackSize = value; }/// <summary>/// 累计接收到的包的数量/// </summary>public ulong PacketReceivedCount { get => _packetReceived; }/// <summary>/// 累计接收的字节数/// </summary>public ulong TotalReceivedBytes { get => _totalReceivedBytes; }/// <summary>/// 累计发出的包的数量/// </summary>public ulong PacketSendCount => _packetSendCount;/// <summary>                                                               /// 累计发出的字节数                                                                /// </summary>public ulong TotalSendBytes => _totalSendBytes; public CoAPPeer(){_socket = new UDPSocketIOCP();_socket.AfterReceiveEnd += Socket_AfterReceiveEnd;}/// <summary>/// 以指定端口启动<see cref="F:Port"/>,如果不配置端口则使用默认端口/// </summary>public void Start(){Start(BindPort);}/// <summary>/// 启动本端服务 默认5683端口/// </summary>/// <param name="port"></param>public void Start(int port){BindPort = port;_socket.Start(BindPort);StartTime = DateTime.Now;Running = true;}/// <summary>/// 端口下线/// </summary>public void Shutdown(){_socket.Shutdown();StartTime = DateTime.MinValue;Running = false;}/// <summary>/// 数据接收完成回调/// </summary>/// <param name="sender"></param>/// <param name="args"></param>/// <remarks>继承类如果覆盖该事件,则可以接管数据处理</remarks>protected virtual void Socket_AfterReceiveEnd(object sender, DataTransferArgs args){_packetReceived++;_totalReceivedBytes += args.Data != null ? (uint)args.Data.Length : 0;if (DatagramReceived != null){DatagramReceived(args.IP, args.Port, args.Data);}}}
}
从以上的代码中可以发现,上述类也是定义了CoAP协议工作所必须要的一些属性,比如端口、协议、数据包内容等等。CoapServer的属性代码如下:
 private Cache.MessageCacheManager _cm;/// <summary>
/// 接收到请求
/// </summary>
public MessageTransmit RequestReceived;
/// <summary>
/// 发起响应请求
/// </summary>
public MessageTransmit Responsed;
private bool _proxyPassed = false;
private uint maxBodySize=20*1024*1024;
/// <summary>
/// 服务端能处理的最大POST资源大小 单位byte
/// </summary>
public uint MaxBodySize { get => maxBodySize; set => maxBodySize = value; }
/// <summary>
/// 服务器根目录
/// </summary>
public string Root = AppDomain.CurrentDomain.BaseDirectory;
3、资源控制器定义
每一个后台都会对应一个资源控制器,这里也不例外,我们来看下C#的实现。在CoapResource中同样的定义了get、post、put、delete四种请求方法。如下图所示:
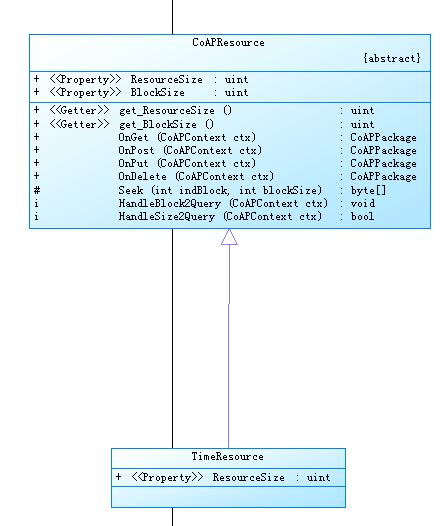
/// <summary>/// CoAP资源/// </summary>public abstract class CoAPResource{/// <summary>/// 资源总大小/// </summary>public abstract uint ResourceSize { get; }/// <summary>/// 默认分块大小128,单位Bytes /// </summary>/// <remarks>/// 如果资源尺寸过大,则必须合理配置此大小。/// 取值范围为16-2048Bytes BlockOptionValue中Size的数据容量。参考<see cref="BlockOptionValue"/>/// </remarks>public virtual uint BlockSize { get { return 128; } }/// <summary>/// GET方法/// </summary>/// <param name="ctx"></param>/// <returns></returns>public virtual CoAPPackage OnGet(CoAPContext ctx){ctx.Response = new CoAPPackage { MessageType = CoAPMessageType.Acknowledgement, MesssageId = ctx.Request.MesssageId, Token = ctx.Request.Token, Code = CoAPResponseCode.Forbidden };return ctx.Response;}/// <summary>/// Post方法/// </summary>/// <param name="ctx"></param>/// <returns></returns>public virtual CoAPPackage OnPost(CoAPContext ctx){ctx.Response = new CoAPPackage { MessageType = CoAPMessageType.Acknowledgement, MesssageId = ctx.Request.MesssageId, Token = ctx.Request.Token, Code = CoAPResponseCode.Forbidden };return ctx.Response;}/// <summary>/// PUT方法/// </summary>/// <param name="ctx"></param>/// <returns></returns>public virtual CoAPPackage OnPut(CoAPContext ctx){ctx.Response = new CoAPPackage { MessageType = CoAPMessageType.Acknowledgement, MesssageId = ctx.Request.MesssageId, Token = ctx.Request.Token, Code = CoAPResponseCode.Forbidden };return ctx.Response;}/// <summary>/// Delete方法/// </summary>/// <param name="ctx"></param>/// <returns></returns>public virtual CoAPPackage OnDelete(CoAPContext ctx){ctx.Response = new CoAPPackage { MessageType = CoAPMessageType.Acknowledgement, MesssageId = ctx.Request.MesssageId, Token = ctx.Request.Token, Code = CoAPResponseCode.Forbidden };return ctx.Response;}/// <summary>/// 分块查找/// </summary>/// <param name="indBlock"></param>/// <param name="blockSize"></param>/// <returns></returns>protected virtual byte[] Seek(int indBlock, int blockSize){return new byte[] { };}/// <summary>/// Block2分块协商/// </summary>/// <param name="ctx"></param>/// <returns></returns>internal virtual void HandleBlock2Query(CoAPContext ctx){CoAPOption opt = ctx.Request.Options.Find(x => x.Option == CoAPOptionDefine.Block2);if (opt != null){OptionValue opt2 = new BlockOptionValue() { Pack = opt.Value.Pack };//if(opt2)}}/// <summary>/// 请求服务端资源大小,响应条件为 Get Size2=0/// </summary>/// <param name="ctx">响应上下文对象</param>/// <returns></returns>internal virtual bool HandleSize2Query(CoAPContext ctx){CoAPOption opt = ctx.Request.Options.Find(x => x.Option == CoAPOptionDefine.Size2);if (opt != null && int.Parse(opt.Value.ToString()) ==0 && ctx.Request.Code == CoAPRequestMethod.Get){ctx.Response = new CoAPPackage { MessageType = CoAPMessageType.Acknowledgement, MesssageId = ctx.Request.MesssageId, Token = ctx.Request.Token, Code = CoAPResponseCode.Content };CoAPOption optResp = new CoAPOption() { Option = CoAPOptionDefine.Size2, Value = new UnsignedIntegerOptionValue() { Value = ResourceSize } };ctx.Response.SetOption(optResp);return true;}else{return false;}}}4、ResourceManager管理器
每个业务接收类都对应一个Resource,而这些Resource必须要使用一个统一的容器管理起来,可以把它理解成Java对应的IOC容器,程序运行时会自动把相关资源管理起来。资源描述如下
public class ResourceDescriptionAttribute : Attribute{/// <summary>/// 命名空间/// </summary>public string Namespace { get; set; }/// <summary>/// 资源名称/// </summary>public string Name { get; set; }/// <summary>/// 文字描述/// </summary>public string Description { get; set; }/// <summary>/// 资源类型/// </summary>public string ResourceType { get; set; }}资源管理器的核心管理方式也是采用反射的机制,如下:

二、CoapServer生命周期
在上面的代码中,对CoapServer的编码实现进行了介绍,下面将采用熟悉的调试方法来进行调用跟踪,在关键代码中进行深度讲解。
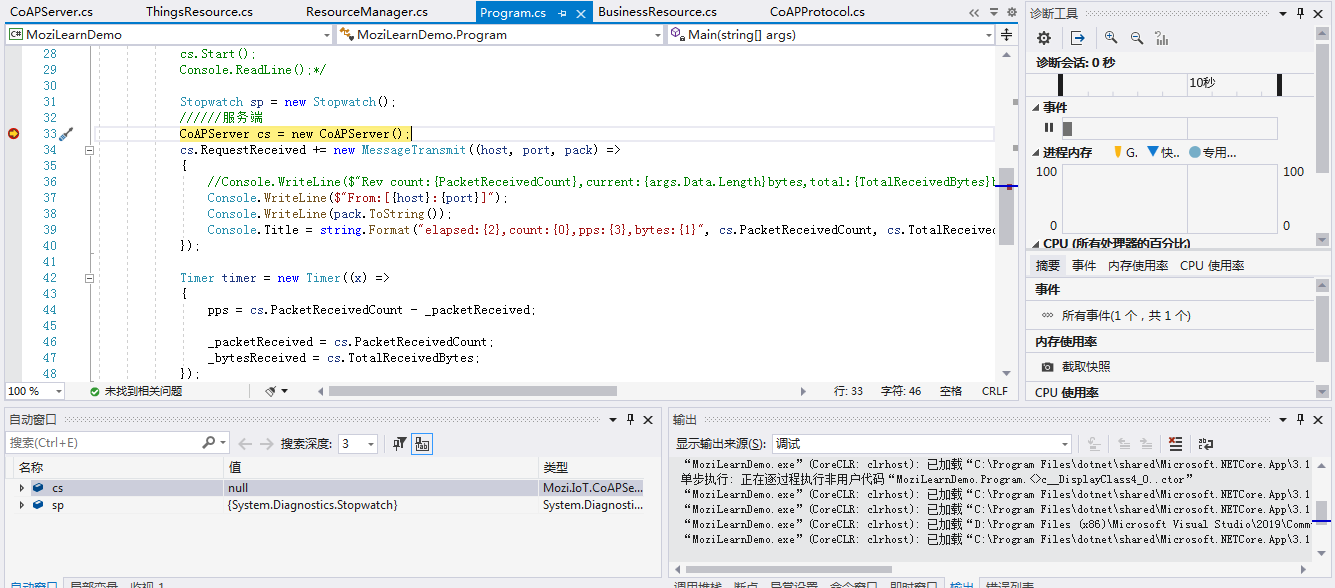
1、Server创建代码
创建Server的代码如下:
static void Main(string[] args){Console.WriteLine("你好!COAP服务端已开启,等待客户端连接......");//服务端CoAPServer cs = new CoAPServer();cs.RequestReceived += new MessageTransmit((host, port, pack) =>{Console.WriteLine($"From:[{host}:{port}]");Console.WriteLine(pack.ToString());Console.Title = string.Format("elapsed:{2},count:{0},pps:{3},bytes:{1}", cs.PacketReceivedCount, cs.TotalReceivedBytes,FormatSeconds(sp.ElapsedMilliseconds),pps);});cs.Start();Console.ReadLine();}2、服务端创建
第一步、调用构造方法
第二步、指定端口启动
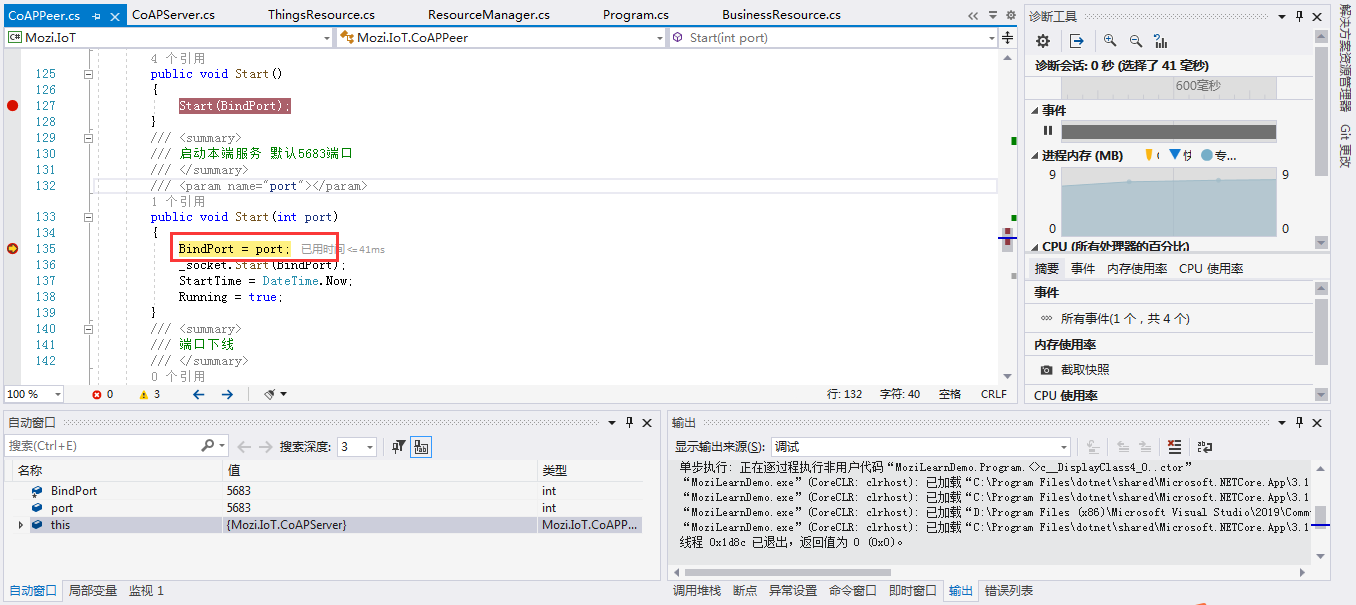
第三步、设置socket,绑定协议

3、绑定endpoint

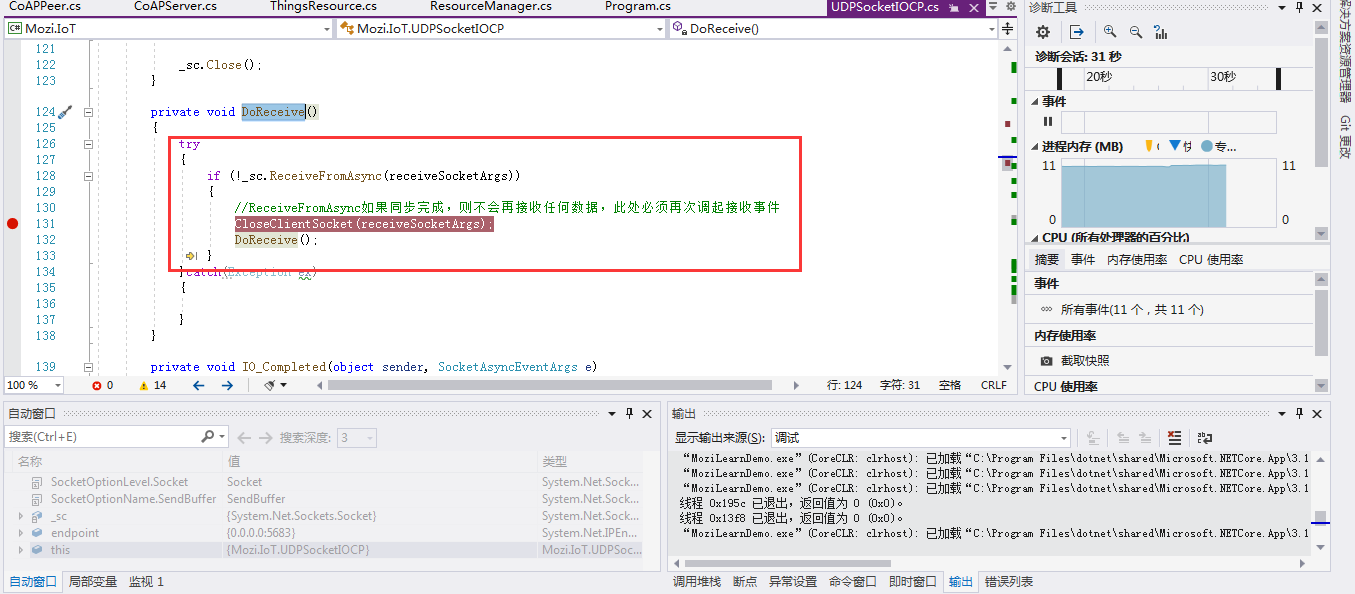
4、准备接收请求
总结
以上就是本文的主要内容,本文以CoapServer为主线,介绍CoapServer使用C#语言的定义以及后台资源管理类的定义和实现。行文仓促,定有不当之处,欢迎各位朋友专家批评指正。
这篇关于物联网协议Coap之C#基于Mozi的CoapServer实现解析的文章就介绍到这儿,希望我们推荐的文章对编程师们有所帮助!


