本文主要是介绍navigationbar_第4部分-NavigationBar和Codable,希望对大家解决编程问题提供一定的参考价值,需要的开发者们随着小编来一起学习吧!
navigationbar
IECSE速成课程:Swift开发 (IECSE Crash Course: Development with Swift)
This article is going to be the fourth article of the series IECSE Crash Course: Development with Swift. Through the course of 10 articles, we are going to make a small app which will display a set of users that we will fetch from the net. While making the app, we will cover some of the most important topics that every iOS developer must know. You can get the code till the previous article here.
本文将成为IECSE速成课程系列:用Swift开发的第四篇文章。 在完成10篇文章的过程中,我们将制作一个小型应用程序,该程序将显示一组将从网上获取的用户。 制作应用程序时,我们将介绍每个iOS开发人员必须知道的一些最重要的主题。 您可以在此处获得上一篇文章之前的代码。
In the previous article, we learned about the Dark Mode, now, we are going to add a TitleBar on top.
在上一篇文章中,我们了解了黑暗模式,现在,我们将在顶部添加一个TitleBar 。
This would mean embedding our TableView inside a navigation controller. The navigation controller manages the currently displayed screens using the navigation stack. At the bottom of this stack is the root view controller and at the top is the view controller currently displayed. You use methods to push and pop view controllers on and of the stack.
这意味着将TableView嵌入导航控制器中。 导航控制器使用导航堆栈管理当前显示的屏幕。 该堆栈的底部是根视图控制器,顶部是当前显示的视图控制器。 您可以使用方法将视图控制器推入并弹出堆栈。
Firstly change the SceneDelegate.swift, we add a navigationController then we put the rootViewController as our tableview.
首先更改SceneDelegate.swift,添加一个navigationController,然后将rootViewController作为我们的表视图。
You could now see a navigation bar at the top , but it feels empty right now. Let’s add a title , we will do that inside the viewDidLoad() in TableViewController.swift.
现在您可以在顶部看到一个导航栏,但是现在感觉很空。 让我们添加一个标题,我们将在TableViewController.swift的viewDidLoad()内部执行此操作。
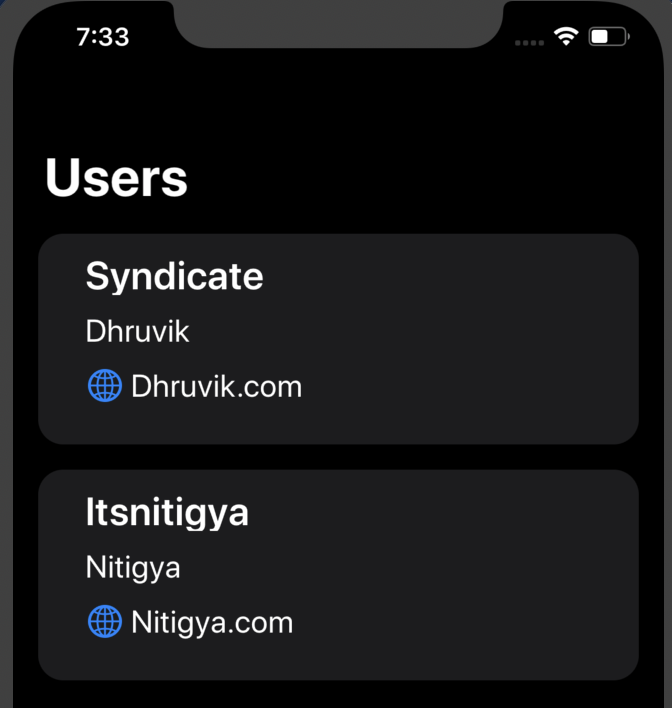
self.title = “Users”Your app should look something like this:
您的应用应如下所示:
We can add items in our NavigationBar, let’s add a navigationItem on the left side.
我们可以在NavigationBar中添加项目,让我们在左侧添加NavigationItem。
Inside the setupTableView(), we create an UIBarButtonItem to be added in the navigationBar.
在setupTableView()内部,我们创建一个UIBarButtonItem来添加到navigationBar中。
let add = UIBarButtonItem(barButtonSystemItem: .add, target: self, action: #selector(goToSecondScreen))We need target and action to do something when we click on the item. Here, target refers to which object the method called is on, which is self, and action is the method to be called.
当我们单击项目时,我们需要目标和行动来做某事。 在这里,目标是指调用的方法在哪个对象上,哪个是自身,而操作是要调用的方法。
Let’s make the goToSecondScreen() function. Firstly, we need to make another UIView which we will present on the click of the item.
让我们制作goToSecondScreen()函数。 首先,我们需要制作另一个UIView,将在单击该项目时显示它。
Make a new file using Command + N save it as SampleScreen.swift.
使用Command + N制作一个新文件,另存为SampleScreen .swif t。
Here, we create an instance of SampleScreen and we present that screen over our current context.
在这里,我们创建SampleScreen的实例,并在当前上下文中显示该屏幕。
@objc func goToSecondScreen(){
    let sampleScreen = SampleScreen()
    self.navigationController?.present(sampleScreen, animated: true)
}
Now, we need to make add this item inside our navigationBar.
现在,我们需要将该项目添加到navigationBar中。
self.navigationItem.rightBarButtonItem = addCodeable
可编码
Introduced in Swift 4, this lets us perform parsing to/from JSON or other serialized formats. When it comes to parsing, there are two things we need to look at first- encoding and decoding.
在Swift 4中引入的功能,使我们可以执行JSON或其他序列化格式的解析。 解析时,我们需要首先考虑两点:编码和解码。
Now, let's define a structure that conforms to the codable protocols. It combines the two protocols which are decodable and encodable into one.
现在,让我们定义一个符合可编码协议的结构。 它把decodable和encodable的两种协议结合在一起。
The compiler will attempt to automatically synthesize the code required to encode or decode an instance of this struct.
编译器将尝试自动合成编码或解码此结构实例所需的代码。
struct User: Codable {
     var name: String
     var username : String
}
Now, we are can use JSONEncoder() and JsonDecoder() on an instance of this structure.
现在,我们可以在此结构的实例上使用JSONEncoder()和JsonDecoder() 。
JSONEncoder
JSONEncoder
First, we create an instance of User and JsonEncoder(), and then, put a try so, we can catch any JSON error that might have in encoding the structure.
首先,我们创建User和JsonEncoder()的实例,然后try ,我们可以捕获在编码结构时可能遇到的任何JSON错误。
do {
   let user = User(name:"nitigya" , username: "itsnitigya")
   let encoder = JSONEncoder()
   let data = try encoder.encode(user)
} catch let jsonError {
    print("Something Went Wrong")
}
JSONDecoder
JSONDecoder
Next, we create an instance of JSONDecoder(), then create a new user from the previous JSON that we encoded.
接下来,我们创建一个JSONDecoder()实例,然后从我们之前编码的JSON创建一个新用户。
do {
   let decoder = JSONDecoder()
   let user2 = try decoder.decode(User.self, from: data)
} catch let jsonError {
    print("Something Went Wrong")
}
These protocols really come in handy when we are working with REST Api’s as these use lightweight formats to exchange information like JSON, XML. Over the next articles, we will deal with network calls, so let me define a concrete process of receiving data from such calls.
当我们使用REST Api时,这些协议确实派上用场,因为它们使用轻量级格式来交换JSON,XML等信息。 在接下来的文章中,我们将处理网络调用,因此让我定义一个从此类调用接收数据的具体过程。
First, we create a struct of the data that we are receiving.
首先,我们创建一个要接收的数据的结构。
Let’s look at this API — for example, here we are receiving four things.
让我们看一下这个API ,例如,在这里我们收到了四样东西。
Looking at the result of the API in Postman, we will make a structure according to the JSON received.
查看Postman中 API的结果,我们将根据收到的JSON建立一个结构。
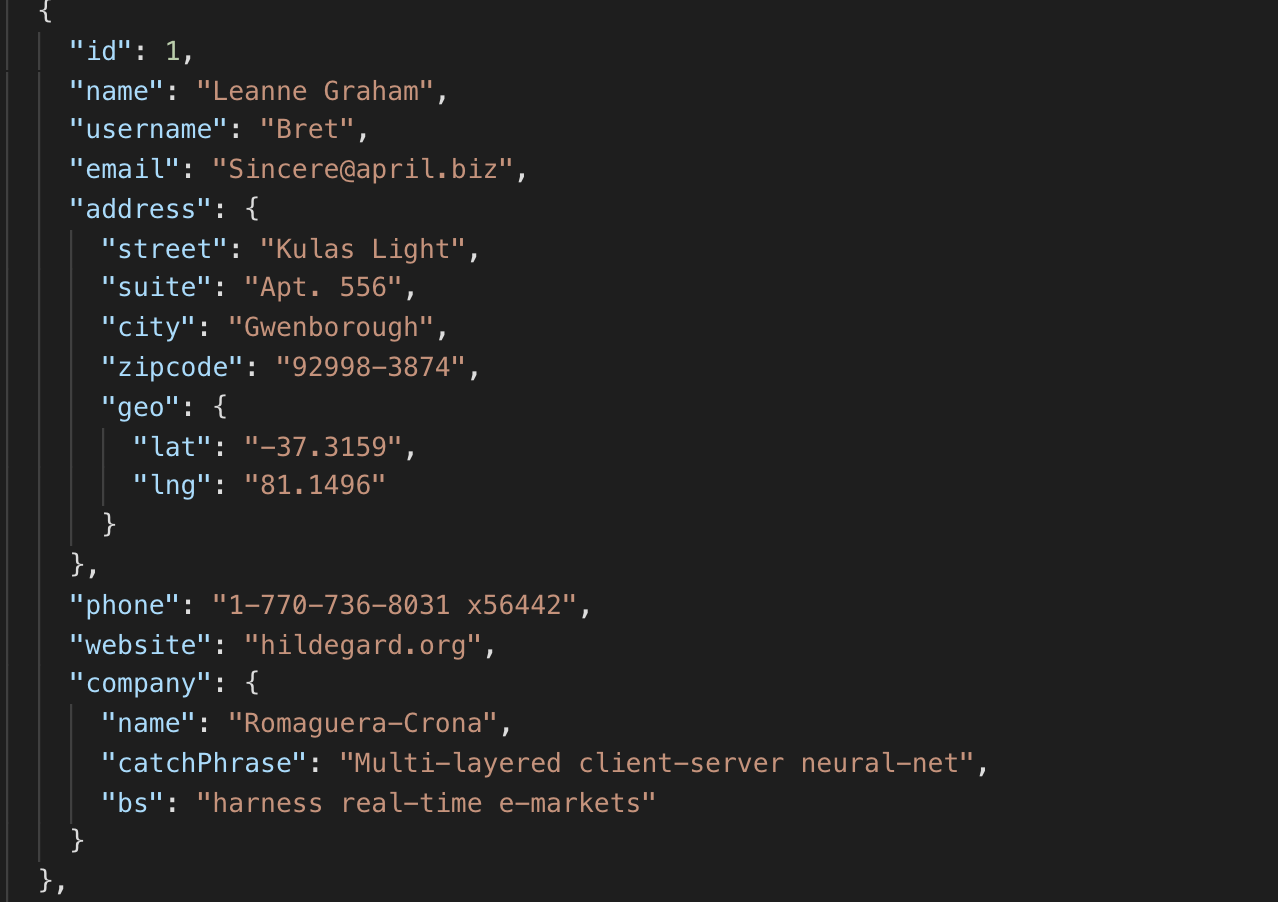
We make User struct with the id, name, username, website.
我们使用ID,名称,用户名,网站制作User结构。
Now, address and company are a key to another JSON, so we make another structure according to that as well.
现在,地址和公司是另一个JSON的密钥,因此我们也根据该结构创建另一个结构。
We also conform the structure to the decodable protocol, so we can decode the incoming JSON to objects.
我们还使结构符合可解码协议,因此我们可以将传入的JSON解码为对象。
Next, let’s get the data using some function. For now, let’s assume we are getting data from a network call. We will learn about this in the next article.
接下来,让我们使用一些函数获取数据。 现在,让我们假设我们正在从网络呼叫中获取数据。 我们将在下一篇文章中了解这一点。
let data = someNetworkCall()Now, we decode this data from JSON.
现在,我们从JSON解码数据。
let users = try JSONDecoder().decode([User].self, from: data!)Finally, we have an array of objects of type Post and to print each element of the array, we can use a simple for-each loop.
最后,我们有一个Post类型的对象数组,并且要打印该数组的每个元素,我们可以使用一个简单的for-each循环。
users.forEach({ (user) in
    print(user)
})
结语 (Wrapping Up)
In this article, we have implemented a Nagivation Bar, introduced encoding and decoding and also gotten a brief overview of an API and it’s structure. You can continue with the series in the next article where we learn how to fetch data from an API.
在本文中,我们实现了Nagivation Bar,介绍了编码和解码,还简要概述了API及其结构。 您可以在下一篇文章中继续阅读该系列文章,我们将学习如何从API提取数据。
恭喜🎉! 您刚刚完成了第四个教程! (Congratulations🎉! You have just completed the fourth tutorial!)
All of the above-written code is available on Github. Watch this space for more interesting challenges, up next in this series!
所有上面编写的代码都可以在Github上找到 。 观看此空间,了解更多有趣的挑战,本系列中的下一个!
Confused about something? Let us know in the responses below. 😄
对某事感到困惑? 在下面的回复中告诉我们。 😄
翻译自: https://medium.com/iecse-hashtag/swift-part-4-navigationbar-and-codable-6acc41953a1f
navigationbar
相关文章:
这篇关于navigationbar_第4部分-NavigationBar和Codable的文章就介绍到这儿,希望我们推荐的文章对编程师们有所帮助!