本文主要是介绍Spring boot一课一得,希望对大家解决编程问题提供一定的参考价值,需要的开发者们随着小编来一起学习吧!
Spring boot 常用注解
目录
一、实体类(entity)常用注解:
@Data
@TableName
@TableId
@TableFiled
二、Mapper类常用注解:
@Mapper
@Results
@Result
@Select
三、Service类常用注解:
@Service
@Autowired
四、Controller类常用注解:
@Controller
@RequestMapping
@PathVariable
@ModelAttribute
前言:本文介绍的是目前为止老师带着做的几个项目的常用注解,用来加深理解的。
一、实体类(entity)常用注解:
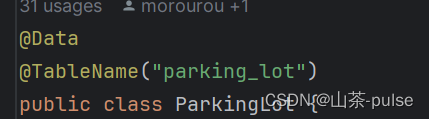
@Data
@Data 是 lombok 库中的一个注解,为实体类提供get、set、toString等方法。由于我的代码中没有使用到set,get方法,所以我就不展示代码了。
@TableName(“ 数据库表名 ”)
@TableName用于标注数据库表名,当实体类与数据库表名不一致时,可以使用@TableName注解进行说明。
@TableName注解的常用属性是name,用于指明数据库的表名。即@TableName(“数据库表名”)
(实体类与数据库表名不一致时)
对比:实体类的名字(PricingStandad)/表名(pricing_standard)
实体类的名字(PricingStandad)
@Data
@TableName("pricing_standard")
//收费标准
public class PricingStandard {@TableId(type = IdType.AUTO)private Long id;@TableField("hourly_rate")private Integer hourlyRate;//小时计费@TableField("daily_rate")private Integer dailyRate;//按天计费@TableField("exceeding_hours")private Integer exceedingHours;//超时数,超过多少小时按天收费private Date updateTime;//更新日期 (标准变化,如随时间,政策变化收费标准变化)
表名(pricing_standard)
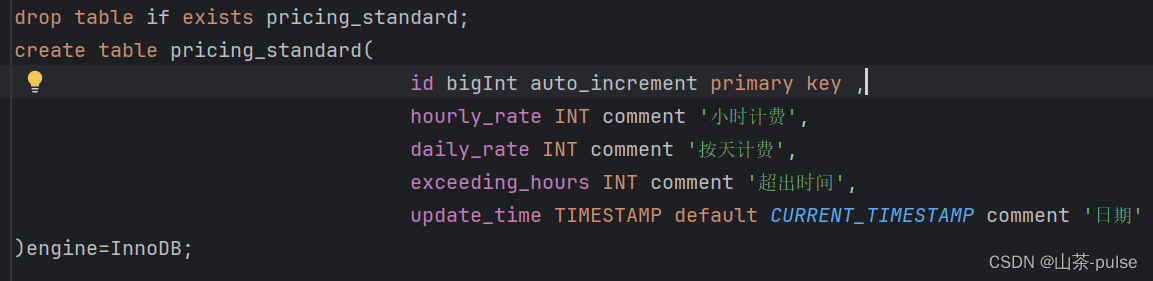
drop table if exists pricing_standard;
create table pricing_standard(id bigInt auto_increment primary key ,hourly_rate INT comment '小时计费',daily_rate INT comment '按天计费',exceeding_hours INT comment '超出时间',update_time TIMESTAMP default CURRENT_TIMESTAMP comment '日期'
)engine=InnoDB;
在使用@TableName注解时,需要注意以下几点:
1.@TableName注解只能用于JPA实体类上,不能用于其他类型的类上。
2.@TableName注解的name属性是必需的,用于指定数据库表名。
3.如果不使用@TableName注解,则默认使用实体类的类名为数据库表名。
4.如果实体类与数据库表名完全一致,则不需要使用@TableName注解。
总之,@TableName注解用于在Spring Boot框架中标注JPA实体类与数据库表之间的映射关系,方便开发人员进行数据持久化操作。
@TableId(value = "字段名")
@TableId是用于标注实体类主键的,会将实体类的属性与数据库表中的主键字段进行映射
若你的主键不像我的Id 一样设有自增,只是一个字段为主键的话,可以这么写:
@TableId(value = "id")
private Long id;
而我的自增是这么写的
实体类中:

@Data
@TableName("pricing_standard")
//收费标准
public class PricingStandard {@TableId(type = IdType.AUTO)private Long id;@TableField("hourly_rate")private Integer hourlyRate;//小时计费@TableField("daily_rate")private Integer dailyRate;//按天计费@TableField("exceeding_hours")private Integer exceedingHours;//超时数,超过多少小时按天收费private Date updateTime;//更新日期 (标准变化,如随时间,政策变化收费标准变化)
对应表中的字段:

create table pricing_standard(id bigInt auto_increment primary key ,
在进行数据操作和查询时,就可以使用实体类中的id属性来操作数据库表中的id字段。(一般用在查询数据 和id自动增加的插入数据里)
@TableFiled(“指定字段名称”)
用于标注实体类属性与数据表字段映射关系,用于指定实体类属性对应的数据库字段名,它可以指定字段的名称、是否允许为空、字段类型等属性。
示例:
实体类中:
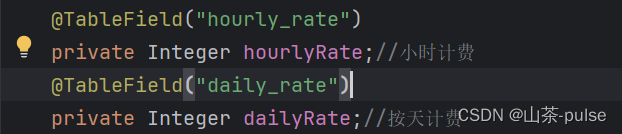
@TableField("hourly_rate")
private Integer hourlyRate;//小时计费
@TableField("daily_rate")
private Integer dailyRate;//按天计费
表中:

drop table if exists pricing_standard;
create table pricing_standard(id bigInt auto_increment primary key , hourly_rate INT comment '小时计费',daily_rate INT comment '按天计费',
从图片中可以感受到实体类属性对应数据库字段名
在进行数据库操作时,可以直接使用 hourlyRate 属性来访问和操作相应的数据库字段。
(在controller和前端模板引擎Thymeleaf会用到)
Thymeleaf示例:
以下是我的pricingstandard的详情界面(HTML)
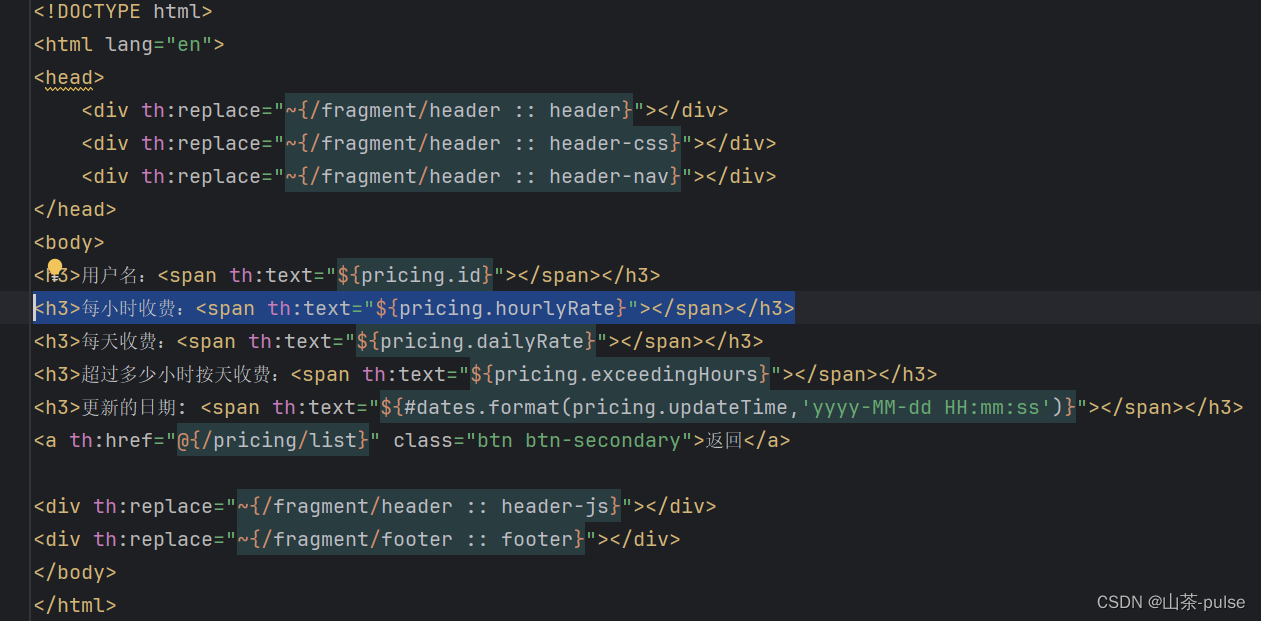
<!DOCTYPE html>
<html lang="en">
<head><div th:replace="~{/fragment/header :: header}"></div><div th:replace="~{/fragment/header :: header-css}"></div><div th:replace="~{/fragment/header :: header-nav}"></div>
</head>
<body>
<h3>用户名:<span th:text="${pricing.id}"></span></h3>
<h3>每小时收费:<span th:text="${pricing.hourlyRate}"></span></h3>
<h3>每天收费:<span th:text="${pricing.dailyRate}"></span></h3>
<h3>超过多少小时按天收费:<span th:text="${pricing.exceedingHours}"></span></h3>
<h3>更新的日期: <span th:text="${#dates.format(pricing.updateTime,'yyyy-MM-dd HH:mm:ss')}"></span></h3>
<a th:href="@{/pricing/list}" class="btn btn-secondary">返回</a><div th:replace="~{/fragment/header :: header-js}"></div>
<div th:replace="~{/fragment/footer :: footer}"></div>
</body>
</html>
其中的
<h3>每小时收费:<span th:text="${pricing.hourlyRate}"></span></h3>
就直接调用了了hourlyRate
二、Mapper类常用注解:
(1)@Mapper
@Mapper用于标注dao层接口,表示该接口是一个 MyBatis Mapper 接口。使用 @Mapper 注解后,MyBatis Plus 会自动为该接口生成相应的 Mapper 实现类,并且会在应用程序启动时加载该实现类。会自动实例化生成很多增删改查的方法不需要自己去写实现类和实现方法
示例:
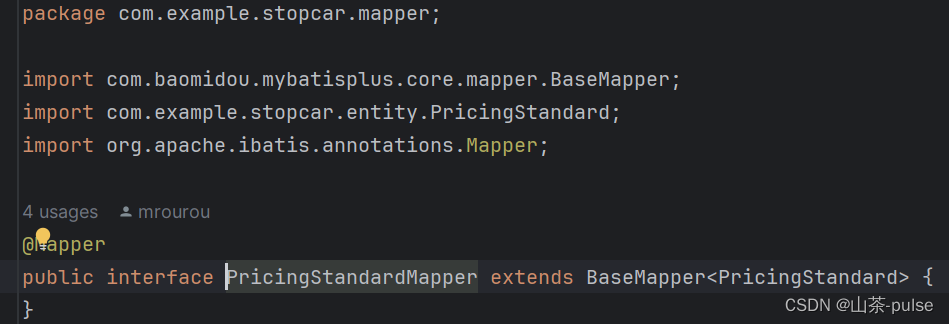
package com.example.stopcar.mapper;import com.baomidou.mybatisplus.core.mapper.BaseMapper;
import com.example.stopcar.entity.PricingStandard;
import org.apache.ibatis.annotations.Mapper;

@Mapper
public interface PricingStandardMapper extends BaseMapper<PricingStandard> {
}
补充:
BaseMapper<PricingStandard>是MyBatis Plus中用于针对"PricingStandard"实体类进行数据库操作的基础接口。它继承自Mapper<PricingStandard>接口,为我们提供了执行针对"PricingStandard"实体类的基本增删改查操作的方法。
(2)接下来的一些注解也是写在Mapper里的,主要是有关联关系的才会写下面这些
由于我的pricingstandard没有关联关系,所以这里用的是我的另一个实体类(parkinglot)的Mapper来展示,目的只是为了弄清楚注解的写法和用法。
(更详细的在图片中)
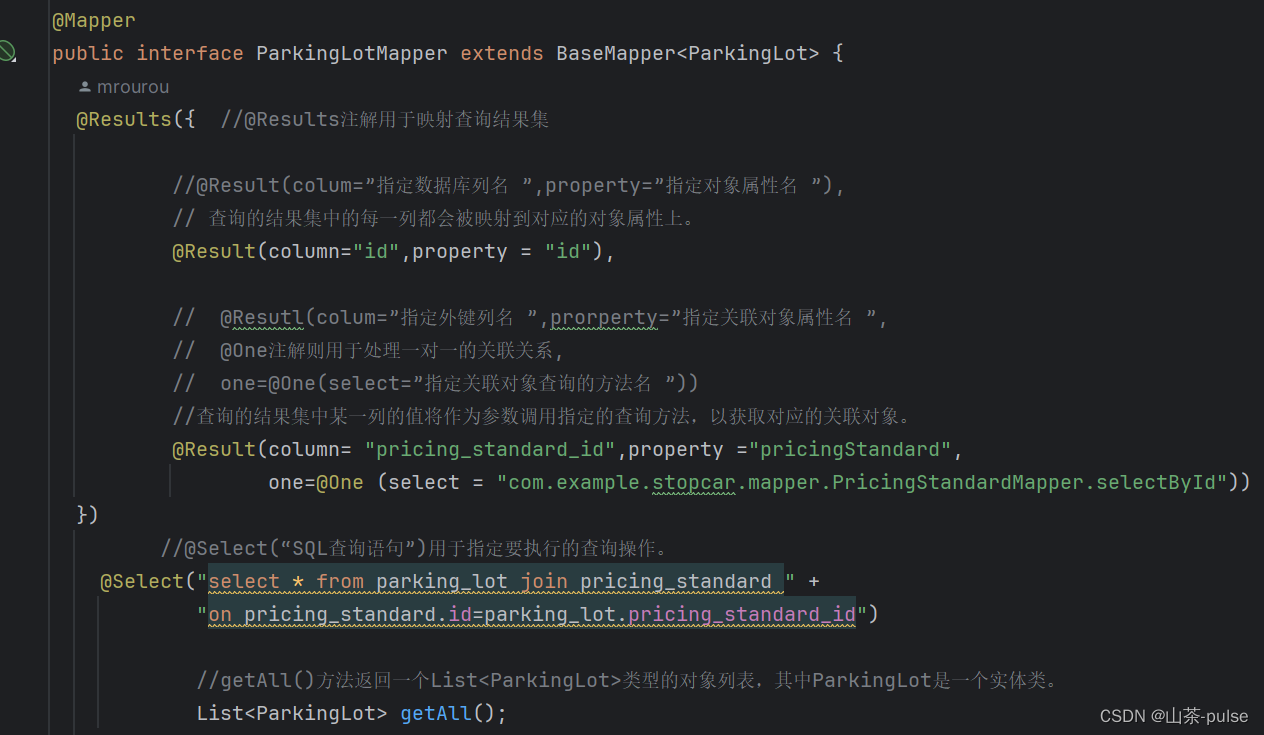
@Results({
@Result(colum=”指定数据库列名 ”,property=”指定对象属性名 ”),
@Resutl(colum=”指定外键列名 ”,prorperty=”指定关联对象属性名 ”,one=@One(select=”指定关联对象查询的方法名 ”))
})
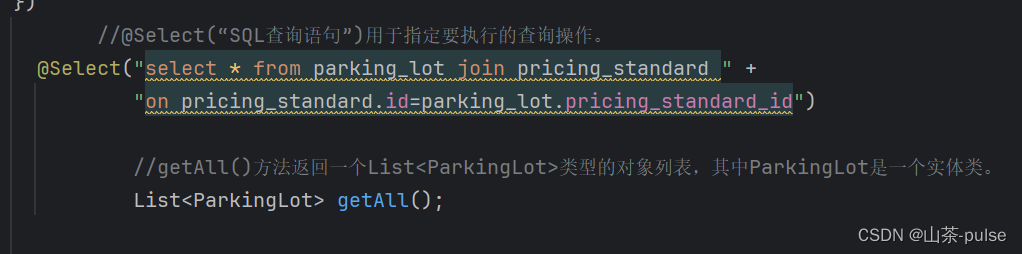
@Select(“SQL查询语句”)
List<使用到的实体类类名> getAll();
@Select注解通常与JPA的实体类一起使用,以便将查询结果映射到实体类对象上。
@Insert(“相应的SQL插入语句+想要插入的对应实体类字段的属性 ”)
Int insert(pakinglot entity);//在实体类(entity)的parkinglot表插入对应的属性的数据
@Insert注解用于定义插入操作的方法。它通常与JPA一起使用,用于在数据库中插入新的实体对象。
示例:
@Mapper
public interface ParkingLotMapper extends BaseMapper<ParkingLot> {@Results({  //@Results注解用于映射查询结果集//@Result(colum=”指定数据库列名 ”,property=”指定对象属性名 ”),// 查询的结果集中的每一列都会被映射到对应的对象属性上。@Result(column="id",property = "id"),//  @Resutl(colum=”指定外键列名 ”,prorperty=”指定关联对象属性名 ”,//  @One注解则用于处理一对一的关联关系,//  one=@One(select=”指定关联对象查询的方法名 ”))//查询的结果集中某一列的值将作为参数调用指定的查询方法,以获取对应的关联对象。@Result(column= "pricing_standard_id",property ="pricingStandard",one=@One (select = "com.example.stopcar.mapper.PricingStandardMapper.selectById"))})//@Select(“SQL查询语句”)用于指定要执行的查询操作。@Select("select * from parking_lot join pricing_standard " +"on pricing_standard.id=parking_lot.pricing_standard_id")//getAll()方法返回一个List<ParkingLot>类型的对象列表,其中ParkingLot是一个实体类。List<ParkingLot> getAll();
@update(“相应的SQL更新语句+想要更新的对应实体类字段属性 ”)
Int update(parkinglot entity);//更新在实体类(entity)的parkinglot表的属性的数据
示例:

//@Update注解用于定义更新数据库记录的操作。它通常与JPA一起使用,用于更新数据库中已有的记录。
//表示要执行一个更新操作,更新名为"parking_lot"的数据库表中记录的"name"字段的值。
// 该更新方法接受一个名为"name"的参数,该参数将被用来设置更新记录的"name"字段的值。
@Update("update parking_lot set name=#{name},volumetric=#{volumetric}" +",pricing_standard_id=#{pricingStandard.id}  where parking_lot.id=#{id}")
int update(ParkingLot entity);
三、Service类常用注解:
@Service
@Service 这是一个Spring框架的注解,表示这个类是一个服务类,Spring会自动扫描和实例化这个类。
用于表示一个类为服务层组件,通常在服务层实现业务逻辑和封装数据访问等操作
示例:
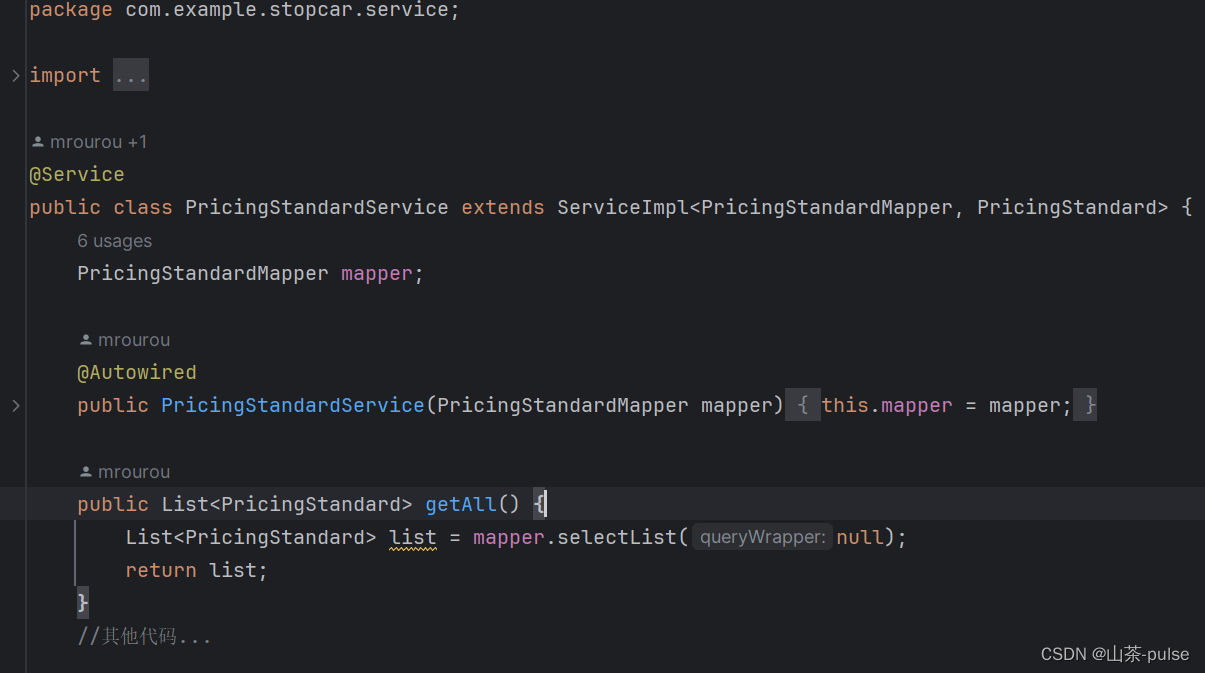
@Service
public class PricingStandardService extends ServiceImpl<PricingStandardMapper, PricingStandard> {PricingStandardMapper mapper;
@Autowired
用于在Spring容器中自动装配bean。它可以根据类型进行自动装配,@Autowired可以标注在成员变量、方法或构造函数上,让Spring容器自动找到同类型的bean并注入到相应的位置。这个注解在Controller类中也会用
示例:

@Autowired
public PricingStandardService(PricingStandardMapper mapper) {this.mapper = mapper;
}
四、Controller类常用注解:
@Controller
@RequestMapping(“/类路径(URL)”)
一般@Controller会与@RequestMapping(“/类路径”)搭配使用
先单独介绍@Controlle,用于标识一个Java类为Spring MVC的控制器。控制器是用于处理用户请求并返回响应的组件,它们负责将用户发来的URL请求转发到对应的服务接口(service层)
而@RequestMapping(“/类路径”)是用来将HTTP请求映射到特定的处理器方法,@RequestMapping可以指定请求的URL、请求的HTTP方法、请求的参数、请求的头信息等,从而将请求映射到对应的处理方法上。这样,当用户发送请求时,Spring MVC就会根据@RequestMapping注解的配置,将请求映射到对应的处理方法上,从而实现请求的处理。它支持对请求方法的匹配,如GET、POST等
示例:
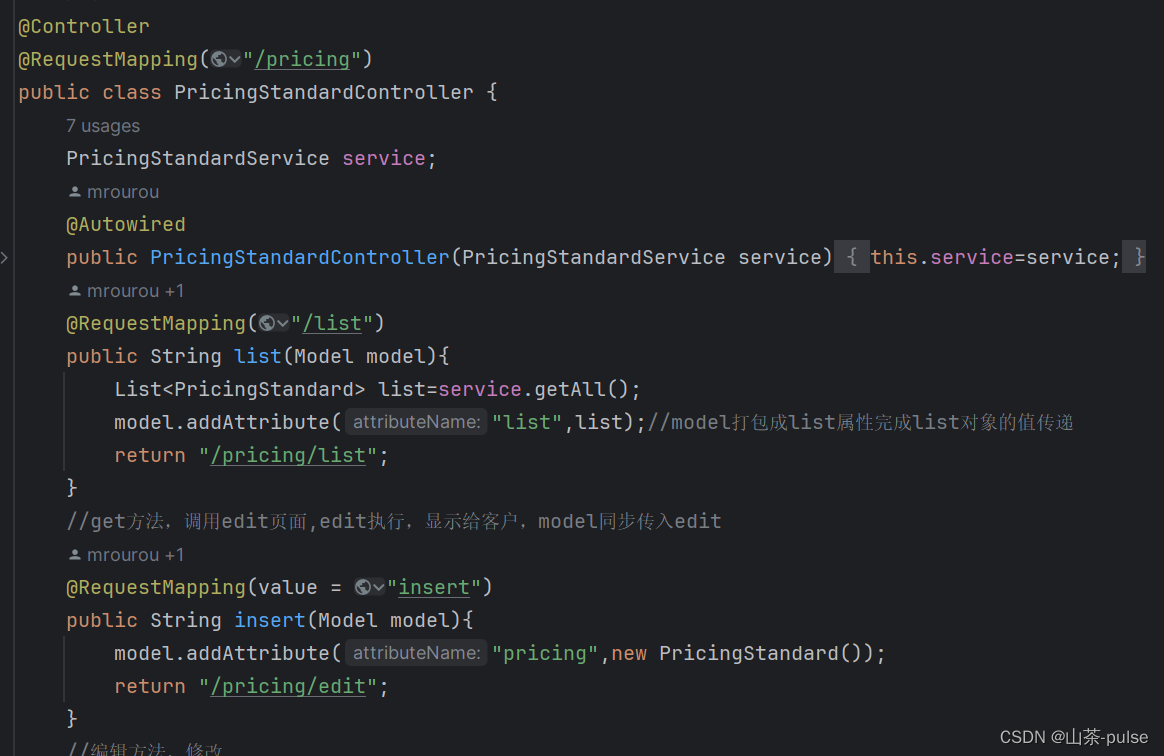
@Controller
@RequestMapping("/pricing")
public class PricingStandardController {PricingStandardService service;@Autowiredpublic PricingStandardController(PricingStandardService service){this.service=service;}@RequestMapping("/list")public String list(Model model){List<PricingStandard> list=service.getAll();model.addAttribute("list",list);//model打包成list属性完成list对象的值传递return "/pricing/list";}
@PathVariable(“URL路径上的参数”)
@PathVariable注解用于将请求URL路径上的参数映射到方法的参数上。它通常用于控制器方法中,用于处理HTTP请求并从请求路径中提取参数。控制器方法就可以使用这些参数来执行相应的操作,比如根据参数值从数据库中获取数据或执行特定的业务逻辑。
示例:
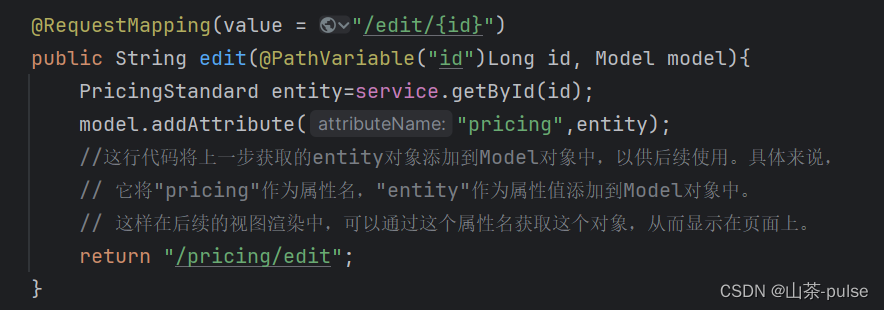
@RequestMapping(value = "/edit/{id}")
public String edit(@PathVariable("id")Long id, Model model){PricingStandard entity=service.getById(id);model.addAttribute("pricing",entity);//这行代码将上一步获取的entity对象添加到Model对象中,以供后续使用。具体来说,// 它将"pricing"作为属性名,"entity"作为属性值添加到Model对象中。// 这样在后续的视图渲染中,可以通过这个属性名获取这个对象,从而显示在页面上。return "/pricing/edit";
}
@ModelAttribute
@ModelAttribute注解通常用于控制器(Controller)的方法参数上,用于将HTTP请求参数绑定到Java对象中。
示例:

@RequestMapping(value = "/save",method = RequestMethod.POST)
public String save(@ModelAttribute("pricing") PricingStandard entity){boolean result=entity.getId()!=null?service.update(entity):service.insert(entity);return "redirect:/pricing/list";
}
总结:感谢看到这里,在本次写博客途中,归纳了各个类中所使用的注解,发现了各个类中的常用注解是比较固定的。也加深对一些注解的理解,还有加深了SpringBoot整体性的认识。但并不全面,欢迎指出不足。
这篇关于Spring boot一课一得的文章就介绍到这儿,希望我们推荐的文章对编程师们有所帮助!


