本文主要是介绍通过JMX和Redis在Spring Boot Admin界面显示多个服务某些参数的和,希望对大家解决编程问题提供一定的参考价值,需要的开发者们随着小编来一起学习吧!
本文介绍通过JMX注解,实现自定义MBean的管理,并显示在Spring Boot Admin UI界面上。同时,通过Redis作为存储媒介,将两个服务中Tomcat的参数maxPostSize及maxThreads的和显示在Spring Boot Admin UI的界面上。
目录
-
- 目录
- 服务布局
- eureka-server
- pomxml
- applicationyml
- 启动类EurekaServerApplicationjava添加注解
- admin-server
- pomxml
- applicationyml
- 启动类AdminServerApplicationjava注解
- jmx-client
- pomxml
- applicationyml
- 启动类JmxClientApplication注解
- MBean类
- 配置类
- jmx-client-2
- 在admin-server中添加求和类
- sumjava
- 配置类
- 启动四个服务
- 总结
服务布局
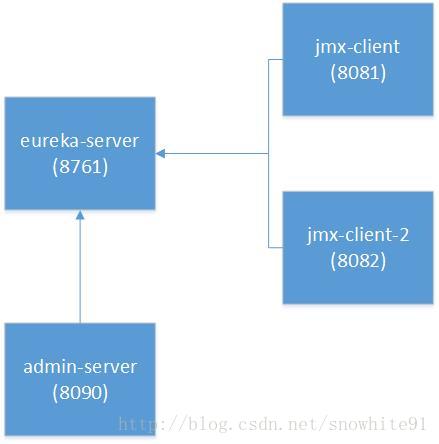
如图所示,本次实例共有四个服务:eureka-server(端口8761)、admin-server(端口8090)、jmx-client(端口8081)以及jmx-client-2(端口8082)。其中,admin-server(端口8090)、jmx-client(端口8081)以及jmx-client-2(端口8082)均注册于注册中心eureka-server(端口8761)。admin-server(端口8090)通过注册中心eureka-server(端口8761)获得jmx-client(端口8081)以及jmx-client-2(端口8082)服务中的相关信息。
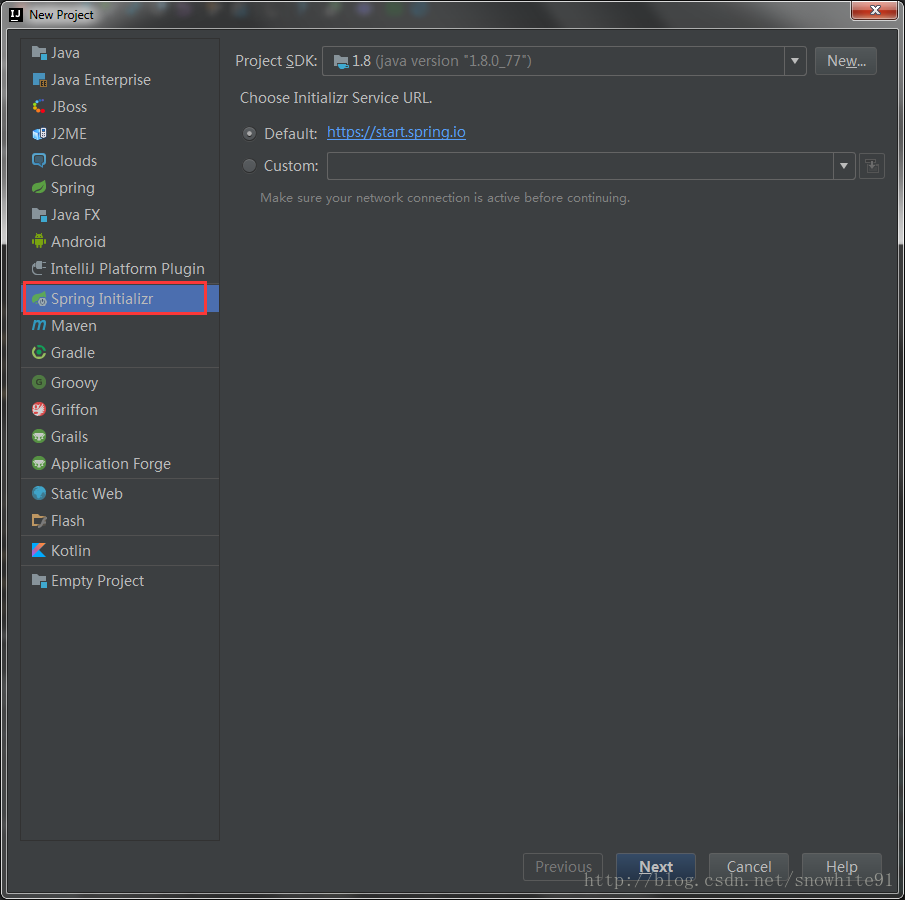
PS:所有服务都是通过在线生成,如图
eureka-server
pom.xml
<dependency><groupId>org.springframework.cloud</groupId><artifactId>spring-cloud-starter-eureka-server</artifactId></dependency>eureka-server要引入spring-cloud-starter-eureka-server依赖包。
application.yml
spring:application:name: Eureka-Serverindex: 1
server:port: 8761eureka:server:enable-self-preservation: false #关闭自我保护eviction-interval-timer-in-ms: 4000 #清理间隔(单位毫秒)instance:hostname: eureka-serverclient:register-with-eureka: falsefetch-registry: falseservice-url:defaultZone: http://${eureka.instance.hostname}:${server.port}/eureka/
management:security:enabled: false
启动类EurekaServerApplication.java添加注解
@SpringBootApplication
@EnableEurekaServer
到此,注册中心就完成配置。
admin-server
pom.xml
<dependency><groupId>de.codecentric</groupId><artifactId>spring-boot-admin-server</artifactId><version>1.5.4</version></dependency><dependency><groupId>de.codecentric</groupId><artifactId>spring-boot-admin-server-ui</artifactId><version>1.5.4</version></dependency><dependency><groupId>org.springframework.cloud</groupId><artifactId>spring-cloud-starter-eureka</artifactId><version>1.2.6.RELEASE</version></dependency><!--jmx依赖包--><dependency><groupId>org.jolokia</groupId><artifactId>jolokia-core</artifactId></dependency><!--redis--><dependency><groupId>org.springframework.data</groupId><artifactId>spring-data-redis</artifactId></dependency><dependency><groupId>redis.clients</groupId><artifactId>jedis</artifactId></dependency>application.yml
info:version: @project.version@
server:port: 8090spring:application:name: Admin-Serverindex: 1boot:admin:url: http://localhost:${server.port}redis:host: localhostport: 6379password:pool:max-active: 10max-wait: 1000
endpoints:health:sensitive: false
# 向注册中心注册服务
eureka:instance:instance-id: ${spring.application.name}:${spring.application.index}:${random.value}prefer-ip-address: truehostname: admin-sever-${spring.application.index}status-page-url-path: ${management.context-path}/infohealth-check-url-path: ${management.context-path}/healthmetadata-map:management:context-path: ${management.context-path}client:service-url:defaultZone: http://localhost:8761/eureka/
management:security:enabled: falsecontext-path: /manage
启动类AdminServerApplication.java注解
@SpringBootApplication
@EnableAdminServer
@EnableDiscoveryClient
至此,admin-server配置暂时完成。
jmx-client
pom.xml
<!--jmx依赖--><dependency><groupId>org.jolokia</groupId><artifactId>jolokia-core</artifactId></dependency><!--Redis依赖--><dependency><groupId>org.springframework.data</groupId><artifactId>spring-data-redis</artifactId></dependency><dependency><groupId>redis.clients</groupId><artifactId>jedis</artifactId></dependency>
application.yml
info:version: @project.version@spring:application:name: JMX-Clientindex: 1boot:admin:url: http://localhost:8090redis:host: localhostport: 6379password:pool:max-active: 10max-wait: 1000
server:port: 8081
# 注册到注册中心
eureka:instance:instance-id: ${spring.application.name}:${spring.application.index}:${random.value}prefer-ip-address: truehostname: jmx-client-${spring.application.index}status-page-url-path: ${management.context-path}/infohealth-check-url-path: ${management.context-path}/healthmetadata-map:management:context-path: ${management.context-path}client:service-url:defaultZone: http://localhost:8761/eureka/
management:security:enabled: falsecontext-path: /manage
可以发现,jmx-client模块并没有直接注册到admin-server服务中,而是直接注册到eureka-server服务中。同时,admin-server也注册在eureka-server中,admin-server就能够通过注册中心获得jmx-client的相关信息。
启动类JmxClientApplication注解
@SpringBootApplication
@EnableEurekaClient
MBean类
@ManagedResource(objectName = "bean:name=MyBean", description = "My Managed Bean", log = true, logFile = "jmx.log",currencyTimeLimit = 15, persistPolicy = "OnUpdate", persistPeriod = 200, persistLocation = "foo",persistName = "bar")
public class MyBean {private ApplicationContext applicationContext;@Autowiredprivate StringRedisTemplate stringRedisTemplate;private ValueOperations<String, String> valueOperations;public MyBean(ApplicationContext applicationContext) {this.applicationContext = applicationContext;}@PostConstructprivate void init(){this.valueOperations = stringRedisTemplate.opsForValue();}private Connector getConnector(){EmbeddedServletContainer embeddedServletContainer =((EmbeddedWebApplicationContext) applicationContext).getEmbeddedServletContainer();Tomcat tomcat = ((TomcatEmbeddedServletContainer) embeddedServletContainer).getTomcat();return tomcat.getConnector();}@ManagedAttribute(description = "获得最小备用线程数,tomcat启动时的初始化的线程数")public int getMaxPostSize() {int maxPostSize = (int) IntrospectionUtils.getProperty(getConnector(), "maxPostSize");valueOperations.set("maxPostSize", String.valueOf(maxPostSize));return maxPostSize;}@ManagedAttribute(description = "设置最小备用线程数,tomcat启动时的初始化的线程数")public void setMaxPostSize(int value){valueOperations.set("maxPostSize", String.valueOf(value));IntrospectionUtils.setProperty(getConnector(), "maxPostSize", String.valueOf(value));}@ManagedAttribute(description = "获得tomcat起动的最大线程数,即同时处理的任务个数")public int getMaxThreads(){int maxThreads = (int) IntrospectionUtils.getProperty(getConnector(), "maxThreads");valueOperations.set("maxThreads", String.valueOf(maxThreads));return maxThreads;}@ManagedAttribute(description = "设置tomcat起动的最大线程数,即同时处理的任务个数")public void setMaxThreads(int value){valueOperations.set("maxThreads", String.valueOf(value));IntrospectionUtils.setProperty(getConnector(), "maxThreads", String.valueOf(value));}
其中,getXXX是获得相应的属性,setXXX是具有修改属性值的权限。
配置类
public class BeanConfig {@Beanpublic MyBean myBean(ApplicationContext applicationContext){return new MyBean(applicationContext);}}至此,jmx-client配置已经完成。
jmx-client-2
复制一份jmx-client ,并更改**application.yml**server端口号为8082
server:port: 8082更改自定义MBean存储在Redis中的key值,以避免与jmx-client存储的key值重复,即
@ManagedAttribute(description = "获得最小备用线程数,tomcat启动时的初始化的线程数")public int getMaxPostSize() {int maxPostSize = (int) IntrospectionUtils.getProperty(getConnector(), "maxPostSize");valueOperations.set("maxPostSize2", String.valueOf(maxPostSize));return maxPostSize;}@ManagedAttribute(description = "设置最小备用线程数,tomcat启动时的初始化的线程数")public void setMaxPostSize(int value){valueOperations.set("maxPostSize2", String.valueOf(value));IntrospectionUtils.setProperty(getConnector(), "maxPostSize", String.valueOf(value));}@ManagedAttribute(description = "获得tomcat起动的最大线程数,即同时处理的任务个数")public int getMaxThreads(){int maxThreads = (int) IntrospectionUtils.getProperty(getConnector(), "maxThreads");valueOperations.set("maxThreads2", String.valueOf(maxThreads));return maxThreads;}@ManagedAttribute(description = "设置tomcat起动的最大线程数,即同时处理的任务个数")public void setMaxThreads(int value){valueOperations.set("maxThreads2", String.valueOf(value));IntrospectionUtils.setProperty(getConnector(), "maxThreads", String.valueOf(value));}在admin-server中添加求和类
sum.java
@ManagedResource(objectName = "bean:name=sumBean",description = "两个服务参数的和")
public class SumBean {@Autowiredprivate StringRedisTemplate stringRedisTemplate;private ValueOperations<String, String> valueOperations;@PostConstructprivate void init() {this.valueOperations = stringRedisTemplate.opsForValue();}@ManagedAttribute(description = "两个服务maxPostSize的和")public int getSumMaxPostSize() {// 取出jmx-client保存的maxPostSize值int maxPostSize = Integer.parseInt(valueOperations.get("maxPostSize"));// 取出jmx-client-2保存的maxPostSize2值int maxPostSize2 = Integer.parseInt(valueOperations.get("maxPostSize2"));return maxPostSize + maxPostSize2;}@ManagedAttribute(description = "两个服务maxThreads的和")public int getSumMaxThreads(){// 取出jmx-client保存的maxThreads值int maxThreads = Integer.parseInt(valueOperations.get("maxThreads"));// 取出jmx-client-2保存的maxThreads2值int maxThreads2 = Integer.parseInt(valueOperations.get("maxThreads2"));return maxThreads + maxThreads2;}
}
配置类
@Configuration
public class BeanConfig {@Beanpublic SumBean sumBean(){return new SumBean();}
}
启动四个服务
如图

PS:idea 2.6+版本可以同时启动多个服务,而不需要挨个去找application类了。
Eureka注册中心

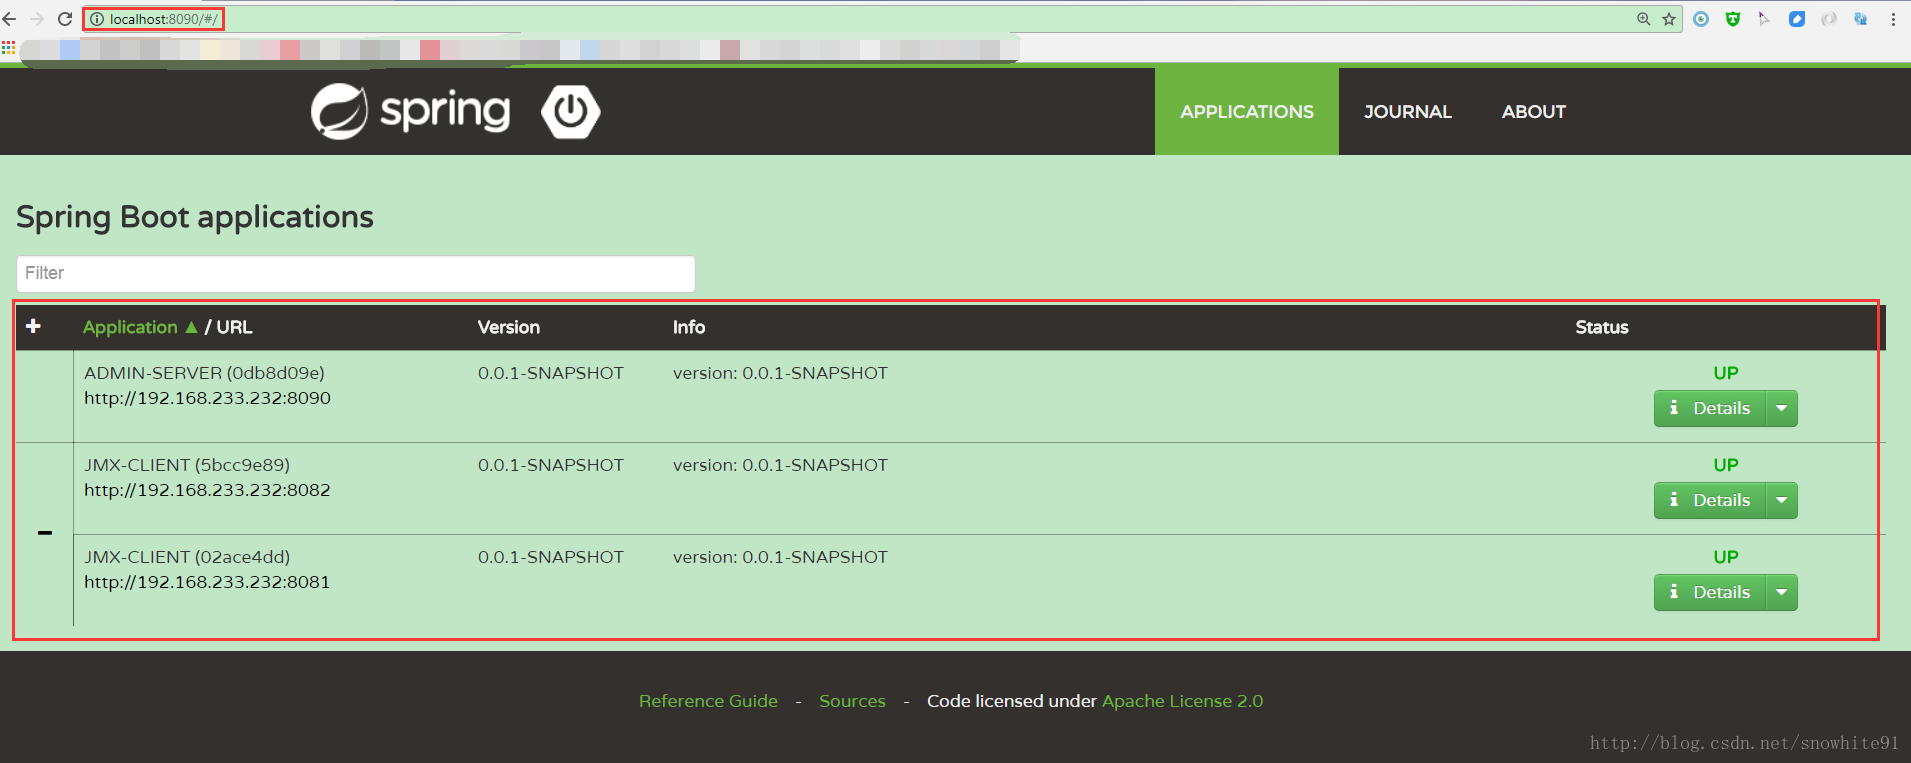
Admin Server
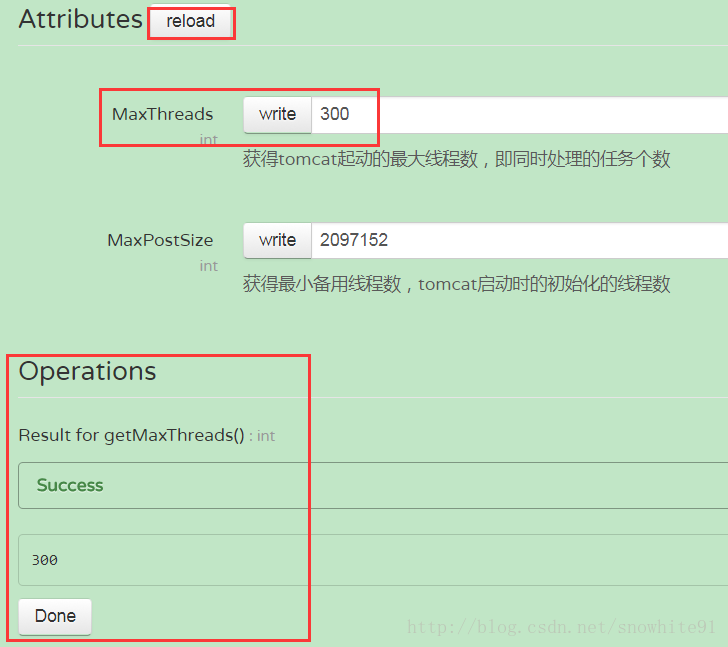
点击JMX-CLIENT后 【Details】链接,然后再点开【JMX】链接,就可以看到自定义的bean
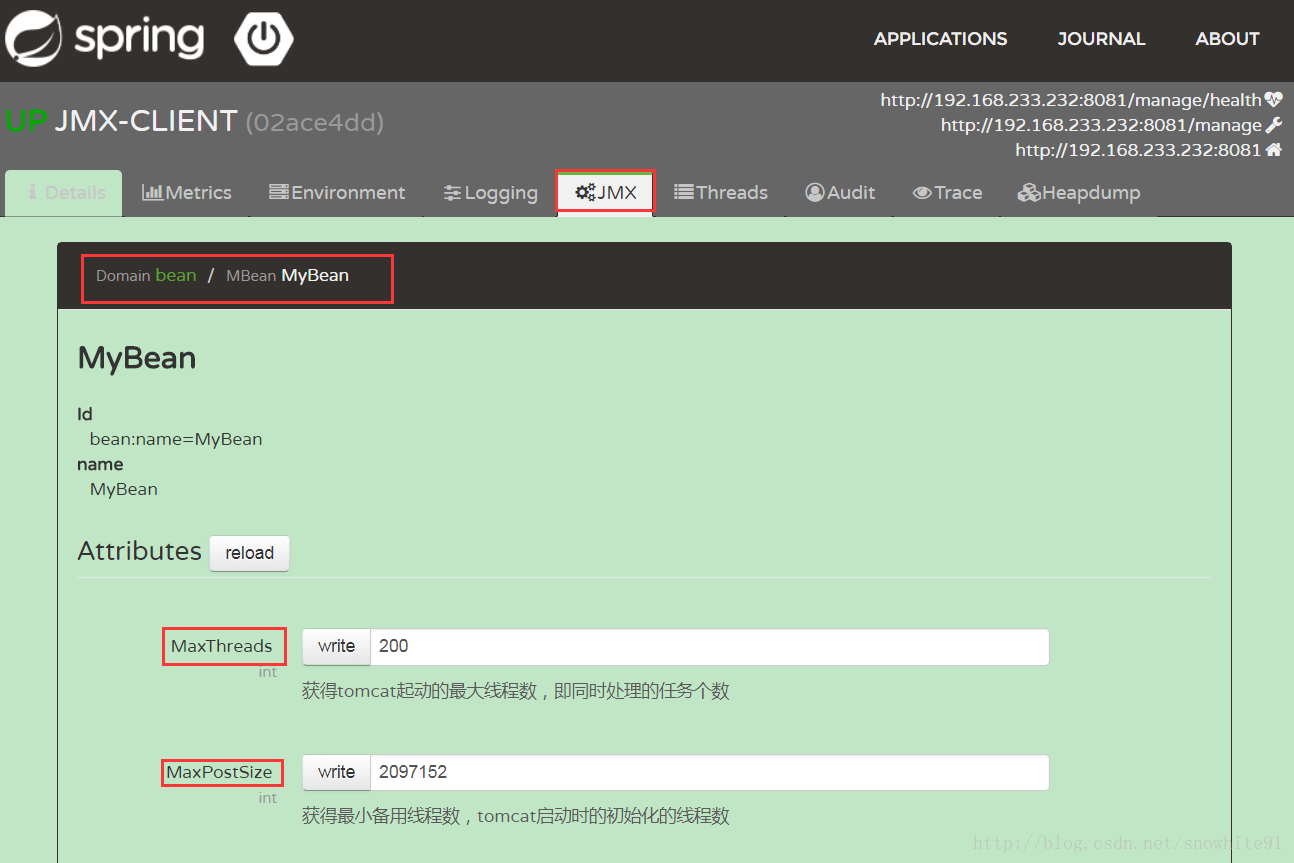
更改【write】后面的数值,点击【reload】,就能看到更改后的数值:
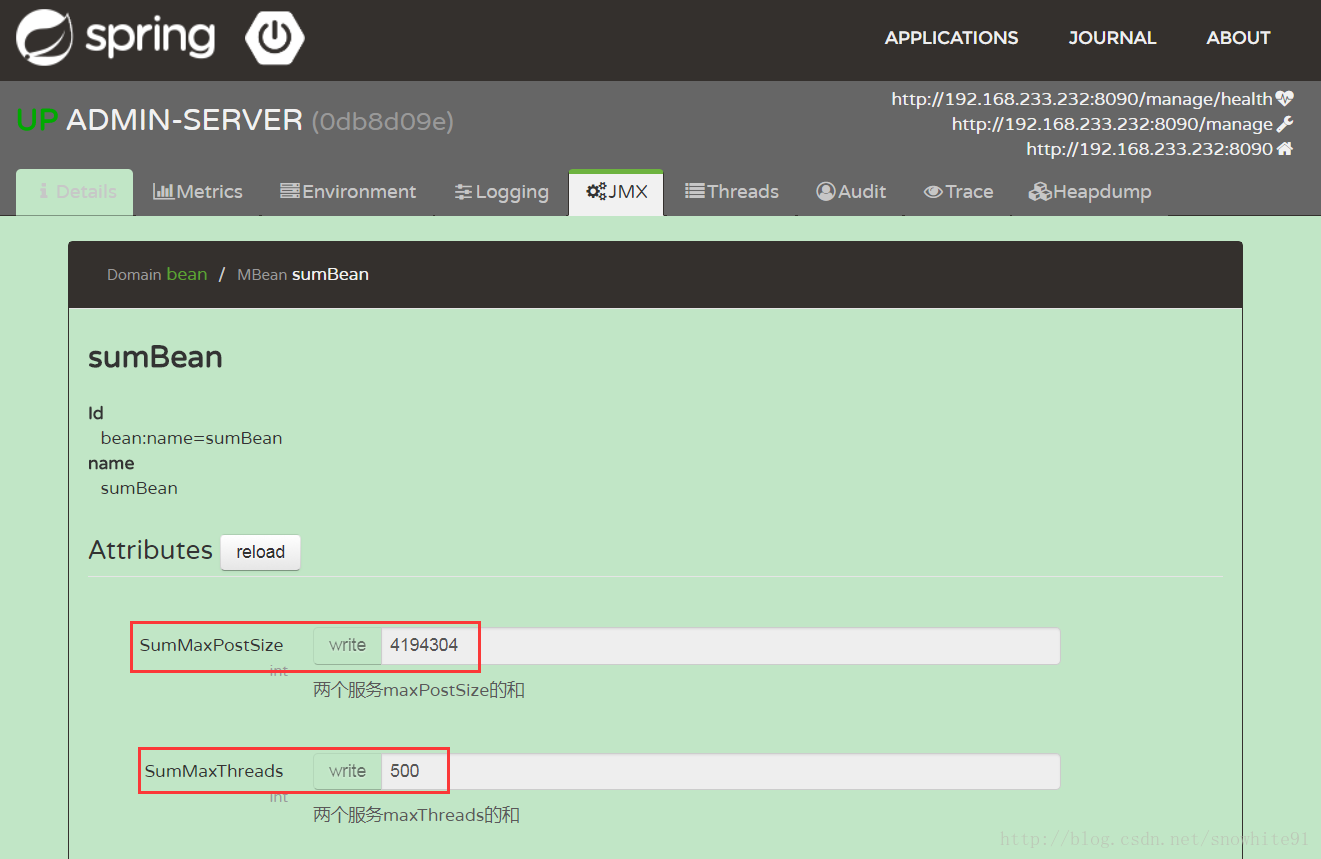
对于jmx-client-2也有同样的效果。在Admin Server UI界面点击ADMIN SERVER后的【Details】链接,进入【JMX】链接,看到自定义的MBean类,查看求和值为jmx-client和jmx-client-2各参数的加和:
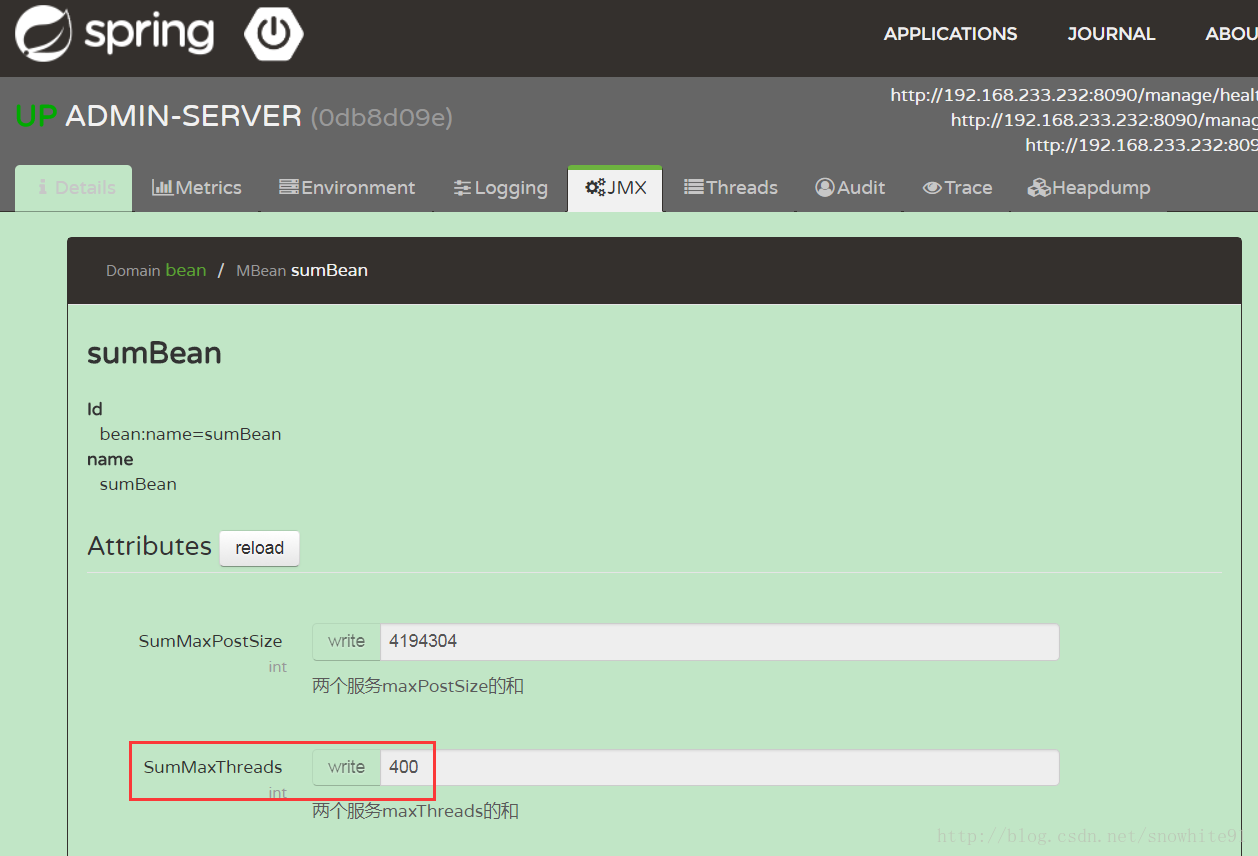
将jmx-client MaxThreads值改回200后,【reload】界面,返回求和界面,可以看到MaxThreads值已经变为400:
总结
通过本实例可以初步了解如何联合JMX、Redis、Spring Boot Admin以及Eureka实现多个服务某些参数值的监控。源码在https://github.com/GitBaymin/spring-jmx
这篇关于通过JMX和Redis在Spring Boot Admin界面显示多个服务某些参数的和的文章就介绍到这儿,希望我们推荐的文章对编程师们有所帮助!


