本文主要是介绍【Spring杂烩】@Enable模块装配的两种实现方式,希望对大家解决编程问题提供一定的参考价值,需要的开发者们随着小编来一起学习吧!
Spring中@Enable模块装配的两种实现方式
- 基本概要
- 模块装配脑图
- 什么时候开始支持模块装配
- 什么是模块?什么是模块装配?
- 模块装配的应用
- 模块装配的两种实现方式
- 源码体现
- 自定义模块装配
- 编程方式
- 注解方式
- 参考资料
基本概要
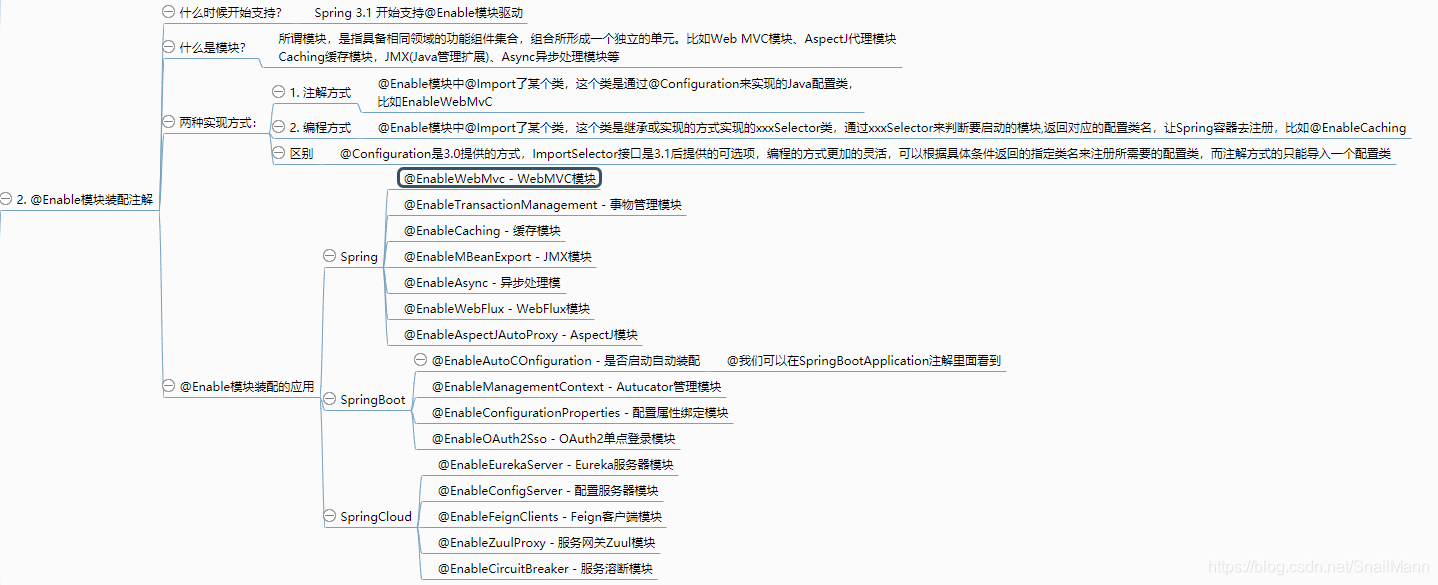
模块装配脑图

什么时候开始支持模块装配
- Spring 3.0 开始支持@Enable模块装配
- 3.0 支持注解方式驱动,3.1 又支持了编程方式驱动
什么是模块?什么是模块装配?
-
所谓模块(@引用小马哥),是指具备相同领域的功能组件集合,组合所形成一个独立的单元。比如Web MVC模块、AspectJ代理模块Caching缓存模块,JMX(Java管理扩展)、Async异步处理模块等
-
所谓模块装配,简而言之就是,通过@EnableXXX注解实现一个开关,这个开关决定是否开启某个功能模块的所有组件的自动化配置
-
作用就是: 实现一个模块的组件集合是否被Spring装配的开关,比如使用了@EnableWebMvc,则代表Spring容器会去加载WebMvc相关的Bean;使用了@EnableCaching注解,则代表Spring容器会去加载Cache相关的Bean
模块装配的应用
-
Spring Framework
@EnableWebMvc - Web MVCmok - WebMVC 模块
@EnableTransactionManagement - 事物管理模块
@EnableCaching - Caching模块
@EnableMBeanExport - JMX模块
@EnableAsync - 异步处理模块
@EnableWebFlux - Web Flux模块
@EnableAspectJAutoProxy - AspectJ代理模块 -
SpringBoot
@EnableAutoConfiguration - 自动装配模块
@EnableManagementContext - Actuator管理模块
@EnableConfigurationProperties - 配置属性绑定模块
@EnableOAuth2Sso - OAuth2单点登录模块 -
SpringCloud
@EnableEurekaServer - Eureka服务器模块
@EnableConfigServer - 配置服务器模块
@EnableFeignClients - Feign客户端模块
@EnableZuulProxy - 服务网关Zuul模块
@EnableCircuitBreaker - 服务溶断模块
模块装配的两种实现方式
模块装配有两种实现方式:
- 注解方式
@Enable模块中@Import了某个类,这个类是通过@Configuration来实现的Java配置类, 比如EnableWebMvC- 编程方式
编程方式由两种实现方式:
- @Enable模块中@Import了某个类,这个类是继承或实现的方式实现的xxxSelector类,通过xxxSelector来判断要启动的模块,返回对应的配置类名,让Spring容器去注册,比如@EnableCaching
- @Enable模块中@Import了某个类,这个类是实现ImportBeanDefinitionRegistrar接口实现的。
源码体现
我们从Spring的源码来找到体现
注解方式
注解方式比如有@EnableWebMvc,这是常见的WebMvc模块装配
@Retention(RetentionPolicy.RUNTIME)
@Target(ElementType.TYPE)
@Documented
@Import(DelegatingWebMvcConfiguration.class)
public @interface EnableWebMvc {
}
第一步,我们从@EnableWebMvc源码中看到,里面除了Java的三个元注解外,就只有一个@Import注解了,这个注解是干嘛的呢?
- @Import注解的作用就是就是将参数指定的类,注册到Spring容器中
第二步,我们查看一下@Import指定的类DelegatingWebMvcConfiguration,不过其实会发现,这个类的内部也没有什么东西,但要注意的是,它是一个@Configuration配置类, 里面有一个WebMvcConfigurerComposite类的引用,并委托它作为一下重写的方法
第三步,因为DelegatingWebMvcConfiguration类并没有什么可重点关注的东西,所以我们检查了一些他的父类WebMvcConfigurationSupport,然后我们就发现了重点
public class WebMvcConfigurationSupport implements ApplicationContextAware, ServletContextAware {@Beanpublic RequestMappingHandlerMapping requestMappingHandlerMapping() {...}@Beanpublic ContentNegotiationManager mvcContentNegotiationManager() {...}@Beanpublic HandlerMapping viewControllerHandlerMapping() {...}@Beanpublic HandlerMapping resourceHandlerMapping() {...}@Beanpublic HandlerMapping defaultServletHandlerMapping() {...}@Beanpublic RequestMappingHandlerAdapter requestMappingHandlerAdapter() {...}...}
我们发现父类里面就提供了很多Spring MVC必备的一Bean,所以我们可以知道,整个的注解方式的模块装配流程就是:
- @EnableXXX注解@Import了某个配置类
- @Configuration注解修饰的配置类中定义了很多让这个模块生效的功能组件(或者说Bean)
编程方式
编程方式由两种实现方式,但是我们这里着重说明XXXSelector的编程方式,ImportBeanDefinitionRegistrar 的方式本博暂不讨论。
就比如说@EnableCaching注解,缓存模块
@Target(ElementType.TYPE)
@Retention(RetentionPolicy.RUNTIME)
@Documented
@Import(CachingConfigurationSelector.class)
public @interface EnableCaching {boolean proxyTargetClass() default false;AdviceMode mode() default AdviceMode.PROXY;int order() default Ordered.LOWEST_PRECEDENCE;}
第一步,以上是@EnableCaching注解的源码,我们可以看到里面不同于EnableWebMvc注解,还存在三个注解属性,这个我们基本不相干,但我们要先记住一个属性AdviceMode mode() default AdviceMode.PROXY;就可以了。然后再看@Import的类是CachingConfigurationSelector,xxxSelector是编程方式的核心
public class CachingConfigurationSelector extends AdviceModeImportSelector<EnableCaching> {@Overridepublic String[] selectImports(AdviceMode adviceMode) {switch (adviceMode) {case PROXY:return getProxyImports();case ASPECTJ:return getAspectJImports();default:return null;}}/*** Return the imports to use if the {@link AdviceMode} is set to {@link AdviceMode#PROXY}.* <p>Take care of adding the necessary JSR-107 import if it is available.*/private String[] getProxyImports() {List<String> result = new ArrayList<>(3);result.add(AutoProxyRegistrar.class.getName());result.add(ProxyCachingConfiguration.class.getName());if (jsr107Present && jcacheImplPresent) {result.add(PROXY_JCACHE_CONFIGURATION_CLASS);}return StringUtils.toStringArray(result);}/*** Return the imports to use if the {@link AdviceMode} is set to {@link AdviceMode#ASPECTJ}.* <p>Take care of adding the necessary JSR-107 import if it is available.*/private String[] getAspectJImports() {List<String> result = new ArrayList<>(2);result.add(CACHE_ASPECT_CONFIGURATION_CLASS_NAME);if (jsr107Present && jcacheImplPresent) {result.add(JCACHE_ASPECT_CONFIGURATION_CLASS_NAME);}return StringUtils.toStringArray(result);}}
第二步,以上是CachingConfigurationSelector的核心源码,我们看到selectImports()方法,发现它是根据一个AdviceMode属性来执行不同的行为,如果是普通代理PROXY,则getProxyImports();如果是切面编程,则是getAspectJImports()。我们可以回想起@EnableCaching注解中有一个属性就是AdviceMode,默认是PROXY,所以默认就是执行getProxyImports()方法。
然后我们看到getProxyImports()或getAspectJImports()方法,会发现最终返回的只是字符串数组,这些字符串数组是什么呢?就是一个配置类的全限定类名,比如PROXY_JCACHE_CONFIGURATION_CLASS
private static final String PROXY_JCACHE_CONFIGURATION_CLASS ="org.springframework.cache.jcache.config.ProxyJCacheConfiguration";
所以Selecotr类的最大作用就是根据条件判断,选择返回的配置类名称集合
第三步,最后我们可以知道,xxxSelector类其实就是实现了ImportSelector接口,实现重写selectImports()方法
,返回指定的配置类全限定名,让Spring容器去注册。而返回的名称对应的配置类就跟@Configuration修饰的配置类并没有太多区别,都配置了该模块需要的一些Bean.
所以我们可以知道,编程方式的流程就是:
- @EnableXXX注解@Import了某个实现了ImportSelector接口的实现类
- 实现类XXXSelector实现了selectImports()方法,根据某些条件判断,返回需要装配到Spring容器的配置类的全限定名称
- 被装配的配置类,生成对应的模块的所需组件(Bean)
小结
- 注解方式,比较简单,就是通过一个注解导入一个配置类就可以实现
- 编程方式比较灵活,可以根据不同的条件选择不同的配置类,甚至选择多个不同配置类集合
自定义模块装配
编程方式实现
项目结构图:

1. 定义配置类
自定义配置类,生成一个Bean,这里仅仅是模拟一下啦,只要输出2019…就算这Bean生成了。(因为配置类在ComponentScan扫描的路径下,为了显示出区别,所以我们的配置类不需要加@Configuration就可以奥,这样子才可以看出,@EnableHello注解是否生效)
/*** 配置类* @author liwenjie*/
public class MyConfig {@Beanpublic void str(){System.out.println("2019...");}}
2. 定义HelloImportSelector
自定义xxxxSelector类,实现ImportSelecotr接口,实现selectImports方法,返回指定的配置类名称
(这里偷了懒,没有根据特定条件选择特定的配置类)
/*** xxxSelector实现类* @author liwenjie*/
public class HelloImportSelector implements ImportSelector {@Overridepublic String[] selectImports(AnnotationMetadata importingClassMetadata) {return new String[]{MyConfig.class.getName()};//返回所需配置类的全限定名称 com.example.demo.config.MyConfig}
}
3. 定义@Enable注解
自定义@EnableHello注解
@Target(ElementType.TYPE)
@Documented
@Retention(RetentionPolicy.RUNTIME)
@Import(HelloImportSelector.class)
public @interface EnableHello {
}
4. SpringBoot引导类中声明@Enable注解
@EnableHello
@SpringBootApplication
public class DemoApplication {public static void main(String[] args) {SpringApplication.run(DemoApplication.class, args);}
}
注解方式实现
注解方式的实现就比较简单了,我们只需要在自定义的@EnableHello注解上修改@Import的类为某个配置类,就可以了
将HelloImportSelector修改为MyConfig配置类
@Target(ElementType.TYPE)
@Documented
@Retention(RetentionPolicy.RUNTIME)
@Import(MyConfig.class)
public @interface EnableHello {
}
重启项目,就可以看到2019依然正常输出
小贴士
- 这里我们会看到一个小细节,不同于Spring的源码,MyConfig配置类并没有@Configuration注解,无论是注解方式还是编程方式, 但是Spring中的配置类就会加上@Configuration,这个是为什么呢?其实@Import注解导入的类,是不需要注解声明的,只是可能Spring为了代码的规范,将这些注解作为标识符号用来声明这个类的作用和意义。另外有可能通过别的一些机制,比如反射查找该类是否拥有@Configuration注解来做一些判断
参考资料
- emmmm…
这篇关于【Spring杂烩】@Enable模块装配的两种实现方式的文章就介绍到这儿,希望我们推荐的文章对编程师们有所帮助!


