本文主要是介绍Spring Boot - JaCoCo Code Coverage,希望对大家解决编程问题提供一定的参考价值,需要的开发者们随着小编来一起学习吧!
文章目录
- 概述
- 如何集成
- pom添加插件
- Code Demo
- 排除不相关的类
- CI/CD中使用
- 完整POM

概述
JaCoCo(Java Code Coverage)是一个开源的Java代码覆盖率工具,它主要用于评估Java程序的测试完整性。通过跟踪测试过程中执行的代码,JaCoCo能够提供多种覆盖率指标,帮助开发者确保代码的测试质量。这些指标包括指令覆盖、分支覆盖、圈复杂度、行覆盖、方法覆盖和类覆盖。
在实际应用中,JaCoCo可以嵌入到构建工具如Maven和Ant中,也可以作为Eclipse插件使用。此外,它还支持JavaAgent技术,能够监控Java程序的执行并收集覆盖率数据。JaCoCo生成的覆盖率报告可以帮助开发者识别未被测试到的代码部分,从而指导他们完善测试用例。
JaCoCo的设计旨在提供灵活的集成方式,可以与其他开发和测试工具如Sonar和Jenkins集成,以增强代码质量和测试流程的管理。它的原理是通过在测试运行时,对程序的代码执行情况进行监控,并通过一系列的规则和限制来确保代码的测试覆盖程度。这样的工具对于提升软件测试的全面性和深度具有重要作用。
如何集成
集成JaCoCo到你的Java项目中通常涉及以下几个步骤:
- 添加JaCoCo依赖:
- 对于Maven项目,你需要在
pom.xml文件中添加JaCoCo的依赖。例如:<dependencies><!-- 其他依赖 --><dependency><groupId>org.jacoco</groupId><artifactId>jacoco-maven-plugin</artifactId><version>0.8.3</version> <!-- 使用最新的版本 --><scope>test</scope></dependency> </dependencies> - 对于Gradle项目,你需要在
build.gradle文件中添加JaCoCo的插件和依赖。例如:plugins {id 'jacoco' version '0.8.3' // 使用最新的版本// 其他插件 }
- 对于Maven项目,你需要在
- 配置JaCoCo插件:
- 在
pom.xml或build.gradle文件中,需要配置JaCoCo插件的行为。这包括设置覆盖率目标、输出报告的格式和路径等。 - 例如,在Maven的
pom.xml中,可能需要配置prepare-agent、report和check等生命周期任务:<build><plugins><plugin><groupId>org.jacoco</groupId><artifactId>jacoco-maven-plugin</artifactId><version>0.8.3</version><executions><execution><id>prepare-agent</id><goals><goal>prepare-agent</goal></goals></execution><execution><id>report</id><phase>test</phase><goals><goal>report</goal></goals></execution><!-- 强制要求覆盖率 --><execution><id>check-code-coverage</id><phase>test</phase><goals><goal>check</goal></goals><configuration><rules><rule><element>BUNDLE</element><limits><limit><counter>INSTRUCTION</counter><value>COVEREDRATIO</value><minimum>0.80</minimum> <!-- 至少80%的代码被执行 --></limit><!-- 可以添加更多的规则 --></limits></rule></rules></configuration></execution></executions></plugin></plugins> </build>
- 在
- 运行测试并生成覆盖率报告:
- 使用Maven的
mvn test命令或者Gradle的gradle test命令运行你的测试。 - 测试完成后,JaCoCo会生成覆盖率报告,通常在
target/site/jacoco目录下(对于Maven项目)。
- 使用Maven的
- 分析覆盖率报告:
- 打开生成的HTML报告,分析覆盖率数据。
- 识别未覆盖到的代码区域,并补充相应的测试用例。
- 集成到持续集成/持续部署(CI/CD)流程(可选):
- 将JaCoCo集成到你的CI/CD工具链中,比如Jenkins、Travis CI、GitLab CI等。
- 在CI/CD配置中添加步骤来运行测试并生成覆盖率报告。
- 使用JaCoCo的命令行工具(可选):
- 使用JaCoCo提供的命令行工具来生成报告,如
jacoco coverage report。 - 可以配置命令行工具来与IDE或构建工具集成。
- 使用JaCoCo提供的命令行工具来生成报告,如
请注意,具体的集成步骤和配置可能会根据所使用的构建工具、IDE和项目设置有所不同。因此,建议查阅最新的JaCoCo官方文档 。
接下来我们以以Spring Boot 为例 看看如何完成集成
pom添加插件
pom.xml中增加如下配置
<build><pluginManagement><plugins><plugin><groupId>org.jacoco</groupId><artifactId>jacoco-maven-plugin</artifactId><version>0.8.8</version></plugin></plugins></pluginManagement><plugins><plugin><groupId>org.jacoco</groupId><artifactId>jacoco-maven-plugin</artifactId><executions><execution><goals><goal>prepare-agent</goal></goals></execution><execution><id>report</id><phase>test</phase><goals><goal>report</goal></goals></execution></executions></plugin></plugins>
</build>
https://www.jacoco.org/jacoco/trunk/doc/maven.html
Code Demo
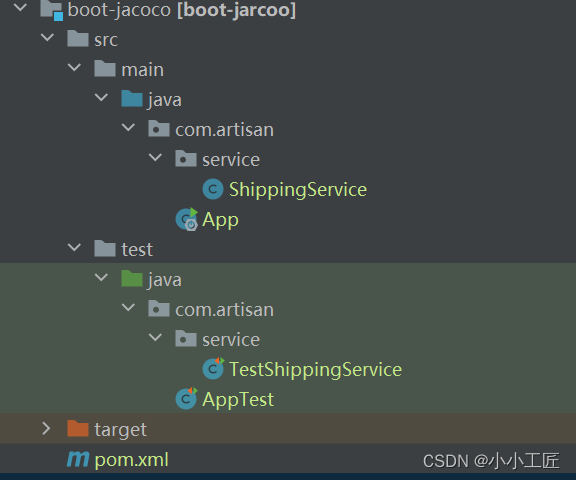
package com.artisan.service;/*** @author 小工匠* @version 1.0* @mark: show me the code , change the world*/
public class ShippingService {public int calculateShippingFee(int weight) {if (weight <= 0) {throw new IllegalStateException("Please provide correct weight");}if (weight <= 2) {return 5;} else if (weight <= 5) {return 10;}return 15;}
}
package com.artisan.service;import org.junit.jupiter.api.Test;import static org.junit.jupiter.api.Assertions.assertEquals;
import static org.junit.jupiter.api.Assertions.assertThrows;/*** @author 小工匠* @version 1.0 * @mark: show me the code , change the world*/
public class TestShippingService {@Testpublic void incorrectWeight() {ShippingService shippingService = new ShippingService();assertThrows(IllegalStateException.class, () -> shippingService.calculateShippingFee(-1));}@Testpublic void firstRangeWeight() {ShippingService shippingService = new ShippingService();assertEquals(5, shippingService.calculateShippingFee(1));}
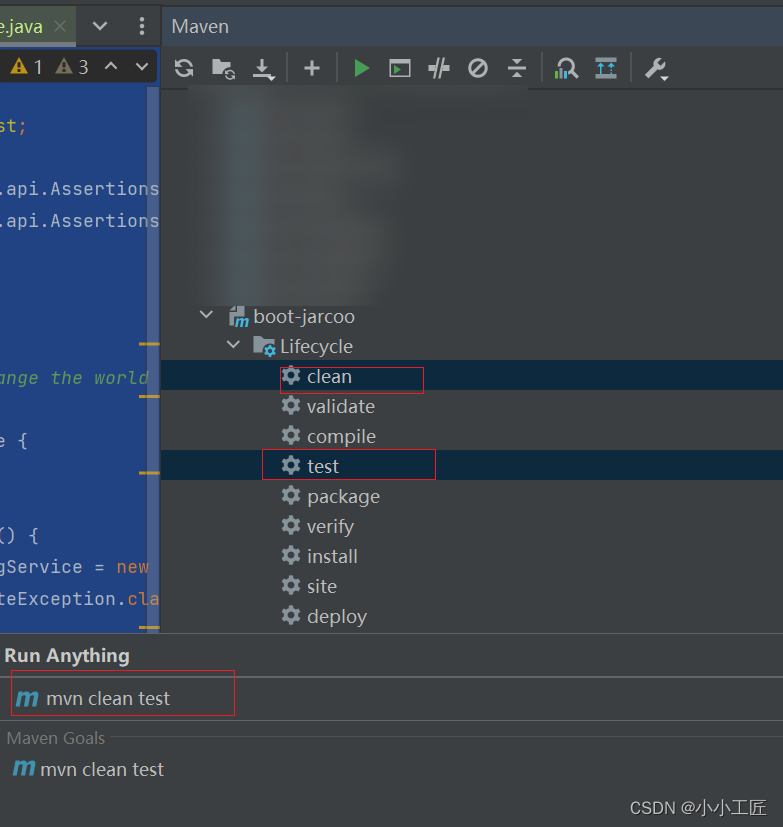
}转到 Maven,选择 clean 和 test 命令,然后选择 Run Maven Build
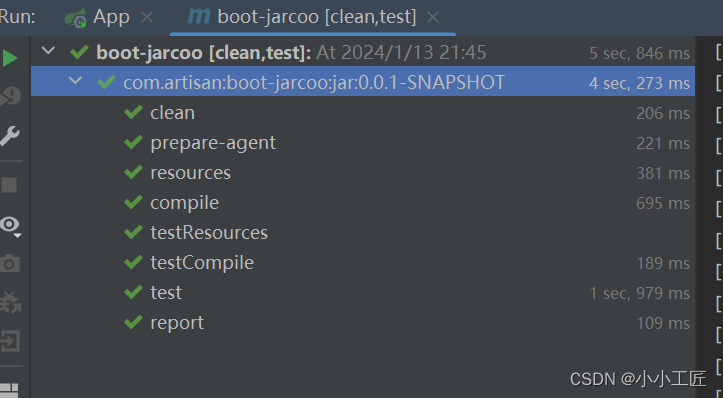
测试完成后, target/site/jacoco/index.html 包含所有输出。

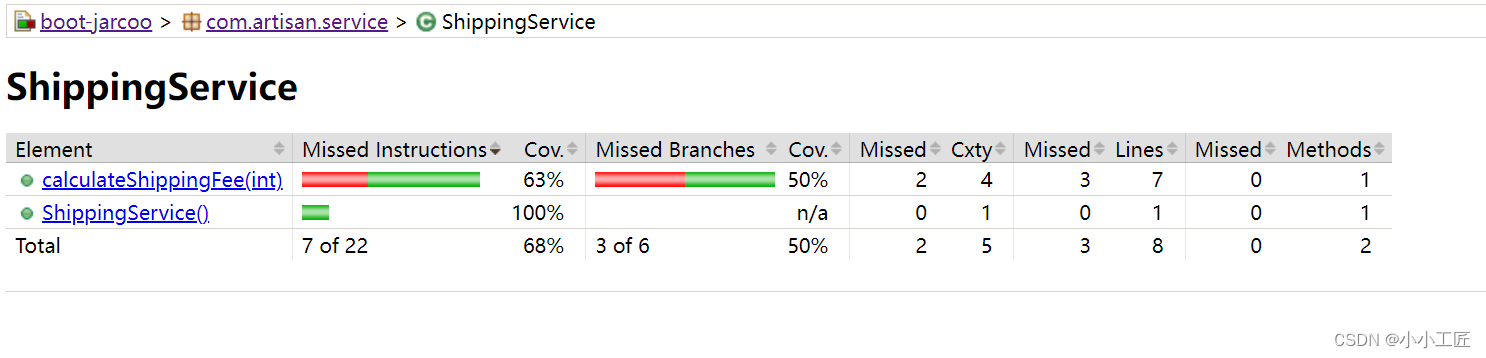
在图像中看到,boot-jarcoo是项目名称,com.artisan.service 是包。显示代码已覆盖 68%,分支已覆盖 50%。
点击com.artisan.service ,进入详情

ShippingService ,里面代码已经覆盖了 68%,分支已经覆盖了 50% 。
进入 ShippingService 类
打开 calculateShippingfee(int) 方法
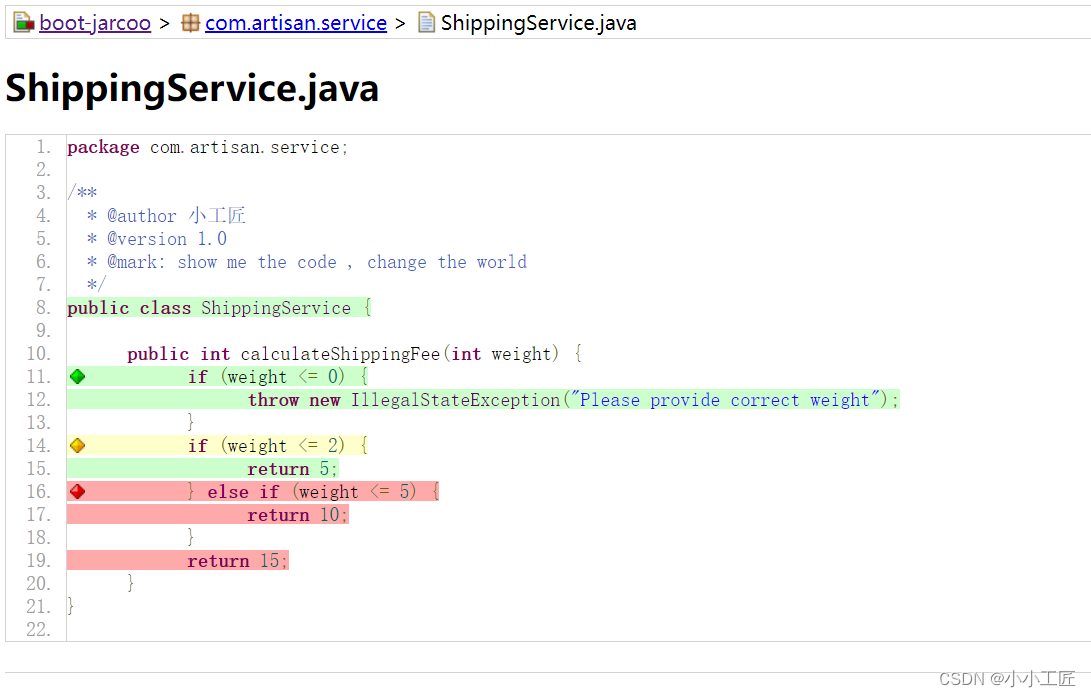
Jacoco 在这里非常清楚地展示了不同级别的覆盖范围。它使用不同颜色的菱形图标来表示分支的代码覆盖率。并使用背景颜色来表示行的代码覆盖率。
- 绿色菱形表示所有分支均已被覆盖。
- 黄色菱形意味着代码已被部分覆盖 , 一些未经测试的分支。
- 红色菱形表示测试期间没有使用任何分支。
接下来添加更多代码来覆盖部分覆盖的分支。
@Testpublic void secondRangeWeight() {ShippingService shippingService = new ShippingService();assertEquals(10, shippingService.calculateShippingFee(4));}
Run Maven Build 再次使用 clean 和 test 命令,再次在浏览器中打开 calculateShippingfee(int) 方法的测试覆盖率。
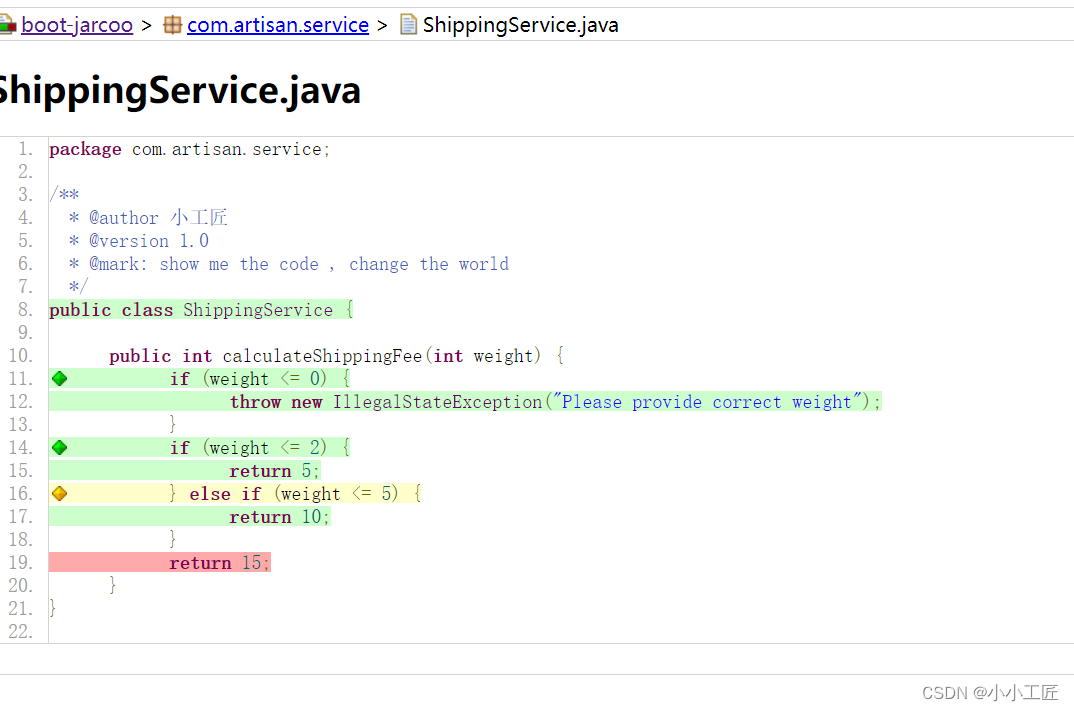
可以看到黄色钻石仍然在那里。这意味着我们还没有涵盖权重大于 5 的场景。让我们再添加一个测试用例
@Testpublic void lastRangeWeight() {ShippingService shippingService = new ShippingService();assertEquals(15, shippingService.calculateShippingFee(10));}
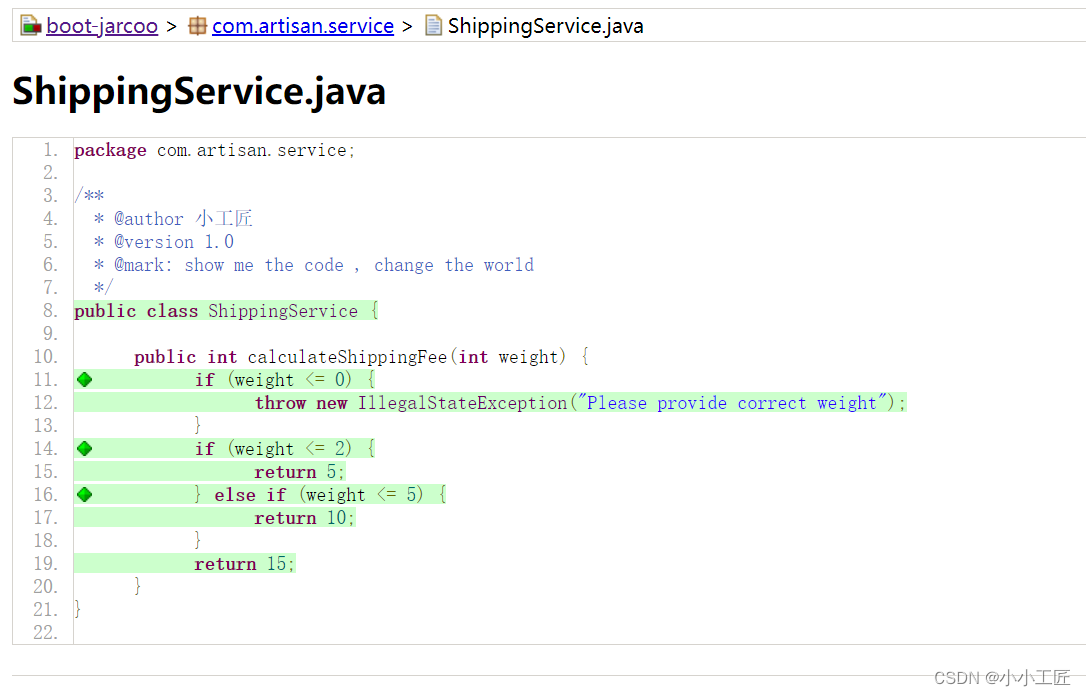
可以看到所有的场景都已经被完全覆盖了。
排除不相关的类
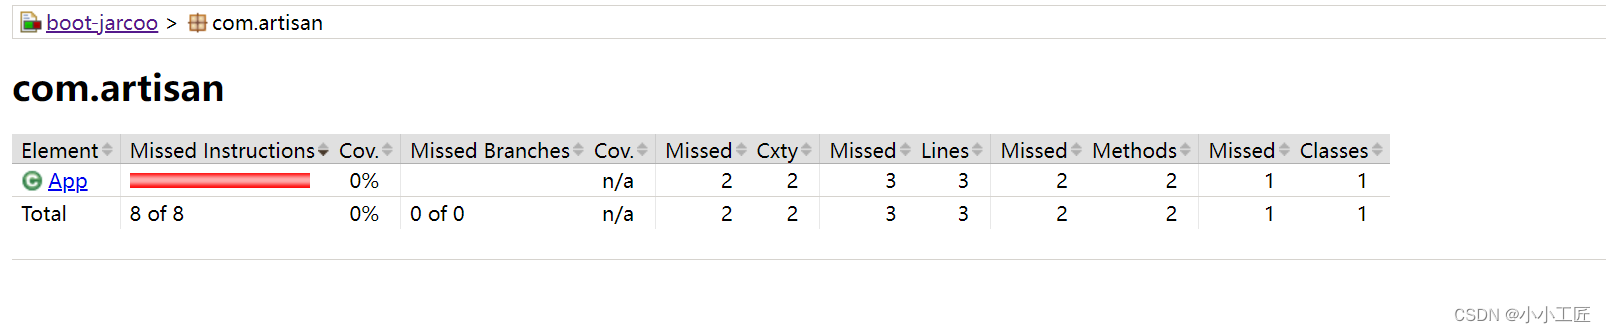
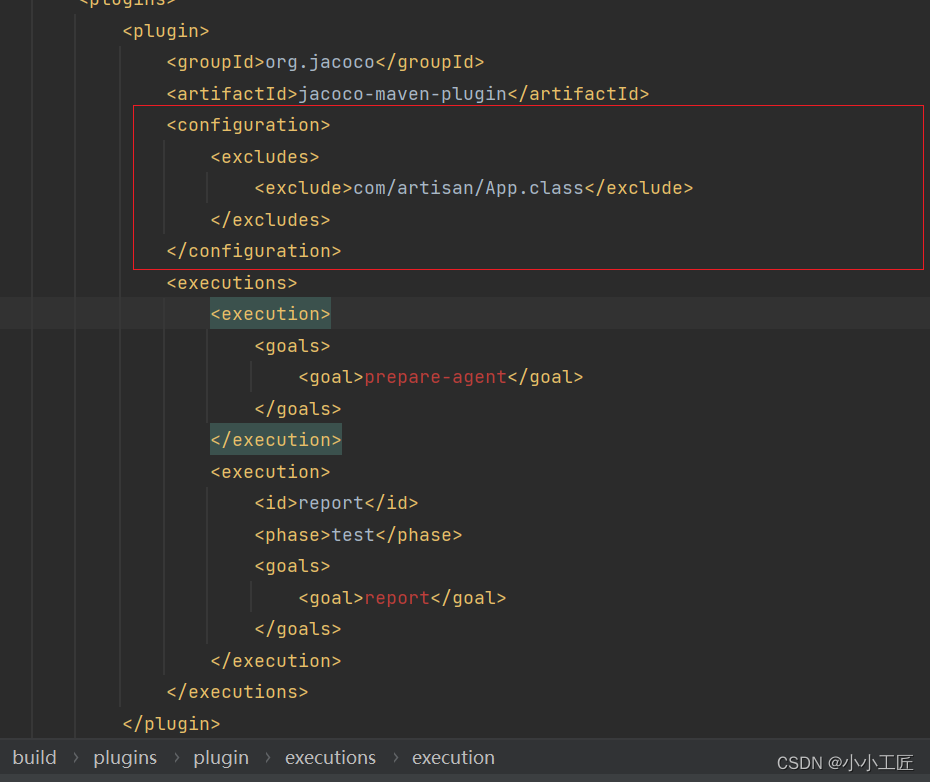
意到 App类对于覆盖率报告并不是非常重要。在某些情况下,此类的覆盖率可能会扭曲整体代码覆盖率报告。为了避免此类不相关的类影响代码覆盖率,我们可以使用Jacoco插件将其排除。
<plugins><plugin><groupId>org.jacoco</groupId><artifactId>jacoco-maven-plugin</artifactId><configuration><excludes><exclude>com/artisan/App.class</exclude></excludes></configuration>...</plugin>
</plugins>
https://www.eclemma.org/jacoco/trunk/doc/report-mojo.html#excludes
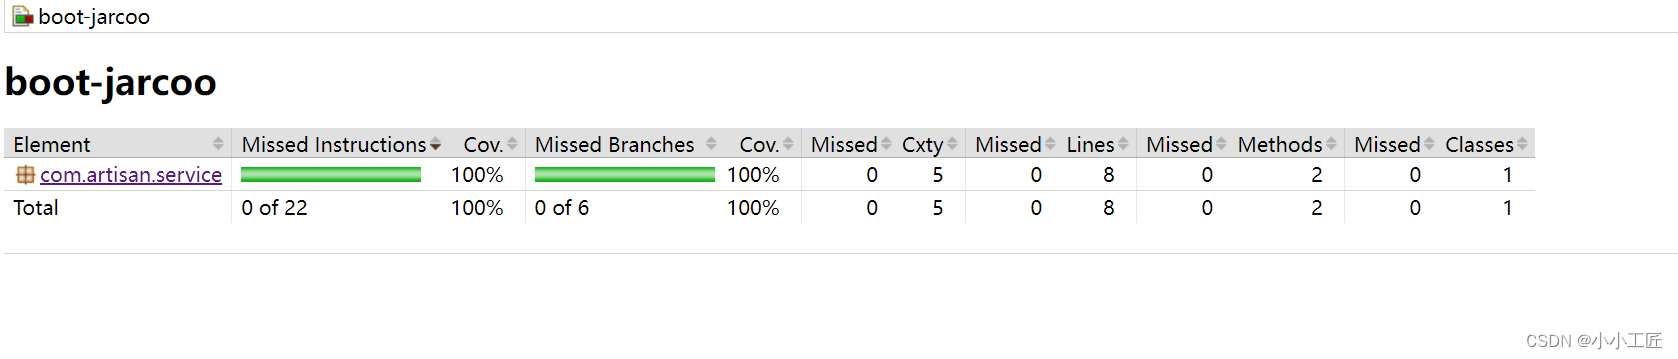
重新编译测试,得到报告
CI/CD中使用
现在假设我们使用 CI/CD 来部署代码,我们可能想验证已经完成了多少行代码覆盖率或代码覆盖率百分比等。为此,我们需要在Jacoco 插件配置
<execution><id>jacoco-check</id><goals><goal>check</goal></goals><configuration><rules><rule><element>PACKAGE</element><limits><limit><counter>LINE</counter><value>COVEREDRATIO</value><minimum>90%</minimum></limit></limits></rule></rules></configuration>
</execution>
在此执行中,我们添加了一条规则。规则是,对于 PACKAGE,计数应为 LINE,并且 LINE 覆盖率最小应为 90%.
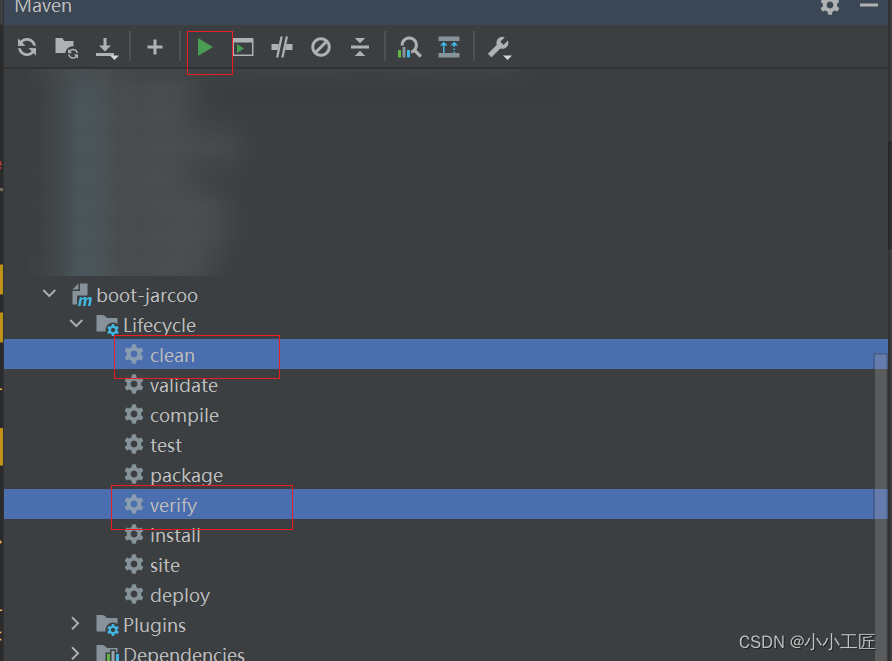
转到 Maven,选择 clean 和 verify 命令,然后选择 Run Maven Build 进行检查。
为了验证这个功能,我们先去掉
@Testpublic void secondRangeWeight() {ShippingService shippingService = new ShippingService();assertEquals(10, shippingService.calculateShippingFee(4));}@Testpublic void lastRangeWeight() {ShippingService shippingService = new ShippingService();assertEquals(15, shippingService.calculateShippingFee(10));}
再 选择 clean 和 verify 命令,然后选择 Run Maven Build 进行检查。

可以看到它失败了。原因清楚地表明违反了规则“线路覆盖率为0.62,但预期最小值为0.90”。
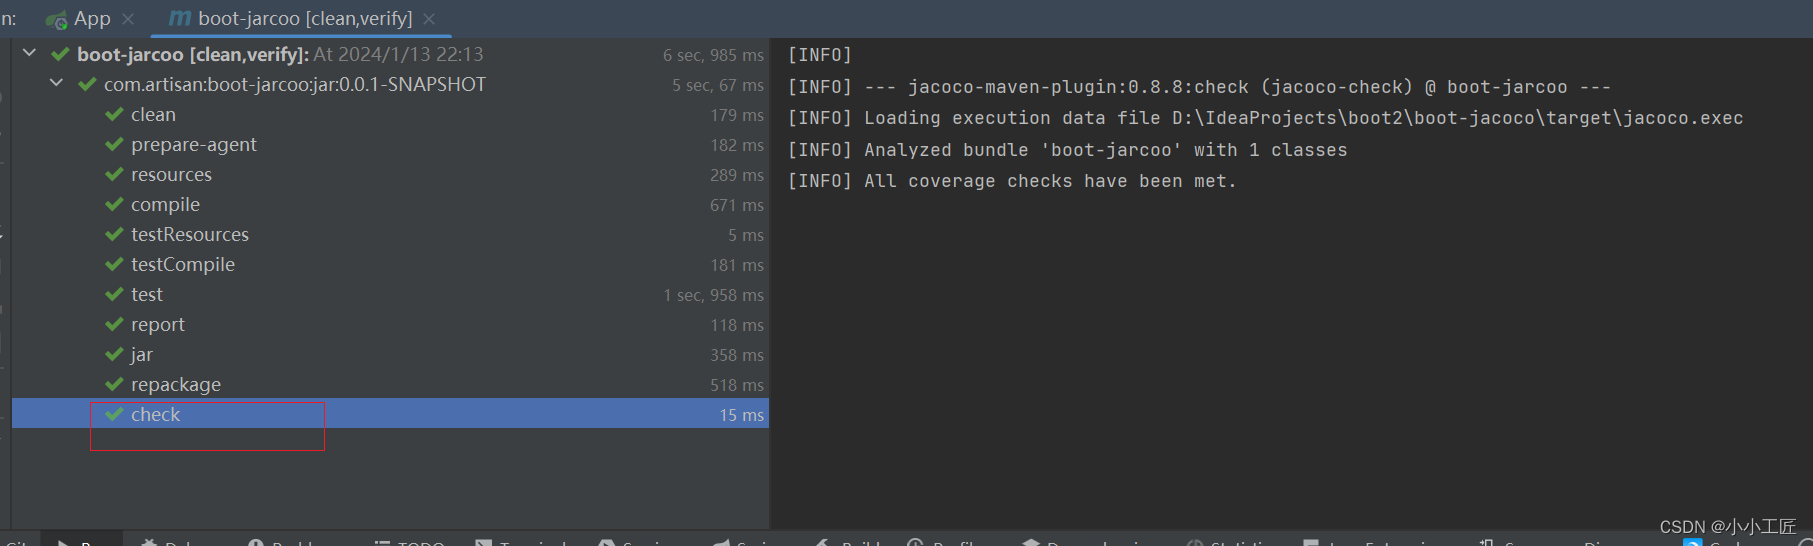
现在让我们更新 LINE 覆盖率最小值为 60%,然后再次运行。
完整POM
<project xmlns="http://maven.apache.org/POM/4.0.0" xmlns:xsi="http://www.w3.org/2001/XMLSchema-instance"xsi:schemaLocation="http://maven.apache.org/POM/4.0.0 http://maven.apache.org/xsd/maven-4.0.0.xsd"><parent><artifactId>boot2</artifactId><groupId>com.artisan</groupId><version>0.0.1-SNAPSHOT</version></parent><modelVersion>4.0.0</modelVersion><artifactId>boot-jarcoo</artifactId><packaging>jar</packaging><name>boot-jarcoo</name><url>http://maven.apache.org</url><properties><project.build.sourceEncoding>UTF-8</project.build.sourceEncoding></properties><dependencies><dependency><groupId>org.springframework.boot</groupId><artifactId>spring-boot-starter</artifactId></dependency><dependency><groupId>org.springframework.boot</groupId><artifactId>spring-boot-starter-web</artifactId></dependency><dependency><groupId>junit</groupId><artifactId>junit</artifactId><version>4.13.2</version><scope>test</scope></dependency><dependency><groupId>org.springframework.boot</groupId><artifactId>spring-boot-starter-test</artifactId><scope>test</scope></dependency></dependencies><build><pluginManagement><plugins><plugin><groupId>org.jacoco</groupId><artifactId>jacoco-maven-plugin</artifactId><version>0.8.8</version></plugin></plugins></pluginManagement><plugins><plugin><groupId>org.jacoco</groupId><artifactId>jacoco-maven-plugin</artifactId><configuration><excludes><exclude>com/artisan/App.class</exclude></excludes></configuration><executions><execution><goals><goal>prepare-agent</goal></goals></execution><execution><id>jacoco-check</id><goals><goal>check</goal></goals><configuration><rules><rule><element>PACKAGE</element><limits><limit><counter>LINE</counter><value>COVEREDRATIO</value><minimum>60%</minimum></limit></limits></rule></rules></configuration></execution><execution><id>report</id><phase>test</phase><goals><goal>report</goal></goals></execution></executions></plugin></plugins></build>
</project>
这篇关于Spring Boot - JaCoCo Code Coverage的文章就介绍到这儿,希望我们推荐的文章对编程师们有所帮助!


