本文主要是介绍《ORANGE’S:一个操作系统的实现》读书笔记(二十九)文件系统(四),希望对大家解决编程问题提供一定的参考价值,需要的开发者们随着小编来一起学习吧!
上一篇文章完善了硬盘驱动程序,并且完成了一个文件系统。这篇文章开始记录对文件的操作,首先记录如何创建一个文件。
目录
创建文件
Linux 下的文件操作
文件描述符(file descriptor)
open()
创建文件所涉及的其它函数
strip_path()
search_file()
get_inode()和sync_inode()
init_fs()
read_super_block()和get_super_block()
关闭文件
查看已创建的文件
创建文件
我们现在已经有了一个文件系统存在于我们的虚拟磁盘上。但是这仅仅是个静态的系统,我们还无法对文件进行添加、删除、修改等操作,而且现在磁盘上还没有一个真正的“普通”文件。不过有了我们这个初级形态的文件系统,接下来只需要一步一步来做就好了。
Linux 下的文件操作
要进行修改和删除操作,首先要有文件才行,所以第一步我们先写代码来创建文件。不过我们同时要考虑文件系统的对外接口,因为文件系统并不“主动”对文件进行操作,它总是根据用户进程的请求而做相应的工作。我们不妨先看一下在Linux系统下用系统调用来进行文件操作的过程,代码如下所示。
代码 tmp/f.c,Linux下用系统调用读写文件。
#include <stdio.h>
#include <sys/types.h>
#include <sys/stat.h>
#include <fcntl.h>
#include <string.h>
#include <assert.h>int main()
{int fd;int n;const char filename[] = "blah";const char bufw[] = "abcde";const int rd_bytes = 3;char bufr[rd_bytes];assert(rd_bytes <= strlen(bufw));/* create & write */fd = open(filename, O_CREAT | O_RDWR | O_TRUNC, 0644);if (fd == -1) {printf("failed to open %s\n", filename);return 1;}n = write(fd, bufw, strlen(bufw));if (n != strlen(bufw)) {printf("failed to write to %s\n", filename);close(fd);return 2;}close(fd);/* open & read */fd = open(filename, O_RDWR);if (fd == -1) {printf("failed to open %s\n", filename);return 3;}n = read(fd, bufr, rd_bytes);if (n != rd_bytes) {printf("failed to read from %s\n", filename);close(fd);return 4;}bufr[n] = 0;printf("%d bytes read: %s\n", n, bufr);close(fd);return 0;
}
这是一段非常简单的对文件进行创建、读写以及关闭的代码,其中用到了open()、write()、read()、close()等几个系统调用。显然,如果我们的文件系统向用户进程提供服务的话,也要实现这些系统调用,所以我们最好模仿一下它们的行为。它的声明如下:
int open(const char *pathname, int flags, mode_t mode);
ssize_t write(int fd, const void *buf, size_t count);
ssize_t read(int fd, void *buf, size_t count);
int close(int fd);
接下来,我们要做的就是实现这些系统调用,只是在功能上,我们将做的简单一些。
文件描述符(file descriptor)
Linux系统文件操作都使用到了一个变量(或者返回值),那就是fd,即“file descriptor”,是它“代表”了一个文件,理所应当地充当了整个过程中最重要的角色。如果对它不是很了解的情况下,下图可以帮助建立一点初步的认识。
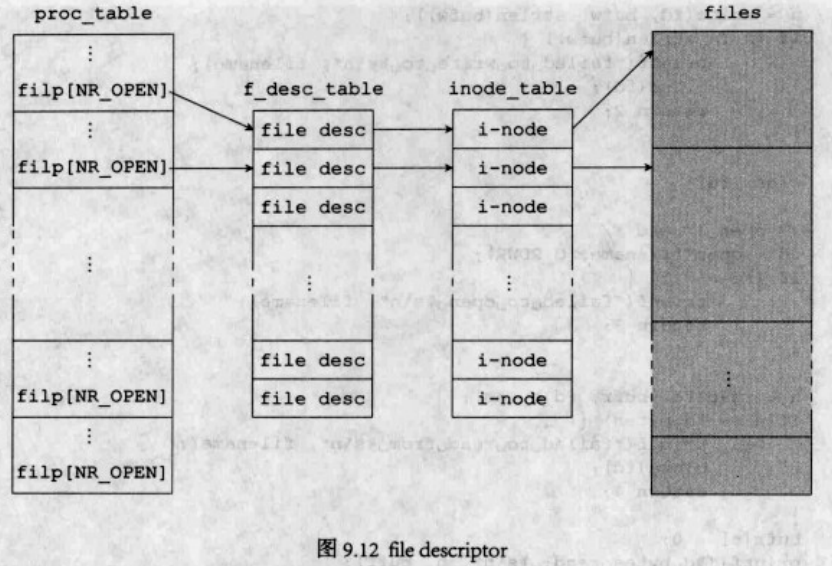
该图描述的是我们即将使用的文件操作方案。每个进程表中都将增加一个filp数组,其成员是指向file descriptor(下文简称fd)的指针。每一个使用中的fd都具有一个指针指向一个inode结构体,而由这个inode结构体可以找到具体的文件。
现在我们来修改进程表,在进程表中添加filp数组。
代码 include/proc.h,修改进程表。
typedef struct s_proc {
...struct file_desc * filp[NR_FILES];
}PROCESS;
我们的fd的定义代码如下所示。
代码 include/fs.h,file descriptor。
/*** @struct file_desc* @brief Pile Descriptor*/
struct file_desc {int fd_mode;                /*< R or W */int fd_pos;                 /*< Current position for R/W */struct inode* fd_inode;     /*< Ptr to the i-node  */
};
这是一个简单的结构体,fd_mode用来记录这个fd是用来做什么操作的,比如读、写,或是既读又写。fd_pos用来记录读写到了文件的什么位置。fd_inode便是指向inode的指针了。
每当一个进程打开一个文件——无论是打开一个已存在的还是创建一个新的,该进程的进程表的filp数组中就会分配一个位置——假设是k,用于存放打开文件的fd指针,而这个k就是返回给用户进程的open()函数的返回值了。这便是我们在代码中看到的变量fd的真正含义——它其实是一个数组下标,循着这个下标,系统可以找到用以描述文件的数据结构。
这里可能会有疑问,既然三部分要连接起来,我们为何不将它们合并起来呢?这个问题可以从两方面考虑。一方面f_desc_table[]和inode_table[]不能合并,我们不能把fd_mode和fd_pos等值塞入i-node,因为不同的进程可以打开同一个文件,而且打开之后可能进行不同的操作——比如读取其不同的位置,所以合并后两个表是行不通的。另一方面,我们也不能将f_desc_table[]直接放入进程表。
open()
现在我们可以着手编写open()了。我们先在用户进程中装模作样地创建一个文件:
代码 kernel/main.c,创建一个文件。
void TestA()
{int fd = open("/blah", O_CREAT);printf("fd: %d\n", fd);close(fd);spin("TestA");
}
跟Linux中的open()系统调用不同,这里我们只用了两个参数,第三个参数我们省略了,访问权限等问题以后再考虑。
调用了open(),但我们压根儿还没有这个函数呢,现在就来创建一个,代码如下。
代码 lib/open.c,open(),这是新建的文件。
/*** open/create a file.* * @param pathname  The full path of the file to be opened/created.* @param flags     O_CREAT, O_RDWR, etc.* * @return File descriptor if successful, otherwise -1.*/
PUBLIC int open(const char *pathname, int flags)
{MESSAGE msg;msg.type = OPEN;msg.PATHNAME = (void*)pathname;msg.FLAGS = flags;msg.NAME_LEN = strlen(pathname);send_recv(BOTH, TASK_FS, &msg);assert(msg.type == SYSCALL_RET);return msg.FD;
}
我们发送了一个OPEN消息给文件系统,所以文件系统需要处理它:
代码 fs/main.c,文件系统处理OPEN消息。
/*** <Ring 1> The main loop of TASK FS.*/
PUBLIC void task_fs()
{printl("Task FS begins.\n");init_fs();while (1) {send_recv(RECEIVE, ANY, &fs_msg);int src = fs_msg.source;pcaller = &proc_table[src];switch (fs_msg.type) {case OPEN:fs_msg.FD = do_open();break;case CLOSE:fs_msg.RETVAL = do_close();break;default:dump_msg("FS::unknown message:", &fs_msg);assert(0);break;}/* reply */fs_msg.type = SYSCALL_RET;send_recv(SEND, src, &fs_msg);}
}
这里我们用一个专门的函数do_open()来处理OPEN消息,代码如下:
代码 fs/open.c,do_open,这是新建的文件。
/*** Open a file and return the file descriptor.* * @return File descriptor if successful, otherwise a negative error code.*/
PUBLIC int do_open()
{int fd = -1; /* return value */char pathname[MAX_PATH];/* get parameters from the message */int flags = fs_msg.FLAGS;       /* access mode */int name_len = fs_msg.NAME_LEN; /* length of filename */int src = fs_msg.source;        /* caller proc nr. */assert(name_len < MAX_PATH);phys_copy((void*)va2la(TASK_FS, pathname),(void*)va2la(src, fs_msg.PATHNAME),name_len);pathname[name_len] = 0;/* fint a free slot in PROCESS::flip[] */int i;for (i = 0; i < NR_FILES; i++) {if (pcaller->filp[i] == 0) {fd = i;break;}}if ((fd < 0) || (fd >= NR_FILES)) {panic("filp[] is full (PID:%d)", proc2pid(pcaller));}/* find a free slot in f_desc_table[] */for (i = 0; i < NR_FILE_DESC; i++) {if (f_desc_table[i].fd_inode == 0) {break;}}if (i >= NR_FILE_DESC) {panic("f_desc_table[] is full (PID:%d)", proc2pid(pcaller));}int inode_nr = search_file(pathname);struct inode * pin = 0;if (flags & O_CREAT) {if (inode_nr) {printl("file exists.\n");return -1;} else {pin = create_file(pathname, flags);}} else {assert(flags & O_RDWR);char filename[MAX_PATH];struct inode * dir_inode;if (strip_path(filename, pathname, &dir_inode) != 0) {return -1;}pin = get_inode(dir_inode->i_dev, inode_nr);}if (pin) {/* connects proc with file_descriptor */pcaller->filp[fd] = &f_desc_table[i];/* connects file_descriptor with inode */f_desc_table[i].fd_inode = pin;f_desc_table[i].fd_mode = flags;f_desc_table[i].fd_pos = 0;int imode = pin->i_mode & I_TYPE_MASK;if (imode == I_CHAR_SPECIAL) {MESSAGE driver_msg;driver_msg.type = DEV_OPEN;int dev = pin->i_start_sect;driver_msg.DEVICE = MINOR(dev);assert(MAJOR(dev) == 4);assert(dd_map[MAJOR(dev)].driver_nr != INVALID_DRIVER);send_recv(BOTH, dd_map[MAJOR(dev)].driver_nr, &driver_msg);} else if (imode == I_DIRECTORY) {assert(pin->i_num == ROOT_INODE);} else {assert(pin->i_mode == I_REGULAR);}} else {return -1;}return fd;
}/*** Create a file and return it's inode ptr.* * @param[in] path  The full path of the new file* @param[in] flags Attributes of the new file* * @return Ptr to i-node of the new file if successful, otherwise 0.* * @see open()* @see do_open()*/
PRIVATE struct inode * create_file(char * path, int flags)
{char filename[MAX_PATH];struct inode * dir_inode;if (strip_path(filename, path, &dir_inode) != 0) {return 0;}int inode_nr = alloc_imap_bit(dir_inode->i_dev);int free_sect_nr = alloc_smap_bit(dir_inode->i_dev, NR_DEFAULT_FILE_SECTS);struct inode * newino = new_inode(dir_inode->i_dev, inode_nr, free_sect_nr);new_dir_entry(dir_inode, newino->i_num, filename);return newino;
}
do_open()首先是从消息内读出各项参数,其中需要格外注意是文件名的读取。由于跨越了两个特权级,所以得到文件名需要付出额外的两份努力。一是需要事先记下文件名的长度,二是需要用phys_copy()来复制一份。
前面说过,open()要返回的是进程表filp[]内的一个索引,所以一开始我们就在filp[]内寻找一个空项,用来存放即将打开的文件fd。由于filp[]内只保存指针,所以我们还要从f_desc_table[]中找一个空项。这两项工作做完之后,我们调用search_file()来看看要打开的文件是否已经存在。其中的具体细节暂时略过,只需要知道这个函数将返回零,因为我们要创建的文件肯定不存在。
接下来是调用create_file(),这是真正来创建文件的函数了。一个文件在文件系统中涉及的要素有五个:
- 文件内容(数据)所占用扇区;
- i-node;
- i-node在inode-map中占用一位;
- 数据扇区在sector-map中占用的一位或多位;
- 文件在目录中占用的目录项(dir entry)。
相应地,我们创建一个文件,需要做以下几项工作:
- 为文件内容(数据)分配扇区;
- 在inode_array中分配一个i-node;
- 在inode-map中分配一位;
- 在sector-map中分配一位或多位;
- 在相应目录中写入一个目录项(dir entry)。
在create_file()中,这几项工作分别是由四个函数来完成的:
- alloc_imap_bit() 在inode-map中分配一位,这也意味着新文件的i-node有了确定的位置。
- alloc_smap_bit() 在sector-map中分配多位,这也意味着为文件内容分配了扇区。
- new_inode() 在inode_array中分配一个i-node,并写入内容。
- new_dir_entry() 在相应目录中写入一个目录项(dir entry)。
这四个函数的定义如下代码所示。
代码 fs/open.c,创建文件需要的函数。
/*** Allocate a bit in inode-map.* * @param dev   In which device the inode-map is located.* * @return I-node nr.*/
PRIVATE int alloc_imap_bit(int dev)
{int inode_nr = 0;int i, j, k;int imap_blk0_nr = 1 + 1; /* 1 boot sector & 1 super block */struct super_block * sb = get_super_block(dev);for (i = 0; i < sb->nr_imap_sects; i++) {RD_SECT(dev, imap_blk0_nr + i);for (j = 0; j < SECTOR_SIZE; j++) {/* skip '11111111' bytes */if (fsbuf[j] == 0xFF) {continue;}/* skip '1' bits */for (k = 0; ((fsbuf[j] >> k) & 1) != 0; k++) {}/* i: sector index; j: byte index; k: bit index */inode_nr = (i * SECTOR_SIZE + j) * 8 + k;fsbuf[j] |= (1 << k);/* write the bit to imap */WR_SECT(dev, imap_blk0_nr + i);break;}return inode_nr;}/* no free bit in imap */panic("inode-map is probably full.\n");return 0;
}/*** Allocate a bit in sector-map.* * @param dev               In which device the sector-map is located.* @param nr_sects_to_alloc How many sectors are allocated.* * @return The 1st sector nr allocated.*/
PRIVATE int alloc_smap_bit(int dev, int nr_sects_to_alloc)
{int i; /* sector index */int j; /* byte index */int k; /* bit index */struct super_block * sb = get_super_block(dev);int smap_blk0_nr = 1 + 1 + sb->nr_imap_sects;int free_sect_nr = 0;for (i = 0; i < sb->nr_smap_sects; i++) { /* smap_blk0_nr + 1: current sect nr. */RD_SECT(dev, smap_blk0_nr + 1);/* byte offset in current sect */for (j = 0; j < SECTOR_SIZE && nr_sects_to_alloc > 0; j++) {k = 0;if (!free_sect_nr) {/* loop until a free bit is found */if (fsbuf[j] == 0xFF) {continue;}for (; ((fsbuf[j] >> k) & 1) != 0; k++) {}free_sect_nr = (i * SECTOR_SIZE + j) * 8 + k - 1 + sb->n_1st_sect;}for (; k < 8; k++) { /* repeat till enough bits are set */assert(((fsbuf[j] >> k) & 1) == 0);fsbuf[j] |= (1 << k);if (--nr_sects_to_alloc == 0) {break;}}}if (free_sect_nr) { /* free bit found, write the bits to smap */WR_SECT(dev, smap_blk0_nr + i);}if (nr_sects_to_alloc == 0) {break;}}assert(nr_sects_to_alloc == 0);return free_sect_nr;
}/*** Generate a new i-node and write it to disk.* * @param dev           Home device of the i-node.* @param inode_nr      I-node nr.* @param start_sect    Start sector of the file pointed by the new i-node.* * @return Ptr of the new i-node.*/
PRIVATE struct inode * new_inode(int dev, int inode_nr, int start_sect)
{struct inode * new_inode = get_inode(dev, inode_nr);new_inode->i_mode = I_REGULAR;new_inode->i_size = 0;new_inode->i_start_sect = start_sect;new_inode->i_nr_sects = NR_DEFAULT_FILE_SECTS;new_inode->i_dev = dev;new_inode->i_cnt = 1;new_inode->i_num = inode_nr;/* write to the inode array */sync_inode(new_inode);return new_inode;
}/*** Write a new entry into the directory.* * @param dir_inode     I-node of the directory.* @param inode_nr      I-node nr of the new file.* @param filename      Filename of the new file.*/
PRIVATE void new_dir_entry(struct inode * dir_inode, int inode_nr, char * filename)
{/* write the dir_entry */int dir_blk0_nr = dir_inode->i_start_sect;int nr_dir_blks = (dir_inode->i_size + SECTOR_SIZE) / SECTOR_SIZE;int nr_dir_entries = dir_inode->i_size / DIR_ENTRY_SIZE; /* including unused slots (the file has been deleted but the slot is still there) */int m = 0;struct dir_entry * pde;struct dir_entry * new_de = 0;int i, j;for (i = 0; i < nr_dir_blks; i++) {RD_SECT(dir_inode->i_dev, dir_blk0_nr + i);pde = (struct dir_entry *)fsbuf;for (j = 0; j < SECTOR_SIZE / DIR_ENTRY_SIZE; j++, pde++) {if (++m > nr_dir_entries) {break;}if (pde->inode_nr == 0) { /* it's a free slot */new_de = pde;break;}}if (m > nr_dir_entries || /* all entryies have been iterated or */new_de) {             /* free slot is found */break;}}if (!new_de) { /* reached the end of the dir */new_de = pde;dir_inode->i_size += DIR_ENTRY_SIZE;}new_de->inode_nr = inode_nr;strcpy(new_de->name, filename);/* write dir block -- ROOT dir block */WR_SECT(dir_inode->i_dev, dir_blk0_nr + i);/* update dir inode */sync_inode(dir_inode);
}
alloc_imap_bit()和alloc_smap_bit()都是对位图的操作。值得注意的是在sector-map中分配扇区时我们没有考虑“空洞太小”的情况,或者说,我们一旦找到一个未使用的扇区,就认为以它为开头存在连续的nr_sects_to_alloc个扇区。我们这样假设是有道理的,一方面,参数nr_sects_to_alloc应该始终为NR_DEFAULT_FILE_SECTS或者它的倍数,另一方面,只要我们每次都这样分配磁盘,那么理论上,除非在一块磁盘的结尾处,我们不会遇到一处小于NR_DEFAULT_FILE_SECTS的连续扇区。
new_inode()和new_dir_entry()相对简单一些,都是将相应的项赋值后马上写回磁盘,保持内存和磁盘的数据一致。
在do_open()中,调用create_file()之后文件其实就已经创建完毕了,之所以函数没有立刻结束,是因为创建完之后立即进行了“打开”操作,对照图9.12可知,之后是起到连接进程表、f_desc_table[]和inode_table[]的作用,三部分连接起来之后,文件就认为是被“打开”了。然后对文件属性进行判断,如果是字符设备特殊文件的话就交给相应的驱动程序,至于交给哪个驱动程序是由文件的设备号决定的,它实际上应该是TTY进程。我们现在还没有用过特殊文件,所以这段代码暂时不会执行。
到这里,创建文件的主要过程已经清楚了,最核心的函数其实就是由do_open()调用的create_file()。了解了这个主干,我们接下来看看其中涉及的一些细枝末节。
创建文件所涉及的其它函数
strip_path()
首先看看create_file()中用到的strip_path(),代码如下所示。
代码 fs/misc.c,strip_path(),这是新建的文件。
/*** Get the basename from the fullpath* * In Orange'S FS v1.0, all files are stored in the root dirctory.* There is no sub-folder thing.* * This routine should be called at the very beginning of file operations * such as open(), read() and write(). It accepts the full path and returns * two things: the basename and a ptr of the root dir's i-node.* * e.g. After strip_path(filename, "/blah", ppinode) finishes, we get:*      - filename: "blan"*      - *ppinode: root_inode*      - ret val: 0 (successful)* * Currently an acceptable pathname should begin with at most one '/' preceding a filename.* * Filenames may contain any character except '/' and '\\0'.* * @param[out]  filename The String for the result.* @param[in]   pathname The full pathname.* @param[out]  ppinode  The ptr of the dir's inode will be stored here.* * @return Zero if success, otherwise the pathname is not valid.*/
PUBLIC int strip_path(char * filename, const char * pathname, struct inode** ppinode)
{const char * s = pathname;char * t = filename;if (s == 0) {return -1;}if (*s == '/') {s++;}while (*s) { /* check each character */if (*s == '/') {return -1;}*t++ = *s++;/* if filename is too long, just truncate it */if (t - filename >= MAX_FILENAME_LEN) {break;}}*t = 0;*ppinode = root_inode;return 0;
}
虽然函数名有点晦涩,但代码做的事情很简单:把路径分成文件名和文件夹两部分。比如strip_path(filename, path, &dir_inode)中path是文件的路径,是输入,filename和dir_inode都是输出。函数调用成功之后,filename里将包含“纯文件名”,即不含路径的文件名,dir_inode这个inode指针将指向文件所在文件夹的i-node。
一言蔽之,strip_path()的主要作用便是定位直接包含给定文件的文件夹,并得到给定文件夹在此文件夹中的名称。由于当前我们的文件系统是扁平的,所以这个函数返回之后dir_inode指向的将永远是根目录“/”的i-node。
search_file()
我们前面遇到这个函数时将它略过了,因为它其实是为下一步打开文件的操作而准备的,代码如下所示。
代码 fs/misc.c,search_file()。
/*** Search the file and return the inode_nr.* * @param[in] path  The full path of the file to search.* @return          Ptr to the i-node of the file if successful, otherwise zero.* * @see open()* @see do_open()*/
PUBLIC int search_file(char * path)
{int i, j;char filename[MAX_PATH];memset(filename, 0, MAX_FILENAME_LEN);struct inode * dir_inode;if (strip_path(filename, path, &dir_inode) != 0) {return 0;}if (filename[0] == 0) { /* path: "/" */return dir_inode->i_num;}/* Search the dir for the file */int dir_blk0_nr = dir_inode->i_start_sect;int nr_dir_blks = (dir_inode->i_size + SECTOR_SIZE - 1) / SECTOR_SIZE;int nr_dir_entries = dir_inode->i_size / DIR_ENTRY_SIZE; /* including unused slots(the file has been deleted but the slot is still there) */int m = 0;struct dir_entry * pde;for (i = 0; i < nr_dir_blks; i++) {RD_SECT(dir_inode->i_dev, dir_blk0_nr + i);pde = (struct dir_entry *)fsbuf;for (j = 0; j < SECTOR_SIZE / DIR_ENTRY_SIZE; j++, pde++) {if (memcmp(filename, pde->name, MAX_FILENAME_LEN) == 0) {return pde->inode_nr;}if (++m > nr_dir_entries) {break;}}if (m > nr_dir_entries) { /* all entries have been iterated */break;}}/* file not found */return 0;
}
我们还是通过strip_path()来得到文件所在目录的i-node,通过这个i-node来得到目录所在的扇区,然后读取这些扇区,查看里面是否有我们要找的文件,如果找到就返回文件的i-node,如果没找到就返回零。
这里使用了一个memcmp()比较相等的函数,它的具体定义如下所示。
代码 lib/misc.c,memcmp()。
/*** Compare memory areas.* * @param s1  The 1st area.* @param s2  The 2nd area.* @param n   The first n bytes will be compared.* * @return  an integer less than, equal to, or greater than zero if the first*          n bytes of s1 is found, respectively, to be less than, to match,*          or  be greater than the first n bytes of s2.*/
PUBLIC int memcmp(const void * s1, const void *s2, int n)
{if ((s1 == 0) || (s2 == 0)) { /* for robustness */return (s1 - s2);}const char * p1 = (const char *)s1;const char * p2 = (const char *)s2;int i;for (i = 0; i < n; i++,p1++,p2++) {if (*p1 != *p2) {return (*p1 - *p2);}}return 0;
}
get_inode()和sync_inode()
对于文件而言,i-node无疑是其灵魂,在对文件操作的过程中,从打开到关闭,我们始终需要面对i-node。在这里,我们用了一个缓冲区来存放系统中所有的i-node:inode_table[]。当我们需要用到一个i-node时,我们就在inode_table[]中找一个位置将它放进去,所用到的函数便是这个get_inode,代码如下所示。
代码 fs/main.c,get_inode()。
/*** <Ring 1> Get the inode ptr of given inode nr. A cache -- inode_table[] -- is * maintained to make things faster. If the inode requested is already there,* just return it. Otherwise the inode will be read from the disk.* * @param dev   Device nr.* @param num   I-node nr.* * @return The inode ptr requested.*/
PUBLIC struct inode * get_inode(int dev, int num)
{if (num == 0) {return 0;}struct inode * p;struct inode * q = 0;for (p = &inode_table[0]; p < &inode_table[NR_INODE]; p++) {if (p->i_cnt) { /* not a free slot */if ((p->i_dev == dev) && (p->i_num == num)) {/* this is the inode we want */p->i_cnt++;return p;}} else { /* a free slot */if (!q) { /* q hasn't been assigned yet */q = p; /* q <- the 1st free slot */}}}if (!q) {panic("the inode table is full");}q->i_dev = dev;q->i_num = num;q->i_cnt = 1;struct super_block * sb = get_super_block(dev);int blk_nr = 1 + 1 + sb->nr_imap_sects + sb->nr_smap_sects + ((num - 1) / (SECTOR_SIZE / INODE_SIZE));RD_SECT(dev, blk_nr);struct inode * pinode = (struct inode*)((u8*)fsbuf + ((num - 1) % (SECTOR_SIZE / INODE_SIZE)) * INODE_SIZE);q->i_mode = pinode->i_mode;q->i_size = pinode->i_size;q->i_start_sect = pinode->i_start_sect;q->i_nr_sects = pinode->i_nr_sects;return q;
}/*** Decrease the reference nr of a slot in inode_table[]. When the nr reaches * zero, it means the inode is not used any more and can be overwritten by * a new inode.* * @param pinode    I-node ptr.*/
PUBLIC void put_inode(struct inode * pinode)
{assert(pinode->i_cnt > 0);pinode->i_cnt--;
}/*** <Ring 1> Write the inode back to the disk. Commonly invoked as soon as the *          inode is changed.* * @param p I-node ptr*/
PUBLIC void sync_inode(struct inode * p)
{struct inode * pinode;struct super_block * sb = get_super_block(p->i_dev);int blk_nr = 1 + 1 + sb->nr_imap_sects + sb->nr_smap_sects + ((p->i_num - 1) / (SECTOR_SIZE / INODE_SIZE));RD_SECT(p->i_dev, blk_nr);pinode = (struct inode*)((u8*)fsbuf + (((p->i_num - 1) % (SECTOR_SIZE / INODE_SIZE)) * INODE_SIZE));pinode->i_mode = p->i_mode;pinode->i_size = p->i_size;pinode->i_start_sect = p->i_start_sect;pinode->i_nr_sects = p->i_nr_sects;WR_SECT(p->i_dev, blk_nr);
}
如果一个inode已经被读入inode_table[]这个缓冲区了,那么下一次在需要它时,我们不需要再进行一次磁盘I/O,直接从缓冲区中读出来就可以了。在这里我们使用了比较原始的策略来保持磁盘和缓冲区的一致性:一旦内存中的值发生改变,则立即写入磁盘——这一过程由sync-inode()来完成。
对于缓冲区的管理是这样的:如果一个inode的i_cnt项为零,那么此项被认为是未使用,于是可以分配给新读入的i-node。一旦一个i-node读入,那么i_cnt自加。当i-node用完之后,使用者应调用一个put_inode(),这样i_cnt自减。当i_cnt自减至零时,说明不再有人继续使用这个i-node,它就又变成一个空项了。
init_fs()
init_fs()并不是一个新函数,不过其中增加了一些内容,代码如下所示。
代码 fs/main.c,init_fs()。
/*** <Ring 1> Do some preparation.*/
PRIVATE void init_fs()
{int i;/* f_desc_table[] */for (i = 0; i < NR_FILE_DESC; i++) {memset(&f_desc_table[i], 0, sizeof(struct file_desc));}/* inode_table[] */for (i = 0; i < NR_INODE; i++) {memset(&inode_table[i], 0, sizeof(struct inode));}/* super_block[] */struct super_block * sb = super_block;for (; sb < &super_block[NR_SUPER_BLOCK]; sb++) {sb->sb_dev = NO_DEV;}/* open the device: hard disk */MESSAGE driver_msg;driver_msg.type = DEV_OPEN;driver_msg.DEVICE = MINOR(ROOT_DEV);assert(dd_map[MAJOR(ROOT_DEV)].driver_nr != INVALID_DRIVER);send_recv(BOTH, dd_map[MAJOR(ROOT_DEV)].driver_nr, &driver_msg);/* make FS */mkfs();/* load super block of ROOT */read_super_block(ROOT_DEV);sb = get_super_block(ROOT_DEV);assert(sb->magic == MAGIC_V1);root_inode = get_inode(ROOT_DEV, ROOT_INODE);
}
函数开头初始化了三个缓冲区:f_desc_table[]、inode_table[]和super_block[]。前两者我们已经做了说明,super_block[]使用方法类似,它用来存放超级块。每个分区都对应一个超级块,我们开始使用这个分区时(通常以“打开”设备为标志),会将其超级块读入内存,放入super_block[]这个缓冲区。之后我们可以由函数get_super_block()随时得到其指针。
中间部分是打开根设备和创建分区。对于一个扁平的文件系统,所有的文件都包含在根目录下面,所以根目录文件的i-node地位非常重要,这里我们用了一个全局变量root_inode来存放其指针。
使用到的全局变量和缓冲区定义在global.h中,具体如下所示:
EXTERN  struct file_desc    f_desc_table[NR_FILE_DESC];
EXTERN  struct inode        inode_table[NR_INODE];
EXTERN  struct super_block  super_block[NR_SUPER_BLOCK];
EXTERN  MESSAGE             fs_msg;
EXTERN  PROCESS *           pcaller;
EXTERN  struct inode *      root_inode;
read_super_block()和get_super_block()
前面我们介绍了super_block[],现在要看的这两个函数就是操作它的接口,代码如下所示。
代码 fs/main.c,超级块缓冲区。
/*** <Ring 1> Read super block from the given device then write it into a free*          super_block[] slot.* * @param dev   From which device the super block comes.*/
PRIVATE void read_super_block(int dev)
{int i;MESSAGE driver_msg;driver_msg.type = DEV_READ;driver_msg.DEVICE = MINOR(dev);driver_msg.POSITION = SECTOR_SIZE * 1;driver_msg.BUF = fsbuf;driver_msg.CNT = SECTOR_SIZE;driver_msg.PROC_NR = TASK_FS;assert(dd_map[MAJOR(dev)].driver_nr != INVALID_DRIVER);send_recv(BOTH, dd_map[MAJOR(dev)].driver_nr, &driver_msg);/* find a free slot in super_block[] */for (i = 0; i < NR_SUPER_BLOCK; i++) {if (super_block[i].sb_dev == NO_DEV) {break;}}if (i == NR_SUPER_BLOCK) {panic("super block slots used up");}assert(i == 0); /* currently we use only the 1st slot */struct super_block * psb = (struct super_block *)fsbuf;super_block[i] = *psb;super_block[i].sb_dev = dev;
}/*** <Ring 1> Get the super block from super_block[].* * @param dev   Device nr.* * @return Super block ptr.*/
PUBLIC struct super_block * get_super_block(int dev)
{struct super_block * sb = super_block;for (; sb < &super_block[NR_SUPER_BLOCK]; sb++) {if (sb->sb_dev == dev) {return sb;}}panic("super block of device %d not found.\n", dev);return 0;
}
代码中,read_super_block()的作用是将一个设备的超级块读入缓存,get_super_block()可得到给定设备的超级块指针。在获取超级块时,我们采用了比较原始的遍历法来找到哪个是我们需要的。
关闭文件
跟创建文件比起来,关闭文件显得十分简单,由代码可知,CLOSE消息是由do_close()来处理的,它的函数体代码如下所示。
代码 fs/open.c,关闭文件。
/*** Handle the message CLOSE.* * @return Zero if success.*/
PUBLIC int do_close()
{int fd = fs_msg.FD;put_inode(pcaller->filp[fd]->fd_inode);pcaller->filp[fd]->fd_inode = 0;pcaller->filp[fd] = 0;return 0;
}
代码主要是三个语句:
- 调用put_inode()释放inode_table[]中的条目;
- 将filp[fd]->fd_inode清零释放f_desc_table[]中的条目;
- 将filp[fd]清零释放进程表中的fd条目。
经过这三个语句,之前为文件所分配的资源就全部释放了,文件也就可被认为是“关闭”了。
好了,现在我们就差最后一个close()函数了,现在来编写它,代码如下所示。
代码 lib/close.c,close(),这是新建的文件。
/*** Close a file descriptor.* * @param fd  File descriptor.* * @return Zero if successful, otherwise -1.*/
PUBLIC int close(int fd)
{MESSAGE msg;msg.type = CLOSE;msg.FD = fd;send_recv(BOTH, TASK_FS, &msg);return msg.RETVAL;
}
查看已创建的文件
终于完成了open()和close()两个系统调用,我们现在可以make运行一下,看一下效果了,不要忘记,由于新增了几个C文件,Makefile需要进行相应的修改。运行结果如下图所示。
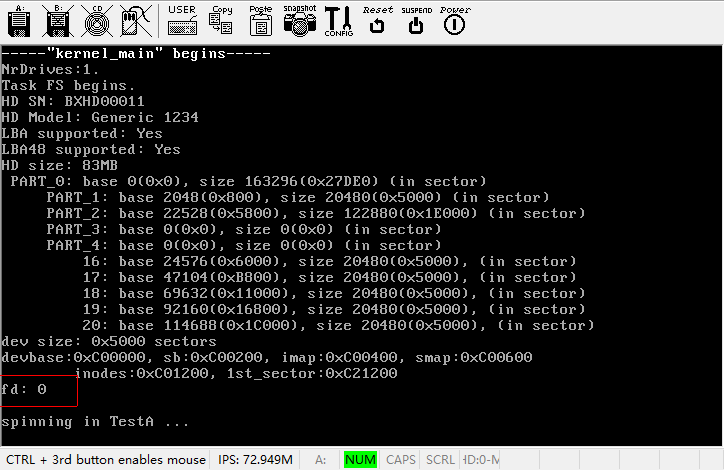
可以看到,进程TestA打印出了新创建的文件的fd:0。根据我们的代码,这个数字应该是正确的,不过文件到底有没有创建成功,我们还是要看看磁盘映像:


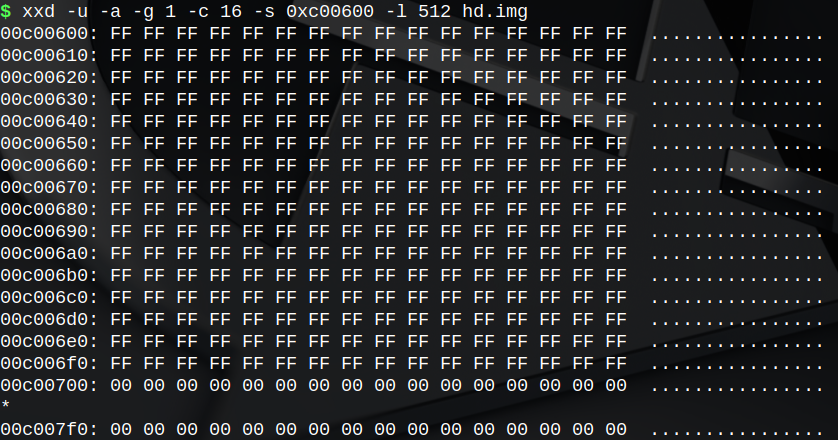
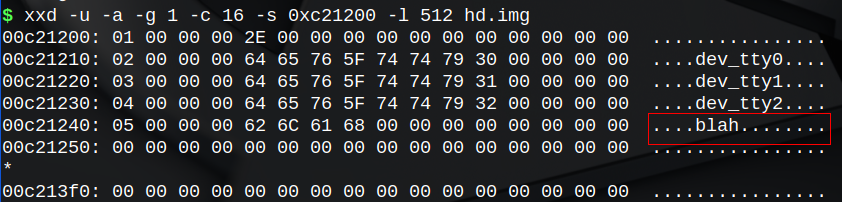
可以看到,inode-map变成了二进制的“11 1111”(十六进制3Fh),文件系统创建之初这里是1Fh,这里第5位(从0开始数)由0变成了1。也就是说新增加了一个i-node,其编号是5。
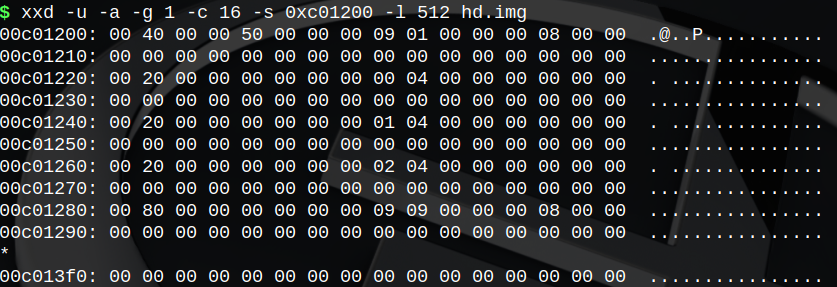
我们马上看一下inode_array,从1开始数,数到5是c01280处,对照inode结构体的声明可知:
- i_mode为8000h,这正是I_REGULAR的值。
- i_size为0,因为目前它还是个空文件。
- i_start_sect为909h。从超级块内容可知,sb.n_1st_sect为109h,由于第109h扇区占用sector-map中第1位(第0位保留),所以第909h扇区占用第801h位。
- i_nr_sects为800h(十进制2048),正是NR_DEFAULT_FILE_SECTS的值,结合i_start_sect可知,文件在sector-map中占用第801h到第1000h位。
在文件系统刚刚建立起来的时候,sector-map第0h位到第800h位被占,其中第0h位是保留位,第1h位到第800h位(共800h位)属于根目录文件,在这里我们新建的文件“/blah”又占用了第801h位到第1000h位,换算出来,从第0字节到第1FFh字节(共计200字节)都被占满,另外第200h字节被占用了1位。这跟我们得到的磁盘映像的信息是吻合的。
再来看一下根目录文件,很容易发现新增加的条目,其i-node号为5,这跟inode-map中是对应的,文件名是“blah”。所有信息都是正确的,这意味着我们的文件创建工作成功了。
这里可能会有一个问题,就是i-node号和inode-map中的位置是件容易迷糊的事情,我们不妨再来理顺一下:
对根目录而言,i-node号为1(ROOT_INODE定义为1),在inode-map中占用第1位(从0开始数),具体i-node数据位于inode_array[0]。于是,第M号i-node在inode-map中占用第M位(从0开始数),具体i-node数据位于inode_array[M-1]。
我们还可以知道,inode_array中的第M项(从0开始数)对应第M+1号i-node以及inode-map中的第M+1位(从0开始数)。
与此类似,根目录区的开始扇区即为第sb.n_1st_sect扇区,占用sector-map中的第1位(从0开始数)。于是,第M扇区(以本分区的开始扇区为0扇区)对应sector-map中的第(M-super_block.n_1st_sect+1)位。同时sector-map中的第M位对应第(M-1+super_block.n_1st_sect)扇区。
欢迎关注我的公众号

这篇关于《ORANGE’S:一个操作系统的实现》读书笔记(二十九)文件系统(四)的文章就介绍到这儿,希望我们推荐的文章对编程师们有所帮助!


