本文主要是介绍FileChannel主要方法的使用,希望对大家解决编程问题提供一定的参考价值,需要的开发者们随着小编来一起学习吧!
FileChannel介绍
FileChannel类是Channel接口的主要实现类,Channel是NIO的重要组件之一。
FileChannel类的主要作用是读取、写入、映射、操作文件。
write
public abstract int write(ByteBuffer src) throws IOException;
FileChannel内部维护了一个当前文件的position,可以查询、修改position。
/*** int write(ByteBuffer src)将src的remaining的字节写入FileChannel的position。* @throws Exception*/
@Test
public void testWrite() throws Exception {FileOutputStream fos = new FileOutputStream("d:/1.txt");FileChannel fileChannel = fos.getChannel();ByteBuffer b = ByteBuffer.wrap(new byte[]{1,2,3,4,5});int result = fileChannel.write(b);System.out.println("写入了" + result+ "个字节");  // 1,2,3,4,5System.out.println("fileChannel.position()=" + fileChannel.position());fileChannel.position(2);//设置FileChannel的position位置是2b.rewind();result = fileChannel.write(b); //1,2,1,2,3,4,5System.out.println("写入了" + result+ "个字节");b.position(4);result = fileChannel.write(b);System.out.println("写入了" + result+ "个字节"); //1,2,1,2,3,4,5,5fos.close();
}
/*** int write(ByteBuffer src)是同步的,同一时间只能有一个线程写入* @throws Exception*/
@Test
public void testWrite2() throws Exception {FileOutputStream fos = new FileOutputStream("d:/1.txt");FileChannel fileChannel = fos.getChannel();ExecutorService exec = Executors.newFixedThreadPool(100);for (int i = 0; i < 200; i++) {exec.execute(()->{int i2 = new Random().nextInt(2);ByteBuffer byteBuffer;if(i2 % 2 == 0){byteBuffer = ByteBuffer.wrap((Thread.currentThread().getName() + "写入abcde\n").getBytes());}else{byteBuffer = ByteBuffer.wrap((Thread.currentThread().getName() + "写入12345\n").getBytes());}try {Thread.sleep(1);fileChannel.write(byteBuffer);} catch (Exception e) {e.printStackTrace();}});}exec.shutdown();while(!exec.isTerminated()){Thread.sleep(1000);}
}
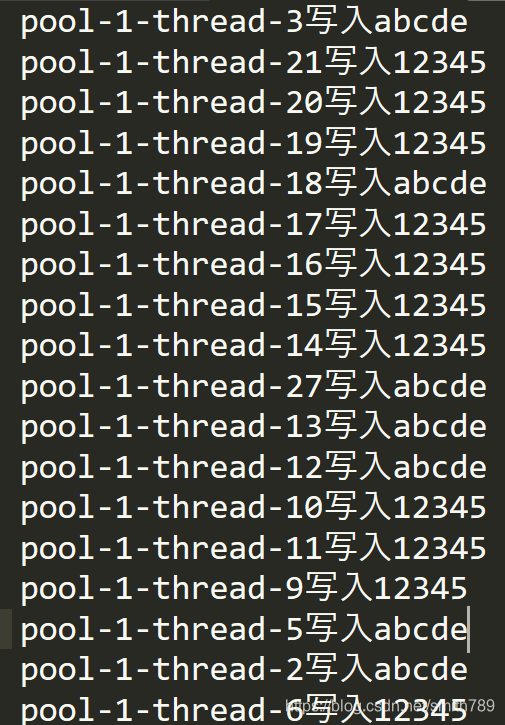
写入的文件没有发生数字和字母混合在同一行的情况。
其他write方法
write(ByteBuffer[] srcs) 将ByteBuffer数组srcs里的内容(都是从position到limit处的内容)批量写到当前FileChannel的position开始处。
write(ByteBuffer src, long position)向FileChannel通道的指定position写入src的remaining内容。
read()
和write()一样,同一时间只能有1个线程读取,其他线程阻塞。
public abstract int read(ByteBuffer dst) throws IOException
read方法返回读取了多少个字节,如果是末尾,返回-1。如果dst的remaining用完了,返回0.
read方法会将FileChannel当前position读入1个到dst的remaining字节空间。
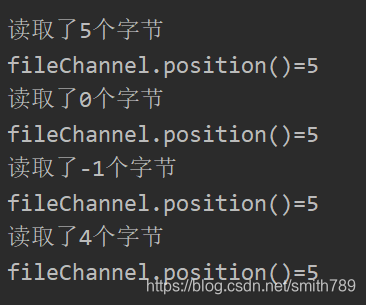
/*** 假设1.txt里写入了5个字节:* ByteBuffer b = ByteBuffer.wrap(new byte[]{1,2,3,4,5});* fileChannel.write(b);* @throws Exception*/
@Test
public void testRead() throws Exception {FileInputStream fis = new FileInputStream("d:/1.txt");FileChannel fileChannel = fis.getChannel();ByteBuffer byteBuffer = ByteBuffer.allocate(5);int resultBytesCount = fileChannel.read(byteBuffer);System.out.println("读取了" + resultBytesCount+"个字节");   //读取了5个字节System.out.println("fileChannel.position()=" + fileChannel.position()); //fileChannel.position()=5resultBytesCount = fileChannel.read(byteBuffer);System.out.println("读取了" + resultBytesCount+"个字节");  //读取了0个字节System.out.println("fileChannel.position()=" + fileChannel.position()); //fileChannel.position()=5byteBuffer.clear();resultBytesCount = fileChannel.read(byteBuffer);System.out.println("读取了" + resultBytesCount+"个字节");  //读取了-1个字节,因为FileChannel已经到头了System.out.println("fileChannel.position()=" + fileChannel.position()); //fileChannel.position()=5fileChannel.position(1);byteBuffer.position(1);resultBytesCount = fileChannel.read(byteBuffer); //从byteBuffer的position=1处开始读,读入到fileChannel的position=1处System.out.println("读取了" + resultBytesCount+"个字节");  //读取了4个字节System.out.println("fileChannel.position()=" + fileChannel.position()); //fileChannel.position()=5fileChannel.close();;fis.close();
}
其他read方法
read(ByteBuffer[] dsts) 将FileChannel的当前position开始字节读取到,ByteBuffer数组dsts的每一个ByteBuffer的position到limit。
int read(ByteBuffer dst, long position) 将FileChannle的指定position开始的内容读入到dst的position处。
size
long size() 返回此FileChannel关联文件的大小
例如使用FileChannel完成文件的读取
/*** 假定文件已经存在,使用ByteBuffer和FileChannel将文件中的数据读入到程序,并显示在控制台屏幕。*/
@Test
public void testSize() throws Exception {File file = new File("d:\\1.txt");FileInputStream fileInputStream = new FileInputStream(file);FileChannel fileChannel = fileInputStream.getChannel();ByteBuffer byteBuffer = ByteBuffer.allocate((int) fileChannel.size());fileChannel.read(byteBuffer);//将byteBuffer 的 字节数据 转成StringSystem.out.println(new String(byteBuffer.array()));fileInputStream.close();
}/*** 使用 FileChannel完成文件的拷贝。拷贝一个文件 1.txt*/
public void testReadAndWrite() throws Exception{FileInputStream fileInputStream = new FileInputStream("1.txt");FileChannel fileChannel1 = fileInputStream.getChannel();FileOutputStream fileOutputStream = new FileOutputStream("2.txt");FileChannel fileChannel2 = fileOutputStream.getChannel();ByteBuffer byteBuffer = ByteBuffer.allocate(512);while (true) {byteBuffer.clear(); //清空bufferint read = fileChannel1.read(byteBuffer);if(read == -1) { //表示读完break;}byteBuffer.flip();fileChannel2.write(byteBuffer);}fileInputStream.close();fileOutputStream.close();
}
transFrom & transTo
long transferFrom(ReadableByteChannel src,long position, long count) 将数据从src通道中的position开始传输最大count个字节到当前FileChannel通道。
long transferTo(long position, long count,WritableByteChannel target) 将FileChannel中position处开始的字节传输最大count个字节到另外一个通道。如果position>FileChannel大小,不传输任何字节。
用transFrom完成文件的拷贝
/*** 使用 FileChannel(通道) 和 方法  transferFrom ,完成文件的拷贝*/
public void testTransferFrom() throws Exception{FileInputStream fileInputStream = new FileInputStream("d:\\1.txt");FileOutputStream fileOutputStream = new FileOutputStream("d:\\1.txt");FileChannel sourceCh = fileInputStream.getChannel();FileChannel destCh = fileOutputStream.getChannel();//使用transferForm完成拷贝destCh.transferFrom(sourceCh,0,sourceCh.size());//关闭相关通道和流sourceCh.close();destCh.close();fileInputStream.close();fileOutputStream.close();
}
这篇关于FileChannel主要方法的使用的文章就介绍到这儿,希望我们推荐的文章对编程师们有所帮助!


