本文主要是介绍实践补充 Installing Tomcat 7.0.x on OS X,希望对大家解决编程问题提供一定的参考价值,需要的开发者们随着小编来一起学习吧!
我的 Mac 下是1.6的 SDK,下载 Tomcat 8.0 运行后,访问 http://127.0.0.1:8080 并无反应,而且关闭脚本会报错 :
Unsupported major.minor version 51.0
看来安装 Tomcat 8.0 需要至少 JDK 1.7 或 JDK 1.8 才行,不过我的 Mac 上没有提示,我也就不更新了。
故重新下载 Tomcat 6.0 ,按如下操作,一切正常,并能正常访问 8080 端口打开页面。
再次下载 Tomcat 7.0 ,按如下操作重复,一切正常,并能正常访问 8080 端口打开页面。
不过有一点,需要注意,就是 link 生成的 /Library/Tomcat 需要先 unlink:
sudo unlink /Library/Tomcat
1、mv 下载并解压出来的Tomcat目录 /usr/local
这一步,我是先输入个 mv,然后从 Finder 中把目录拖到 console 中,自动显示路径串,然后再输入 /L 然后按 Tab 键自动补齐 Library ,如果你的目录中存在多个 L 开头的文件或目录,那就再多输几个字符,确保唯一就可以自动补全了,再输入 /T ,继续按 Tab 键自动补全
2、sudo unlink /Library/Tomcat
取消之前安装时创建的 /Library/Tomcat 链接
3、sudo ln -s /usr/local/apache-tomcat-7.0.56/ /Library/Tomcat
4、sudo chown -R 当前用户 /Library/Tomcat
5、sudo chmod +x /Library/Tomcat/bin/*.sh将 Tomcat 目录下的 .sh 脚本修改为可执行
6、/Library/Tomcat/bin/startup.sh
启动 Tomcat ,当前链接到哪个版本的 Tomcat ,启动的就是哪个版本的 Tomcat
7、http://127.0.0.1:8080
使用浏览器打开这个地址端口,能正常显示 Tomcat 的欢迎页面,就表示布署 Tomcat 成功
8、/Library/Tomcat/bin/shutdown.sh
关闭 Tomcat 服务
9、下载并安装 Tomcat Controller,UI 启停 Tomcat
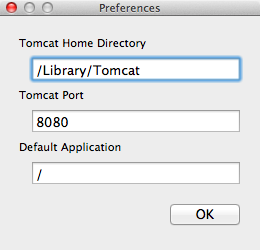
注意,默认的 Tomcat Home Directory 是指向 /usr/local/tomcat,可以在这里更改成特定版本的 Tomcat,也可以按下图指定,然后通过上面的链接来更改当前的 Tomcat 版本。
感觉前者更方便些,也免于创建链接了。
Tomcat 6.0 下载链接:http://mirrors.hust.edu.cn/apache/tomcat/tomcat-6/v6.0.43/bin/apache-tomcat-6.0.43.zip (2015-02-10 更新)
Tomcat 7.0 下载链接:http://mirrors.hust.edu.cn/apache/tomcat/tomcat-7/v7.0.59/bin/apache-tomcat-7.0.59.zip (2015-02-10 更新)
Tomcat 8.0 下载链接:http://mirrors.hust.edu.cn/apache/tomcat/tomcat-8/v8.0.18/bin/apache-tomcat-8.0.18.zip
Tomcat Controller 下载链接:http://www.activata.co.uk/downloads_files/TomcatController_1_2.dmg.zip
接下来,研究 Spring Mvc 框架,以及 mybatis 操作 mysql 数据库,并由 Spring 管理数据库连接事务。
逐步研究步骤:
1、Spring Mvc 框架 + SQLHelper 读写 mysql 数据库;
据说 Spring Mvc 要比 Structs2 效率高一些,而且现在在招聘网站上搜类似的招聘,基本都是 Spring 的 Mvc 框架,
别理解错了,上招聘网站一不是为找工作,二不是为招人,招聘网站是技术走向的风向标,在一段时间内的统计结果,很有代表性;
2、mybatis 操作 mysql
3、Spring 管控 mybatis 数据库连接池
4、三者整合研究
同一样技术,不同的人有不同的研究过程和理解,但结果都是一样的,能把它们用起来。
不一定真正用得到,但至少能知道别人做得对不对,问题出在哪儿,这就够了。
_____________________________________________________
Installing Tomcat 7.0.x on OS X
by Wolf Paulus | Dec 14, 2013 | Mac OS X | 281 comments
While Tomcat 8 is close to be released (Tomcat 8.0.0-RC5 (alpha) is released already), Tomcat 7 was the first Apache Tomcat release to support the Servlet 3.0, JSP 2.2, and EL 2.2 specifications. Please note that Tomcat 7 requires Java 1.6 or better, which shouldn’t be a problem, if you are running OS X 10.5 or 10.6.
On OS X 10.7, 10.8 (Mnt Lion), and 10.9 (Mavericks) however, Java is not installed anymore, at least not initially. The easiest way to get Java onto your Mac is probably to open the Terminal app and enter java. You will be asked if you want to install it and OS X takes care of the rest – you would end up with Java 6.
Prerequisite: Java
On 10.9 (Mavericks), Apple changed this once again, now sending you to Oracle’s Java SE web page, where you can download the JDK, (currently 7 jdk-7u45-macosx-x64.dmg). While at Oracle, I usually also download the Java SE Development Kit 7 Documentation, allowing me to stay away from their site for many months.
The JDK installer package come in an dmg and installs easily on the Mac; and after opening the Terminal app again,
java -version
now shows something like this:
java version "1.7.0_45"
Java(TM) SE Runtime Environment (build 1.7.0_45-b18)
Java HotSpot(TM) 64-Bit Server VM (build 24.45-b08, mixed mode)
Whatever you do, when opening Terminal and running java -version, you should see something like this, with a version of at least 1.6.x
sudo is a program for Unix-like operating systems, allowing you to run programs with the security privileges of another user (normally the superuser, or root). Since we are creating directories, outside of your home folder, administrator right are required. I.e., when executing sudo you will be asked to enter your password; and your Mac User account needs to be an ‘Admin’ account.
Installing Tomcat
Here are the easy to follow steps to get it up and running on your Mac
- Download a binary distribution of the core module: apache-tomcat-7.0.47.tar.gz from here. I picked the tar.gz in Binary Distributions / Core section.
- Opening/unarchiving the archive will create a folder structure in your Downloads folder: (btw, this free Unarchiver app is perfect for all kinds of compressed files and superior to the built-in Archive Utility.app)
- ~/Downloads/apache-tomcat-7.0.47
- Open to Terminal app to move the unarchived distribution to /usr/local
- sudo mkdir -p /usr/local
- sudo mv ~/Downloads/apache-tomcat-7.0.47 /usr/local
- To make it easy to replace this release with future releases, we are going to create a symbolic link that we are going to use when referring to Tomcat (after removing the old link, you might have from installing a previous version):
- sudo rm -f /Library/Tomcat
sudo ln -s /usr/local/apache-tomcat-7.0.47 /Library/Tomcat - Change ownership of the /Library/Tomcat folder hierarchy:
- sudo chown -R <your_username> /Library/Tomcat
- Make all scripts executable:
- sudo chmod +x /Library/Tomcat/bin/*.sh
Instead of using the start and stop scripts, like so:
Last login: Sun Aug 14 15:20:38 on ttys000
wpbookpro:~ wolf$ /Library/Tomcat/bin/startup.sh
Using CATALINA_BASE: /Library/Tomcat
Using CATALINA_HOME: /Library/Tomcat
Using CATALINA_TMPDIR: /Library/Tomcat/temp
Using JRE_HOME: /Library/Java/Home
Using CLASSPATH: /Library/Tomcat/bin/bootstrap.jar:/Library/Tomcat/bin/tomcat-juli.jar
wpbookpro:~ wolf$ /Library/Tomcat/bin/shutdown.sh
Using CATALINA_BASE: /Library/Tomcat
Using CATALINA_HOME: /Library/Tomcat
Using CATALINA_TMPDIR: /Library/Tomcat/temp
Using JRE_HOME: /Library/Java/Home
Using CLASSPATH: /Library/Tomcat/bin/bootstrap.jar:/Library/Tomcat/bin/tomcat-juli.jar
wpbookpro:~ wolf$
you may also want to check out Activata’s Tomcat Controller, a tiny freeware app, providing a UI to quickly start/stop Tomcat. It may not say so, but Tomcat Controller works on OS X 10.8 and 10.9 just fine.
Finally, after your started Tomcat, open your Mac’s Web browser and take a look at the default page: http://localhost:8080
.entry-content You can start editing here.
这篇关于实践补充 Installing Tomcat 7.0.x on OS X的文章就介绍到这儿,希望我们推荐的文章对编程师们有所帮助!


