本文主要是介绍Springboot操作mysql后整合freemarker用可操作界面显示,希望对大家解决编程问题提供一定的参考价值,需要的开发者们随着小编来一起学习吧!
此文接着上一篇
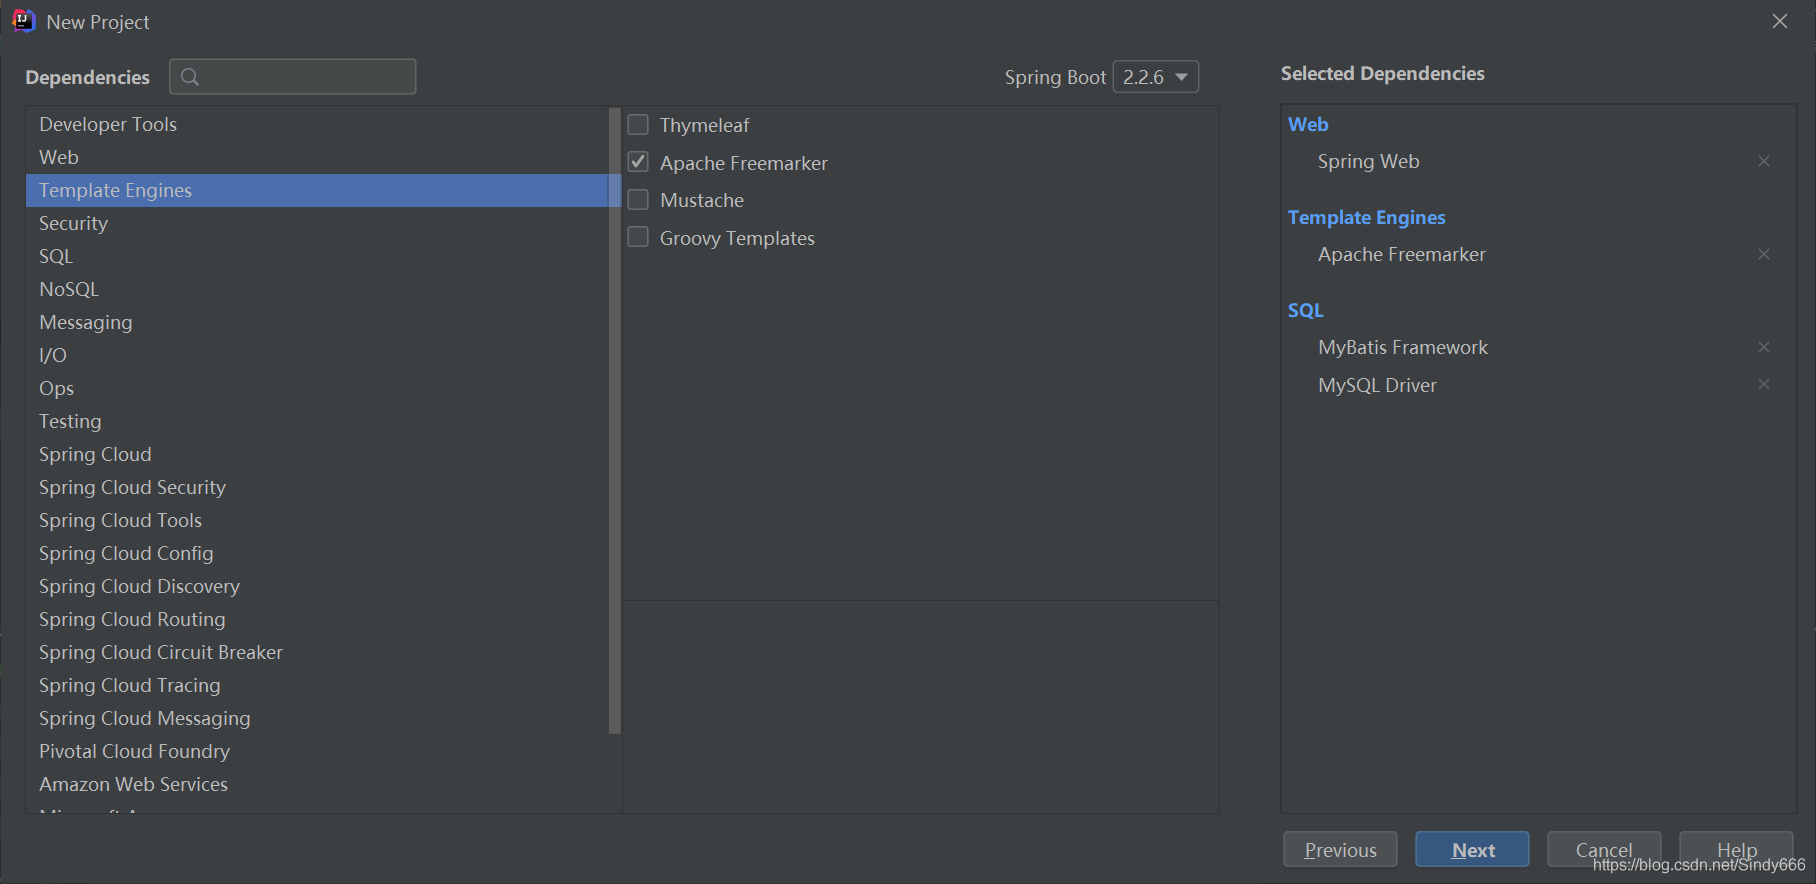
同样创建新文件,在添加依赖包时多勾选一个freemarker

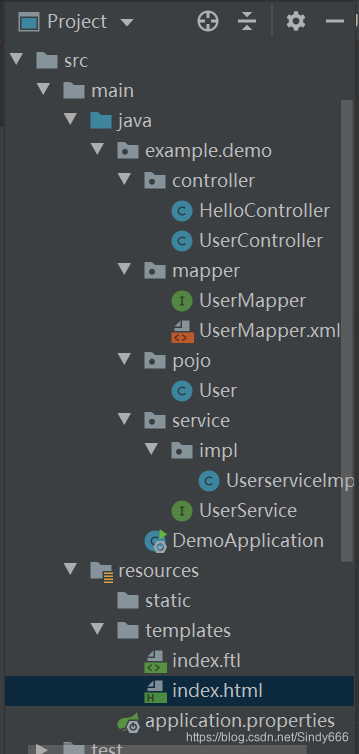
目录结构如下:在templates里添加index.html和index.ftl
在html里面写网页,然后复制到ftl文件里,再删除index.html

需要修改的是application.properties和controller里添加一个HelloController其他直接从上一篇复制就好。
application.properties:上面和之前一样,加上下面的
spring.datasource.url=jdbc:mysql://localhost:3306/db1?useUnicode=true&useJDBCCompliantTimezoneShift=true&useLegacyDatetimeCode=false&serverTimezone=UTC
spring.datasource.username=root
spring.datasource.password=xxd123456
spring.datasource.driver-class-name=com.mysql.cj.jdbc.Driver
mybatis.type-aliases-package=example.demo.mapperspring.freemarker.template-loader-path=classpath:/templates
spring.freemarker.cache=false
spring.freemarker.charset=UTF-8
spring.freemarker.check-template-location=true
spring.freemarker.content-type=text/html
spring.freemarker.expose-request-attributes=false
spring.freemarker.expose-session-attributes=false
spring.freemarker.request-context-attribute=request
spring.freemarker.suffix=.ftl
HelloController:
package example.demo.controller;import org.springframework.stereotype.Controller;
import org.springframework.web.bind.annotation.RequestMapping;@Controller
public class HelloController {@RequestMapping(value="/")public String index(){return "index";}
}
然后写html网页,需要去了解一些html的知识
<!DOCTYPE html>
<html lang="en">
<head><meta charset="UTF-8"><title>数据库</title><style>h2{text-align: center;color: darksalmon;}table{background-color: blanchedalmond ;border-radius: 10px;margin: 0 auto;border: lightcoral 5px solid;}</style>
</head>
<body>
<div class="getAll"><h2>查询所有用户信息</h2><form action="/findAll" method="get"><table><tr><td><input type="submit" value="Inquire"></td></tr></table></form>
</div>
<div class="selectById"><h2>精确查询</h2><form action="/selectUserById" method="get"><table><tr><td class="left">ID:</td><td class="right"><input type="text" name="id"></td><td><input type="submit" value="Inquire"></td></tr></table></form>
</div><div class="addUser"><h2>添加用户信息</h2><form action="/add" method="get"><table><tr><td class="left">Name:</td><td class="right"><input type="text" name="name"></td></tr><tr><td class="left">Gender:</td><td><input type="radio" name="gender" value="Male">Male<input type="radio" name="gender" value="Female">Female   <input type="submit" value="Submit"></td></tr></table></form>
</div>
<div class="deleteUser"><h2>删除用户信息</h2><form action="/deleteById" method="get"><table><tr><td class="left">ID:</td><td class="right"><input type="text" name="id"></td><td><input type="submit" value="Delete"></td></tr></table></form>
</div>
<div class="updateUser"><h2>修改用户信息</h2><form action="/updateUserById" method="get"><table><tr><td class="left">ID:</td><td class="right"><input type="text" name="id"></td></tr><tr><td class="left">New Name:</td><td class="right"><input type="text" name="name"></td></tr><tr><td class="left">New Gender:</td><td><input type="radio" name="gender" value="Male">Male<input type="radio" name="gender" value="Female">Female   <input type="submit" value="Submit"></td></tr></table></form>
</div></body>
</html>
运行成功后,打开浏览器,输入http://localhost:8080

这篇关于Springboot操作mysql后整合freemarker用可操作界面显示的文章就介绍到这儿,希望我们推荐的文章对编程师们有所帮助!


