本文主要是介绍手拉手Springboot获取yml配置文件信息,希望对大家解决编程问题提供一定的参考价值,需要的开发者们随着小编来一起学习吧!
环境介绍
| 技术栈 | springboot3 |
| 软件 | 版本 |
| mysql | 8 |
| IDEA | IntelliJ IDEA 2022.2.1 |
| JDK | 17 |
| Spring Boot | 3.1.7 |
配置文件说明:启动配置文件优先级:properties高于yml
配置文件application.yml
yml是 JSON 的超集,简洁而强大,是一种专门用来书写配置文件的语言,可以替代 application.properties。
在创建一个 SpringBoot 项目时,引入的 spring-boot-starter-web 依赖间接地引入了 snakeyaml 依赖, snakeyaml 会实现对 yml配置的解析。
yml的使用非常简单,利用缩进来表示层级关系,并且大小写敏感。
yml配置与 Properties 配置的比较
可以使用 @PropertySource 注解加载自定义的 Properties 配置文件,但无法加载自定义的 yml文件。
yml支持列表的配置,而 Properties 不支持。

实体类获取配置文件信息
方式一@Value()
通过在属性上使用@Value注解,直接将yml文件中的属性值注入到对应的属性中。这种方式适用于需要将yml文件中的属性值注入到单个属性中的情况。
@Value()注解可以用来将外部的值动态注入到Bean中,在@Value注解中,可以使用 ${} 和 #{} 区别
@Value("${}"): 可以获取对应助兴文件中定义的属性值
@Value("#{}"):表示SpEl表达式通常来获取bean的属性,或者调用bean的某个方法
@Component
@Data
public class Host {@Value("${host01.host}")private String host;@Value("${host01.port}")private String port;@Value("${host01.user}")private String user;@Value("${host01.password}")private String password;}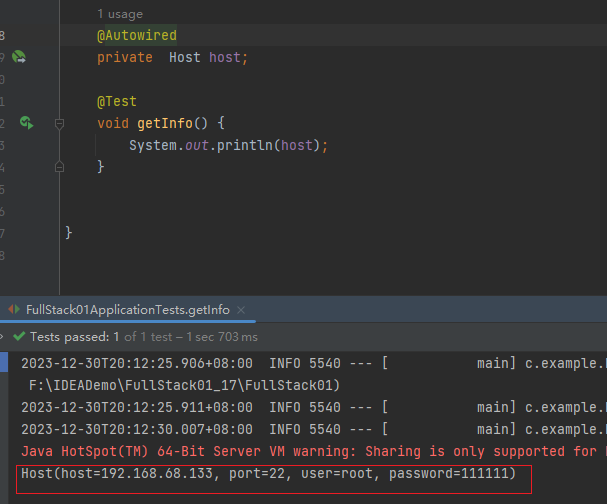
方式二@ConfigurationProperties(prefix = "前缀")
加入依赖
<dependency>
<groupId>org.springframework.boot</groupId>
<artifactId>spring-boot-configuration-processor</artifactId>
<optional>true</optional>
</dependency>
Spring源码中大量使用了ConfigurationProperties注解,比如server.port就是由该注解获取到的,通过与其他注解配合使用,能够实现Bean的按需配置。
该注解有一个prefix属性,通过指定的前缀,绑定配置文件中的配置,该注解可以放在类上,也可以放在方法上。当将该注解作用于方法上时,如果想要有效的绑定配置,那么该方法需要有@Bean注解且所属Class需要有@Configuration注解。
Sring的有效运行是通过上下文(Bean容器)中Bean的配合完成的,Bean可以简单理解成对象,有些对象需要指定字段内容,那么这些内容我们可以通过配置文件进行绑定,然后将此Bean归还给容器.
@ConfigurationProperties注解将yml中的值映射到bean的属性上,通过在配置类上使用@ConfigurationProperties注解,将yml文件中的属性值映射到配置类的属性上。这种方式适用于需要将yml文件中的多个属性值映射到一个配置类中的情况。
@Component
@ConfigurationProperties(prefix = "host01")
@Data
public class Host {//@Value("${host01.host}")private String host;//@Value("${host01.port}")private String port;//@Value("${host01.user}")private String user;//@Value("${host01.password}")private String password;}
pom.xml
server:
port: 8007
management:
server:
port: 8008
endpoints:
web:
exposure:
include: "*"
endpoint:
prometheus:
enabled: true
health:
show-details: always
metrics:
export:
prometheus:
enabled: true
spring:
mvc:
path match:
matching-strategy: ant_path_matcher
profiles:
active: dev
application:
name: ProvideAPIServices
datasource:
dynamic:
primary: sys2 #设置默认的数据源或者数据源组,默认值即为master
strict: false #严格匹配数据源,默认false. true未匹配到指定数据源时抛异常,false使用默认数据源
datasource:
oracle:
username: system
password: 111111
url: jdbc:oracle:thin:@127.0.0.1:.172:1521:orcl
driver-class-name: oracle.jdbc.driver.OracleDriver
# driver-class-name: com.mysql.jdbc.Driver
wms:
url: jdbc:p6spy:mysql://127.0.0.1:3306/Wms?useUnicode=true&characterEncoding=UTF-8
username: root
password: pwd
driver-class-name: com.p6spy.engine.spy.P6SpyDriver
# driver-class-name: com.mysql.jdbc.Driver
sys2:
username: root
password: pwd
url: jdbc:p6spy:mysql://127.0.0.1:3306/sys?serverTimezone=Asia/Shanghai&useUnicode=true&characterEncoding=UTF-8
driver-class-name: com.p6spy.engine.spy.P6SpyDriver
mybatis-plus:
configuration:
#输出日志
log-impl: org.apache.ibatis.logging.stdout.StdOutImpl
#配置映射规则
map-underscore-to-camel-case: true #表示支持下划线到驼蜂的映射
#隐藏mybatis图标
global-config:
banner: false
db-config:
logic-delete-field: status
logic-not-delete-value: 1
logic-delete-value: 0
#
#mybatis:
# mapper-locations=classpath: com/example/dao/*.xml
pagehelper:
propertyName: propertyValue
reasonable: false
defaultCount: true # 分页插件默认参数支持 default-count 形式,自定义扩展的参数,必须大小写一致
#主机相关信息
host01:
host: 192.168.68.133
port: 22
user: root
password: 111111
#邮箱
email:
user: 123@123
code: 12314134
host: 123.qq.com
auth: true
#爱好
hobbies:
-打篮球
-踢足球
-玩游戏
这篇关于手拉手Springboot获取yml配置文件信息的文章就介绍到这儿,希望我们推荐的文章对编程师们有所帮助!


