本文主要是介绍tekton 发布 kubernetes 应用,希望对大家解决编程问题提供一定的参考价值,需要的开发者们随着小编来一起学习吧!
tekton 发布 kubernetes 应用
基于Kubernetes 服务部署 Tekton Pipeline 实例,部署完成后使用tekton来完成源码拉取、应用打包、镜像推送和应用部署。
本文实现一个 golang-helloworld 项目 CI/CD 的完整流程,具体包括以下步骤:
- 从 gitee 仓库拉取代码,将源码构建成二进制文件
- 根据 Dockerfile 构建镜像并推送到阿里云ACR镜像仓库
- 使用sed命令替换yaml文件中的镜像地址为上一步构建的镜像
- 使用 kubectl apply -f 命令部署yaml文件到kubernetes集群
示例git仓库:https://gitee.com/willzhangee/tekton-golang-demo
创建serviceaccount
镜推送到外部镜像仓库需要进行认证,创建登录阿里云ACR仓库的secret
kubectl create secret docker-registry aliyun-acr \
--docker-server=https://registry.cn-shenzhen.aliyuncs.com \
--docker-username=<your-username> \
--docker-password=<your-password> \
--dry-run=client -o json | jq -r '.data.".dockerconfigjson"' | base64 -d > /tmp/config.jsonkubectl create secret generic docker-config --from-file=/tmp/config.json
创建kubernetes secret
kubectl create secret generic kubernetes-config --from-file=/root/.kube/config
创建serviceAccount
$ cat serviceaccount.yaml
apiVersion: v1
kind: ServiceAccount
metadata:name: build-bot
secrets:- name: docker-config- name: kubernetes-config
---
apiVersion: rbac.authorization.k8s.io/v1
kind: Role
metadata:name: tekton-kubectl-role
rules:
- apiGroups:- "*"resources:- pods- deployments- deployments/scale- deployments/statusverbs:- get- list- watch- create- delete- patch- update
---
apiVersion: rbac.authorization.k8s.io/v1
kind: RoleBinding
metadata:name: tekton-kubectl-binding
subjects:
- kind: ServiceAccountname: build-bot
roleRef:apiGroup: rbac.authorization.k8s.iokind: Rolename: tekton-kubectl-role
应用yaml文件
kubectl apply -f serviceaccount.yaml
创建 git-clone task
在执行镜像构建前Dockerfile存放在git仓库中,需要将代码克隆到本地,需要安装git-clone task,这里使用官方task。
kubectl apply -f \
https://raw.githubusercontent.com/tektoncd/catalog/main/task/git-clone/0.9/git-clone.yaml
创建kaniko-build task
创建kaniko-build task,用于构建dokcer镜像,基于官方kaniko-task改造。
$ cat kaniko-build-task.yaml
apiVersion: tekton.dev/v1beta1
kind: Task
metadata:name: kaniko-build
spec:params:- name: IMAGE_URLdescription: Name (reference) of the image to build.- name: IMAGE_TAGdescription: Tag to apply to the built imagedefault: latest- name: DOCKERFILEdescription: Path to the Dockerfile to build.default: ./Dockerfile- name: CONTEXTdescription: The build context used by Kaniko.default: ./- name: EXTRA_ARGStype: arraydefault: []- name: BUILDER_IMAGEdescription: The image on which builds will run (default is v1.5.1)default: gcr.io/kaniko-project/executor:v1.5.1@sha256:c6166717f7fe0b7da44908c986137ecfeab21f31ec3992f6e128fff8a94be8a5workspaces:- name: sourcedescription: Holds the context and Dockerfile- name: dockerconfigdescription: Includes a docker `config.json`optional: truemountPath: /kaniko/.dockerresults:- name: IMAGE_DIGESTdescription: Digest of the image just built.- name: IMAGE_URLdescription: URL of the image just built.steps:- name: build-and-pushworkingDir: $(workspaces.source.path)image: $(params.BUILDER_IMAGE)args:- $(params.EXTRA_ARGS)- --dockerfile=$(params.DOCKERFILE)- --context=$(workspaces.source.path)/$(params.CONTEXT)- --destination=$(params.IMAGE_URL):$(params.IMAGE_TAG)- --digest-file=$(results.IMAGE_DIGEST.path)securityContext:runAsUser: 0
应用yaml文件
kubectl apply -f kaniko-build-task.yaml
创建kubernetes-deploy task
创建kubernetes-deploy task,用于部署yaml文件到kubernetes集群。
$ cat kubernetes-deploy-task.yaml
apiVersion: tekton.dev/v1beta1
kind: Task
metadata:name: kubernetes-deploy
spec:workspaces:- name: manifest-dir- name: kubeconfig-dirmountPath: /root/.kubeparams:- name: pathToYamlFiledescription: The path to the yaml file to deploy within the git sourcedefault: deployment.yaml- name: IMAGE_URL- name: IMAGE_TAG- name: KUBECTL_IMAGEdefault: docker.io/bitnami/kubectl:lateststeps:- name: run-kubectlimage: $(params.KUBECTL_IMAGE)workingDir: $(workspaces.manifest-dir.path)script: |sed -i s#IMAGE#$(params.IMAGE_URL)#g $(params.pathToYamlFile)sed -i s#TAG#$(params.IMAGE_TAG)#g $(params.pathToYamlFile)kubectl apply -f $(params.pathToYamlFile)
应用yaml文件
kubectl apply -f kubernetes-deploy-task.yaml
创建pipeline和pipelinerun
$ cat pipeline-run.yaml
apiVersion: tekton.dev/v1beta1
kind: Pipeline
metadata:name: devops-hello-world-pipeline
spec:workspaces:- name: shared-data- name: docker-config- name: kubernetes-configparams:# git-clone- name: git_urltype: string- name: revisiontype: string- name: gitInitImagetype: string# kaniko-build- name: dockerfiletype: stringdescription: reference of the image to build- name: builder_imagetype: stringdescription: reference of the image to build- name: image_urldescription: Url of image repository- name: image_tagdescription: Tag to apply to the built imagedefault: latest# kubernetes-deploy- name: kubectl_imagetype: stringtasks:- name: clonetaskRef:name: git-cloneworkspaces:- name: outputworkspace: shared-dataparams:- name: urlvalue: $(params.git_url)- name: revisionvalue: $(params.revision)- name: gitInitImagevalue: $(params.gitInitImage)- name: build-push-imageparams:- name: DOCKERFILEvalue: $(params.dockerfile)- name: IMAGE_URLvalue: $(params.image_url)- name: IMAGE_TAGvalue: $(tasks.clone.results.commit)- name: BUILDER_IMAGEvalue: $(params.builder_image)taskRef:name: kanikorunAfter:- cloneworkspaces:- name: sourceworkspace: shared-data- name: dockerconfigworkspace: docker-config- name: deploy-to-k8staskRef:name: kubernetes-deployparams:- name: KUBECTL_IMAGEvalue: $(params.kubectl_image)- name: IMAGE_URLvalue: $(params.image_url)- name: IMAGE_TAGvalue: $(tasks.clone.results.commit)- name: pathToYamlFilevalue: deployment.yamlworkspaces:- name: manifest-dirworkspace: shared-data- name: kubeconfig-dirworkspace: kubernetes-configrunAfter:- build-push-image
---
apiVersion: tekton.dev/v1beta1
kind: PipelineRun
metadata:generateName: devops-hello-world-pipeline-run-
spec:serviceAccountName: build-botpipelineRef:name: devops-hello-world-pipelineparams:# git-clone- name: git_urlvalue: https://gitee.com/willzhangee/tekton-golang-demo.git- name: revisionvalue: master- name: gitInitImage#value: gcr.io/tekton-releases/github.com/tektoncd/pipeline/cmd/git-init:latestvalue: dyrnq/tektoncd-pipeline-cmd-git-init:latest# kaniko- name: dockerfilevalue: ./Dockerfile- name: builder_image# value: gcr.io/kaniko-project/executor:v1.5.1@sha256:c6166717f7fe0b7da44908c986137ecfeab21f31ec3992f6e128fff8a94be8a5value: docker.io/bitnami/kaniko:latest- name: image_urlvalue: registry.cn-shenzhen.aliyuncs.com/cnmirror/devops-hello-world- name: image_tagvalue: latest# kubernetes-deploy- name: kubectl_imagevalue: 'docker.io/bitnami/kubectl:latest'workspaces:- name: shared-datavolumeClaimTemplate:spec:accessModes:- ReadWriteOncestorageClassName: openebs-hostpathresources:requests:storage: 1Gi- name: docker-configsecret:secretName: docker-config- name: kubernetes-configsecret:secretName: kubernetes-config
参数说明:
- gitInitImage:执行git clone任务的镜像,官方镜像无法访问,推荐在docekrhub中查找替代镜像
- builder_image:执行kaniko 构建任务的镜像,官方镜像无法访问,推荐在docekrhub中查找替代镜像
- image_url:最终构建的应用镜像
- serviceAccountName:指定
serviceAccountName用于认证 - shared-data workspace:用于在不同任务之间共享数据,PipelineRun中定义了
volumeClaimTemplate类型的workspaces,能够动态申请所需的持久卷,使用kubectl get storageclass命令,确认k8s集群有默认可用的storageclass资源可用,本示例输出为openebs-hostpath (default) - docker-config workspace:用于镜像仓库认证的secret卷,将secret中的
config.json挂载到/kaniko/.docker下 - kubernetes-config:用于访问kubernetes,挂载到/root/.kube目录下
应用yaml文件
kubectl create -f pipeline-run.yaml
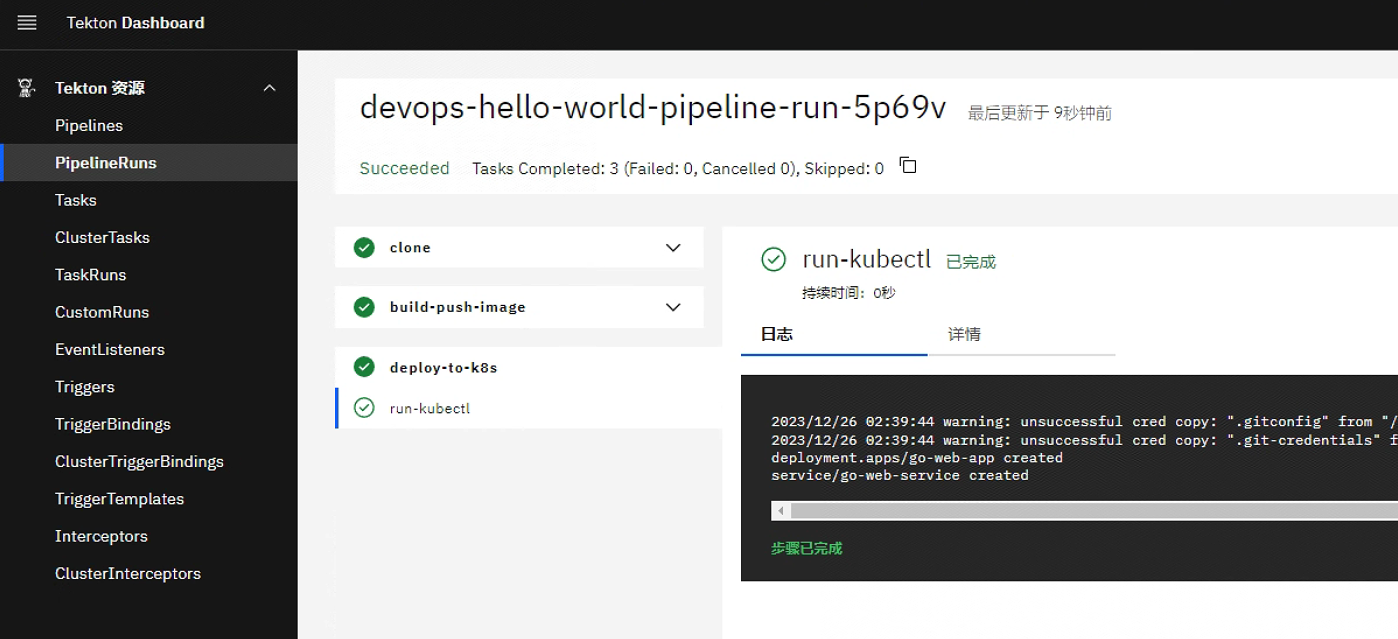
查看pipelinerun执行结果
连接到kubernetes 确认部署的应用
root@kube001:~# kubectl get pods -l run=go-web-app
NAME                          READY   STATUS    RESTARTS   AGE
go-web-app-79454cfdd7-dcz7p   1/1     Running   0          64s
查看镜像信息
root@kube001:~# kubectl get pods go-web-app-79454cfdd7-dcz7p -o jsonpath='{.spec.containers[0].image}'
registry.cn-shenzhen.aliyuncs.com/cnmirror/devops-hello-world:927ec5cc665690ad798ffbbd02a8db520692951e
参考:https://juejin.cn/post/7073347226772340749
这篇关于tekton 发布 kubernetes 应用的文章就介绍到这儿,希望我们推荐的文章对编程师们有所帮助!


