本文主要是介绍基于python的excel检查和读写软件,希望对大家解决编程问题提供一定的参考价值,需要的开发者们随着小编来一起学习吧!
软件版本:python3.6
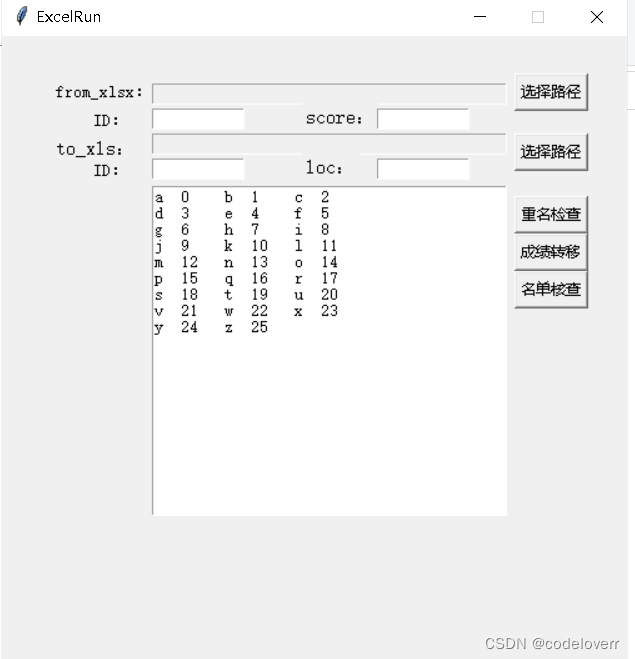
窗口和界面gui代码:
class mygui:def _init_(self):passdef run(self):root = Tkinter.Tk()root.title('ExcelRun')max_w, max_h = root.maxsize()root.geometry(f'500x500+{int((max_w - 500) / 2)}+{int((max_h - 300) / 2)}') # 居中显示root.resizable(width=False, height=False)# 标签组件label = Tkinter.Label(root, text='from_xlsx:', font=('宋体', 10))label.place(x=40, y=35)# 输入框控件entry_text = Tkinter.StringVar()entry = Tkinter.Entry(root, textvariable=entry_text, font=('FangSong', 10), width=40, state='readonly')entry.place(x=120, y=38)idlabel1 = Tkinter.Label(root, text='ID:', font=('宋体', 10))idlabel1.place(x=70, y=58)fpath1_num1 = Tkinter.StringVar()entry2 = Tkinter.Entry(root, textvariable=fpath1_num1, font=('FangSong', 10), width=10)entry2.place(x=120, y=58)idlabel2 = Tkinter.Label(root, text='score:', font=('宋体', 12))idlabel2.place(x=240, y=53)fpath1_num2 = Tkinter.StringVar()entry3 = Tkinter.Entry(root, textvariable=fpath1_num2, font=('FangSong', 10), width=10)entry3.place(x=300, y=58)label2 = Tkinter.Label(root, text='to_xls:', font=('宋体', 12))label2.place(x=40, y=78)filepath2 = Tkinter.StringVar()filepath2entry = Tkinter.Entry(root, textvariable=filepath2, font=('FangSong', 10), width=40, state='readonly')filepath2entry.place(x=120, y=78)id2label1 = Tkinter.Label(root, text='ID:', font=('宋体', 10))id2label1.place(x=70, y=98)filepath2_num1 = Tkinter.StringVar()filepath2_num1entry = Tkinter.Entry(root, textvariable=filepath2_num1, font=('FangSong', 10), width=10)filepath2_num1entry.place(x=120, y=98)id2label2 = Tkinter.Label(root, text='loc:', font=('宋体', 12))id2label2.place(x=240, y=93)filepath2_num2 = Tkinter.StringVar()filepath2_num2entry = Tkinter.Entry(root, textvariable=filepath2_num2, font=('FangSong', 10), width=10)filepath2_num2entry.place(x=300, y=98)button = Tkinter.Button(root, text='选择路径', command=lambda: self.get_path(entry_text,outputtext))button.place(x=410, y=30)button_path2 = Tkinter.Button(root, text='选择路径', command=lambda: self.get_path(filepath2,outputtext))button_path2.place(x=410, y=78)button2 = Tkinter.Button(root, text='重名检查', command=lambda: self.get_path2(entry_text,outputtext,fpath1_num1))button2.place(x=410, y=128)button3 = Tkinter.Button(root, text='成绩转移', command=lambda: self.get_path3(\entry_text.get(),int(fpath1_num1.get()),int(fpath1_num2.get()),\filepath2.get(),int(filepath2_num1.get()),int(filepath2_num2.get()),outputtext))button3.place(x=410, y=158)button4 = Tkinter.Button(root, text='名单核查', command=lambda: self.get_path4(\entry_text.get(),int(fpath1_num1.get()),\filepath2.get(),int(filepath2_num1.get()),outputtext))button4.place(x=410, y=188)outputtext = Text(root, height=20, width=40)# 将多行输入文本放入(pack)窗口中outputtext.place(x=120, y=120)var='a' lst=[chr(ord(var)+i) for i in range(26)]for i in range(0,26):outputtext.insert("end",lst[i]+' '+str(i)+'\t')if (i+2)%3==1:outputtext.insert("end",'\n')root.mainloop()f=mygui()excel检查和读写代码:
from xlrd import open_workbook
from xlutils.copy import copy
import xlrd
import os
import randomclass zuoye__2_excel:def run(self,path1,p1num1,p1num2,path2xls,p2num1,p2num2):dic={}dic2={}rb2 = open_workbook(path1)rs2 = rb2.sheet_by_index(0)nrows = rs2.nrowsncols = rs2.ncolswb = copy(rb2)#通过get_sheet()获取的sheet有write()方法ws = wb.get_sheet(0)#ws.write(0, 0, 'changed!')# for i in range(0, nrows):#########################################################################################################id=rs2.cell_value(i,p1num1)id=int(id)sc=rs2.cell_value(i,p1num2)dic[id]=sc#INDEX=rs.cell_value(i,2)##########################################################################################################name=rs.cell_value(i,1)#########################################################################################################rb2 = open_workbook(path2xls)rs2 = rb2.sheet_by_index(0)nrows2 = rs2.nrowsncols2 = rs2.ncolswb2 = copy(rb2)#通过get_sheet()获取的sheet有write()方法ws2 = wb2.get_sheet(0)#ws.write(0, 0, 'changed!')for i in range(0, nrows2):id1=rs2.cell_value(i,p2num1)#id3= id1.replace(" ", "")if type(id1)==str or not id1>0 :continueid2=int(id1)#id2=''.join([i for i in id3 if  i.isdigit()])#name2=rs2.cell_value(i,6)#dic2[id2]=i#dic[id2]=rs2.cell_value(i,5)if  id2  in dic:#########################################################################################################ws2.write(i,p2num2, dic[id2])else:print(id2)filepath='w'+str(random.randint(10000, 30000))+'.xls'if  os.path.exists(filepath):print('文件存在!')return '文件存在,重新保存!'else:wb2.save(filepath)return '文件保存到:'+filepath+'!';
这篇关于基于python的excel检查和读写软件的文章就介绍到这儿,希望我们推荐的文章对编程师们有所帮助!


