本文主要是介绍Android Studio for Platform (ASfP) 使用教程,希望对大家解决编程问题提供一定的参考价值,需要的开发者们随着小编来一起学习吧!
文章目录
- 编写Repo脚本
- 下载源代码
- lunch 查看版本
归纳的很清楚,下载Repo并下载源码->可以参考我的 Framework入门のPiex 6P源码(下载/编译/刷机)
启动图标(重启生效)
[Desktop Entry]
Encoding=UTF-8
Name=AndroidStudio
Comment=AndroidStudio
Exec=/opt/android-studio-for-platform/bin/studio.sh
Icon=/opt/android-studio-for-platform/bin/studio.png
Terminal=false
StartupNotify=true
Type=Application
Categories=Application;Development;
OR
/opt/android-studio-for-platform/bin/studio.sh
修改vmoptions配置
/opt/android-studio-for-platform/bin/studio64.vmoptions
网上搜索了下相关配置主要是对 Xmx 的修改
heap size
-Xms 和 -Xmx 配置堆内存,也就是 IntelliJ 可以使用的内存。-Xms 初始堆内存,调大该内存可以让启动速度更快,以省去分配内存的时间
-Xmx 最大堆内存,如果遇到 OutOfMemoryError 可以调大该数值,最大不要超过系统 1/4.
GC Algorithm
-XX:+UseConcMarkSweepGC 参数用来调整 GC 算法。使用该算法利用多个线程在后台进行 GC,以避免应用程序停止。当分配超过 4GB 的堆内存时,可以尝试使用 -XX:+UseG1GC.Other
-ea 选项开启 assertions。如果调试 IntelliJ 或者开发插件时可能用到,对 IntelliJ 性能并没有影响。-server 虚拟机的解释执行模式。-XX:SoftRefLRUPolicyMSPerMB=[value] 参数用来控制每 M 空间中 soft reference 保证存活的毫秒数。默认的时间是 1000,JetBrains 推荐 50。-XX:ReservedCodeCacheSize=510m 设置编译器最大的 code cache,另外一个相关的 JVM 参数是 -XX:InitialCodeCacheSize JetBrains 推荐这里使用 240m. 1-Dsun.io.useCanonCaches=[boolean] 该参数是否开启文件名及路径缓存,默认 java 会缓存文件名 30 秒 2,JetBrains 建议关闭。-XX:+OmitStackTraceInFastThrow JetBrains 官方推荐的参数。-XX:MaxJavaStackTraceDepth=-1 JVM 在实现 java.lang.Throwable.fillInStackTrace() 时把整个调用栈上的所有 Java 栈帧消息记录下来-XX:+HeapDumpOnOutOfMemoryError 当发生 OutOfMemoryError 时 dump 堆内容。3
编写Repo脚本
#!/usr/bin/env bashexport LOG_ACCOUNT=tmp
export LOG_FILENAME=repo-sync
export REPO_URL='https://mirrors.tuna.tsinghua.edu.cn/git/git-repo'aosp_branch=android-11.0.0_r9if [ ! -d ".repo" ]; thenrepo init -u https://mirrors.tuna.tsinghua.edu.cn/git/AOSP/platform/manifest -b $aosp_branchrepo_stat=$?if [ $repo_stat -ne 0 ]; thenecho "init repo faild, please try again"exit 0fi
elselog -o -- "local .repo dir exists"
fitry_count=0
echo "from remote sync aosp"repo sync
repo_stat=$?
while [ $repo_stat -ne 0 ]; dolog -o -- "sync faild, status: $repo_stat, try again in 5s ..."sleep 5repo syncrepo_stat=$?((try_count++))
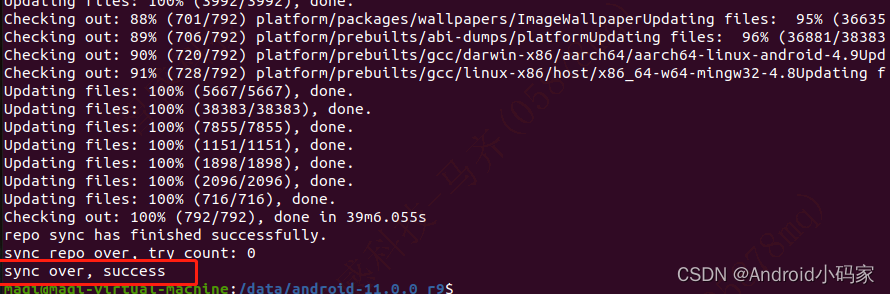
doneecho "sync repo over, try_count: $try_count"
echo "sync over, success"
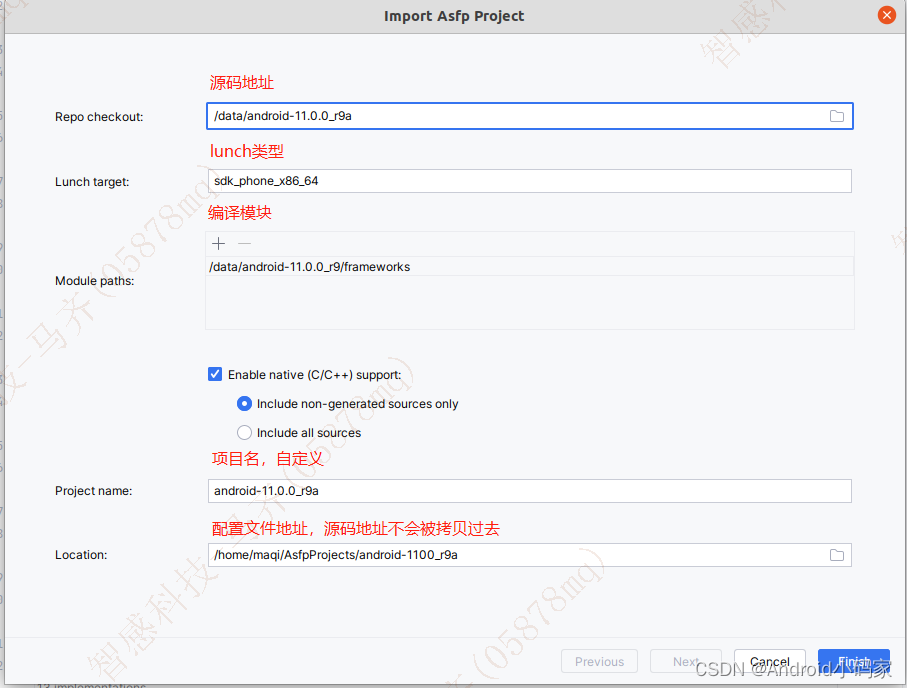
下载源代码
lunch 查看版本
Lunch menu... pick a combo:1. aosp_arm-eng2. aosp_arm64-eng3. aosp_blueline-userdebug4. aosp_blueline_car-userdebug5. aosp_bonito-userdebug6. aosp_bonito_car-userdebug7. aosp_bramble-userdebug8. aosp_car_arm-userdebug9. aosp_car_arm64-userdebug10. aosp_car_x86-userdebug11. aosp_car_x86_64-userdebug12. aosp_cf_arm64_auto-userdebug13. aosp_cf_arm64_phone-userdebug14. aosp_cf_x86_64_phone-userdebug15. aosp_cf_x86_auto-userdebug16. aosp_cf_x86_phone-userdebug17. aosp_cf_x86_tv-userdebug18. aosp_coral-userdebug19. aosp_coral_car-userdebug20. aosp_crosshatch-userdebug21. aosp_crosshatch_car-userdebug22. aosp_flame-userdebug23. aosp_flame_car-userdebug24. aosp_redfin-userdebug25. aosp_sargo-userdebug26. aosp_sunfish-userdebug27. aosp_taimen-userdebug28. aosp_trout_arm64-userdebug29. aosp_trout_x86-userdebug30. aosp_walleye-userdebug31. aosp_walleye_test-userdebug32. aosp_x86-eng33. aosp_x86_64-eng34. arm_krait-eng35. arm_v7_v8-eng36. armv8-eng37. armv8_kryo385-eng38. beagle_x15-userdebug39. beagle_x15_auto-userdebug40. car_x86_64-userdebug41. db845c-userdebug42. fuchsia_arm64-eng43. fuchsia_x86_64-eng44. hikey-userdebug45. hikey64_only-userdebug46. hikey960-userdebug47. hikey960_tv-userdebug48. hikey_tv-userdebug49. pixel3_mainline-userdebug50. poplar-eng51. poplar-user52. poplar-userdebug53. qemu_trusty_arm64-userdebug54. silvermont-eng55. uml-userdebug56. yukawa-userdebug57. yukawa_sei510-userdebuglunch product_name-build_variant
product_name作为需要构建的产品
build_variant 作为需要构建的变体
PS:安卓官网这步给出的
lunch aosp_arm-eng在实际编译完成后是无法正常运行的,这个是很大的坑,很多人都是在这一步卡住了很久
真正能在模拟器上运行的是 lunch sdk_phone_x86_64
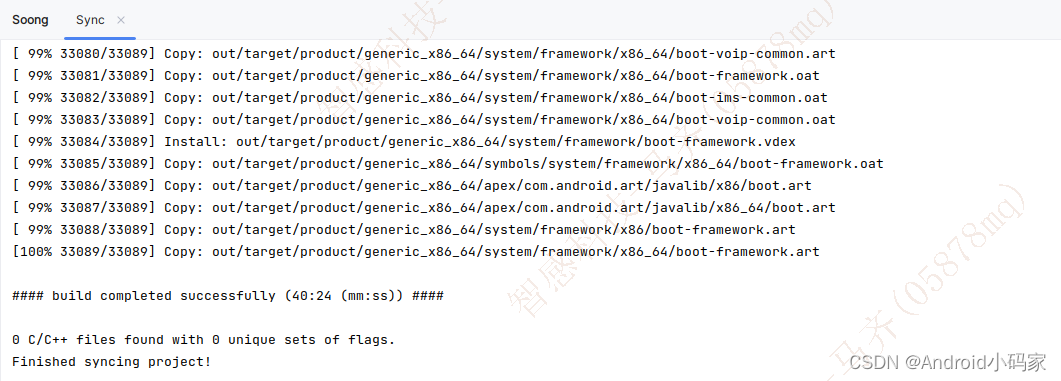
开始编译

Syncing targets: [frameworks, packages/apps/Settings]Preparing for sync...
Updating MAX_ARG_STRLEN to 131072Generating Soong artifacts...
/bin/bash -c "source build/envsetup.sh && lunch sdk_phone_x86_64 && echo ANDROID_PRODUCT_OUT=$ANDROID_PRODUCT_OUT && refreshmod"Refreshing modules (building module-info.json). Log at /data/android-11.0.0_r9/out/target/product/generic_x86_64/module-info.json.build.log.
============================================
PLATFORM_VERSION_CODENAME=REL
PLATFORM_VERSION=11
TARGET_PRODUCT=sdk_phone_x86_64
TARGET_BUILD_VARIANT=eng
TARGET_BUILD_TYPE=release
TARGET_ARCH=x86_64
TARGET_ARCH_VARIANT=x86_64
TARGET_2ND_ARCH=x86
TARGET_2ND_ARCH_VARIANT=x86_64
HOST_ARCH=x86_64
HOST_2ND_ARCH=x86
HOST_OS=linux
HOST_OS_EXTRA=Linux-5.15.0-86-generic-x86_64-Ubuntu-20.04.4-LTS
HOST_CROSS_OS=windows
HOST_CROSS_ARCH=x86
HOST_CROSS_2ND_ARCH=x86_64
HOST_BUILD_TYPE=release
BUILD_ID=RD1A.200810.020.A1
OUT_DIR=out
PRODUCT_SOONG_NAMESPACES=device/generic/goldfish device/generic/goldfish-opengl hardware/google/camera hardware/google/camera/devices/EmulatedCamera device/generic/goldfish device/generic/goldfish-opengl
============================================
ANDROID_PRODUCT_OUT=/data/android-11.0.0_r9/out/target/product/generic_x86_64
编译成功
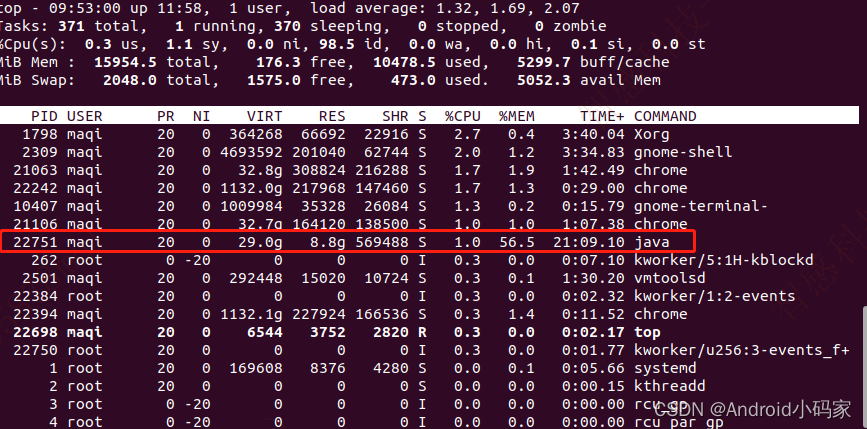
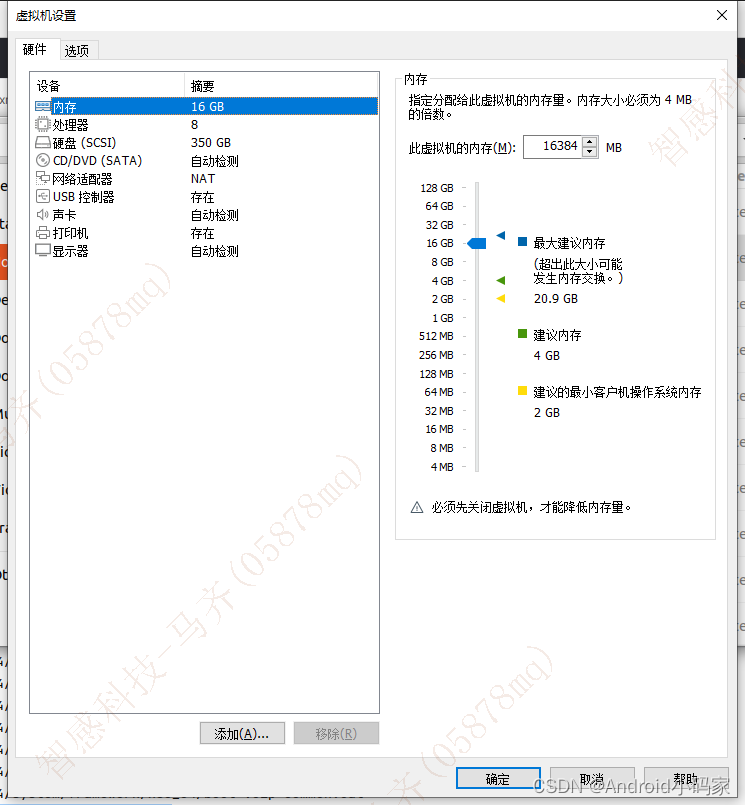
IDE占用内存高达8G
虚拟机设置
https://developer.android.com/studio/platform?hl=zh-cn
https://adtxl.com/index.php/archives/85.html
https://blog.csdn.net/u011897062/article/details/133065217
这篇关于Android Studio for Platform (ASfP) 使用教程的文章就介绍到这儿,希望我们推荐的文章对编程师们有所帮助!


